React Three Fiber for Beginners — Part 1: Your First 3D Scene
Start with familiar React ideas and build a 3D cube using Canvas, meshes, lights, and camera controls.
This is a connected three-part series for developers who already know React components, props, useState, and useRef. You do not need previous Three.js knowledge.
- Part 1: Your first 3D scene
- Part 2: Components, clicks, and animation
- Part 3: Lighting, customization, and performance
We build Little Desk, a small interactive workspace. Each part adds to the same project. The downloadable version has three lesson tabs; the code in each post lets you build the lesson step by step without first writing that navigation shell.
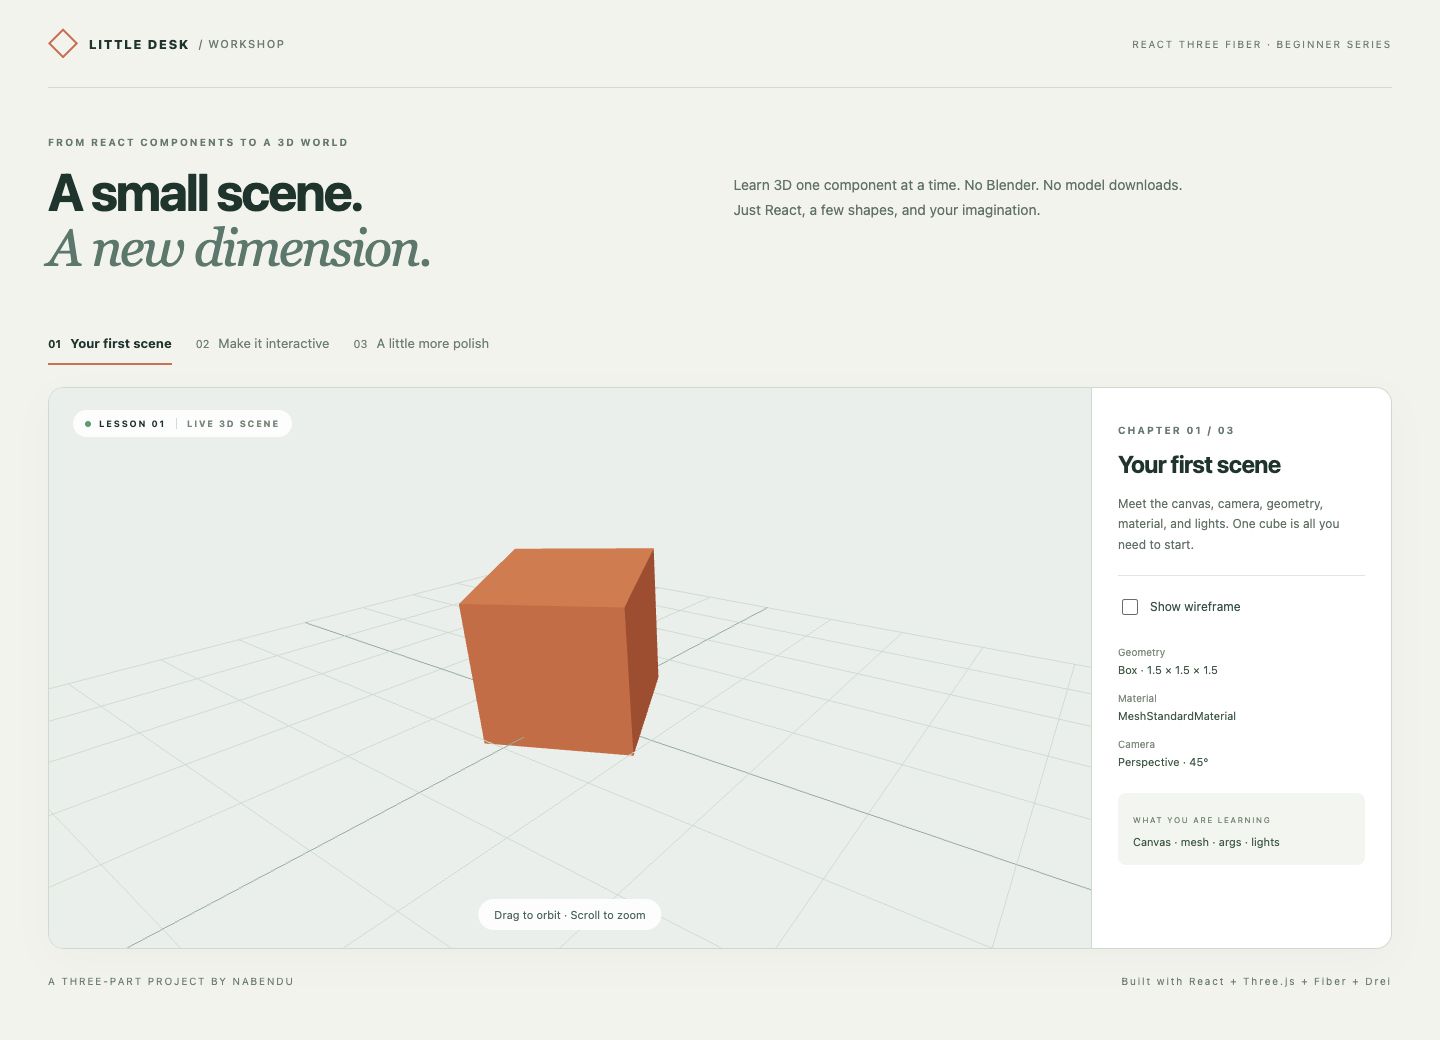
In this post we are going to move from ordinary React interfaces to a real 3D scene. By the end, you will have a lit cube that you can inspect from different angles. We deliberately start with one object. Once that object makes sense, a larger scene becomes a collection of components rather than a collection of mysteries.
What is React Three Fiber?
React Three Fiber is a React renderer for Three.js. React DOM turns JSX into browser elements. Fiber turns scene JSX into Three.js objects that a renderer draws on a canvas. You still use React components and props, but you describe meshes and lights instead of paragraphs and buttons.
The roles in this project are:
| Package | Its job |
|---|---|
react and react-dom | Components, state, and the HTML interface |
three | Cameras, geometry, materials, and rendering |
@react-three/fiber | Connects React to the Three.js scene |
@react-three/drei | Ready-made helpers such as camera controls |
vite | Local development and the production build |
React Three Fiber is different from React Fiber, React's internal reconciliation architecture. In this series, “Fiber” means the 3D renderer.
Create the project
Use Node.js 22.12 or newer for the commands below. Node 20.19 is also supported by the selected Vite version, but a current Node LTS release is a better starting point for a new project. Check your installation:
node -v
npm -v
Create a minimal React project without a generator so the files match this series exactly:
mkdir react-three-fiber-workshop
cd react-three-fiber-workshop
npm init -y
npm pkg set type=module
npm pkg set scripts.dev="vite --host 127.0.0.1"
npm pkg set scripts.build="vite build"
npm pkg set scripts.preview="vite preview --host 127.0.0.1"
npm install --save-exact react@19.3.0 react-dom@19.3.0 three@0.179.1 @react-three/fiber@9.8.1 @react-three/drei@10.7.9
npm install --save-dev --save-exact vite@8.3.1 @vitejs/plugin-react@6.1.1
These versions were checked on 1 October 2026. Keeping the lockfile makes the tutorial reproducible. If you are adding Fiber to an existing application, check its React version first: Fiber 9 pairs with React 19; Fiber 8 pairs with React 18. Do not independently upgrade a renderer without checking its peer dependencies. The official introduction explains that version pairing.
Create vite.config.js:
import { defineConfig } from 'vite';
import react from '@vitejs/plugin-react';

export default defineConfig({ plugins: [react()] });
Create index.html in the project root:
<!doctype html>
<html lang="en">
  <head>
    <meta charset="UTF-8" />
    <meta name="viewport" content="width=device-width, initial-scale=1.0" />
    <title>Little Desk</title>
  </head>
  <body>
    <div id="root"></div>
    <script type="module" src="/src/main.jsx"></script>
  </body>
</html>
Create src/main.jsx:
import { StrictMode } from 'react';
import { createRoot } from 'react-dom/client';
import App from './App';
import './styles.css';

createRoot(document.getElementById('root')).render(
  <StrictMode><App /></StrictMode>
);
So far, this is an ordinary React application. There is no special bootstrap function for 3D.
Give the canvas a home
Create src/styles.css:
* { box-sizing: border-box; }
body {
  margin: 0;
  font-family: system-ui, sans-serif;
  color: #203b33;
  background: #f5f5f0;
}
main { max-width: 1100px; padding: 24px; margin: auto; }
.viewport { height: 560px; border-radius: 16px; overflow: hidden; }
button, input, select { font: inherit; }
label { display: block; margin: 16px 0; }
.object-label {
  white-space: nowrap;
  background: white;
  padding: 8px 12px;
  border-radius: 8px;
  font-size: 12px;
  pointer-events: none;
}
@media (max-width: 700px) { .viewport { height: 420px; } }
The explicit height matters. Canvas fills its parent; it does not invent a height for an otherwise empty container. A zero-height parent is a common cause of an apparently blank scene.
Build your first scene
Create src/lessons/FirstScene.jsx:
import { Canvas } from '@react-three/fiber';
import { OrbitControls } from '@react-three/drei';

export default function FirstScene({ wireframe = false }) {
  return (
    <Canvas camera={{ position: [4, 3, 5], fov: 45 }} dpr={[1, 1.5]}
      fallback={<p>Your browser needs WebGL to display this scene.</p>}>
      <color attach="background" args={['#edf1ed']} />
      <ambientLight intensity={0.8} />
      <directionalLight position={[3, 5, 4]} intensity={2} />
      <mesh position={[0, 0.75, 0]} rotation={[0.15, 0.4, 0]}>
        <boxGeometry args={[1.5, 1.5, 1.5]} />
        <meshStandardMaterial color="#ea875a" roughness={0.45} wireframe={wireframe} />
      </mesh>
      <gridHelper args={[10, 10, '#a2b5aa', '#d5dfd7']} />
      <OrbitControls makeDefault enablePan={false} minDistance={3} maxDistance={10}
        maxPolarAngle={Math.PI / 2.05} target={[0, 0.5, 0]} />
    </Canvas>
  );
}
Now create src/App.jsx:
import { useState } from 'react';
import FirstScene from './lessons/FirstScene';

export default function App() {
  const [wireframe, setWireframe] = useState(false);
  return (
    <main>
      <h1>Little Desk: your first scene</h1>
      <p>Drag to orbit. Scroll to zoom.</p>
      <div className="viewport">
        <FirstScene wireframe={wireframe} />
      </div>
      <label>
        <input type="checkbox" checked={wireframe}
          onChange={(event) => setWireframe(event.target.checked)} />
        Show wireframe
      </label>
    </main>
  );
}
Run the application:
npm run dev -- --port 5190Open the URL printed by Vite. If that port is occupied, choose another port and use the actual URL from the terminal. The downloadable workshop has a more styled shell around the same scene. On lesson 1, the result looks like this:
Read the scene like a React component
The <Canvas> is the boundary between the HTML interface and the 3D scene. Keep ordinary headings and checkboxes outside it. Scene children such as <mesh> and <ambientLight> live inside it. A plain <div> inside the scene is not a Three.js object; later we will use Drei's Html when we deliberately want an HTML label anchored to a mesh.
A mesh combines two things:
- Geometry describes its shape: the vertices and triangles.
- Material describes how its surface looks and reacts to light.
<boxGeometry args={[1.5, 1.5, 1.5]} /> creates the box shape. args supplies its constructor parameters in order: width, height, and depth. Props such as color and roughness configure the material. Fiber attaches the geometry and material to their parent mesh automatically.
You do not have to manually call scene.add() for each JSX mesh. React manages the component tree and Fiber keeps the scene objects in sync with it.
Understand position and rotation
position={[x, y, z]} is a three-number vector. In this scene:
- X moves left and right.
- Y moves up and down.
- Z moves along the depth axis.
These are world units, not CSS pixels. Our cube is 1.5 units tall and centered on its position. Its center sits at Y = 0.75, so its unrotated bottom touches the grid at Y = 0. The initial X tilt changes that exact contact slightly. Moving its center to Y = 0 would place half the cube below the grid.
Rotations use radians. Math.PI / 2 is a quarter turn; Math.PI is a half turn. The small initial rotations reveal more than one face before the reader moves the camera.
Try position={[1, 0.75, 0]}. The object moves right, but it does not become a new React component. You have changed a prop on a scene object.
Give the object light
meshStandardMaterial responds to lighting. The ambient light provides a baseline, and the directional light creates brighter and darker faces. Without lights, this material can look black. meshBasicMaterial, by contrast, is not affected by scene lights, so it is useful for flat elements but does not teach the same surface behavior.
For our painted cube, leave metalness at its default zero. Roughness controls the spread of reflections: a low value looks smoother, and a high value looks more matte. This is a surface property, not a brightness slider. See the Three.js material guide for the distinction.
Inspect the geometry with wireframe
Check Show wireframe. The React state flows into the material through a prop, just as it would into a DOM component. The screenshot exposes the triangles used to draw the box:
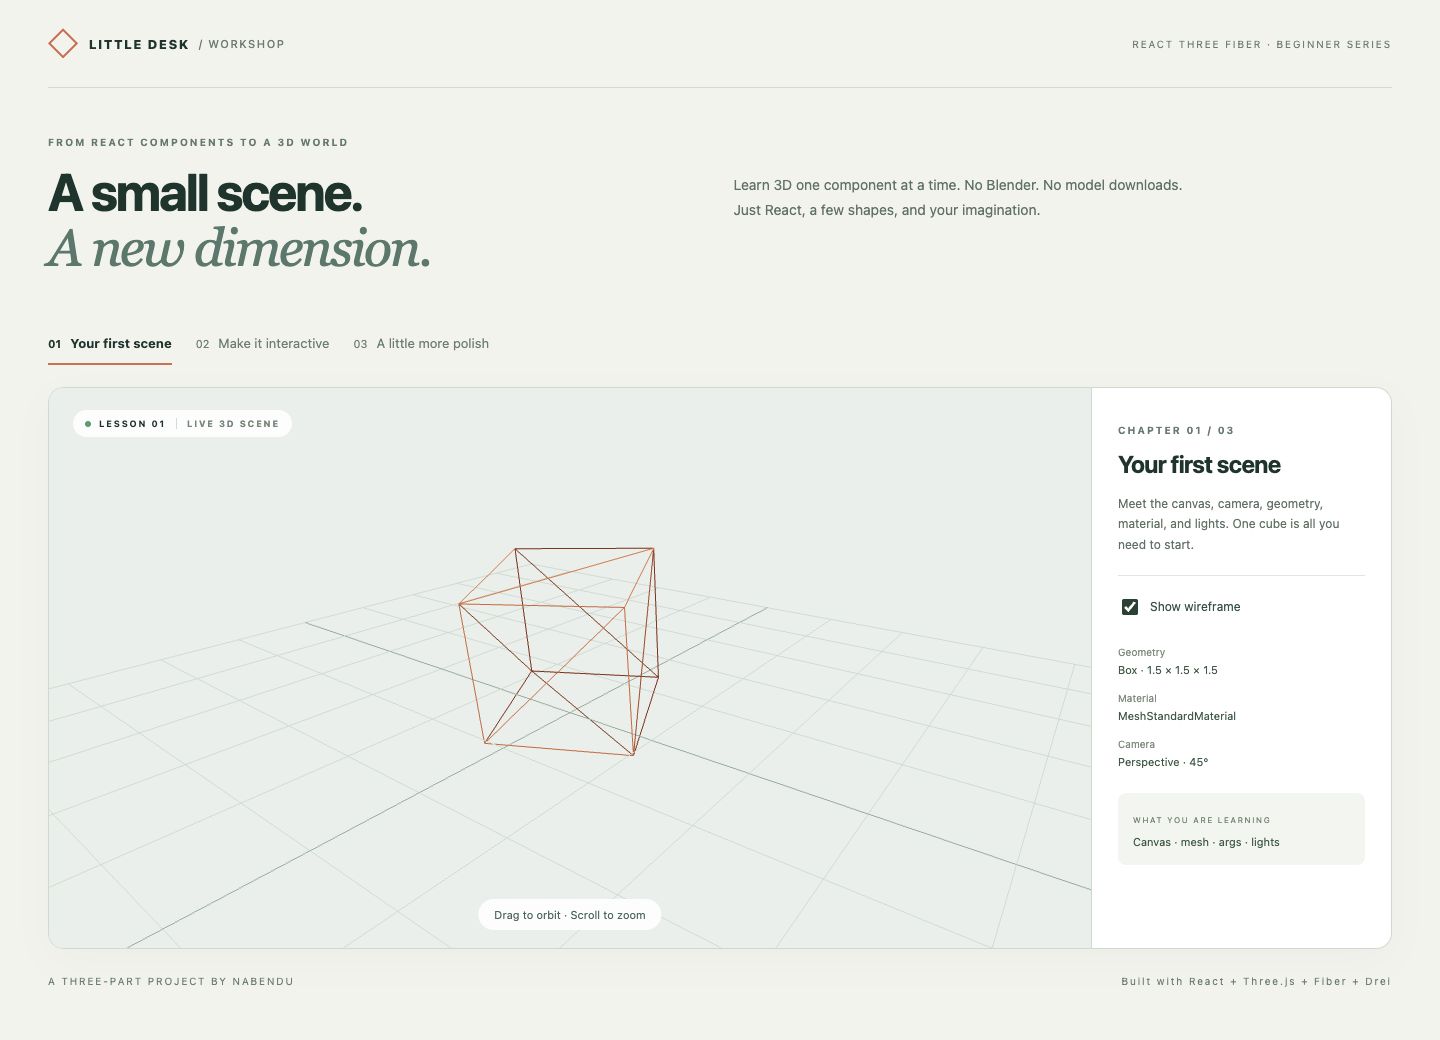 A cube has flat rectangular faces, but GPUs draw triangles. You are not seeing a different model; you are seeing the edges of the same geometry.
Move the camera, not the cube
OrbitControls is a Drei helper. Dragging orbits the camera around the target, scrolling changes its distance, and the mesh stays in place. This is different from setting rotation on the mesh.
The target is [0, 0.5, 0], close to the middle of the cube. enablePan={false} keeps beginners from accidentally pushing the whole subject out of the frame. Distance and angle limits keep the camera out of the object and above the ground.
A perspective camera makes farther objects look smaller. fov is its vertical field of view in degrees. We use 45 degrees to avoid an exaggerated wide-angle appearance. Moving the camera changes framing; it does not change the dimensions of the cube.
Try three small experiments
Change the material to blue. Make the box twice as wide by changing the first geometry argument. Move the light from [3, 5, 4] to [-3, 5, 4] and notice which face becomes brighter.
Make one change at a time. Learning 3D is much easier when you can connect a single number to a visible result.
If the scene is blank, check the parent height, the browser console, and the camera position before adding more code. If the page reports that WebGL is unavailable, check browser hardware acceleration. If you see a Fiber hook error later, check whether the hook's component is actually rendered inside Canvas.
Checkpoint and next part
You now know the minimum pieces of a 3D scene: a canvas, a camera, a mesh, a geometry, a material, and light. Run npm run build to verify that the project bundles.
Download the complete workshop source. It includes the three lesson tabs, the visual shell shown in these screenshots, and a README with run instructions. Your hand-built version can keep the simple shell above; both teach the same scene code.
Continue to Part 2: Components, clicks, and animation, where we turn this cube into an interactive object on a small desk.