Claude Code Crash Course Part 2: Desktop App, MCP Servers and Sub-agents
Use Claude Code in the Claude desktop app, connect it to a browser with the Playwright MCP server, and hand work to your own sub-agents.
In this post we will continue our Task Tracker app from Part 1, but this time we will use the Claude desktop app instead of the terminal. We will redo the everyday tasks (prompts, permission modes, plan mode, @ mentions, reviewing changes) with buttons and panes, and then learn the two topics Part 1 only mentioned at the end: MCP servers and sub-agents.
Everything in this post was checked with Claude Code 2.1.292 on a Claude Pro plan.
Why the desktop app?
The desktop app runs the same Claude Code as the terminal, with a graphical interface on top. Your CLAUDE.md, skills, settings and MCP servers work in both, so nothing you learned in Part 1 is wasted.
What you get on top:
- Panes: a diff view, a terminal, a file editor and a browser next to the chat.
- Parallel sessions: several conversations in a sidebar, each one optionally in its own git worktree.
- Visual review: click a line in the diff and leave a comment for Claude.
- App preview: Claude starts your dev server and checks its own changes in a built-in browser.
Use the terminal when you want scripting and automation, and the desktop app when you want to see and review things side by side.
Install the app and open the Code tab
Download the Claude desktop app from claude.com/download (macOS and Windows, with a Linux beta), sign in, and click the Code tab. The app has three tabs: Chat for normal conversations, Cowork for longer agentic work, and Code for software development.
Start a session
Each conversation in the Code tab is a session. Before sending the first message, set four things in the prompt area:
- Environment: pick Local to work on your own machine. (Cloud keeps running after you close the app.)
- Project folder: pick the
claude-code-crash-coursefolder from Part 1. - Model: the dropdown next to the send button. You can change it mid-session.
- Permission mode: the mode selector, also next to the send button.
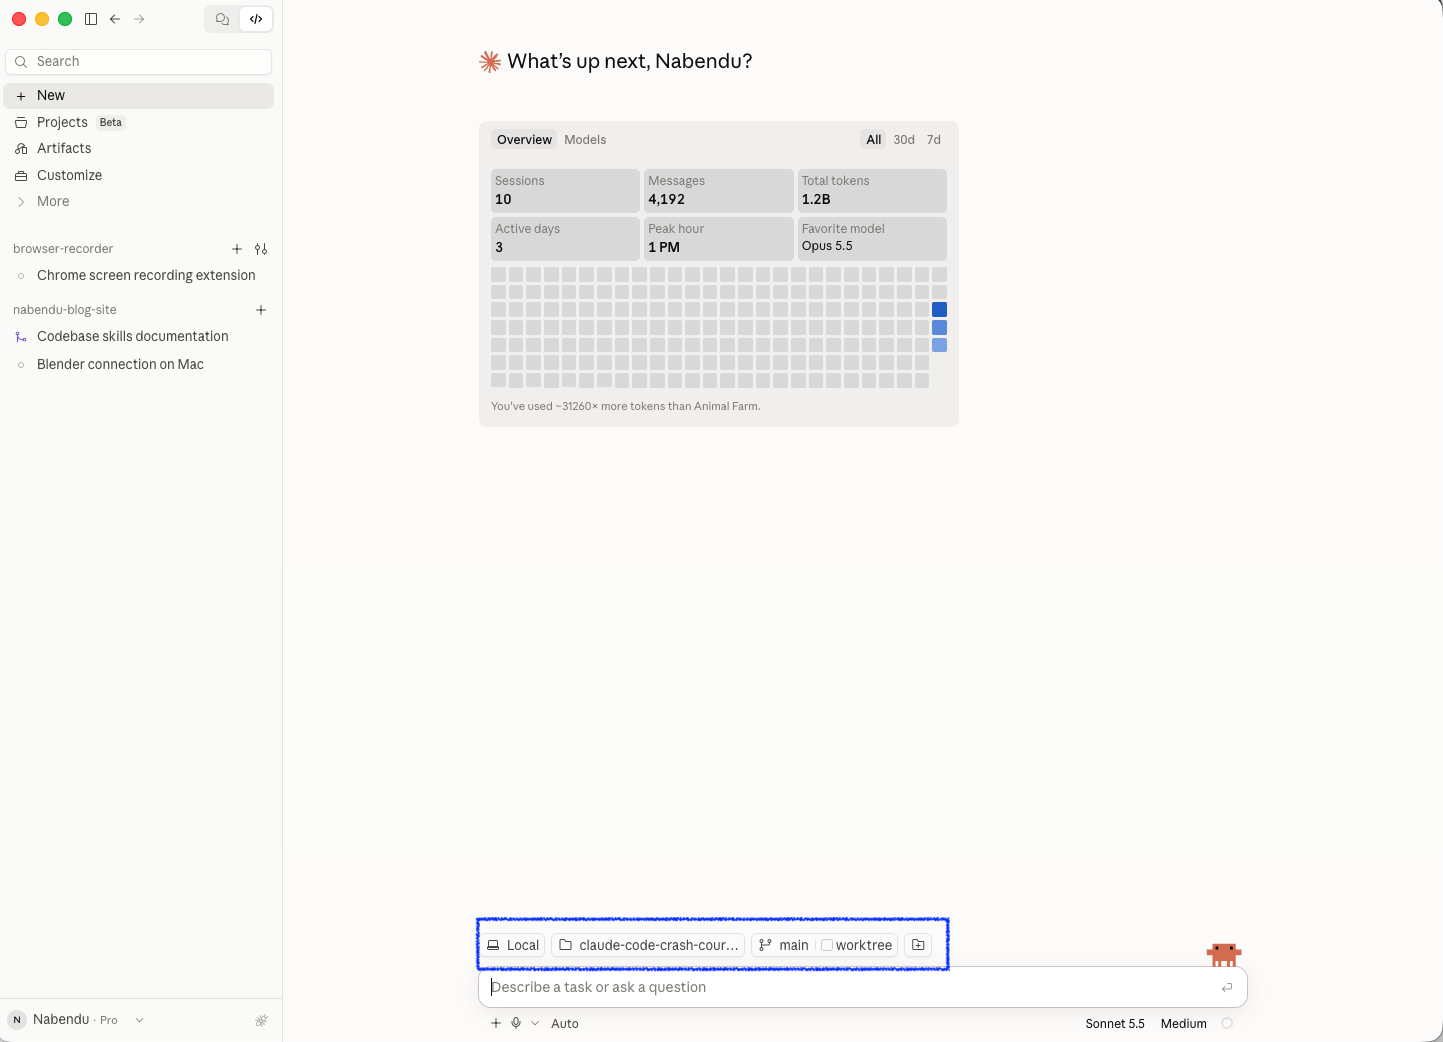
Because our project is a git repo, you will also see a worktree option next to the branch name. Turn it on when you want this session to work in its own copy of the project, so two sessions can't trip over each other. For this post we leave it off.
Permission modes, with buttons
These are the same modes as Part 1, chosen from the mode selector instead of Shift+Tab:
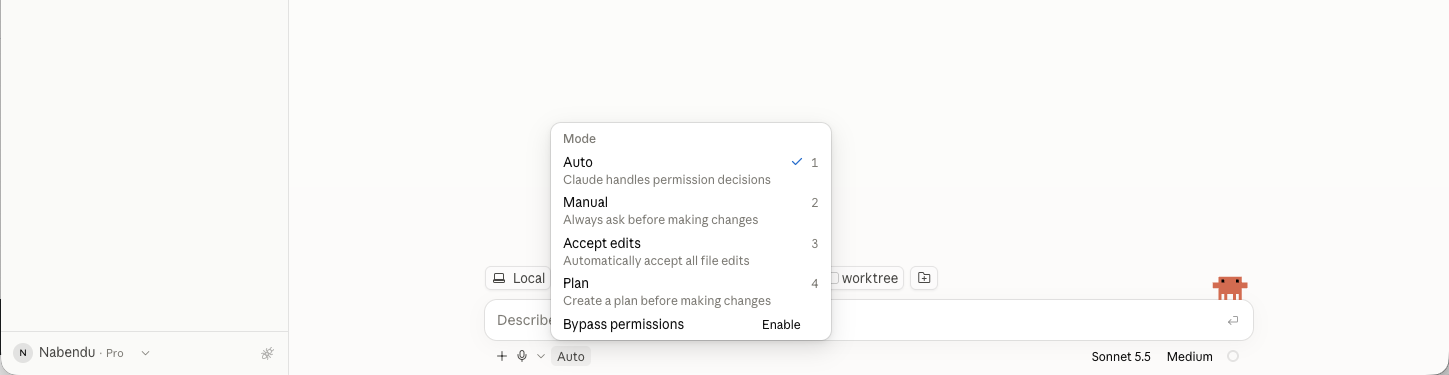
| Desktop mode | CLI name | What it does |
|---|---|---|
| Manual | default | Asks before every edit and command. You see a diff and accept or reject it. |
| Accept edits | acceptEdits | Edits files on its own, still asks before most commands |
| Plan | plan | Only reads and explores, then proposes a plan |
| Auto | auto | Runs without routine prompts; a safety check reviews risky actions |
The app remembers the mode you pick for each folder (except Plan). Start in Manual while you learn. The selector also lists Bypass permissions, which skips every prompt and must be switched on first. Leave it off while you learn. The screenshot above was taken with Auto selected.
Preview the app in the built-in browser
Our app is plain HTML, so it needs a tiny web server to run in a browser. Ask Claude:
Preview the app.Claude creates .claude/launch.json (the config for its preview servers), starts the server and opens the page in the Browser pane. For our project, Python's built-in server is enough:
{
  "version": "0.0.1",
  "configurations": [
    {
      "name": "task-tracker",
      "runtimeExecutable": "python3",
      "runtimeArgs": ["-m", "http.server", "8000"],
      "port": 8000
    }
  ]
}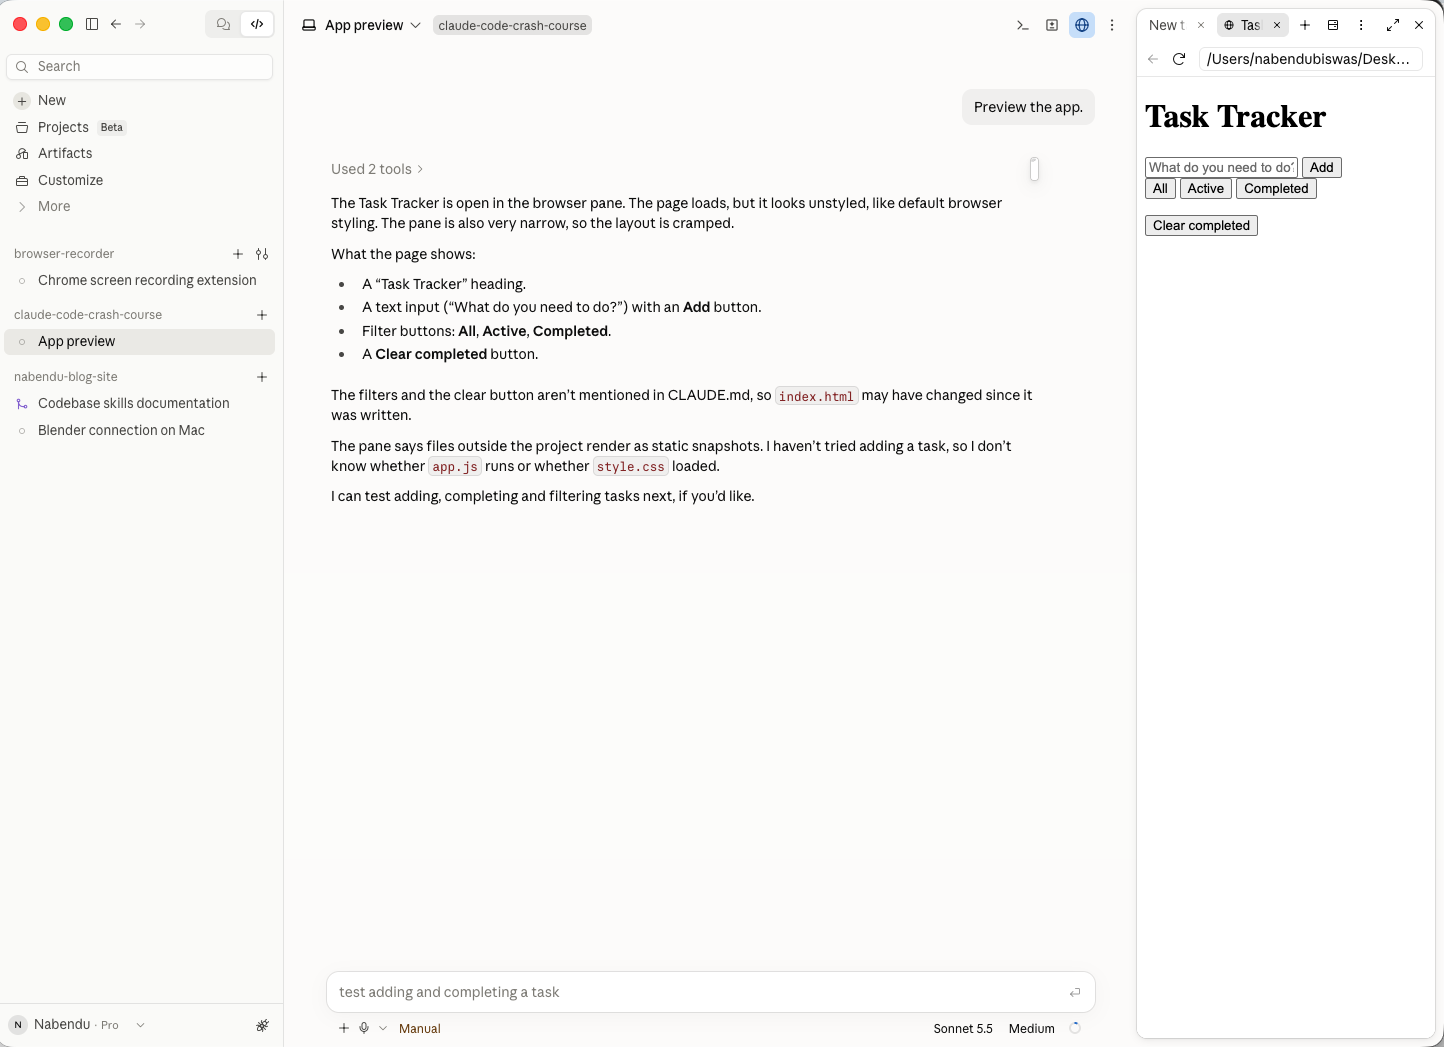
You can click around in the Browser pane yourself. After every code change, Claude also auto-verifies here by taking screenshots and checking for errors, so it catches its own mistakes before it tells you it's done.
@ mentions and attachments
Type @ and the app suggests project files and folders, and also your recent chats, as you type:
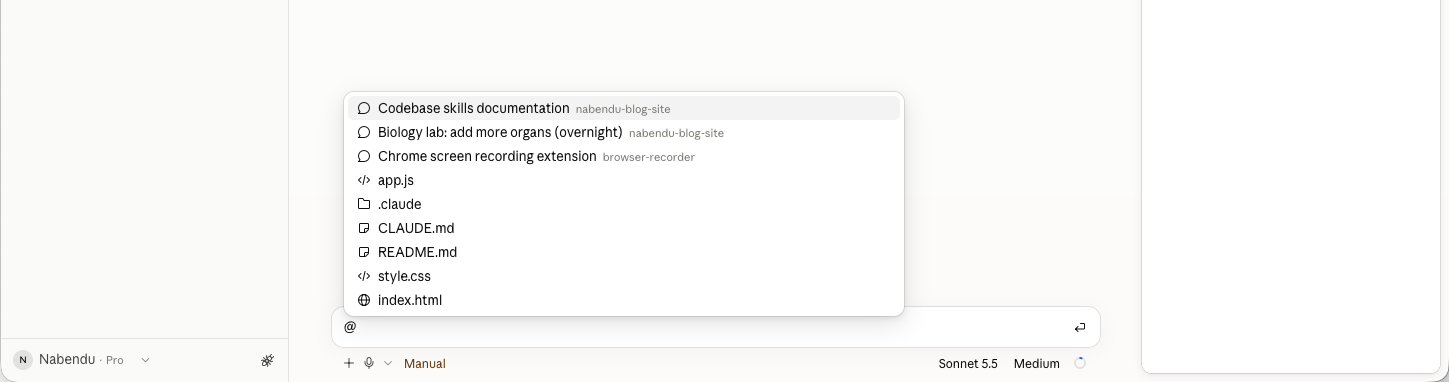
The + button next to the prompt box attaches files, and you can also drag a screenshot or a design mockup straight into the prompt. Showing Claude a picture of a bug is often faster than describing it.
Plan a feature in the Plan pane
Switch the mode selector to Plan and ask for our next feature:
Let me edit a task by double-clicking its text. Enter saves, Escape cancels, and an empty edit keeps the old text.Claude reads app.js and shows its plan in a Plan pane, where you can approve it or tell Claude what to change:
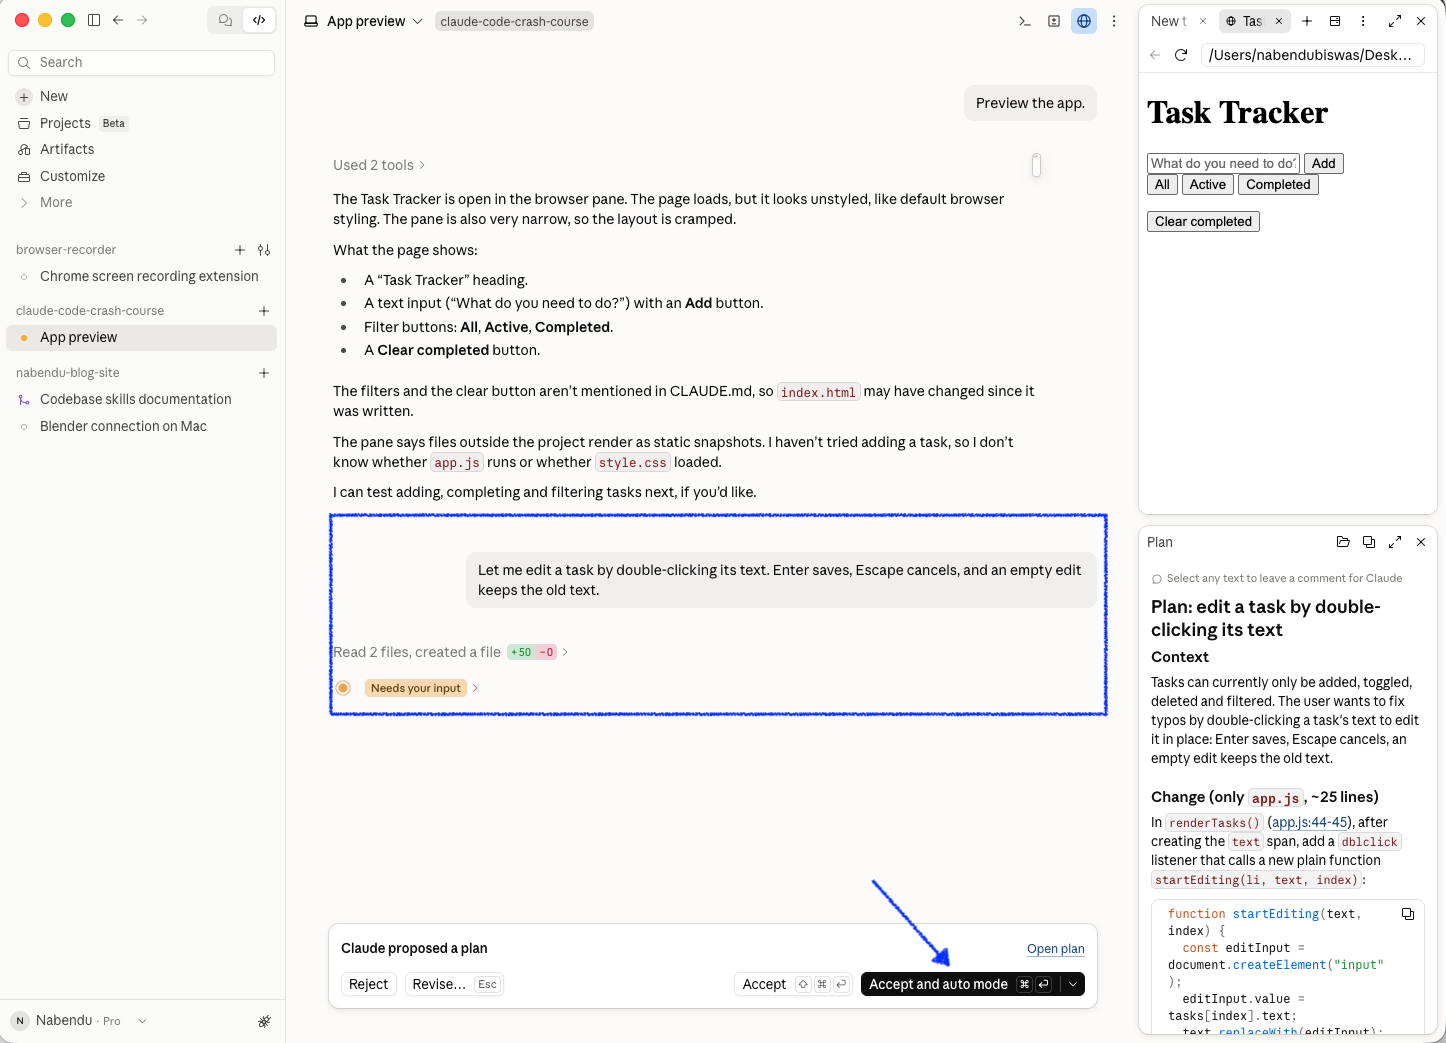
Approve the plan with Accept, or with Accept and auto mode if you want Claude to carry on without asking again. Claude adds about 30 lines to app.js. The change is contained, because every task change still follows the same "change tasks, save, render" pattern from CLAUDE.md.
Review the diff and leave comments
When Claude changes files, a small indicator like +28 -0 appears. Click it, or Changes in the title bar, to open the diff view: files on the left, changes on the right.
Click any line to leave a comment, for example "add a comment explaining why blur saves". Add as many comments as you like, then press Cmd+Enter (Ctrl+Enter on Windows) to send them all. Claude makes the changes and shows a fresh diff.
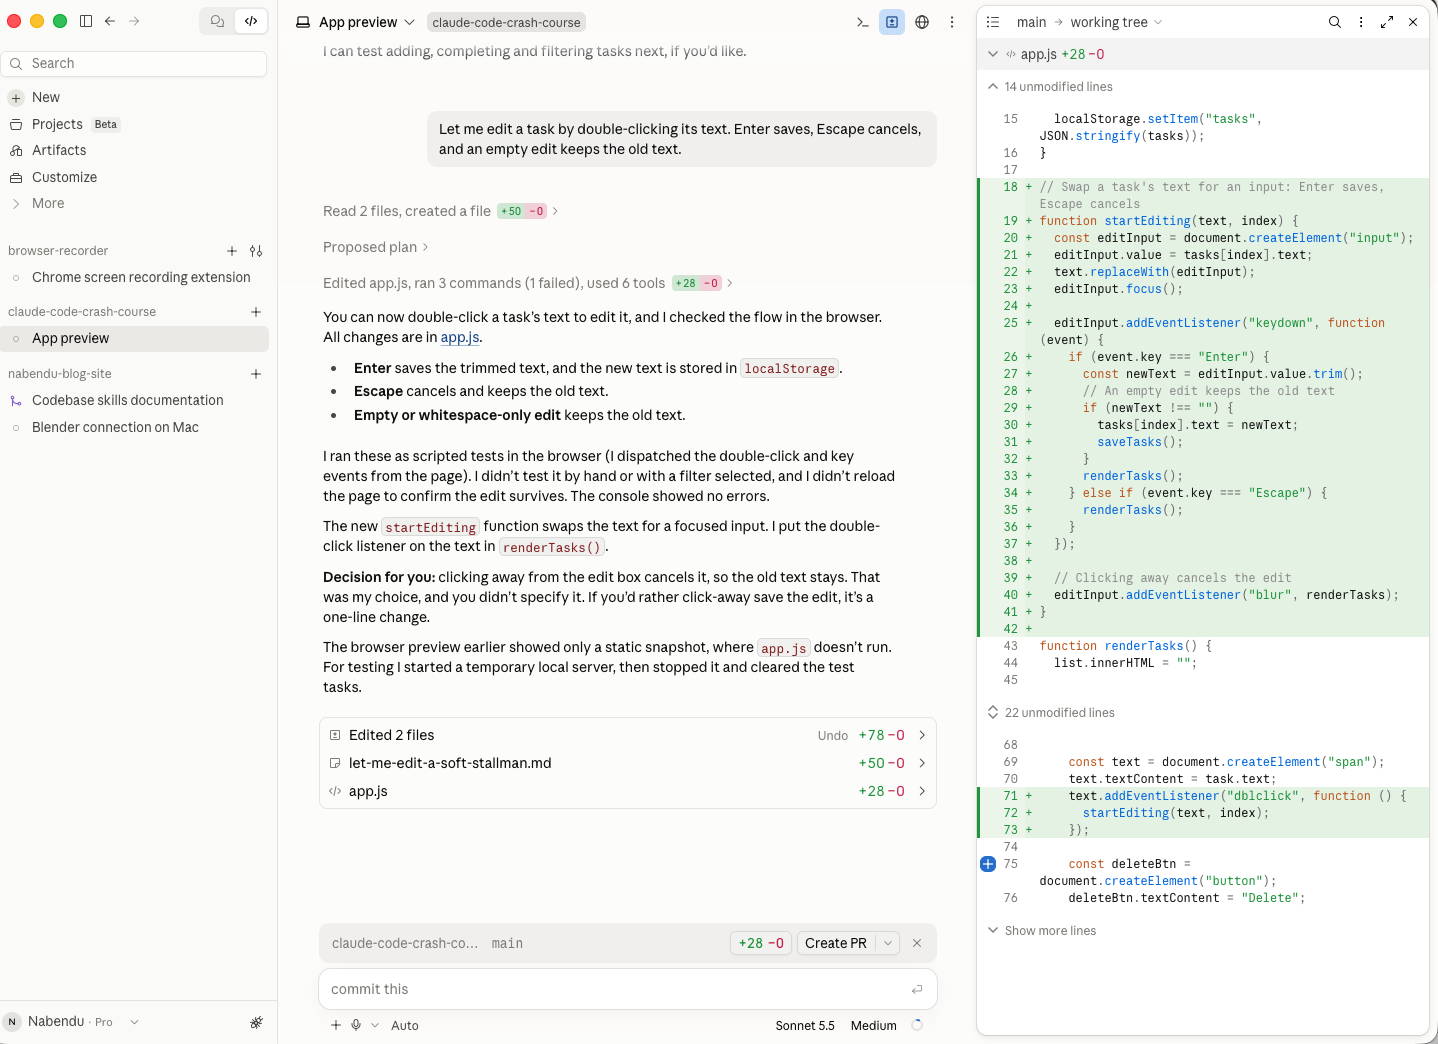
This is the desktop app's biggest advantage over the terminal: you review code the way you would review a pull request.
Side chats and the terminal
Two small features you will use a lot:
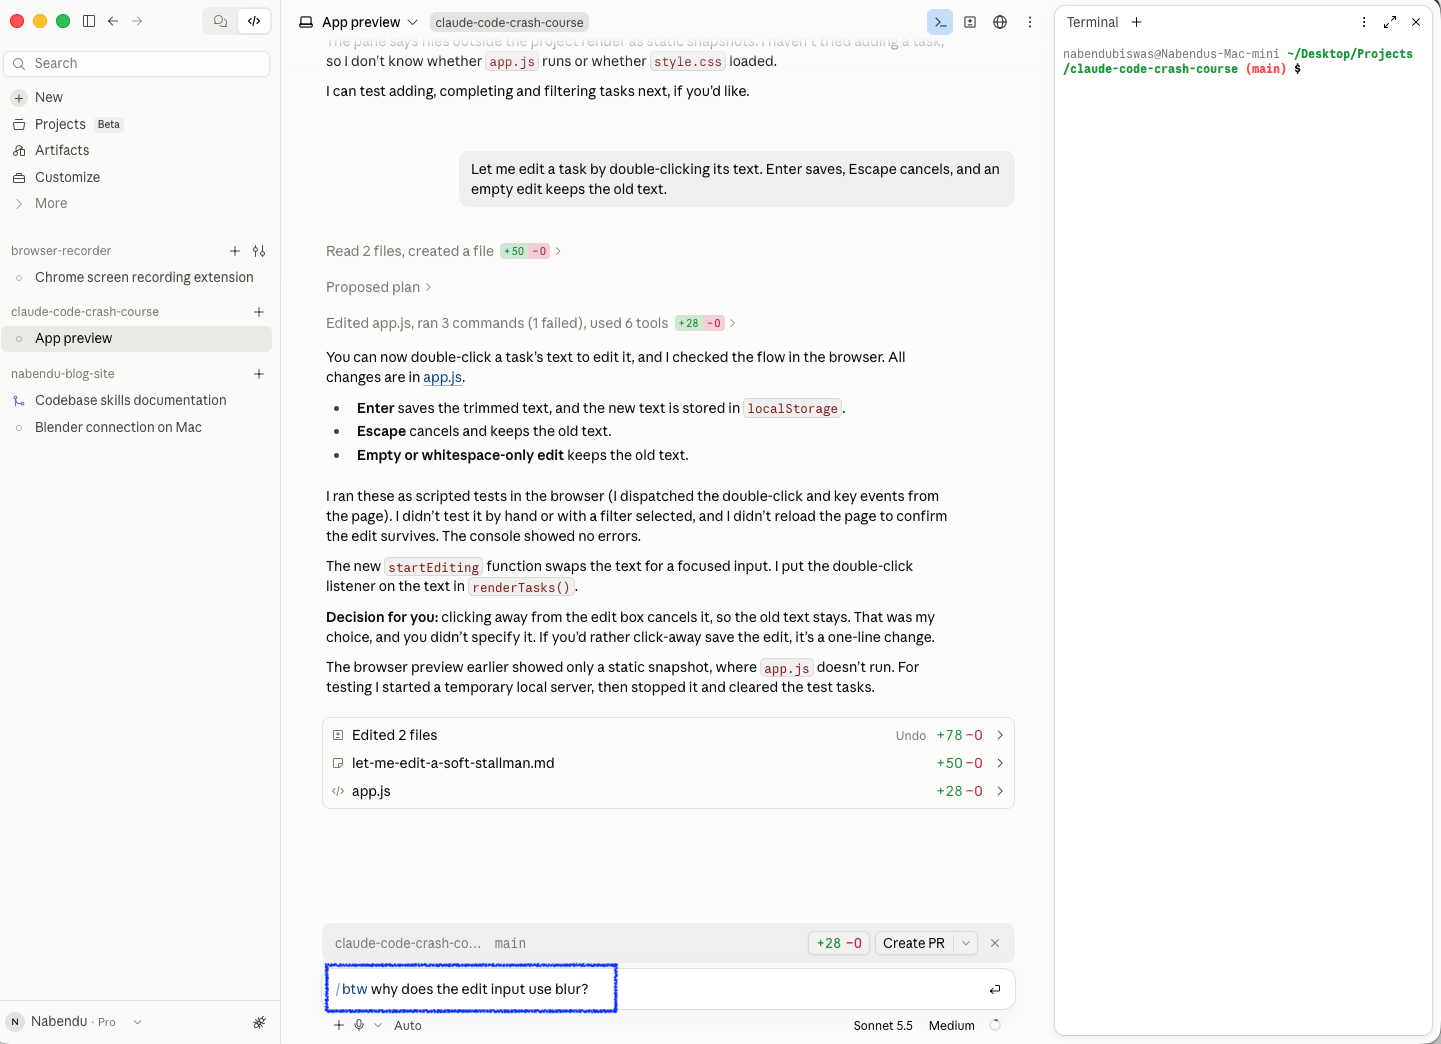
- Side chat (Cmd+; or
/btw): ask a quick question like "why does the edit input use blur?" without adding it to the main conversation. - Terminal pane (**Ctrl+
** or **Terminal** in the title bar): a real terminal in your project folder, forgit status` or anything else.
What is an MCP server?
Out of the box, Claude can read files, edit them and run commands. MCP (Model Context Protocol) is an open standard for plugging extra tools into Claude: a browser, GitHub, a database, Figma, Notion, Sentry, and hundreds more. An MCP server is a small program (or a web service) that offers those tools.
There are two ways to add one:
| Way | Best for | Where it's stored |
|---|---|---|
| Connectors (+ → Connectors) | Popular services with a login: GitHub, Slack, Linear, Notion, Google Calendar | Your Claude account |
Config files (.mcp.json or claude mcp add) | Anything else, and servers your team should share | .mcp.json in the project (shared), or ~/.claude.json (only you) |
The app's own Browser pane is great for clicking around. We will add Playwright as an MCP server anyway, because then any Claude session can drive a real browser: the terminal, the desktop app, and the sub-agents we build later in this post.
Add the Playwright MCP server
Open the Terminal pane and run:
claude mcp add --scope project playwright -- npx @playwright/mcp@latest--scope projectsaves it in.mcp.json, so everyone who clones the repo gets it.- Everything after
--is the command that starts the server.npxdownloads Playwright's MCP server the first time.
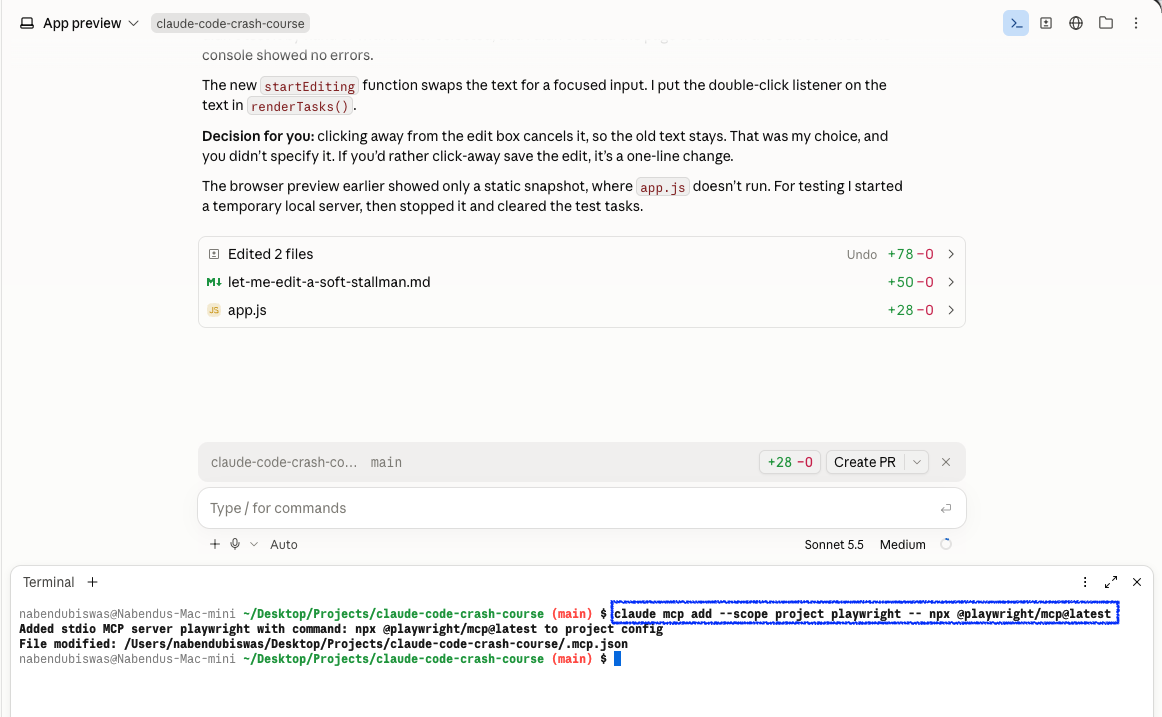
It creates .mcp.json in the project. You can also write this file by hand, or ask Claude to write it:
{
  "mcpServers": {
    "playwright": {
      "type": "stdio",
      "command": "npx",
      "args": ["@playwright/mcp@latest"],
      "env": {}
    }
  }
}
Servers load when a session starts. Our desktop session was already open, so let's see what happens if we just ask for the test. Make sure the preview server is running, then send:
Use Playwright to open http://localhost:8000, add three tasks, complete one and check that the tasks-left count is right.Claude checks, and it can't find Playwright. In our run it also noticed that nothing was listening on port 8000, and offered to install the library and start a server itself:
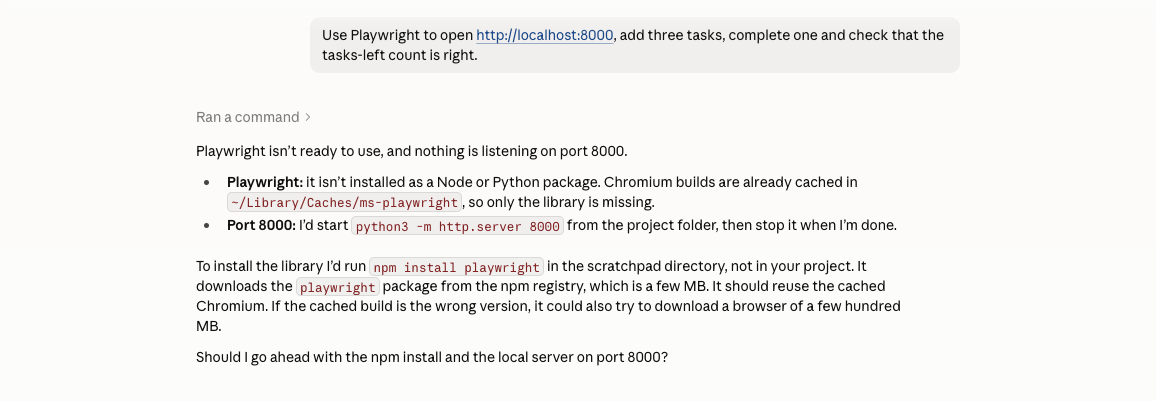
That reply is a good example of Claude being honest about what it can and can't do. We told it we had already added the server in the terminal:
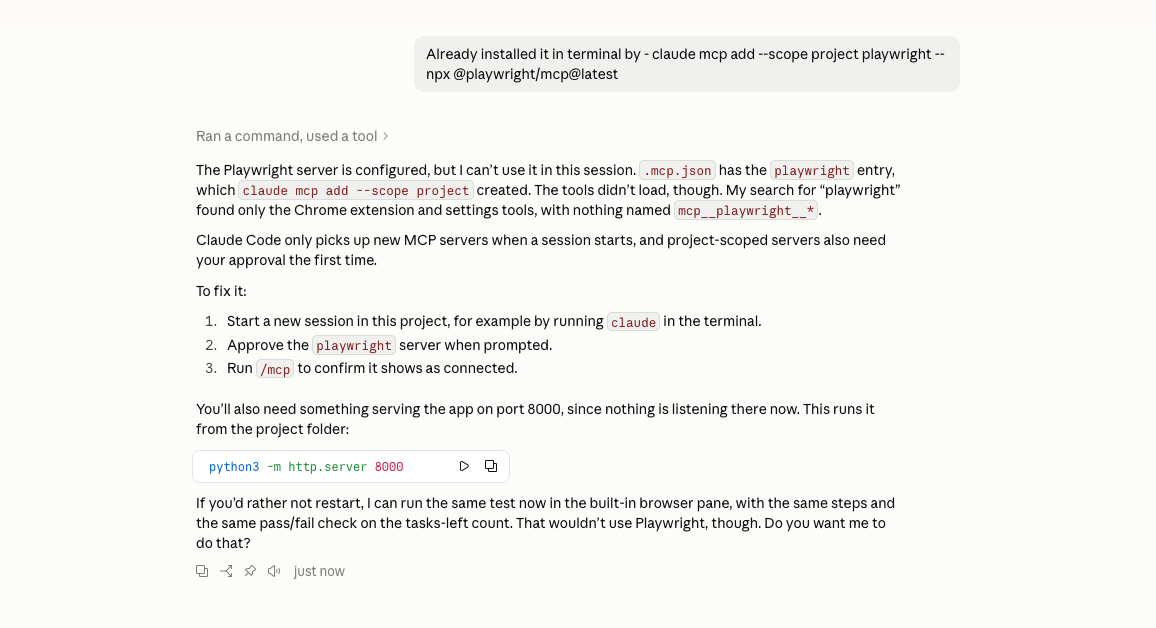
Claude found the playwright entry in .mcp.json, but the tools did not load. Claude Code only picks up new MCP servers when a session starts, and a server from a project's .mcp.json could run any command, so you approve it the first time. The fix has three steps:
- Start a new session in the project, for example by running
claudein the Terminal pane. - Approve the
playwrightserver when it asks. - Run
/mcpto confirm it is connected.
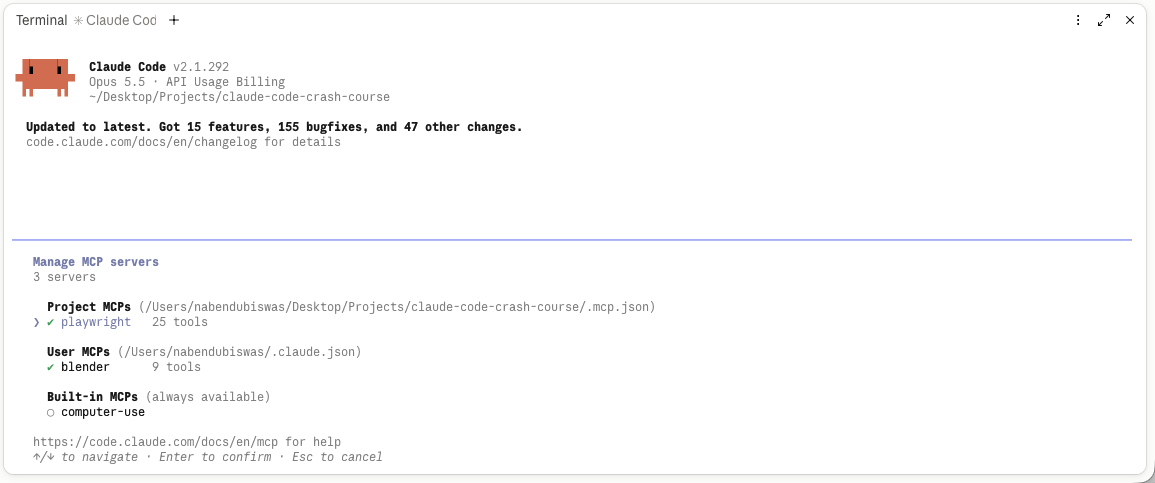
/mcp lists every server by where it comes from. Our playwright server shows under Project MCPs with a green tick and 25 tools, next to a user-level Blender server we already had. Claude's own tools for it are named mcp__<server>__<tool>, for example mcp__playwright__browser_navigate. In Manual mode Claude asks before using one, just like a shell command.
Claude also offered a shortcut that doesn't need a restart: run the same test in the app's built-in browser pane. That is a perfectly good way to check your app, so we said yes:
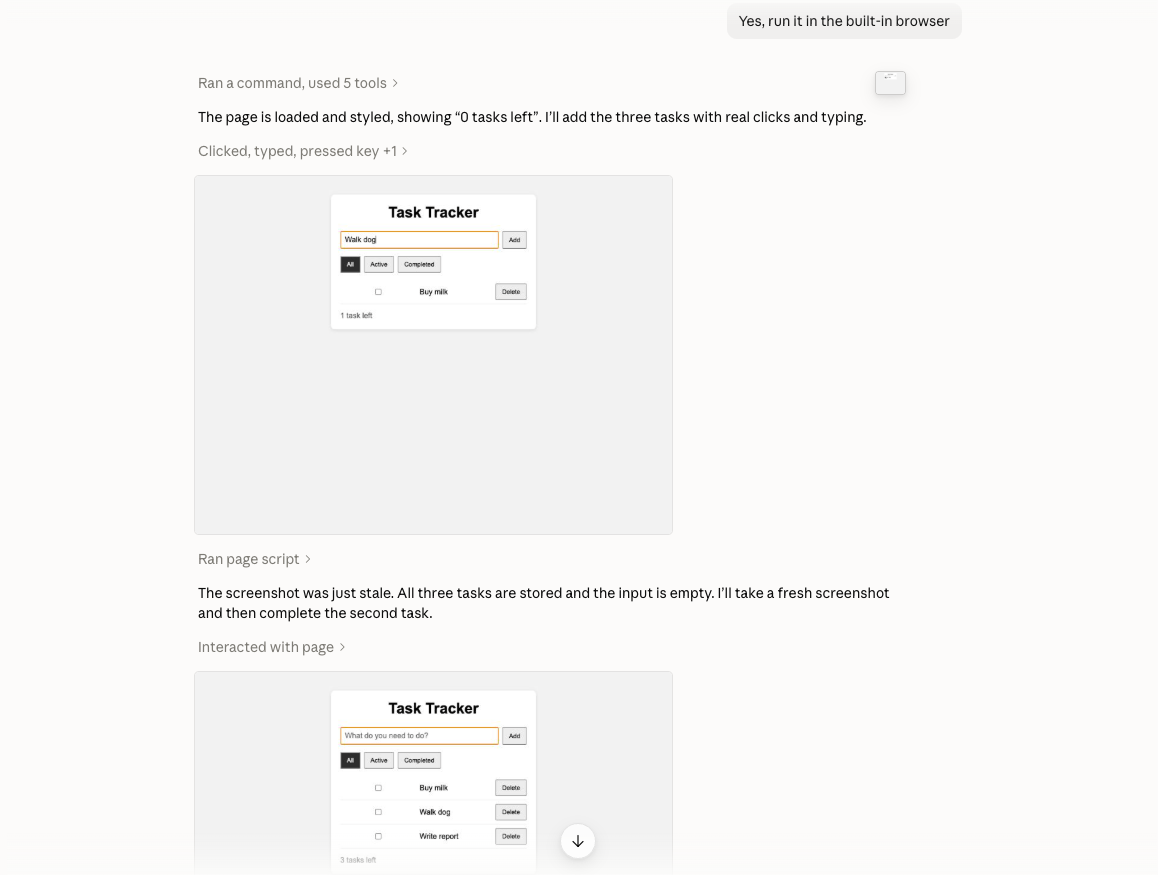
Claude loaded the page, typed the three tasks with real clicks and took screenshots as it went. It even noticed that one screenshot was stale (it still showed "Walk dog" in the input) and checked the page's state instead of trusting the picture. Then it reported back:
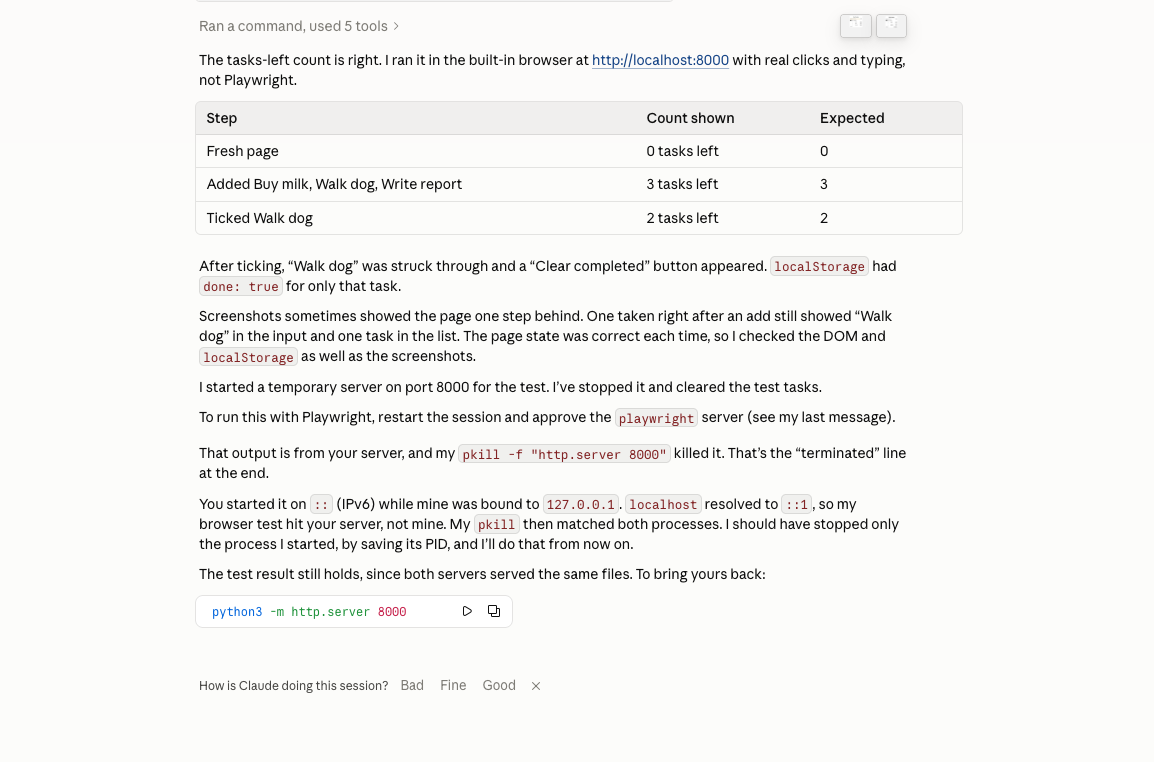
The count was right at every step: 0 on a fresh page, 3 after adding Buy milk, Walk dog and Write report, and 2 after ticking Walk dog. Claude also confirmed localStorage had done: true for only that task.
Two things to take from this run:
- Restart after adding a server. A new MCP server never appears in a session that was already running. Start a new session, approve it, and check
/mcp. - Mind your servers. Our own
python3 -m http.server 8000was already running, and Claude started a temporary server on the same port. The two clashed (localhostresolved to IPv6, so Claude's browser hit ours), and when Claude cleaned up it stopped both. It owned up to this and promised to stop only the process it starts. If a server of yours disappears mid-test, check that first, and restart it with the command Claude gives you.
You can manage connectors in the app the same way: + → Connectors adds services like GitHub, and Manage connectors (or Settings → Connectors) disconnects them.
Only add MCP servers you trust. A server can see what you send it, and its tools run with your permissions.
What is a sub-agent?
A sub-agent is a helper Claude can hand a task to. Each sub-agent runs in its own context window, with its own instructions, its own tool list and even its own model. When it finishes, only a short summary comes back to your main conversation.
Why that matters:
- Your main chat stays clean. A browser test can read dozens of page snapshots; you only see "15 checks passed".
- Focus. A reviewer that can only read files can't "helpfully" change your code.
- Cost. Send simple jobs to a cheaper, faster model like Haiku.
- Speed. Several sub-agents can run at the same time.
Claude already has built-in sub-agents. Explore searches the codebase read-only, Plan researches during plan mode, and general-purpose takes on bigger multi-step jobs. You will see them working when Claude explores a project.
Create your own sub-agents
A sub-agent is a Markdown file in .claude/agents/, with settings at the top and instructions below. You can ask Claude to write one, or create it yourself. Let's make two.
.claude/agents/code-reviewer.md is a cheap, read-only reviewer:
---
name: code-reviewer
description: Read-only reviewer for the Task Tracker code. Use after changes, before committing.
tools: Read, Grep, Glob
model: haiku
---

You review index.html, style.css and app.js for a beginner-friendly project.

List real bugs first, then at most three small improvements that keep the code simple.
Point to the file and line for each item. Keep it under 12 lines. Never edit files.
.claude/agents/ui-tester.md is a browser tester that uses our Playwright MCP server:
---
name: ui-tester
description: Tests the Task Tracker in a real browser with Playwright. Use after any change to the UI.
model: sonnet
---

You test the Task Tracker at http://localhost:8000 (the app is already running).

1. Open the page and take a snapshot.
2. Add three tasks, complete one, then try each filter (All, Active, Completed).
3. Check that the "tasks left" count is right after every step.
4. Click "Clear completed" and check the completed task is gone.
5. Delete a task, reload the page and check the list is still saved.

Do not change any files. Reply with a short pass/fail list, one line per check.| Field | What it does |
|---|---|
name | The sub-agent's name, used to call it |
description | When Claude should use it. Claude reads this to decide on its own, so make it clear. |
tools | Which tools it may use. Leave it out to give it all your tools, including MCP tools. |
model | haiku, sonnet, opus, or inherit to use your session's model |
The ui-tester has no tools line, so it gets every tool, including Playwright's. Its instructions tell it not to edit files.
Use the sub-agents
Start a new session so Claude picks up the new files. Type @ and the agent files appear next to your other files, so you can point Claude straight at one. Let's use that to teach the tester a new check:
@.claude/agents/ui-tester.md also check that double-clicking a task lets me edit it (Enter saves, Escape cancels).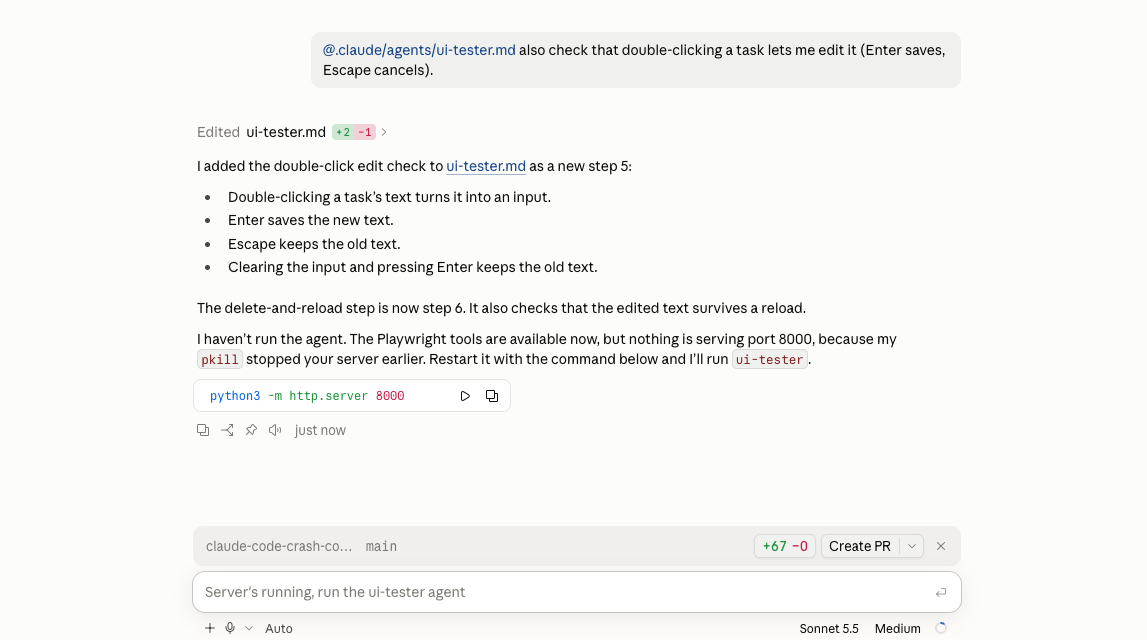
Claude edited the agent file and added the double-click check as step 5. The old delete-and-reload step became step 6, and it now also checks that the edited text survives a reload. The reply is also a useful reminder: Claude hadn't run the agent yet, because the preview server on port 8000 wasn't running, so we started it again and sent "Server's running, run the ui-tester agent".
Now run both agents at once. You can ask in plain English:
Use the ui-tester and code-reviewer subagents in parallel to check the app. Then give me a combined summary.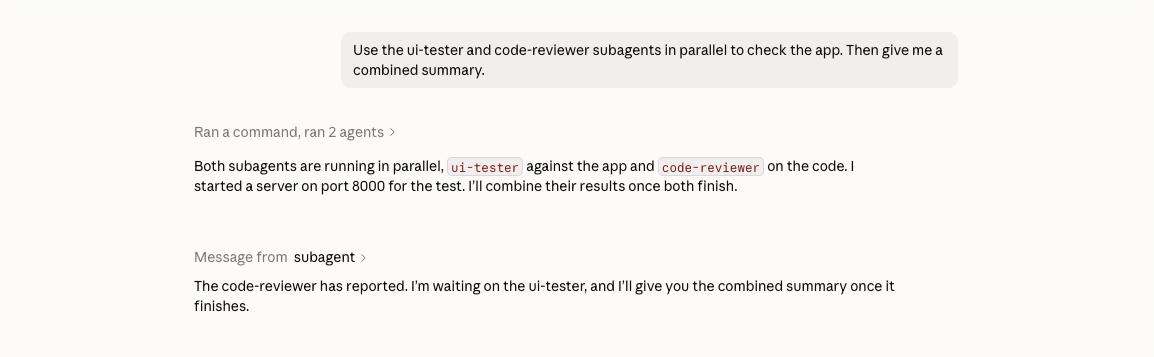
Each sub-agent works in its own context window. The reviewer finished first, and Claude waited for the tester before combining the results. You can also open ⋮ → Background tasks in the title bar to see each agent's work while it runs.
Here is the combined summary:
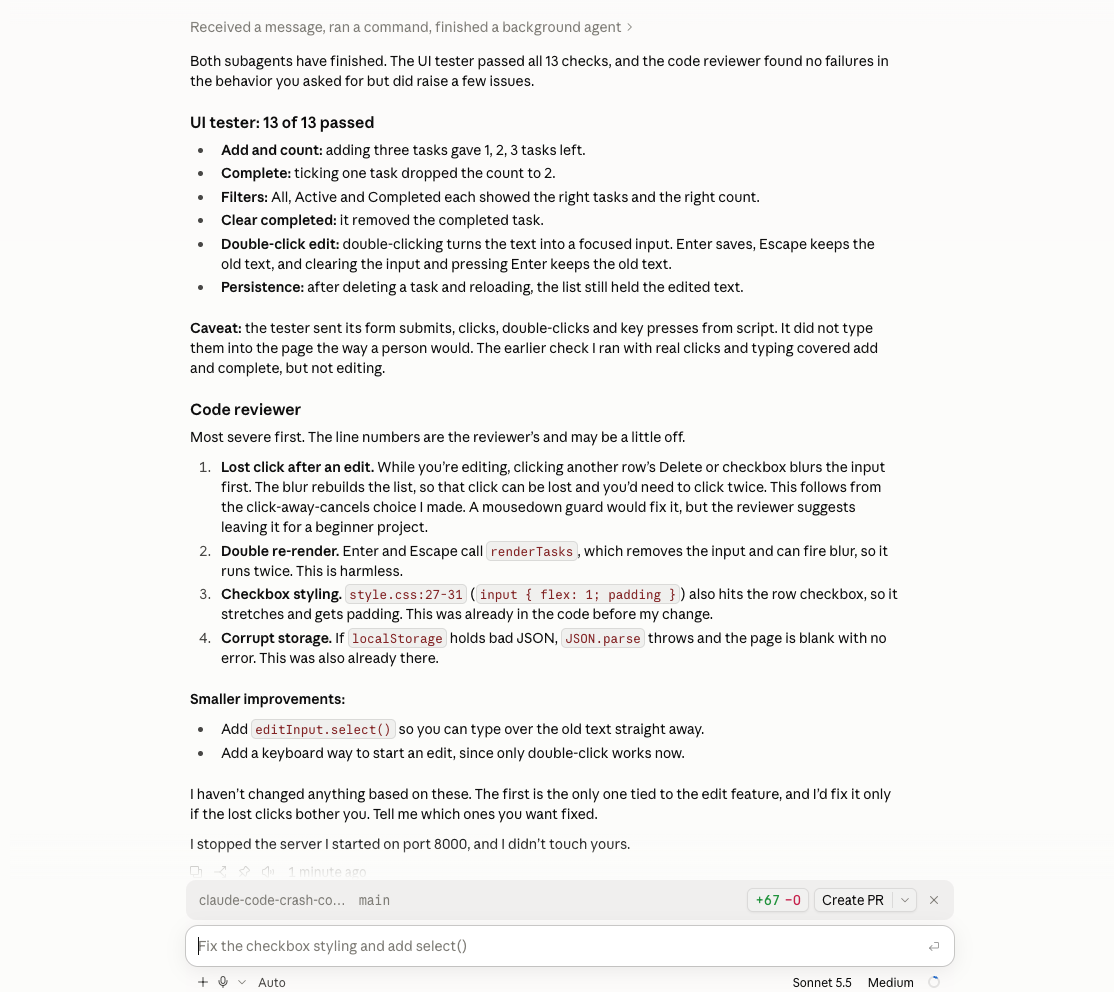
- UI tester: 13 of 13 passed. Adding, completing, all three filters, Clear completed, double-click editing (Enter saves, Escape and an empty edit keep the old text) and persistence after a reload.
- A caveat Claude flagged itself: the tester sent its clicks and key presses from a script rather than typing like a person, so it tells you how far to trust the result.
- Code reviewer: four issues, most severe first. The most relevant one is a lost click: while you're editing, clicking another row's Delete or checkbox first blurs the input, the blur rebuilds the list, and the click can be lost. The other three were harmless or already in the code before the change: a double re-render, checkbox styling that picked up the input rule, and a page that goes blank if
localStorageholds bad JSON. - Two smaller ideas: call
select()so you can type over the old text, and add a keyboard way to start editing.
Claude changed nothing on its own. It said the first issue is the only one tied to the new feature and that it would fix it only if the lost clicks bother you. It also stopped only the server it had started and left yours alone, as it had promised earlier.
The lesson: sub-agents are fast extra eyes, but you still decide what to apply. The summary also showed that CLAUDE.md didn't mention the filters, Clear completed or editing yet, so let's fix that:
Update CLAUDE.md to mention the filters, Clear completed and double-click editing.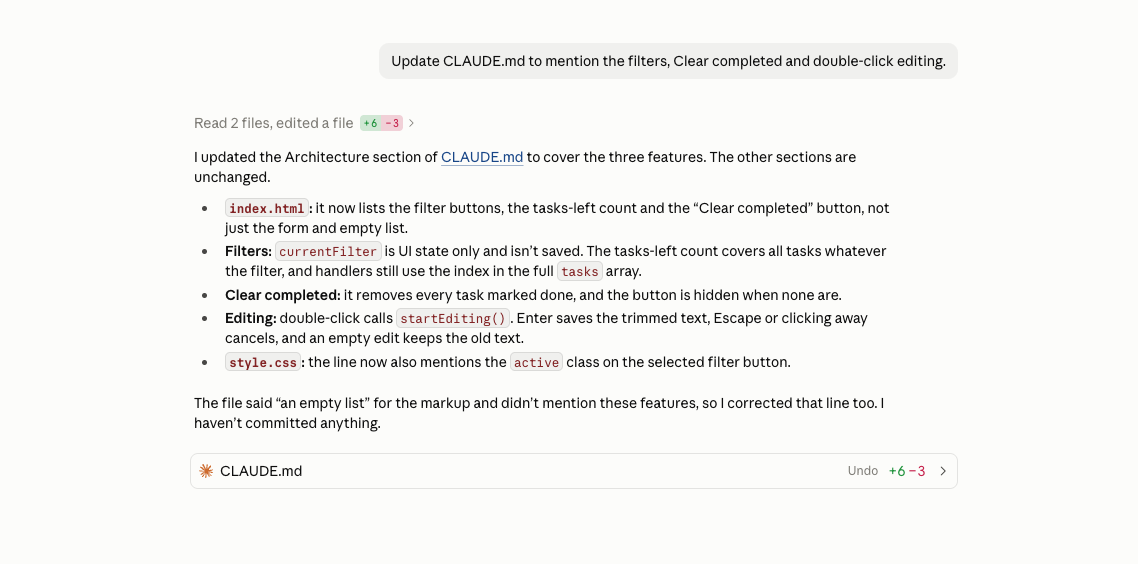
Claude updated the Architecture section: the filter buttons and tasks-left count in index.html, the fact that currentFilter is UI state only and isn't saved, Clear completed, and startEditing(). It also corrected an old line that still said "an empty list". Notice that it didn't commit anything. That's the next step.
Skills or sub-agents?
Both are Markdown files with instructions, so when do you use which?
| Skill (Part 1) | Sub-agent | |
|---|---|---|
| Runs in | Your main conversation | Its own context window |
| You see | Every step | Only the summary |
| Tools and model | Same as your session | Its own, if you set them |
| Best for | Instructions you want to follow along with: reviews, release notes, house style | Big or noisy jobs: browser tests, searching large codebases, parallel checks |
Commit, push and open a pull request
Commit exactly as in Part 1:
Commit all the changes with a short, clear commit message.In Manual mode Claude shows the git command and waits for you to approve it. Here it wants to run git add -A and git commit, with a two-line commit message. Allow once approves this one command, and Always allow stops the question for this command in future:
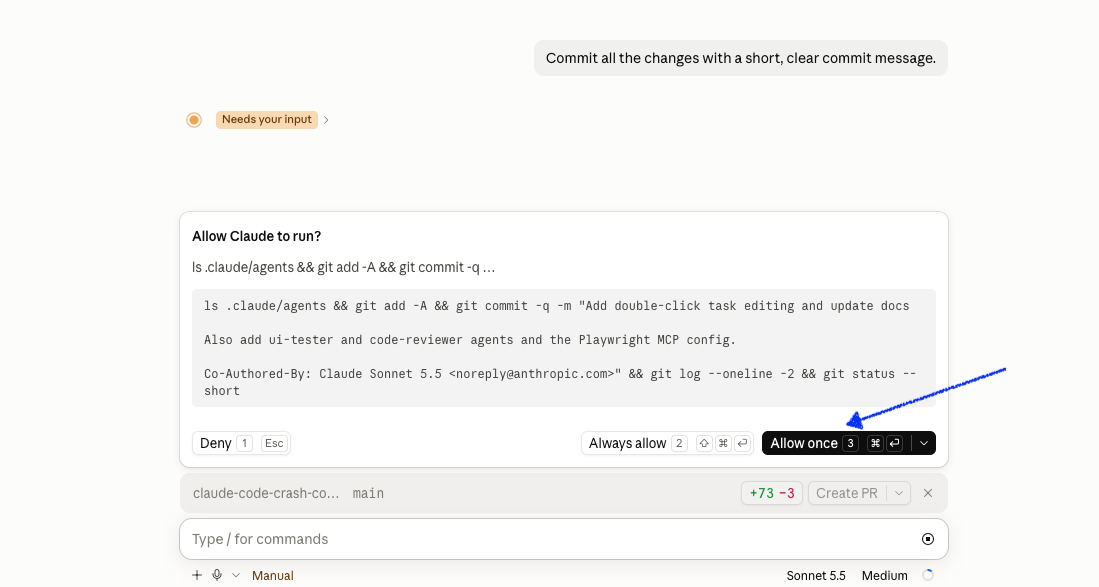
After you allow it, Claude reports what it did:
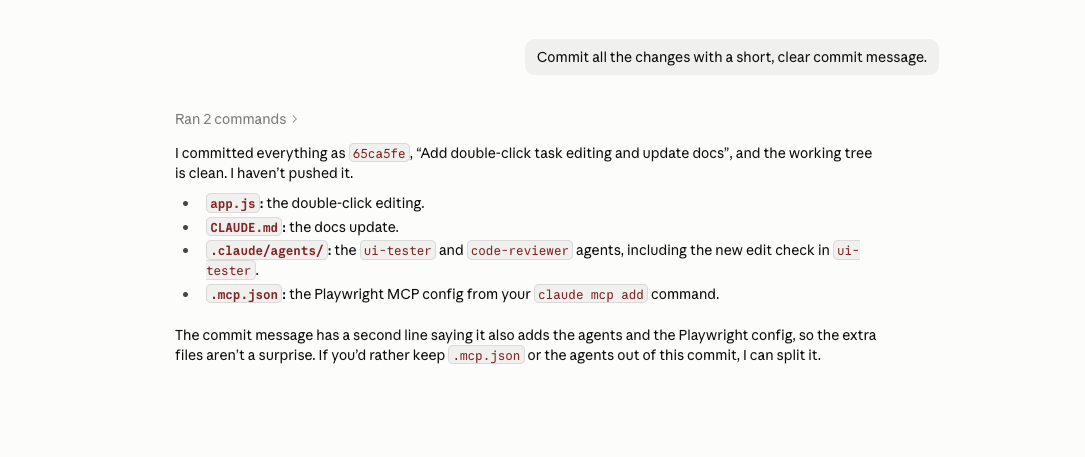
It committed everything in one go, including the agents and .mcp.json, and added a second line to the message so those extra files aren't a surprise. It also said it hadn't pushed, and offered to split the commit if you'd rather keep the MCP config or agents out of it. That's the kind of thing you want from an assistant: it does what you asked, then tells you exactly what that included.
If you ask Claude to push and open a pull request (this needs the GitHub CLI, gh), the app shows a CI status bar for that PR. From there you can turn on Auto-fix, which lets Claude read failing checks and fix them, and Auto-merge.
Quick reference: terminal vs desktop app
| Task | Terminal | Desktop app |
|---|---|---|
| Pick the project | cd then claude | Project folder in the prompt area |
| Change permission mode | Shift+Tab | Mode selector next to send |
| Change model | /model | Model dropdown next to send |
| Mention a file | @app.js | @ with autocomplete |
| Review changes | git diff | Changes pane, comment on lines |
| Run a shell command | ! prefix | Terminal pane |
| Continue a session | claude -c or /resume | Click it in the sidebar |
| Parallel work | Several terminals, --worktree | + New session, worktree option |
| Add an MCP server | claude mcp add | + → Connectors, or claude mcp add in the Terminal pane |
| Call a sub-agent | @agent-name | @ and pick it from the list |
Tips
- Keep MCP servers few and trusted. Each one adds tools for Claude to choose from.
- Give sub-agents only the tools they need, and a clear
description, so Claude knows when to use them. - Commit
.mcp.jsonand.claude/agents/so your whole team gets the same setup. - Use worktree sessions when you run two tasks at the same time on one repo.
You can find the code here