React 19 tutorials
Learn React 19 features — use, Form Actions, useActionState, useFormStatus, useOptimistic, ref as a prop, and document metadata
In this post we will learn about the new features in React 19.
This post has been inspired by this awesome YouTube video by Traversy Media. And also this YouTube video by RoadsideCoder.
Project setup with Vite
We will create the project with Vite, which ships React 19 by default. Open a terminal and run:
npm create vite@latest react19-demo -- --template react
cd react19-demo
npm install
After creating the app, open package.json. It should show React 19 for both react and react-dom.
We will use Tailwind CSS in our project. Install it and generate the config files:
npm install -D tailwindcss @tailwindcss/viteIn vite.config.js, add the Tailwind Vite plugin:
import { defineConfig } from 'vite'
import react from '@vitejs/plugin-react'
import tailwindcss from '@tailwindcss/vite'

export default defineConfig({
  plugins: [react(), tailwindcss()],
})
Remove the default styles from src/index.css and add:
@import "tailwindcss";Now, in App.jsx we will add some Tailwind CSS styles for a simple layout, then start the app:
npm run devGo to http://localhost:5173/ in the browser and we will see Tailwind CSS in action.
The use hook with Promises
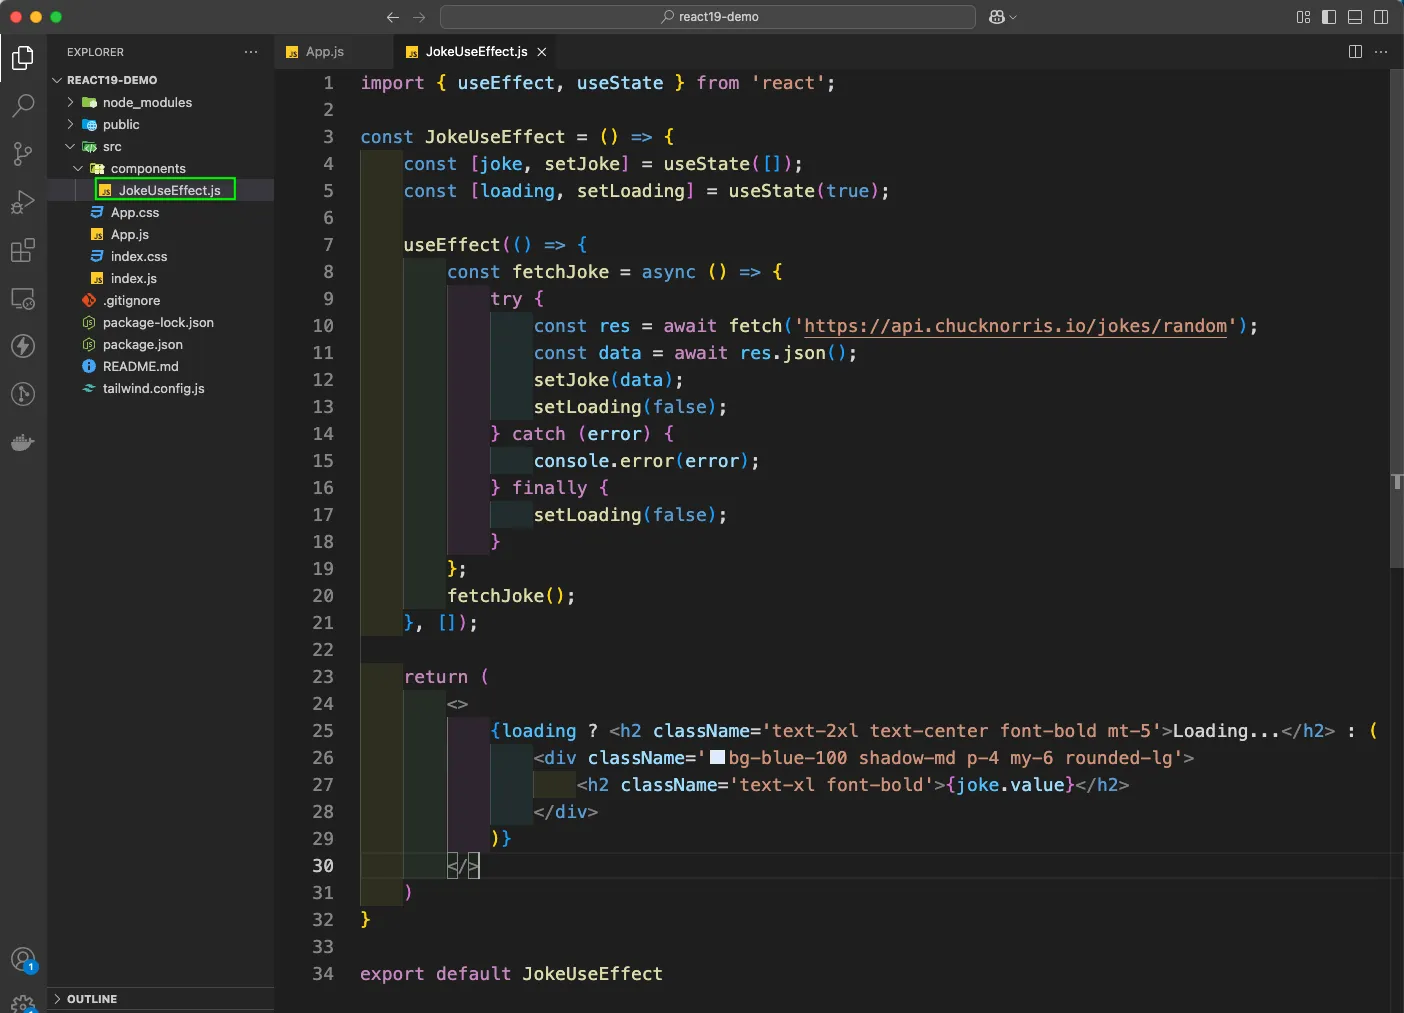
For checking the updates in React 19, first we will see the pain with React 18. We have created a file JokeUseEffect.js and added the below code in it.
In this we are hitting a popular API to get a random joke. Here, we are using the usual React way of useEffect with an empty array. We are using the fetch API to get the data, then setting the data to joke state.
We are also setting the loading state to false. Inside the return, we are showing a Loading text if loading state is true. Or else we will show the value of joke.
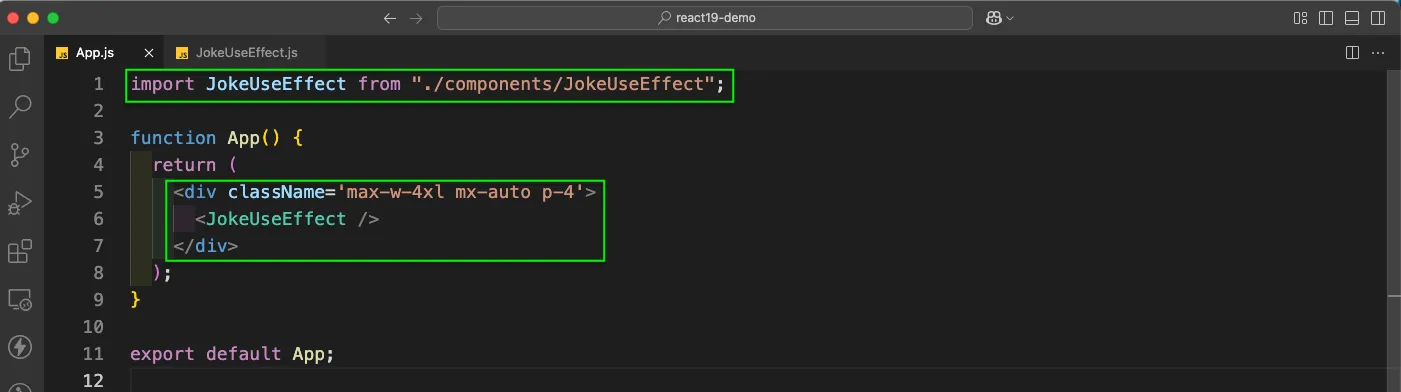
Now, rendering the JokeUseEffect from App.jsx.
In the browser we will see Loading… for 1–2 sec and then will see the data returned by the API.

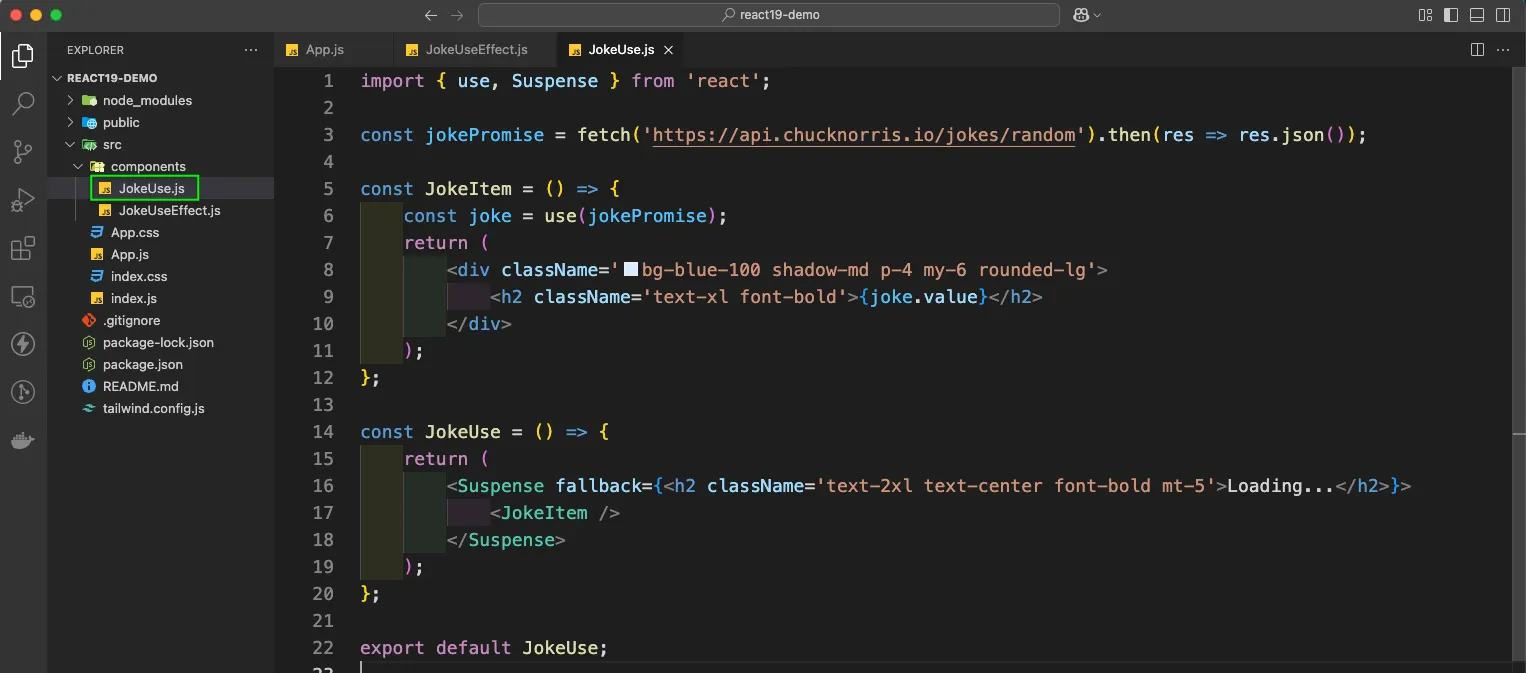
Now, we have created a file JokeUse.js inside the components folder. Here, we are using the new use hook from React 19. According to the official definition, it lets us read the values of Promises or Context.
Here, we have a jokePromise variable in which we are using fetch and then getting res.json(). We have also wrapped our return in JokeUse with Suspense, which has a fallback of Loading.
We have a new component called JokeItem, which has a variable joke. It uses the use hook to read the jokePromise. After that it returns the HTML with the joke value.
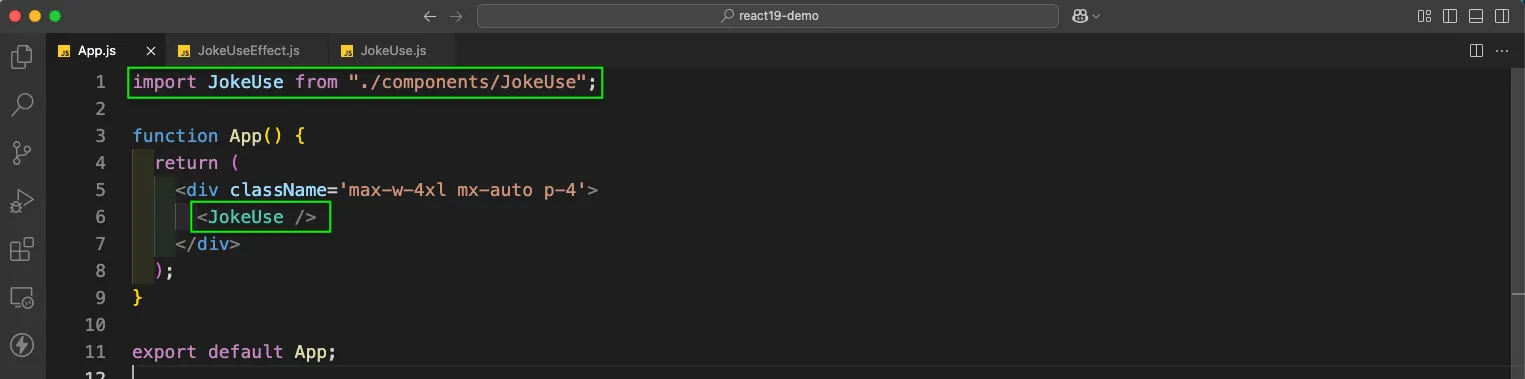
Now, we are rendering the JokeUse from App.jsx.
In the browser the API is hit as earlier.

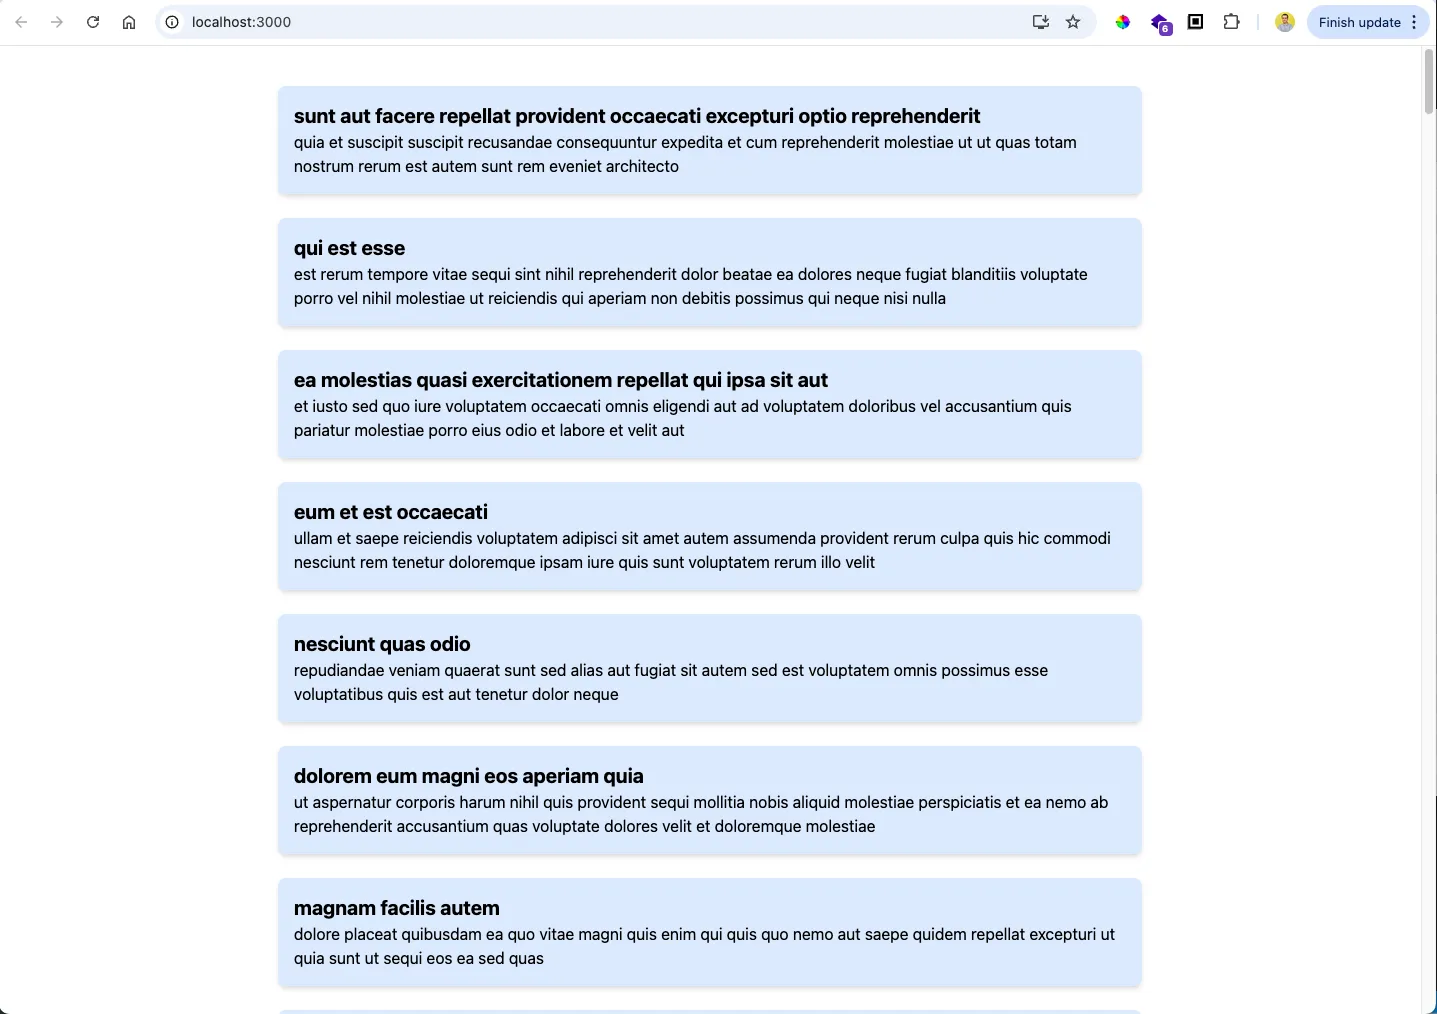
Now, we will also use the use hook to show results from the jsonplaceholder posts API. Here, we get an array of objects but the code is similar to the Joke API code. The only difference is that we are mapping through the posts array and displaying title and body of each post.
We have created a Posts.js file for the same.
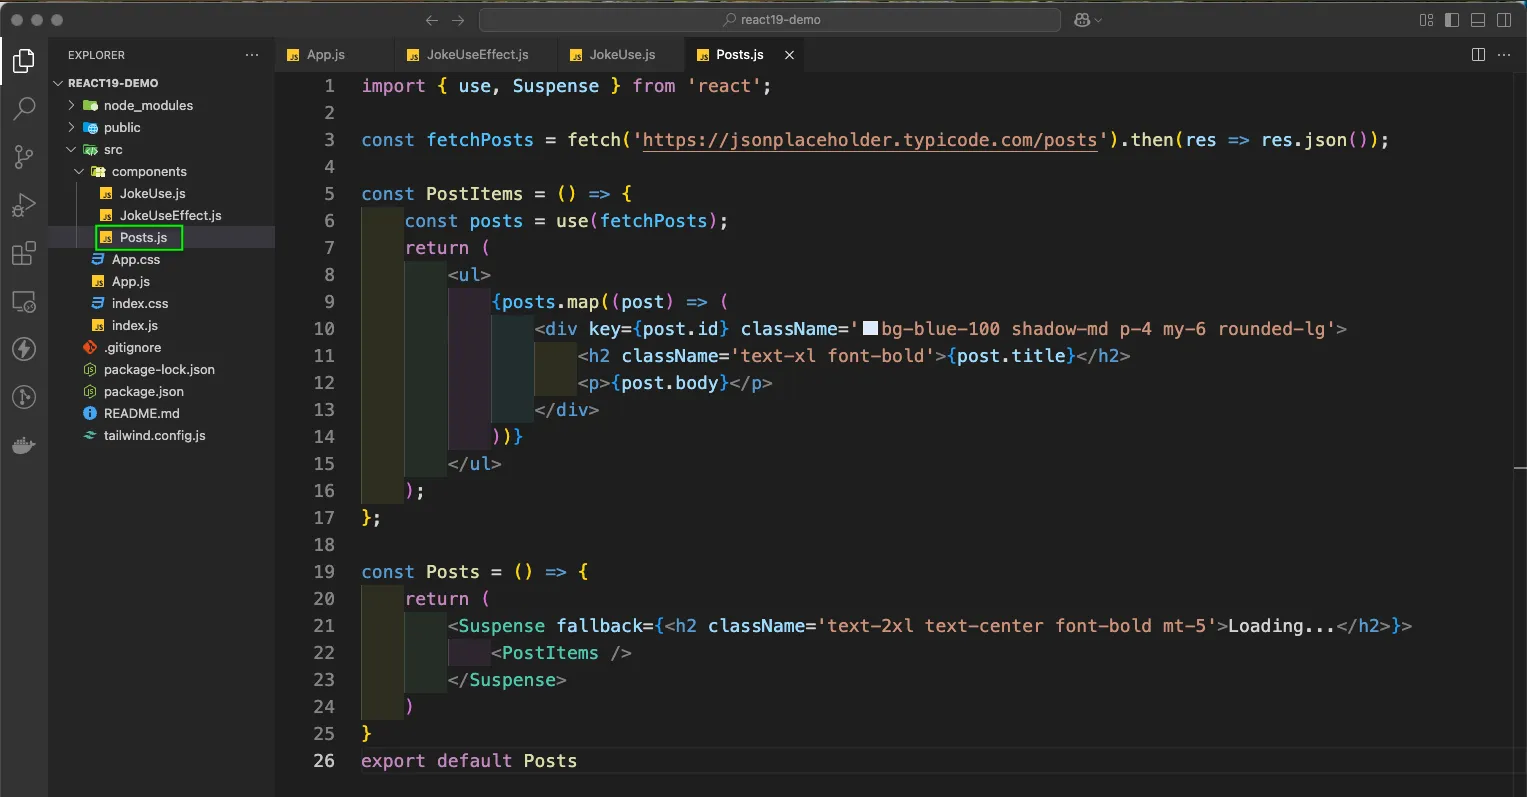
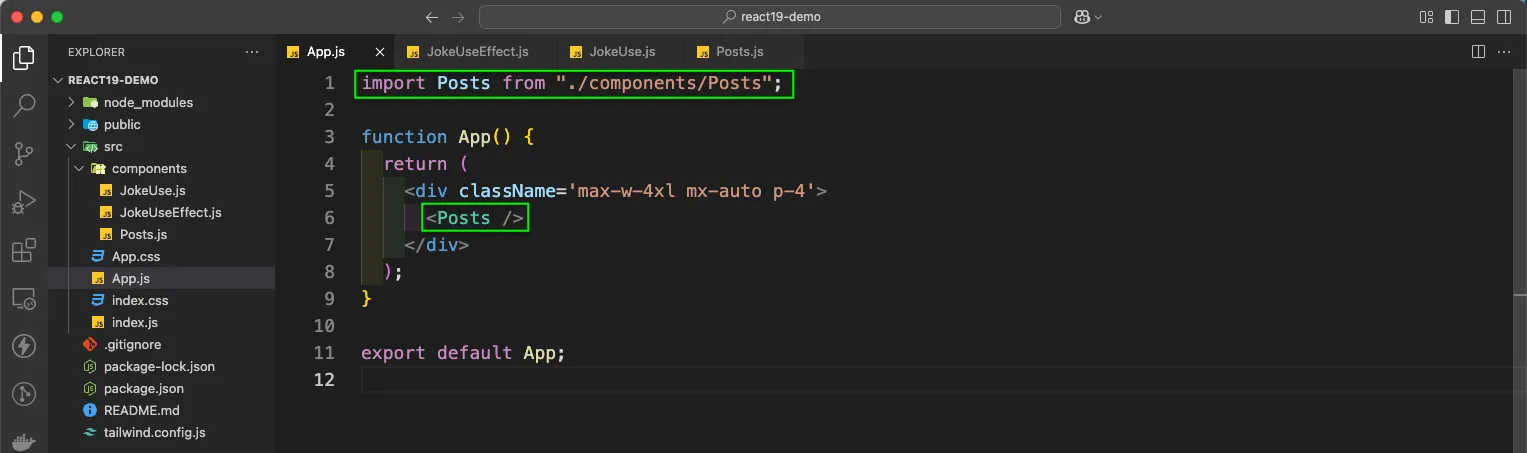
Now, we are rendering the Posts from App.jsx.
In the browser we will get the list of posts.
use with Context
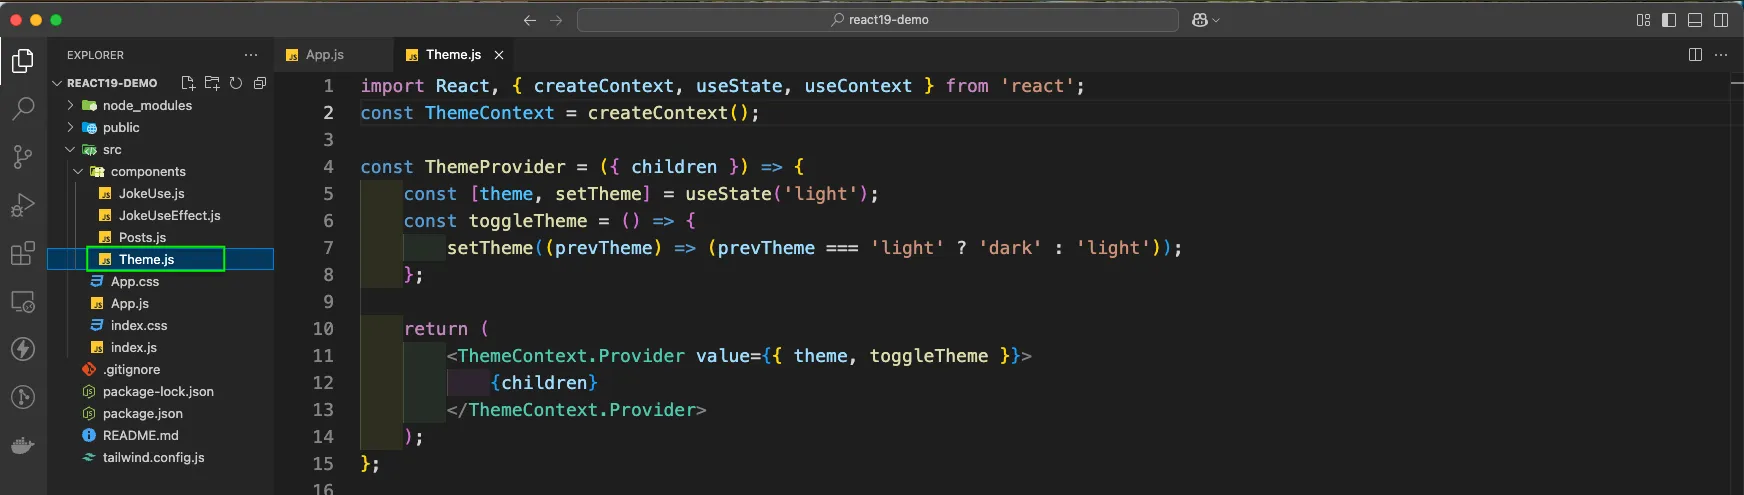
Now, we will see how use works with Context. We have created a Theme.js file. Here, we have the usual code of creating a ThemeContext with createContext().
We are simply toggling the theme between light and dark. Also, in the return statement we are using the provider and passing the value of theme and toggleTheme and the children props.
In the same file, we have a ThemeCard component, which is using the useContext hook to take the ThemeContext and extracting the theme and toggleTheme.
In the return statement we are changing the theme of everything according to the theme. And we also have a button to toggle the theme. The final component called Theme is using the ThemeProvider component and passing ThemeCard as children.
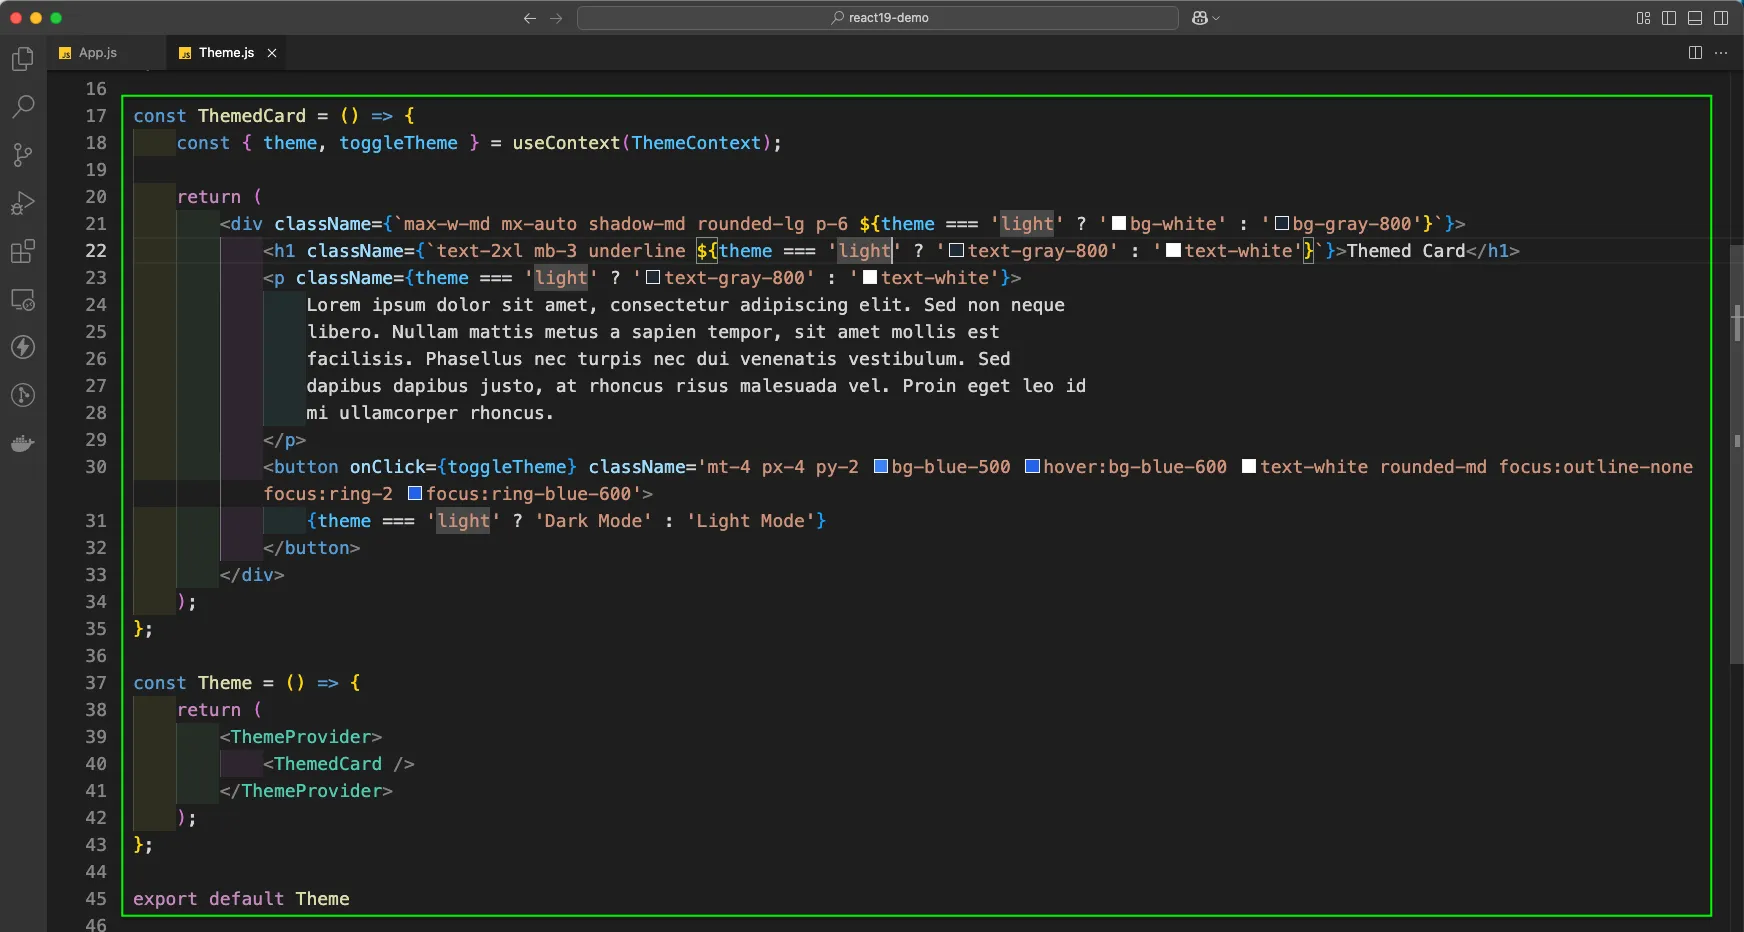
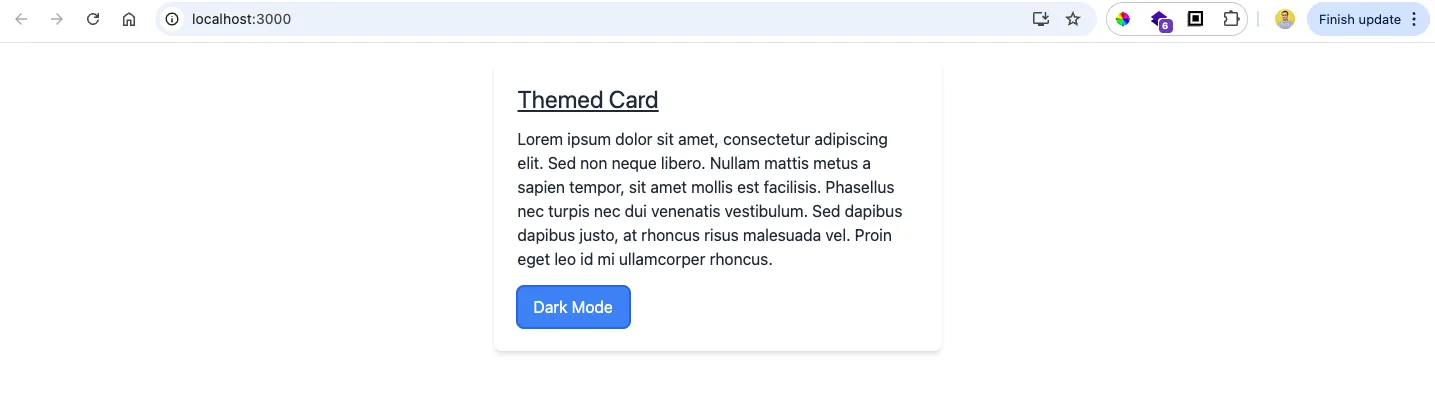
Now, we are rendering the Theme component from App.jsx. In the browser we can switch between themes by clicking the button.

In React 19, we can also read Context with the use hook instead of useContext. Note that useContext still works — use is an alternative, and unlike useContext it can be called conditionally. We did the same in Theme.js.
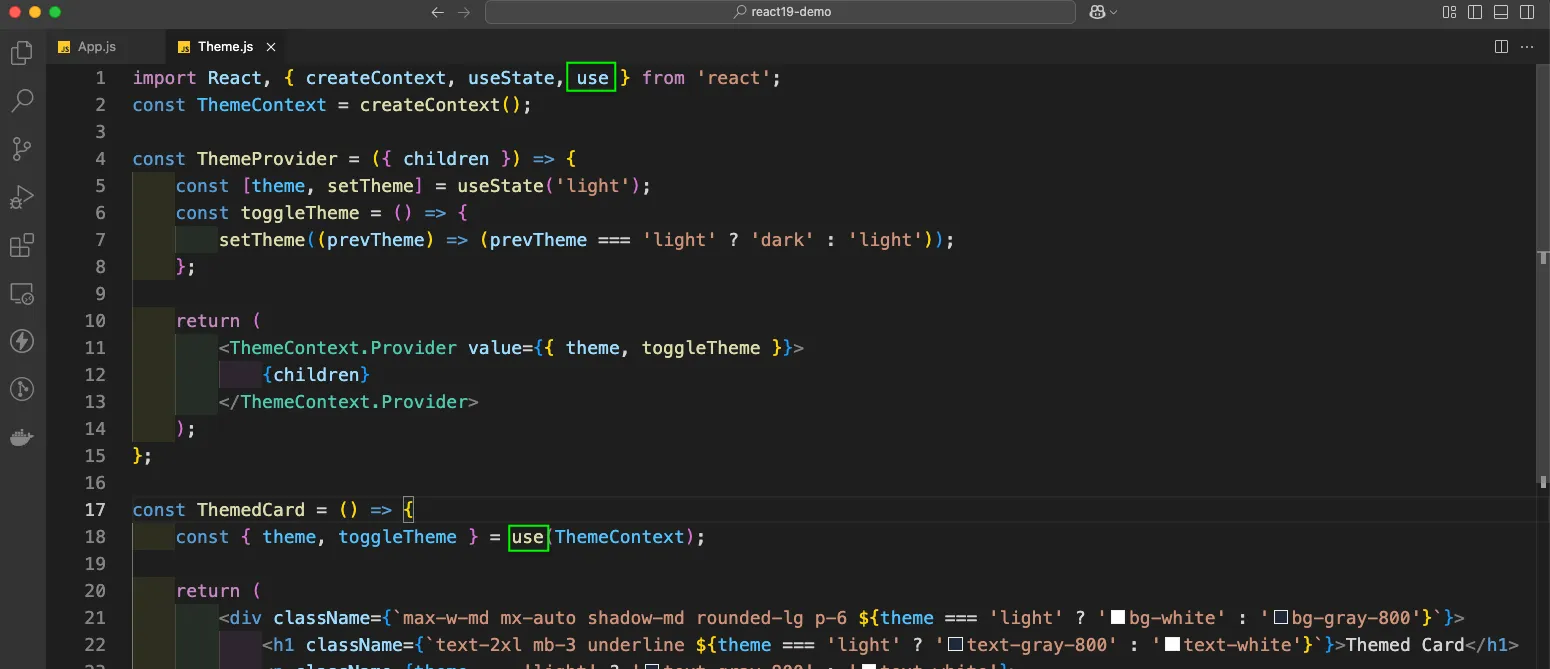
In the browser we are still able to switch between themes.
React 19 also lets you render the Context object itself as a provider, without .Provider:
<ThemeContext value={{ theme, toggleTheme }}>
  {children}
</ThemeContext>
Form Actions
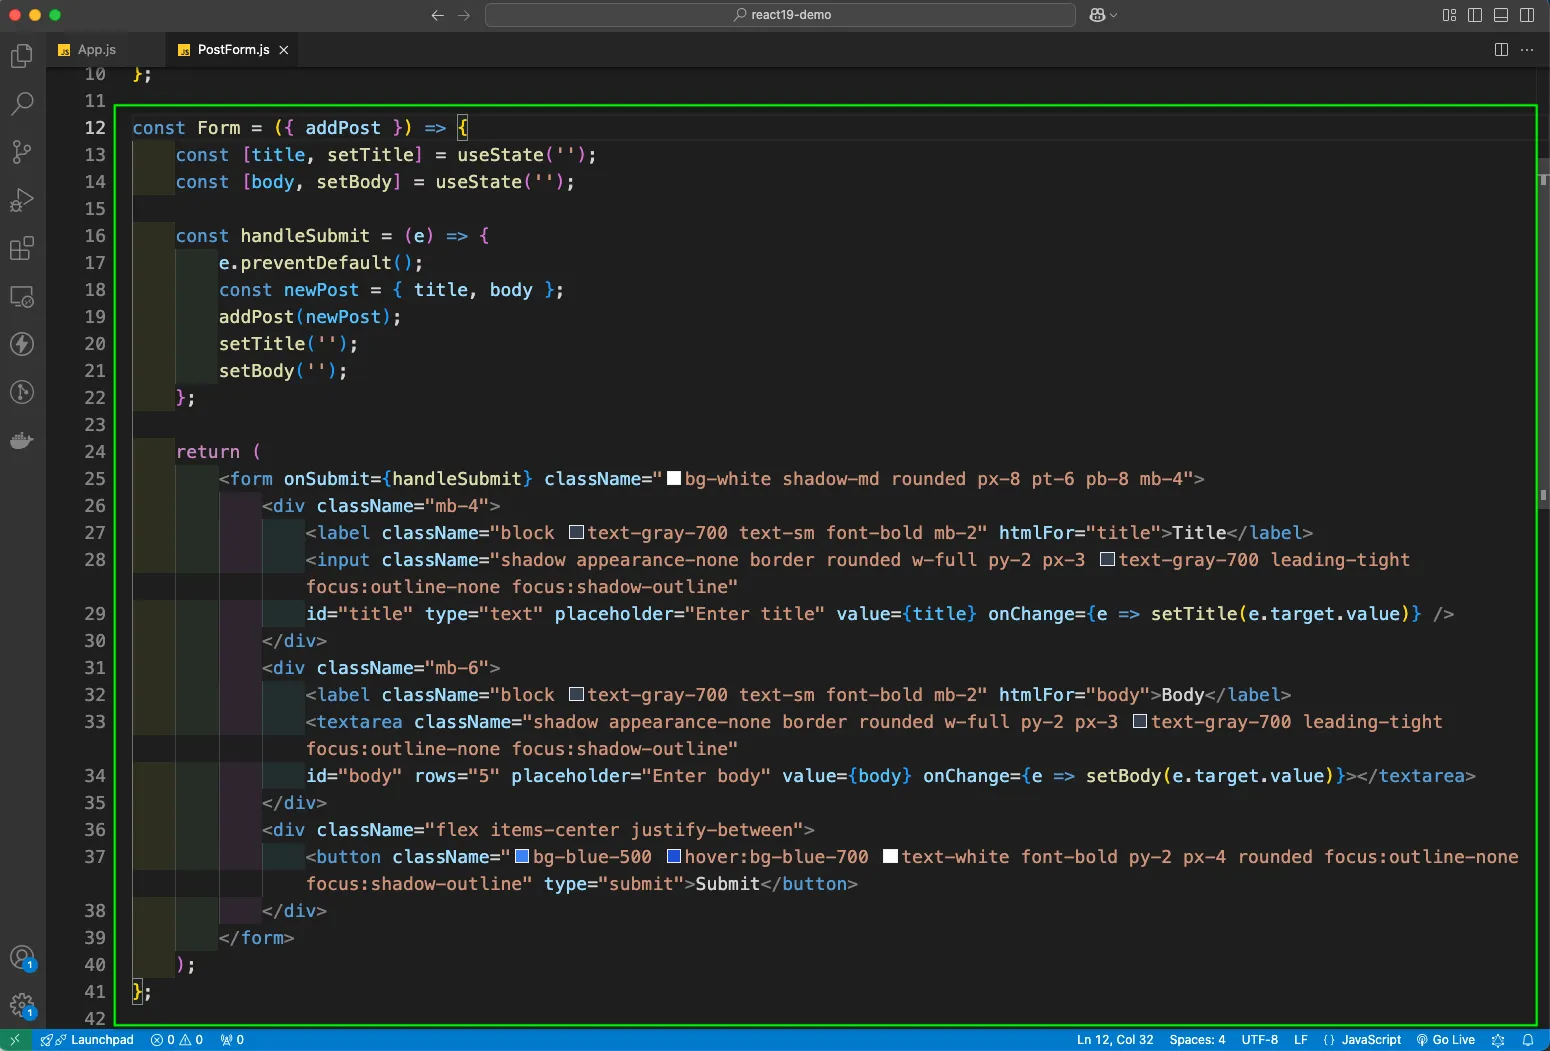
Now, we will see the changes in forms, which traditionally use a lot of code. So, we have created a PostForm.js file. Here, we have a PostItem component, which is taking post props and displaying the title and body.
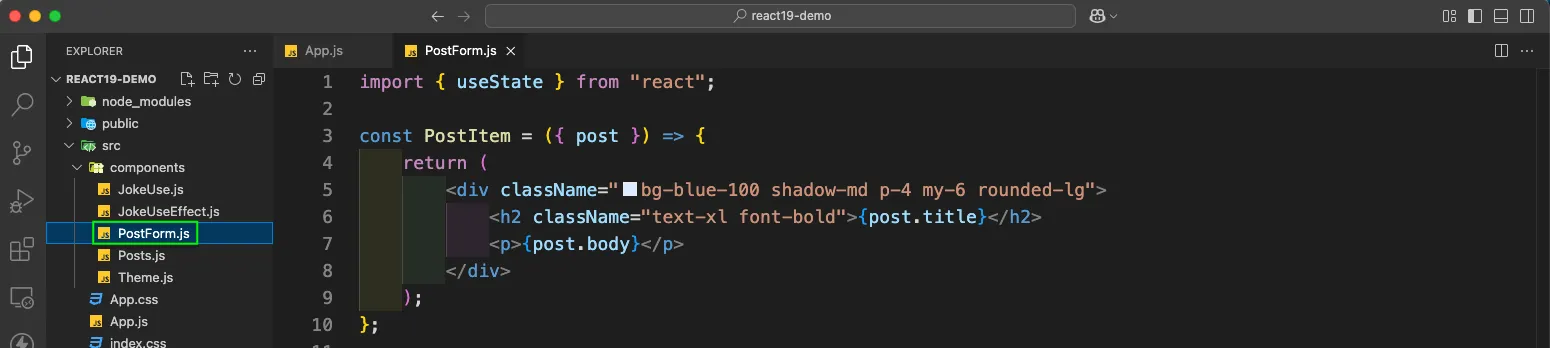
After this we have a Form component and it is taking an addPost prop. We are using the state of title and body. The handleSubmit function which runs on clicking the Submit button creates a newPost from title and body. After that it is using addPost and passing the newPost.
In the return we have the usual React 18 type of controlled component, where value and onChange are there for title and body.
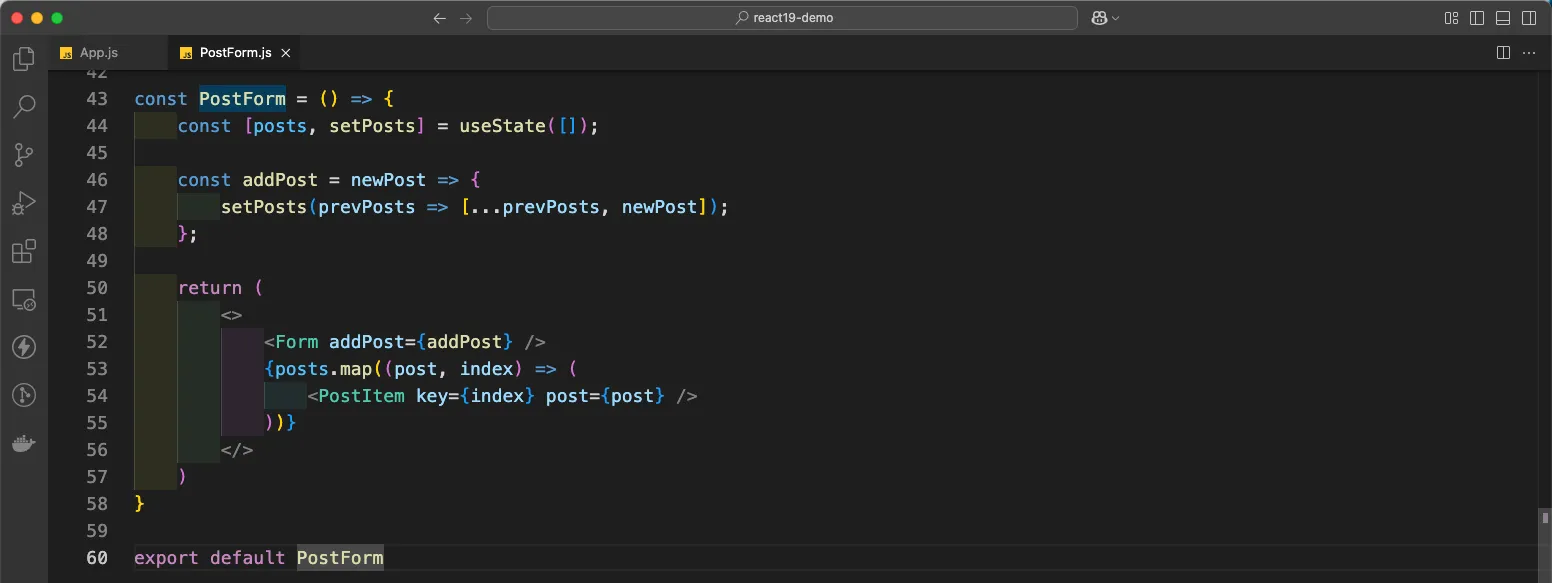
The final part of the PostForm.js file contains the PostForm component. Here, we have a posts state and an addPost function. It uses the prevPosts and adds newPost to it.
The return statement renders the Form component and passes addPost as props. Also, we are mapping through posts and passing each post to the PostItem component.
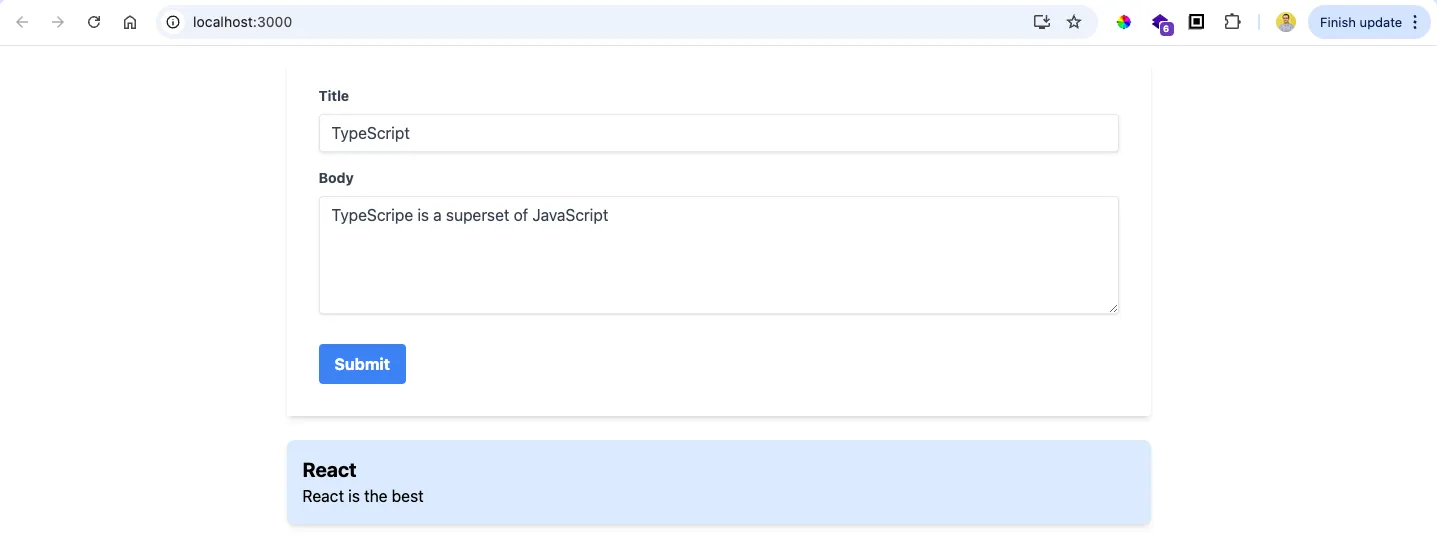
In the browser we are able to give a title and body and add items.
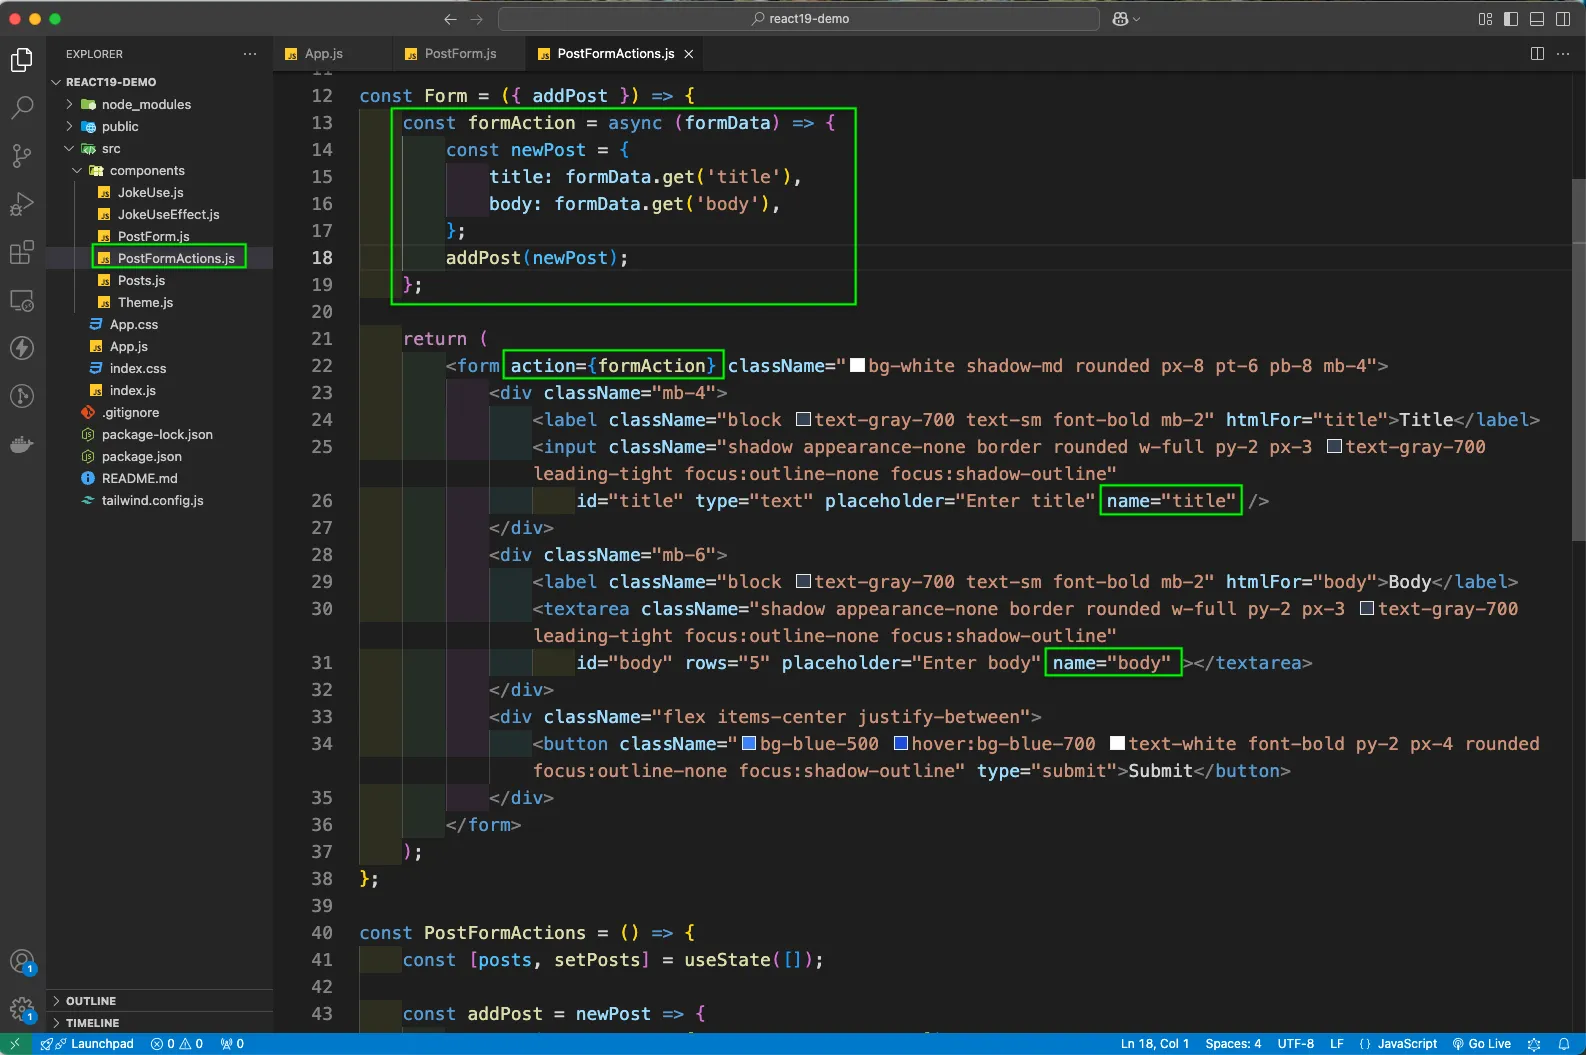
Now, instead of value and onChange in all input fields we will use the name attribute. Also, instead of onSubmit, now we have action in React 19, which is calling a function formAction.
Notice that we have also removed state and the handleSubmit function. The formAction gets a special argument called formData. And we can get the fields with formData.get().
We are storing this in title and body respectively and creating the newPost object. We are passing this to addPost().
We have created a new file called PostFormActions.js and made these changes.
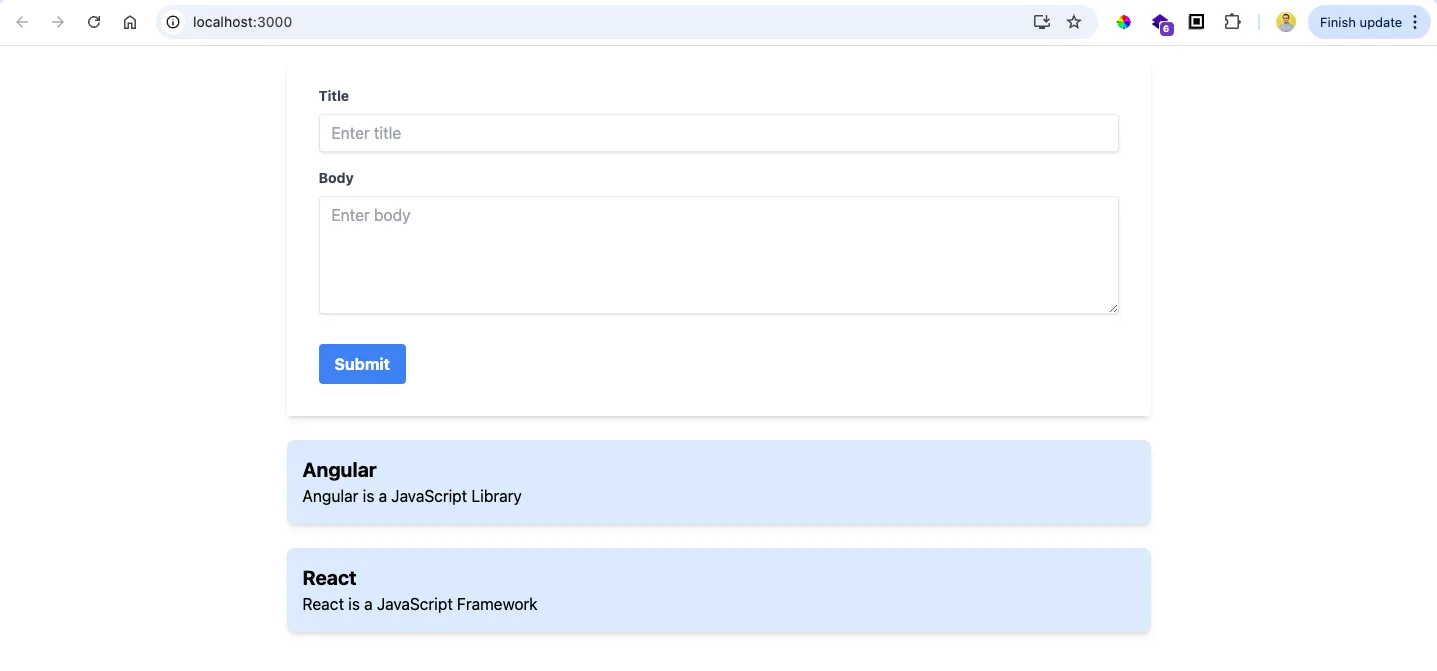
Our form is still working like earlier in the browser.
useFormStatus
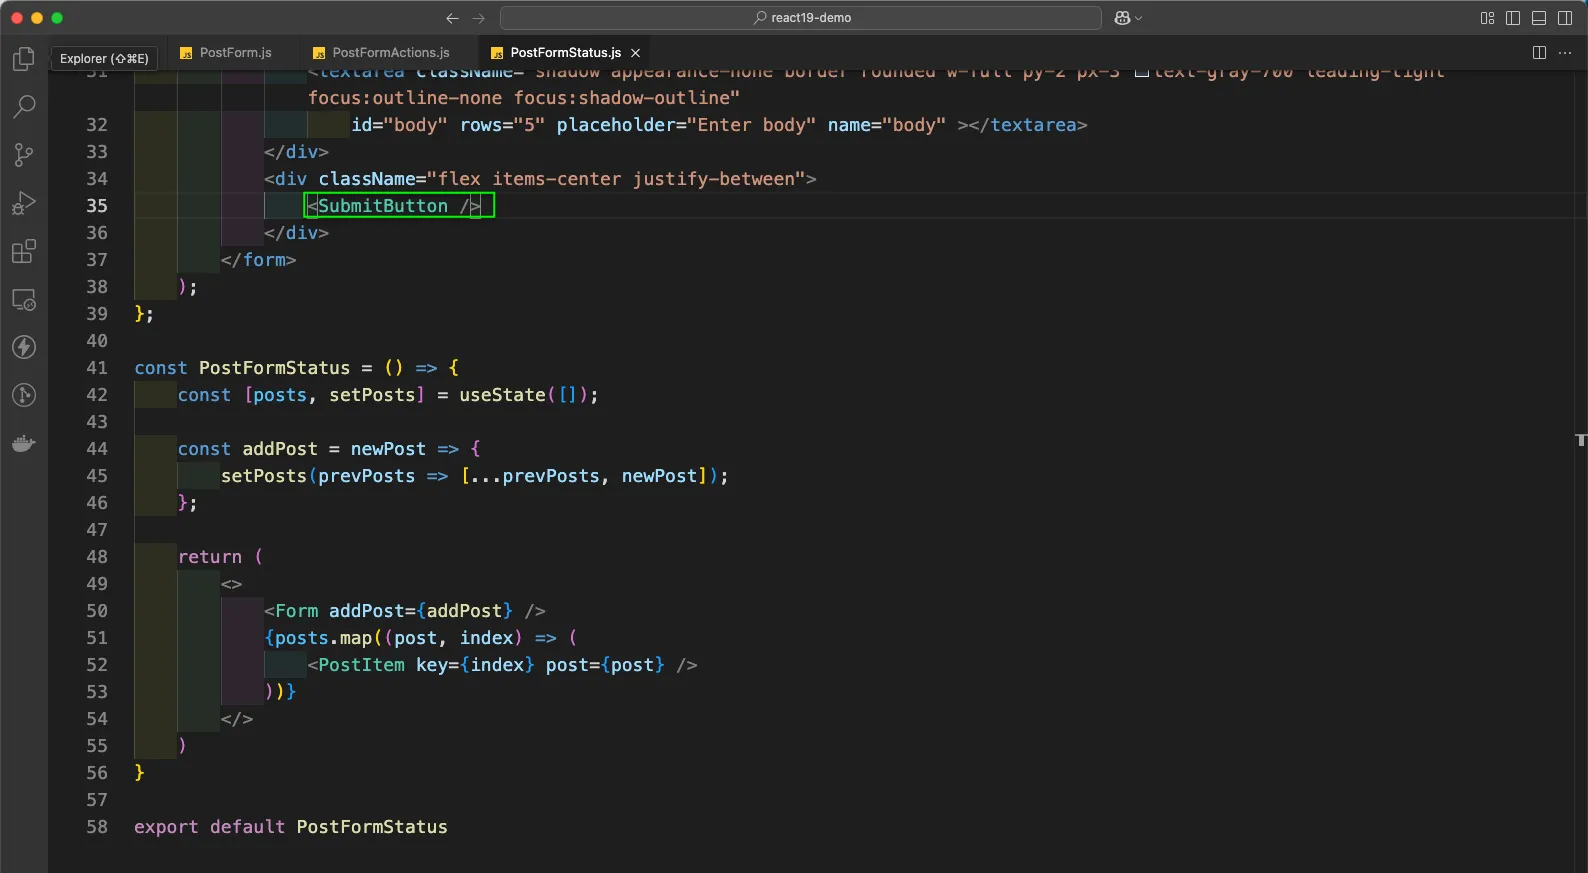
Now, we will look into the concept of useFormStatus. For this we have created a new file called PostFormStatus.js which is similar to our earlier file PostFormActions.js.
But here the button logic we have shifted to a component called SubmitButton.
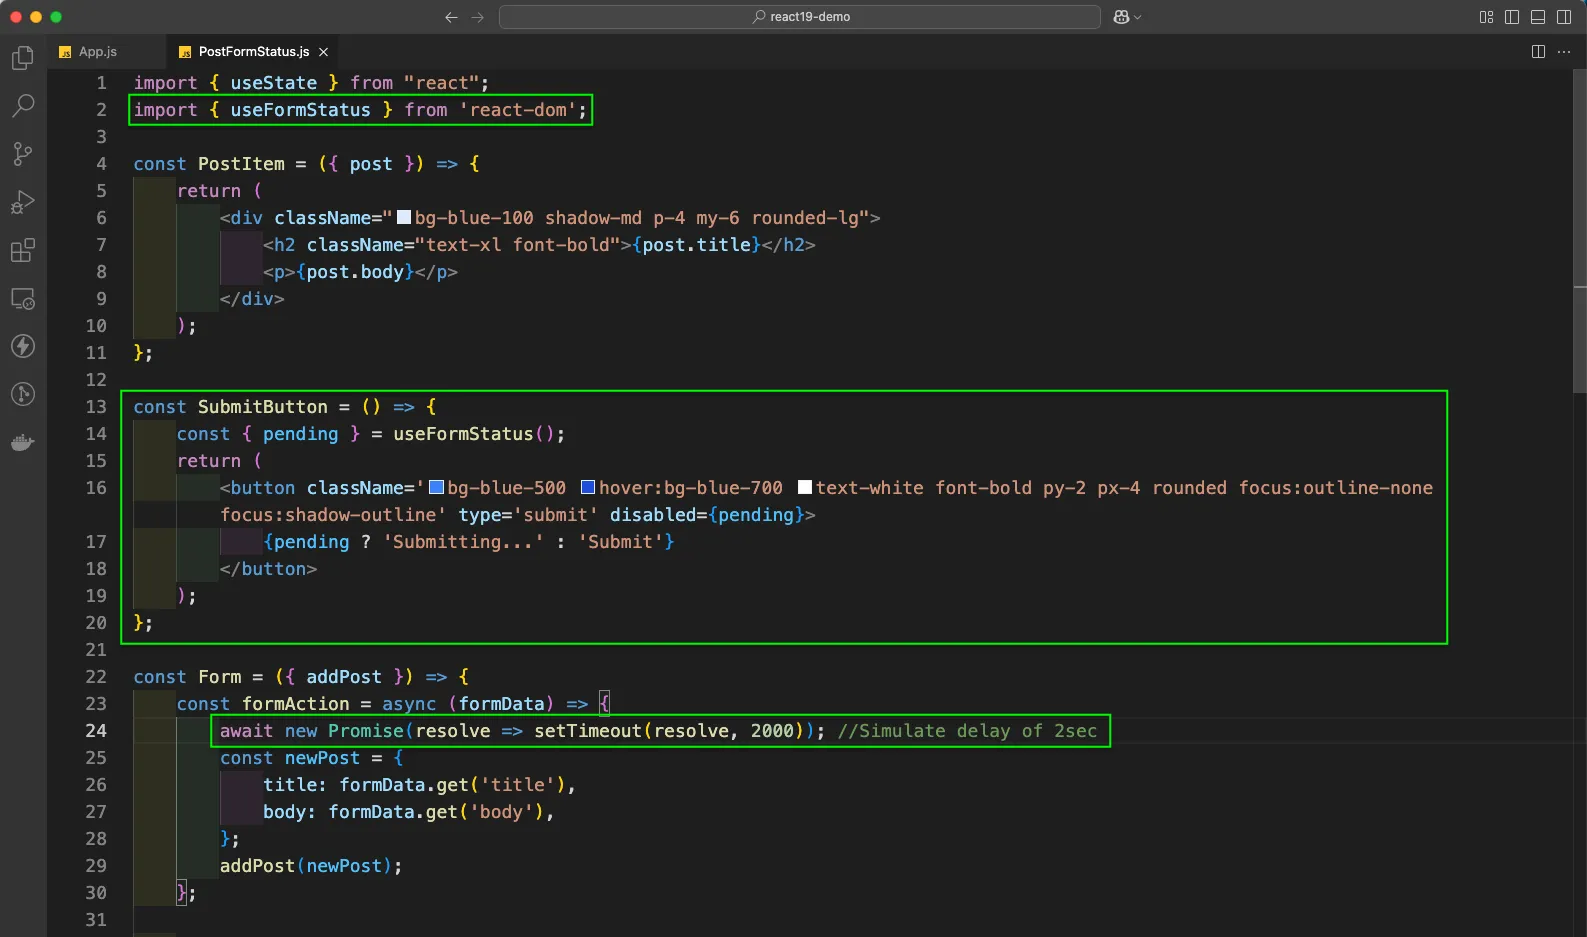
Now, we are importing a new hook called useFormStatus from react-dom. Also, we have created the SubmitButton component, which is using pending from useFormStatus. The return statement has the same button as earlier.
But it is disabled if pending is true. Also, if pending is true we will see the Submitting text or else Submit text. We have also added a delay in the formAction, so that we can see the transition from Submitting to Submit.
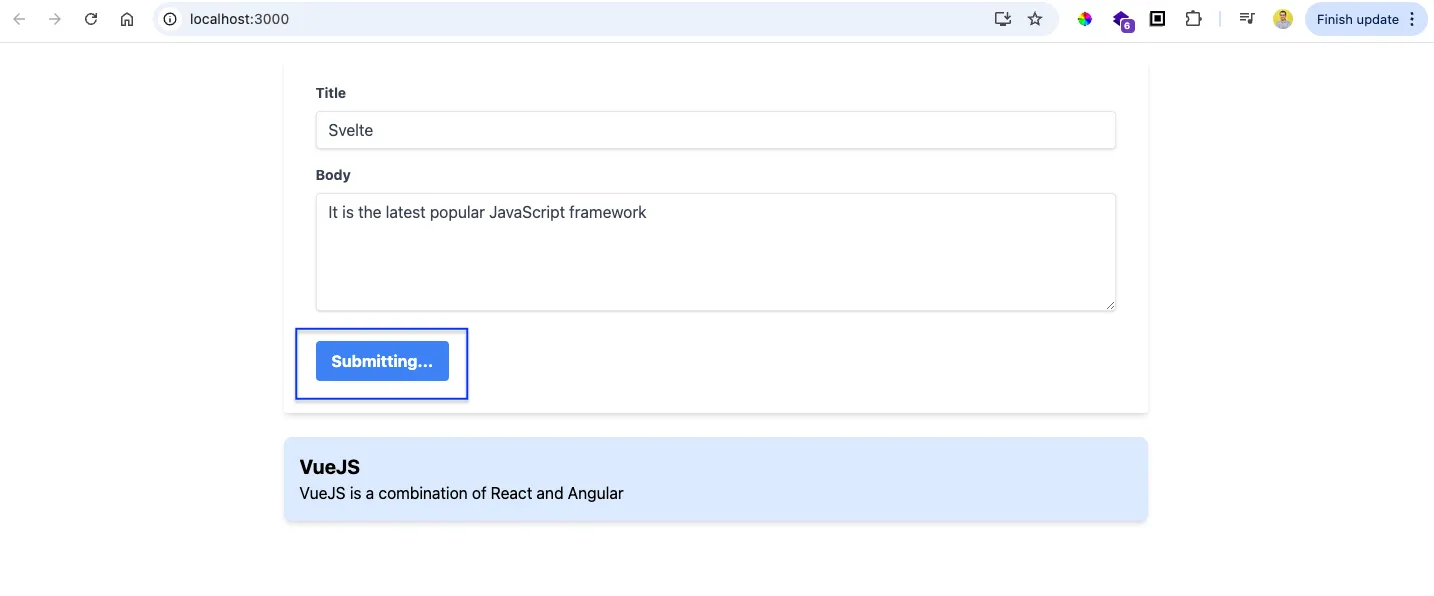
In the browser we write a title and body and click on the Submit button, it will show Submitting… for 2 seconds and then the details will be added.
useActionState
useActionState is one of the most important new hooks in React 19. It wraps an async Action and gives you the returned state, a form action, and a pending flag — so you do not have to manage loading and result state by hand.
Create a file called PostFormActionState.js. The action function receives the previous state and formData, validates the fields, and returns a message. useActionState wires that into the form:
import { useActionState } from "react";

async function submitPost(previousState, formData) {
  const title = formData.get("title");
  const body = formData.get("body");

  await new Promise((resolve) => setTimeout(resolve, 2000));

  if (!title || !body) {
    return { error: "Title and body are required.", success: null };
  }

  return {
    error: null,
    success: `Post "${title}" added successfully!`,
  };
}

function PostFormActionState() {
  const [state, formAction, isPending] = useActionState(submitPost, {
    error: null,
    success: null,
  });

  return (
    <div className="p-4 max-w-md mx-auto">
      <h2 className="text-xl font-bold mb-4">useActionState Form</h2>
      <form action={formAction} className="flex flex-col gap-3">
        <input
          name="title"
          placeholder="Title"
          className="border p-2 rounded"
        />
        <textarea
          name="body"
          placeholder="Body"
          className="border p-2 rounded"
        />
        <button
          type="submit"
          disabled={isPending}
          className="bg-blue-500 text-white p-2 rounded disabled:opacity-50"
        >
          {isPending ? "Submitting..." : "Submit"}
        </button>
      </form>
      {state.error && (
        <p className="mt-3 text-red-600">{state.error}</p>
      )}
      {state.success && (
        <p className="mt-3 text-green-600">{state.success}</p>
      )}
    </div>
  );
}

export default PostFormActionState;
Render PostFormActionState from App.jsx. When you submit with empty fields you get the error message. With valid fields, after a short delay you get the success message, and the button shows Submitting… while isPending is true.
Unlike useFormStatus (which must be called from a child inside the form), useActionState gives you isPending and the action result directly in the parent that owns the form.
useOptimistic
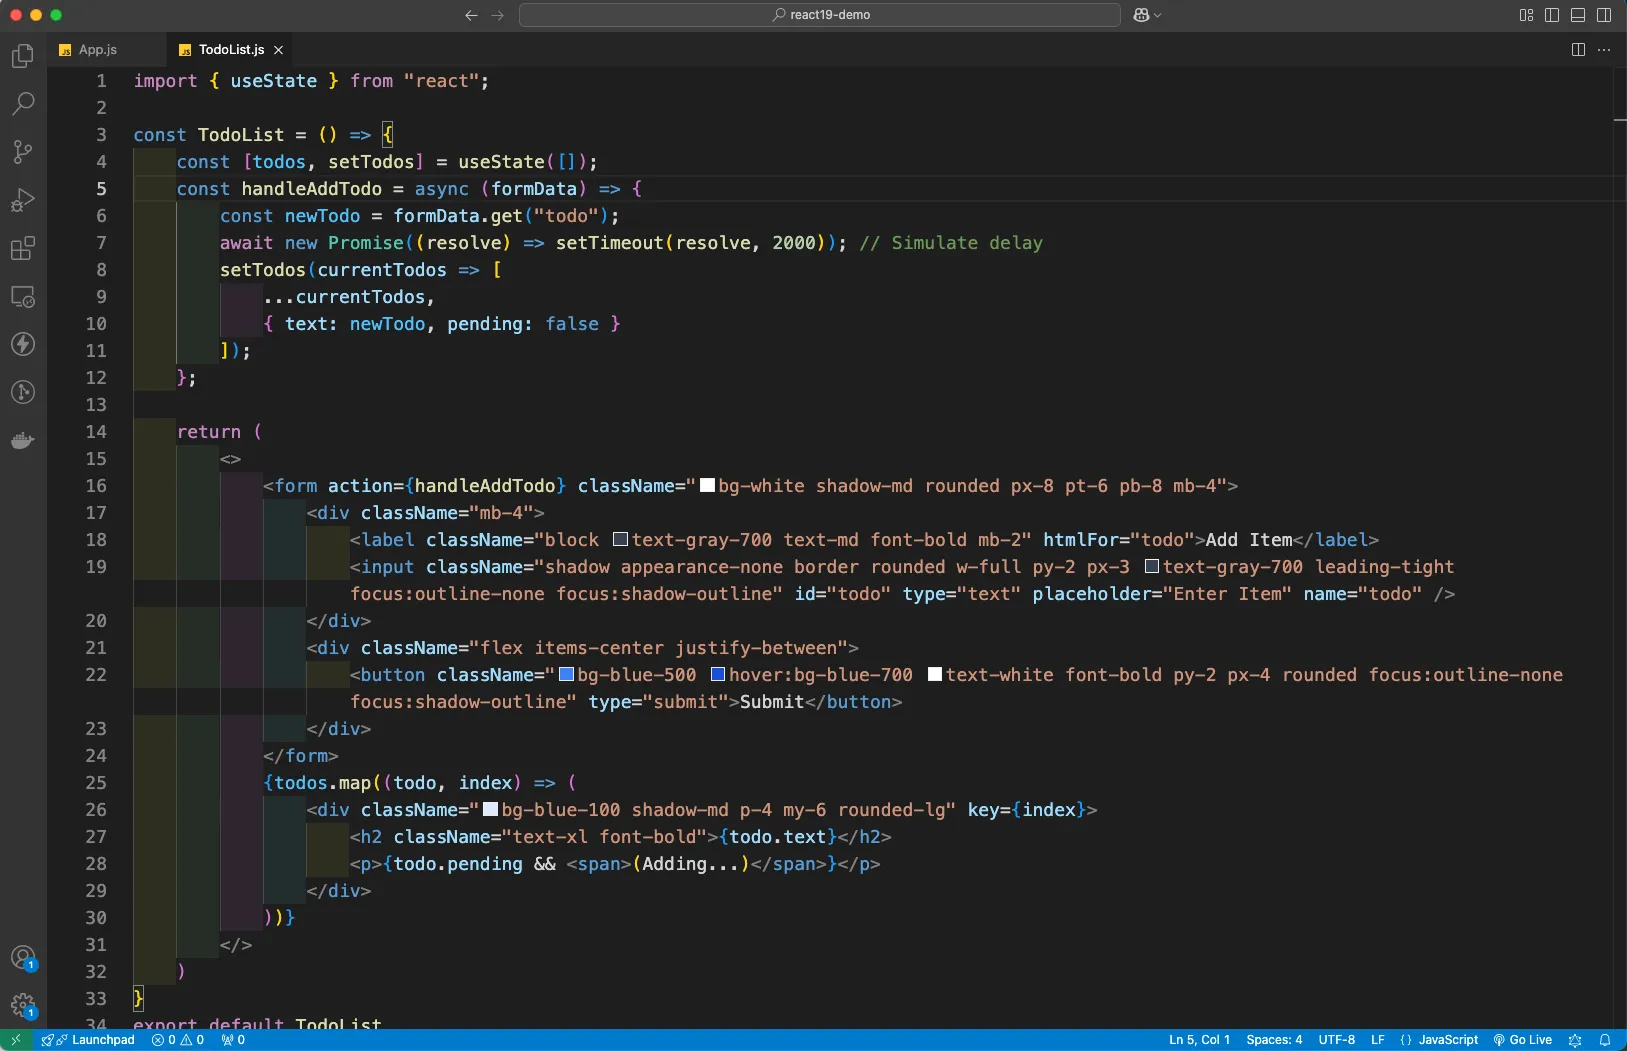
Next, we will learn about the useOptimistic hook. As per the definition, it lets you show different state while an async action is going on. We have created a TodoList.js file and added the usual todo code.
Here, we have used the formData which we have learnt earlier. But we have a state of todos and updating it with setTodos.
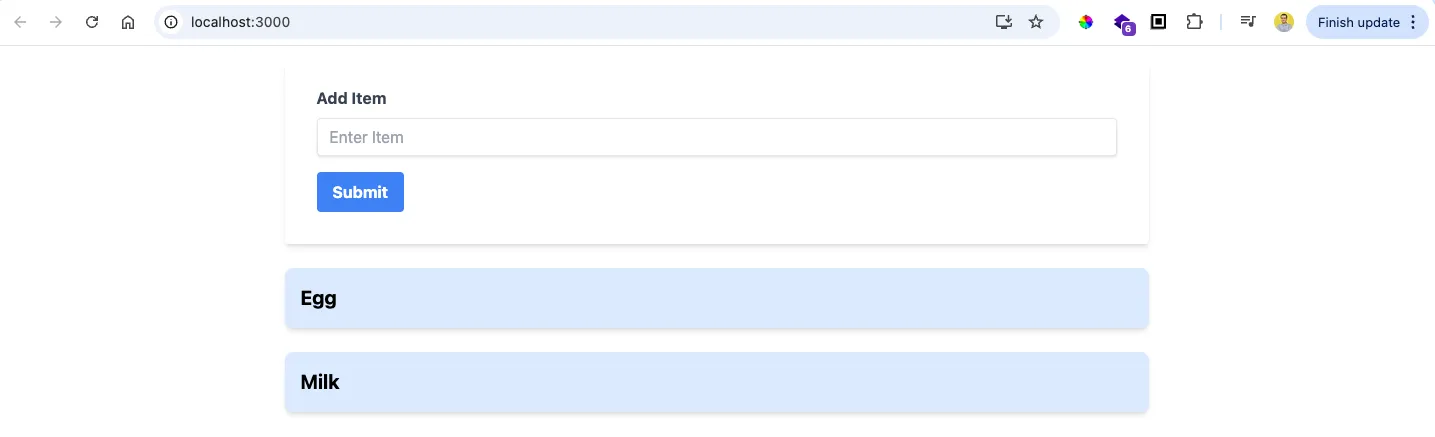
In the browser the list is getting added properly but the pending is not shown and we need to add additional code for it.
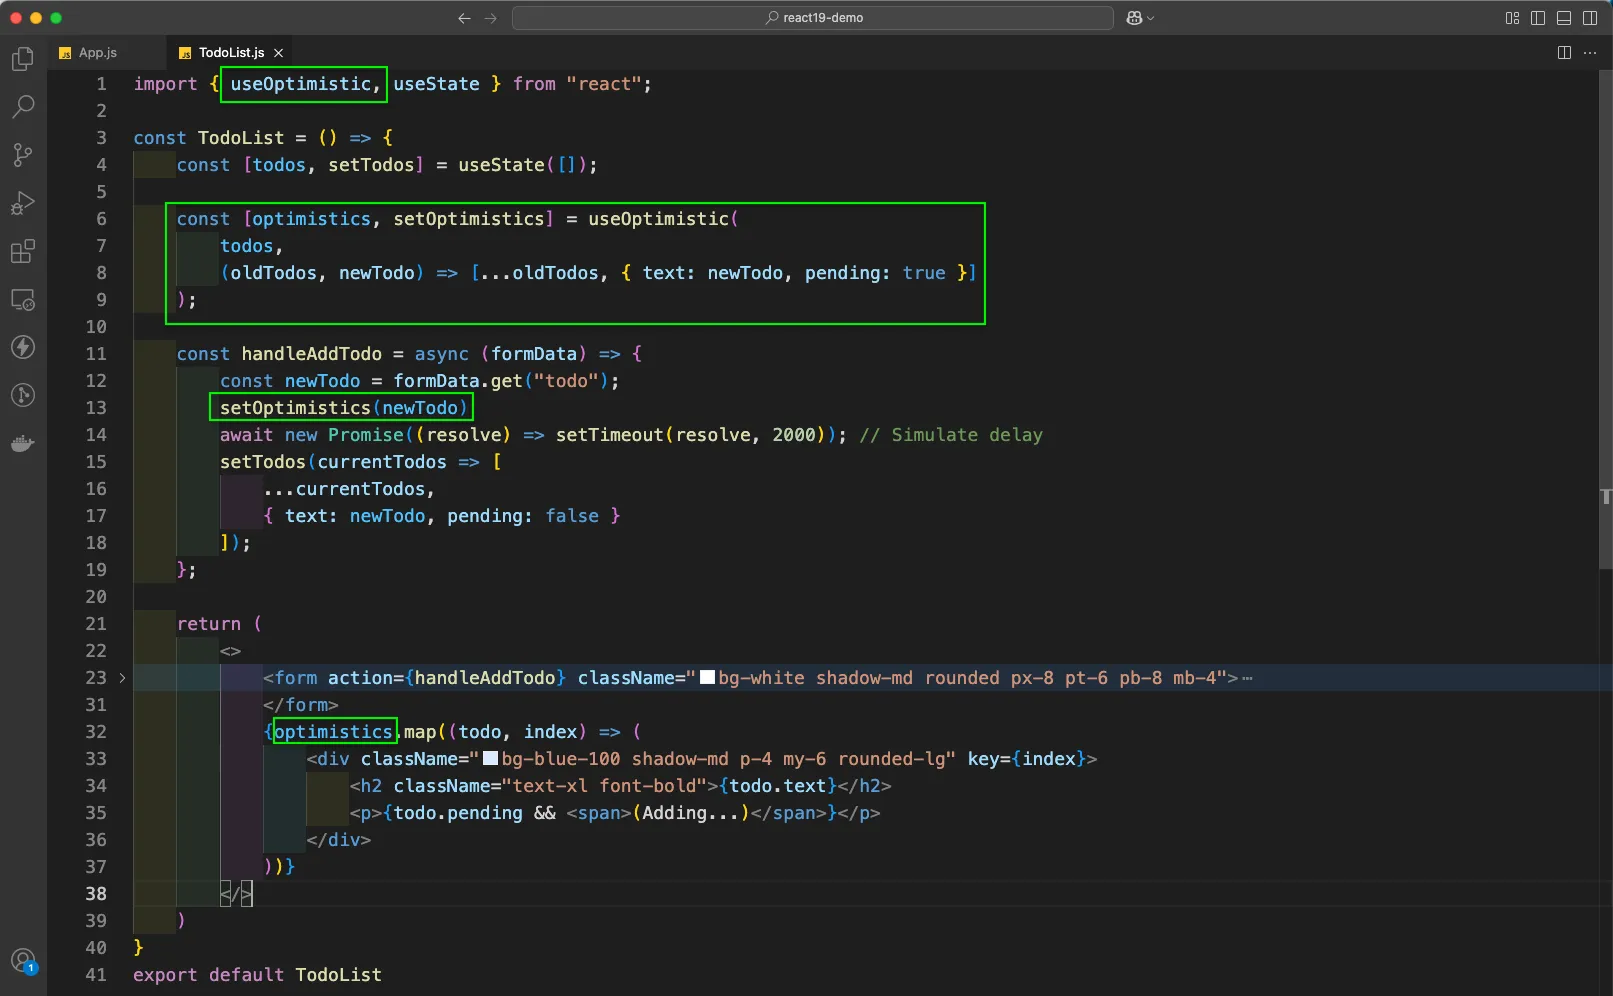
We are going to use the pending by using the useOptimistic hook. Here, we have defined an optimistics state, which can be changed with setOptimistics. The syntax is quite similar to the useState hook.
Inside useOptimistic, we are taking the todos state as the first parameter. The second parameter is a function which takes oldTodos and newTodo. Inside the function the oldTodos is spread and we add text as newTodo and set pending to true.
Inside handleAddTodo we are using setOptimistics and passing the newTodo. Inside the return statement, instead of todos we are passing the optimistics array.
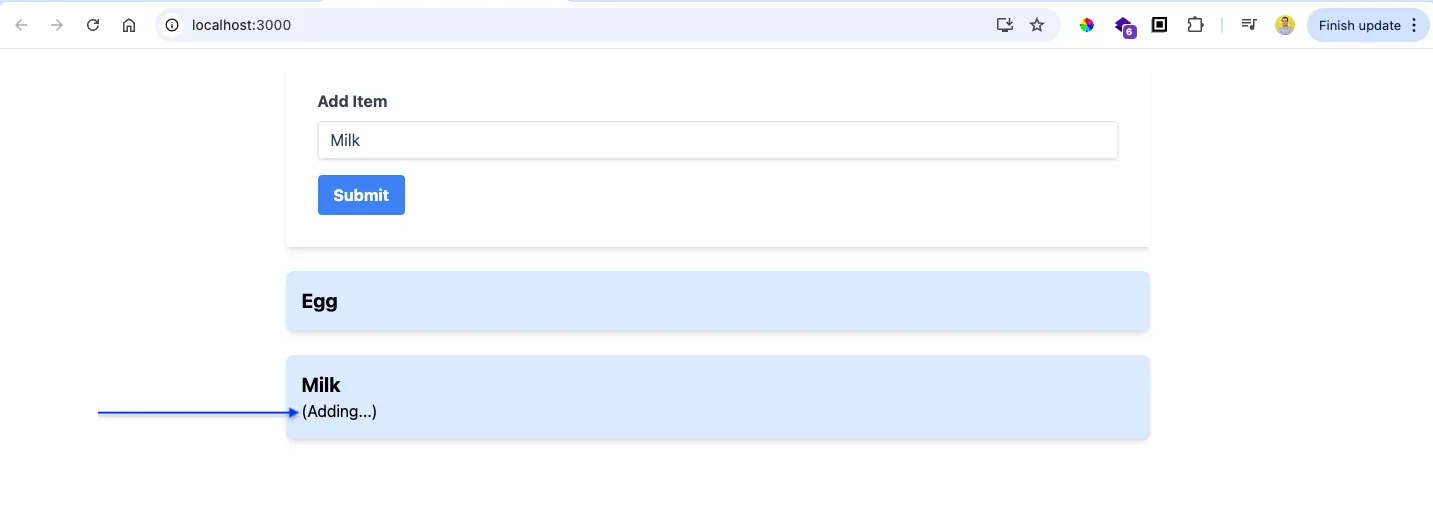
In the browser after adding an item and clicking the Submit button we will see the (Adding…) for 2 seconds.
ref as a prop
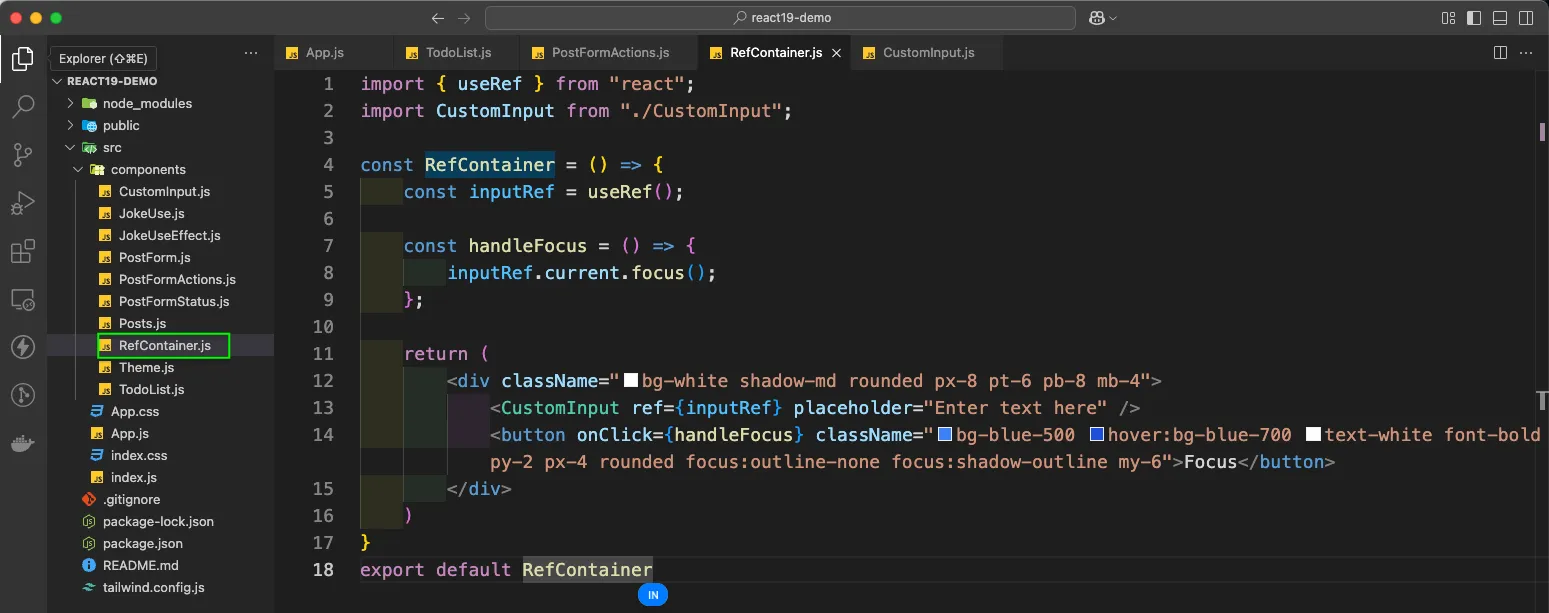
Now, we will look into the changes around forwardRef. For this we will create a new file called RefContainer.js and add the below code in it.
Here, we have an inputRef and that is passed as a ref to a CustomInput component. The button onClick will call handleFocus, which will focus the input.
Next, we will create the CustomInput.js file where we need forwardRef to get the ref. Here, we are using the ref on an input.
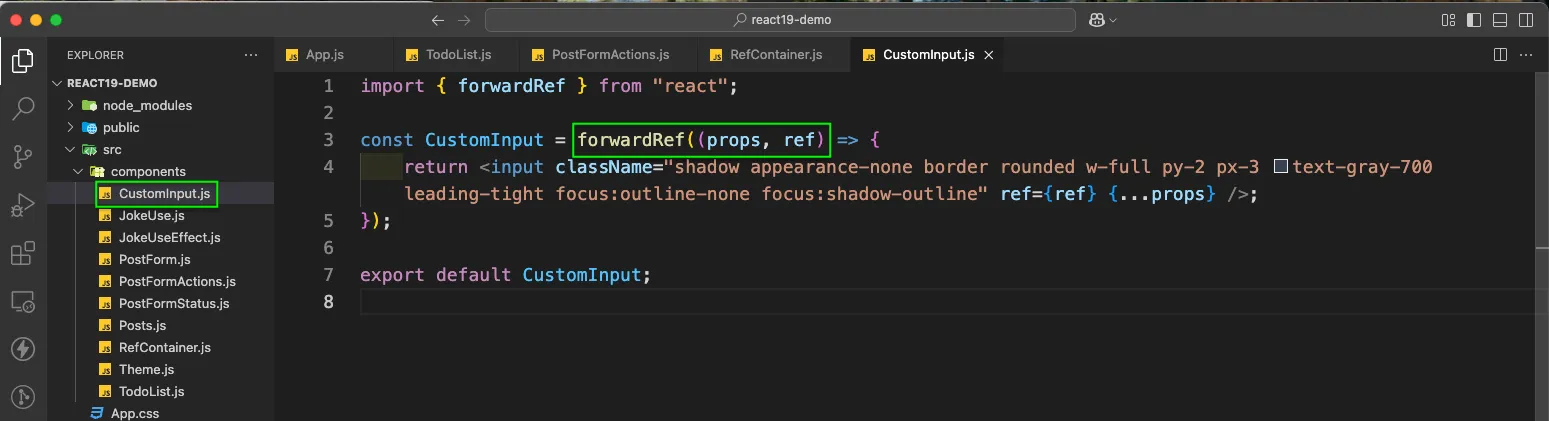
In the browser when we click on the Focus button the input will receive focus.

Now, the change in React 19 is that instead of forwardRef we can use the ref as a normal prop, as in the code below.

Our focus still works the same in the browser.

Document metadata
React 19 lets you render document metadata tags like <title>, <meta>, and <link> from any component. React hoists them into the document <head> automatically — no extra library needed for basic cases.
Create a file called PageMeta.js:
function PageMeta() {
  return (
    <>
      <title>React 19 Demo — Nabendu Blog</title>
      <meta
        name="description"
        content="A walkthrough of React 19 features including use, Actions, and useOptimistic."
      />
      <meta name="keywords" content="react, react 19, javascript" />
      <div className="p-4">
        <h2 className="text-xl font-bold">Document Metadata</h2>
        <p className="mt-2 text-gray-600">
          Check the browser tab title and page source — the title and meta tags
          above are hoisted into the document head by React 19.
        </p>
      </div>
    </>
  );
}

export default PageMeta;
Render PageMeta from App.jsx. The browser tab title should update to React 19 Demo — Nabendu Blog, and the description meta tag will appear in the document head.
For Server Components, Server Actions, and the React Compiler, those are covered better in a Next.js app — see my Next.js 15 crash course for that side of the ecosystem.
Wrap up
This completes our React 19 demo. You can find the code for the same here.