Kafka Crash Course
Devops
In this Kafka crash course we will understand what is kafka and also write some code to learn about it. This post have been inspired by this awesome Youtube video by Piyish Garg.
Kafka solves a very big problem in the tech industry and we will learn about the problem now. Let’s take the example of the famous food delivery app Zomato.
When we order something on Zomato, we also get the live location of the delivery partner. The delivery partner mobile sends live location to Zomato Server from the start to every 1 seconds. This live location is stored in Zomato database, for future analytics. It is also sent to the customer every second on his app.
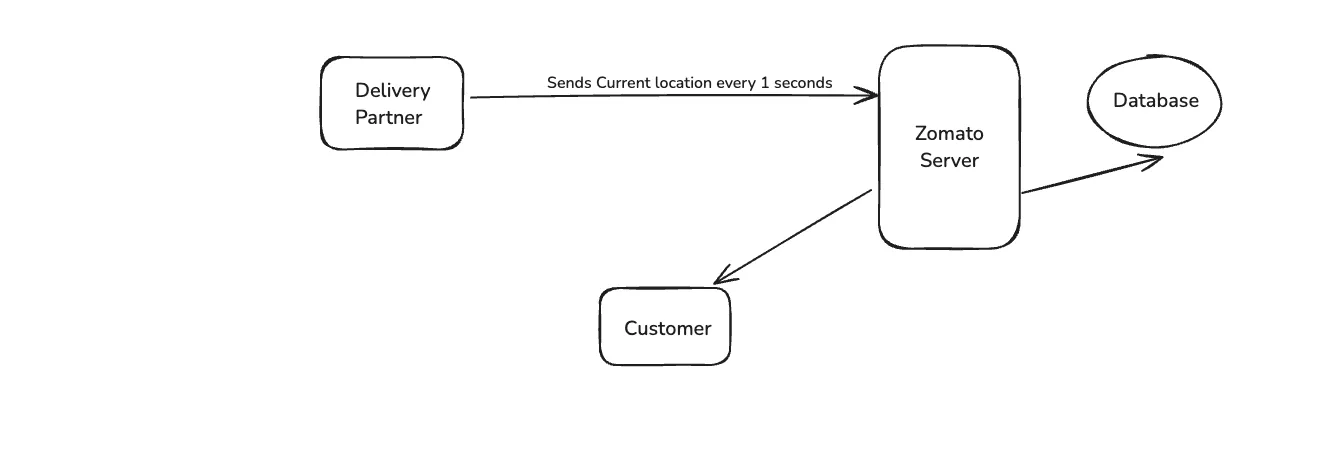
Let us understand the problem here. The database inserts happening here are for a single driver after every one second. But in India there will more then 100,000 delivery partners, who are sending their location data every one second.
Lets assume Zomato is using PostgreSQL and these insert are been done in it. With this amount of data the database will be down within 1 min, because the OPS(Operation Per Second) is very high.
Now the throughput of databases are very low. Throughput is the number of operations we can do per seconds. Operations means the reads and writes which we can do in a database.
Now, we know the problem and this we solve through Kafka which has high throughput. Means even if we put 100,000 records per seconds it will handle it.
But Kafka is not an alternative to databases, because it have high throughput. But the storage is temporary and very low. It cannot hold the large amount of data for a long time.
The databases on the other hand have low throughput but the storage is quite high. And they can even store billions of data with ease. Also, in databases we can query the data easily, but not in Kafka.
Kafka is solving our throughput problem and database is solving our storage problem. So, it means we have to use them together.
Let’s take the example of Uber now. Here, we have drivers which let say is 100,000 and they generate every 1 sec data for their speed and location. This data is handled by kafka, which then sends it to different services in Uber.
Lets say their is a Fare Service, Analytics Service and Customer service. It is sent to them ans they do their analysis and then do a bulk insert to the database. The bulk insert can take 2–5 minutes and it doesn’t matter as the live data is handled by kafka.
The drivers who generates the data is knows as Producers in Kafka and servers which consume the data are known as Consumers in Kafka.

Now, let us understand the top view of architecture for Kafka. Let’s take the case of Zomato again. Here, we have two kind of Producers — Drivers and Restaurant.
The user gets the details of the meal status along with driver status on the app. So, the driver also sends his data and the restaurant also sends the data.
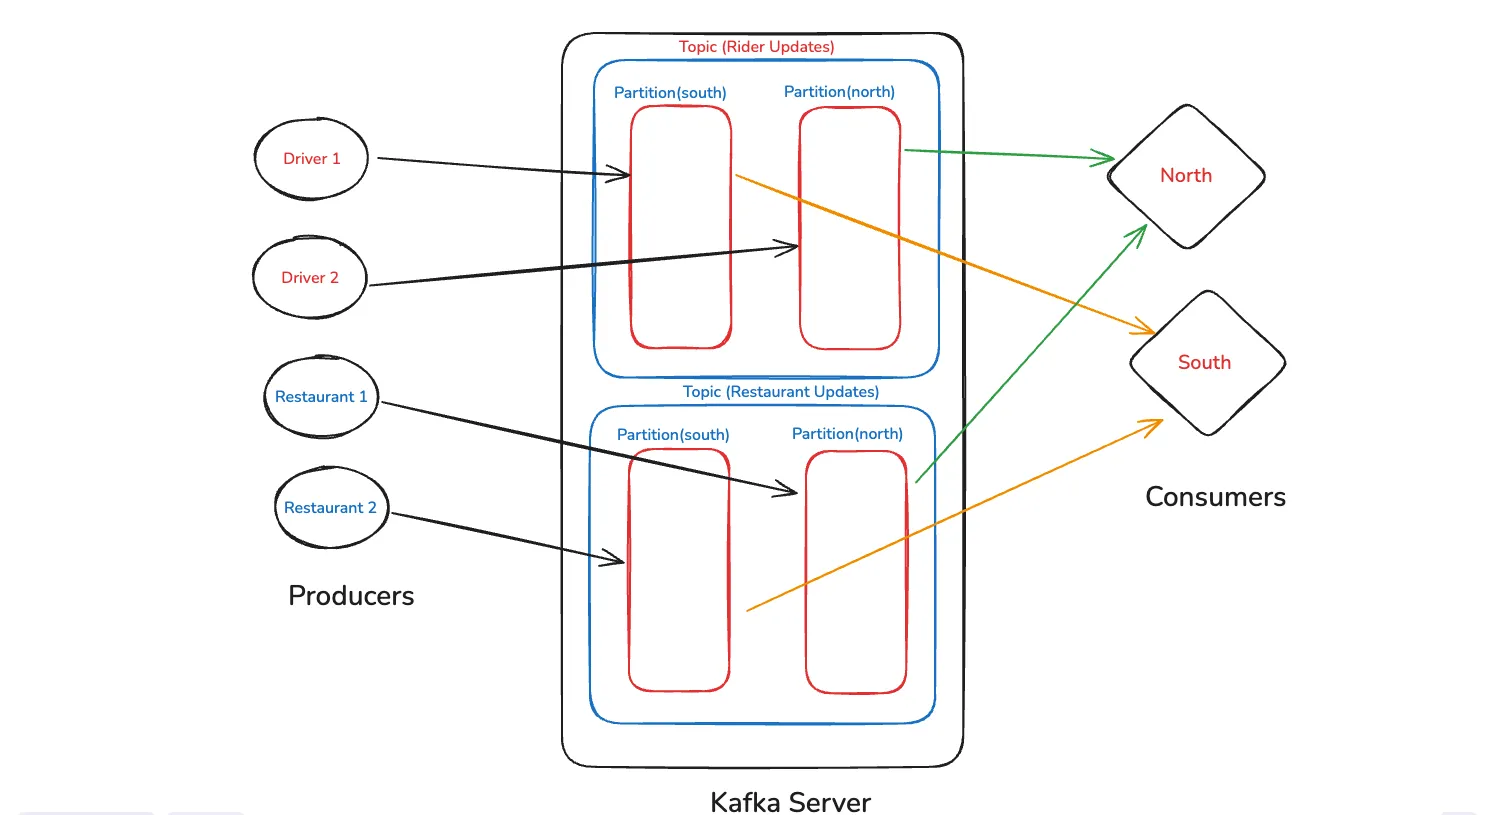
Since, Zomato kind of food delivery applications have huge number of restaurants and drivers, we divide it by regions. As in the diagram below the Kafka Server have Topics. One can be for Rider Updates and other can be for Restaurant updates.
The topic is further divided into partitions. Here, we divide it by regions. So, all the rider updates from the Southern states of a country will go to the South partition and Northern states will go to the north partition. Same will apply for the Restaurant.
Now, the Consumers which are the zomato servers are again divided into North and South. This way it handles the data efficiently.
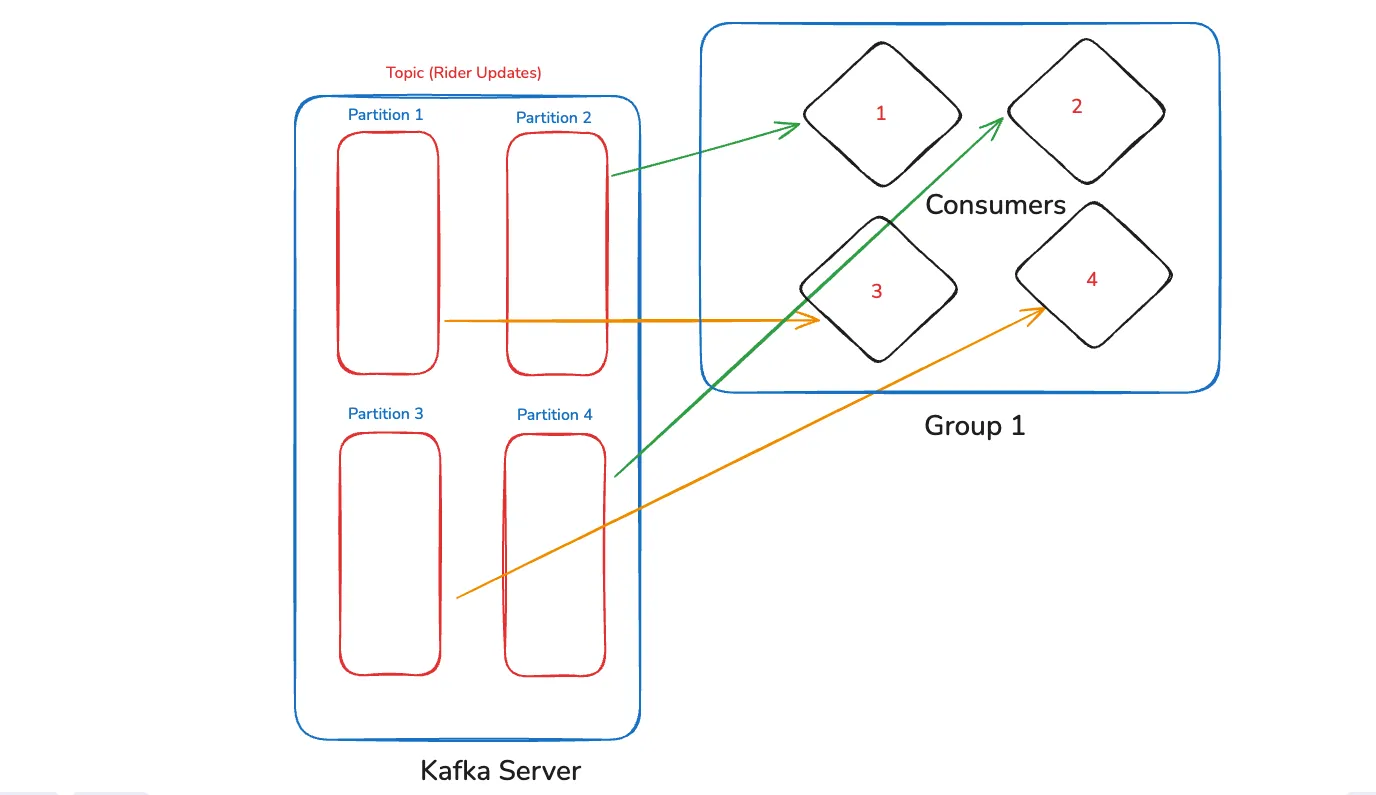
Lets go a bit more technical on topics. We will understand with one topic the concept of auto-balancing. We have a topic for rider updates, which have 4 partions — one for east, west, north and south of the country.
Now four drivers sends per second updates to different partitions and we have two consumers. Then both consumers which are servers will get equal number of data. Two to Consumer 1 and two to consumer 2.
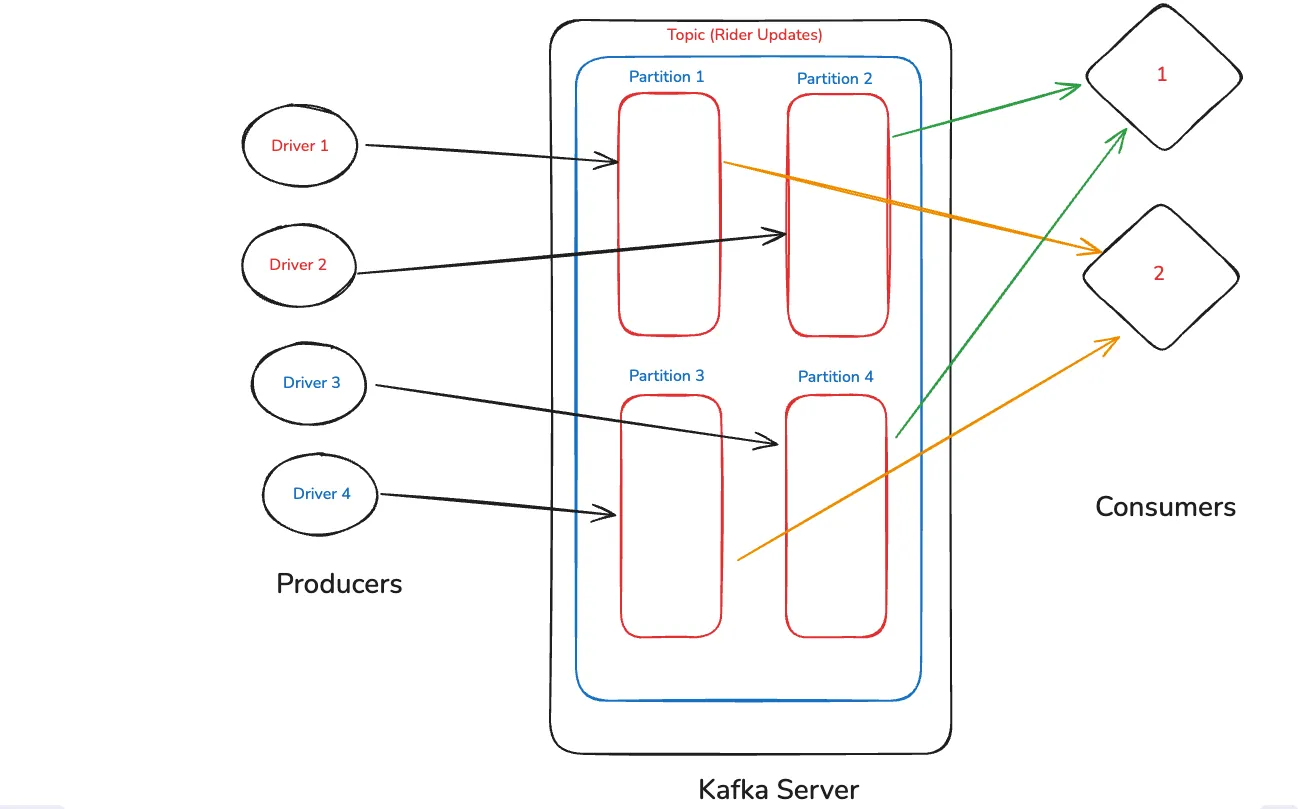
Suppose our data volume is increased and we decide to add two more consumers. Now four data from the Producers will be equally divided. Each of the consumer server will get one data.
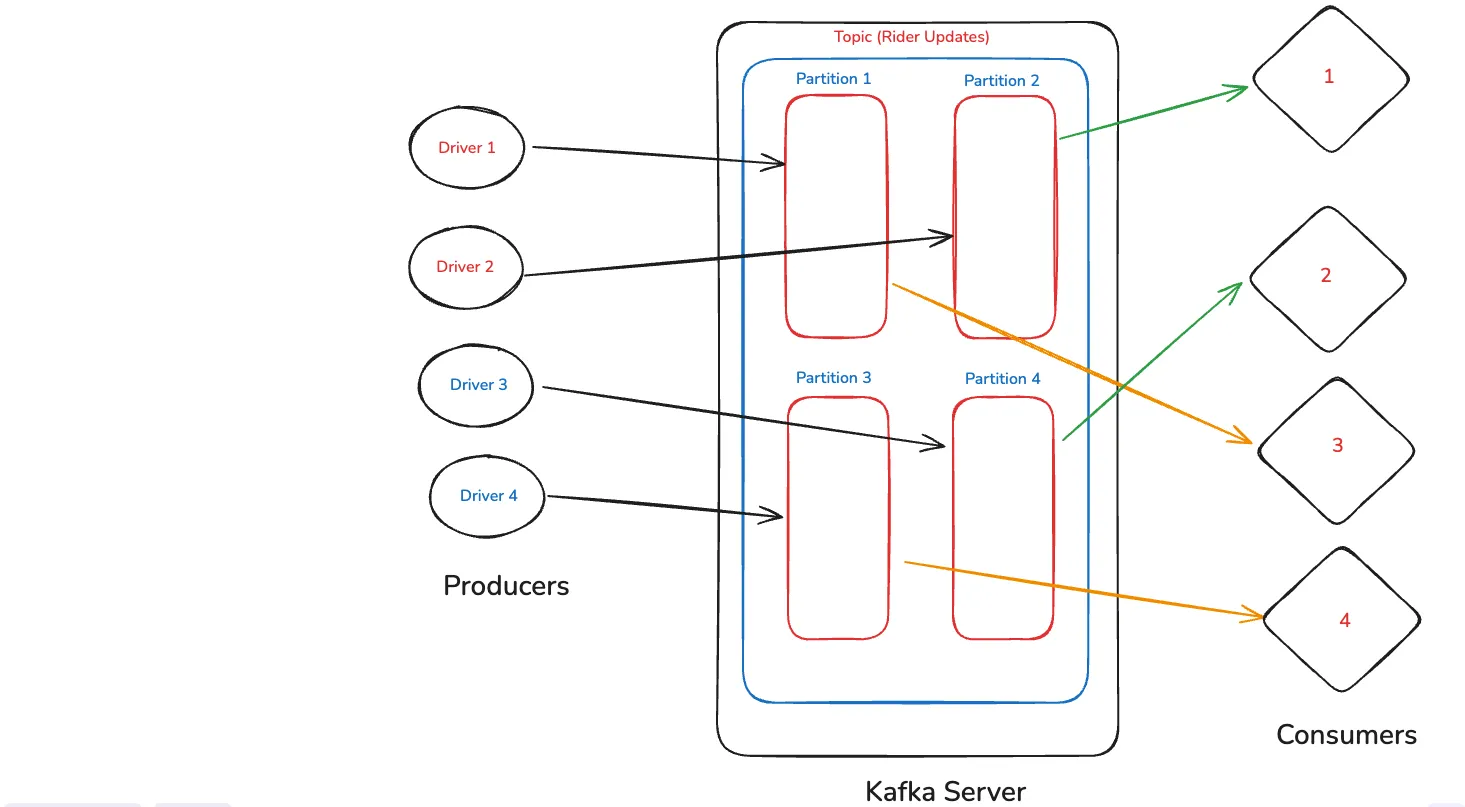
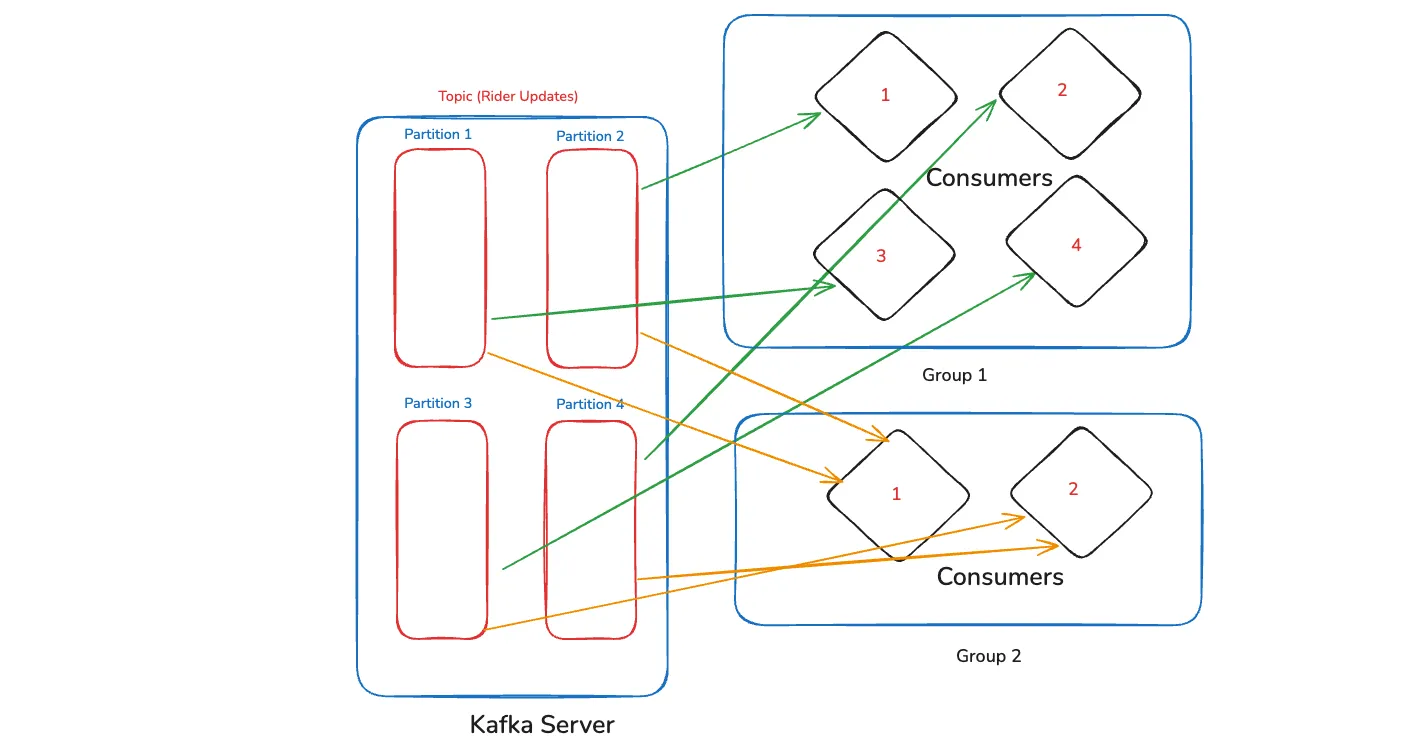
The next thing which we will learn here is consumer groups. Here, the consumers are divided into groups. In the first case we have only one group with 4 consumers. Since we have four partitions, so each data will come to one consumer, due to load balancing.
We can have more groups also. Like in the below case we have a Group 2 with two consumers only. Now, the Group 1 with four consumer will receive one data from each partition.
The Group 2 will also receive data, but since it have two consumer only. SO, each consumer will receive two data.
There is a concept of Queue and Pub-Sub in Queuing systems. The systems like RabbitMQ and SQS uses Queue which are FIFO(First In First Out). But Kafka can behave like a Queue(Equal partitions and consumers) and also as a Pub-Sub through multiple groups.
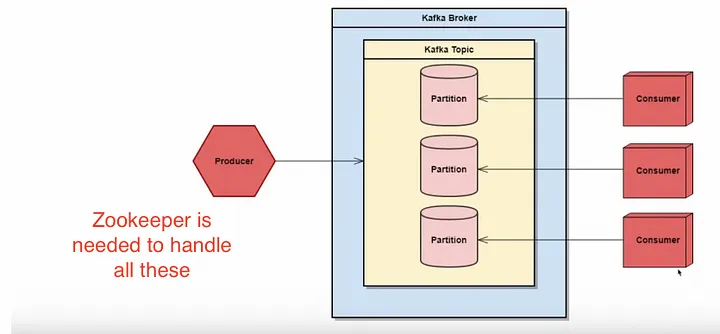
Now, we will write some code, for which need NodeJS and docker installed on your system. For Kafka we need a tool called Zookeeper, which kafka uses internally.
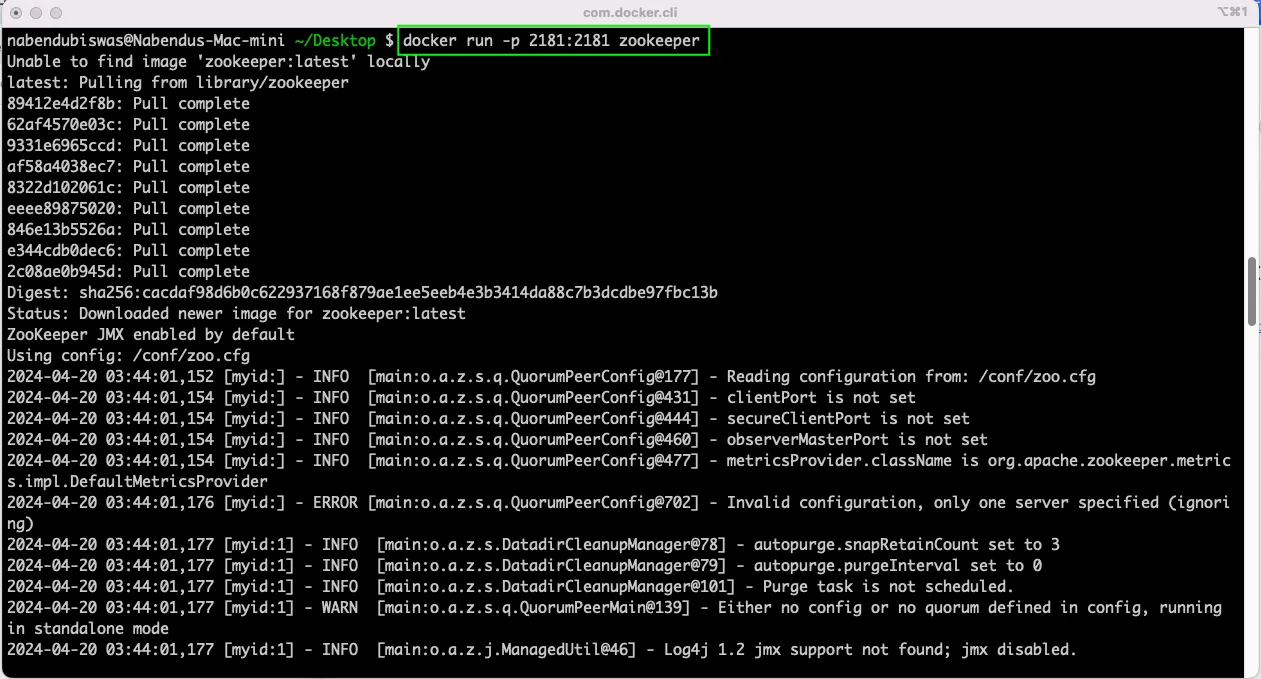
So, open the terminal and run the below command. It will run zookeeper on it’s default port of 2181.
Now, we also need to run Kafka. But for that we need to know the IP Address of the system. We can run ipconfig command to find it. But on a Mac, we can also find it by going to the System Preferences.
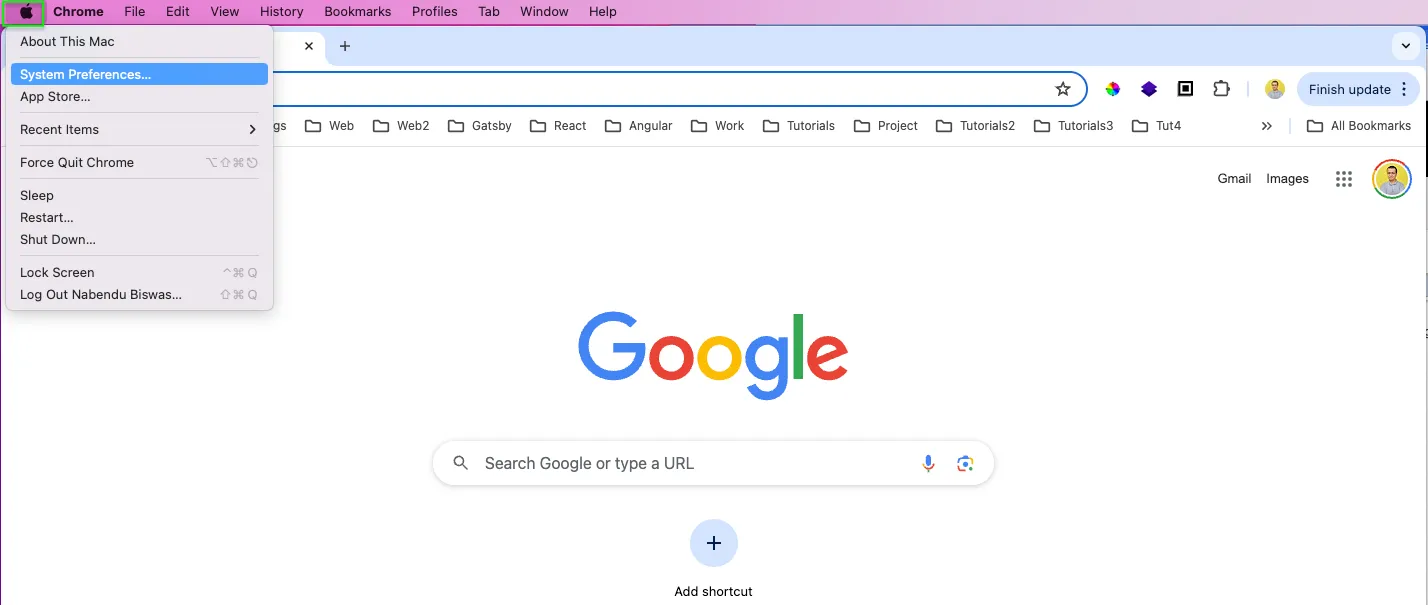
After that click on the Network icon.
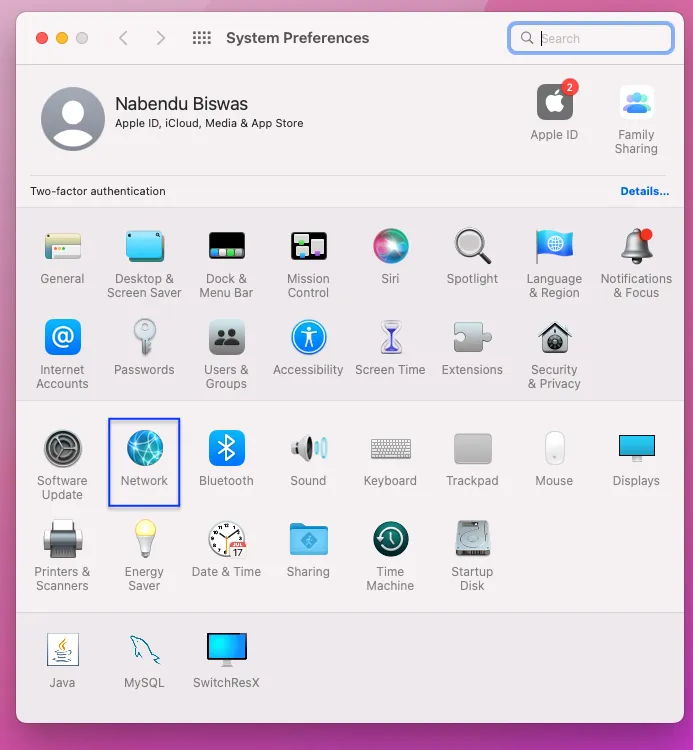
Next, you will get the IP address on the Ehernet or Wi-Fi through which you have connected.

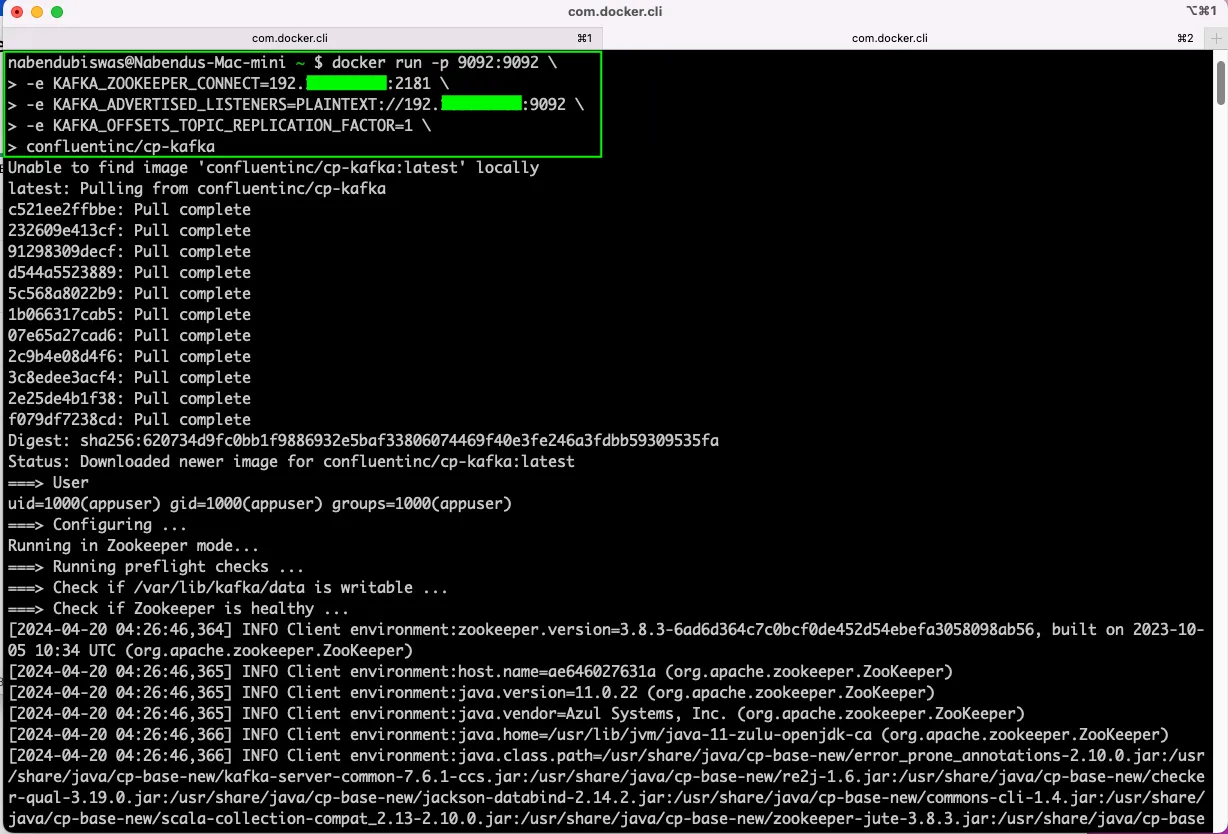
Now, open another terminal and give the below command. Here in first line we are telling to run kafka on port 9092, then connect to zookeeper with our private IP on port 2181.
Then we have to give the advertised listener, which we telling kafka on which IP address and port it is running. Then we have to tell how many replications we want which is 1 in our case.
Lastly, we have to give the official name of the image from docker hub, which is conluentinc/cp-kafka. On hitting enter finally, we have kafka running on our system.
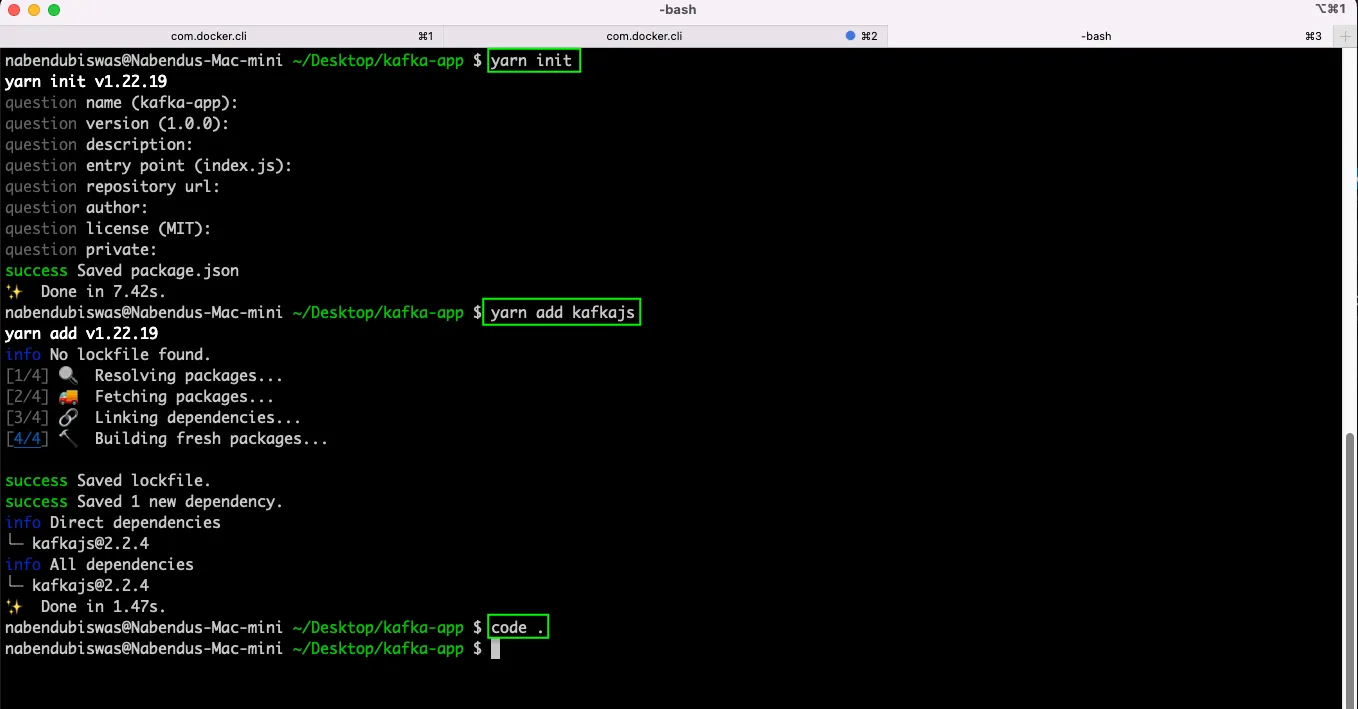
Now, we will make a project. So, we have created a directory and changed to it.

To interact with kafka, we will use a library called kafkajs. So, in the terminal first do yarn init and then add the kafkajs module. Finally, we are opening the project in VS Code.
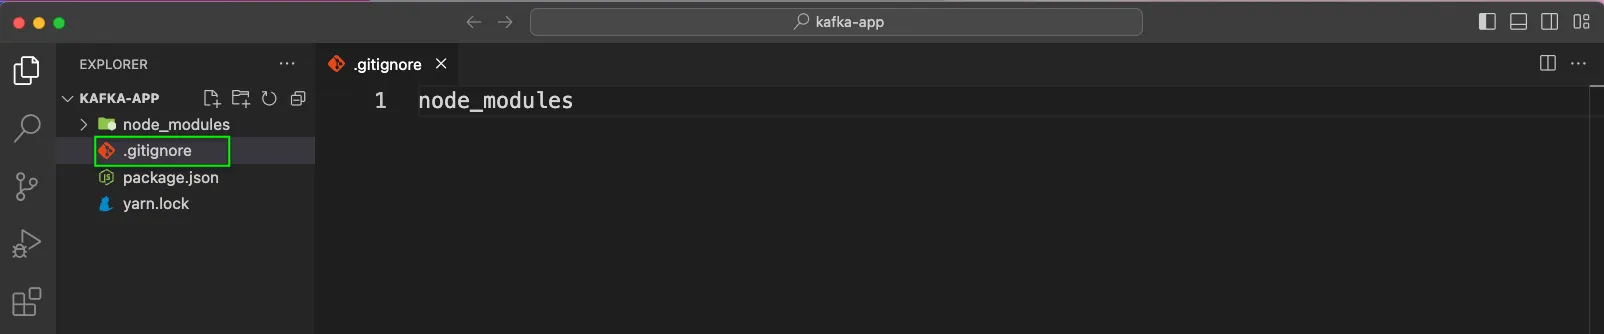
As we should always do in a NodeJS application. Created a .gitignore file and added node_modules in it.
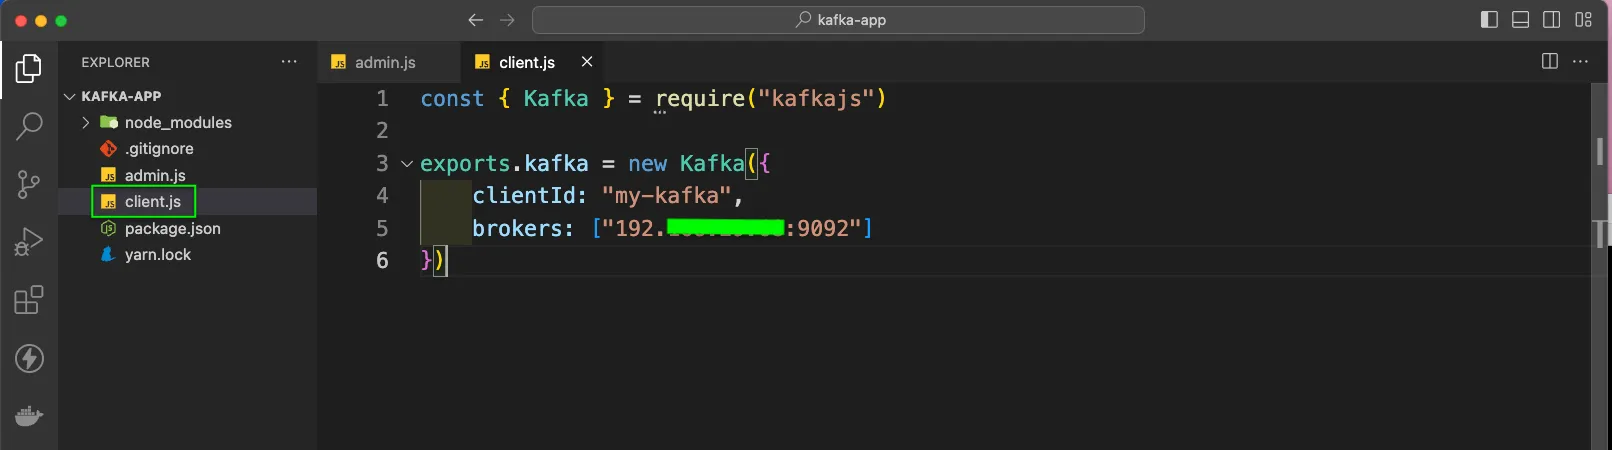
First create a file called client.js. Here, we are first importing Kafka from kafkajs. Now, we will export a new Kafka instance, which will take a clientId. We can give any unique name in it.
Next in brokers we need to give the IP address with the port 9092.
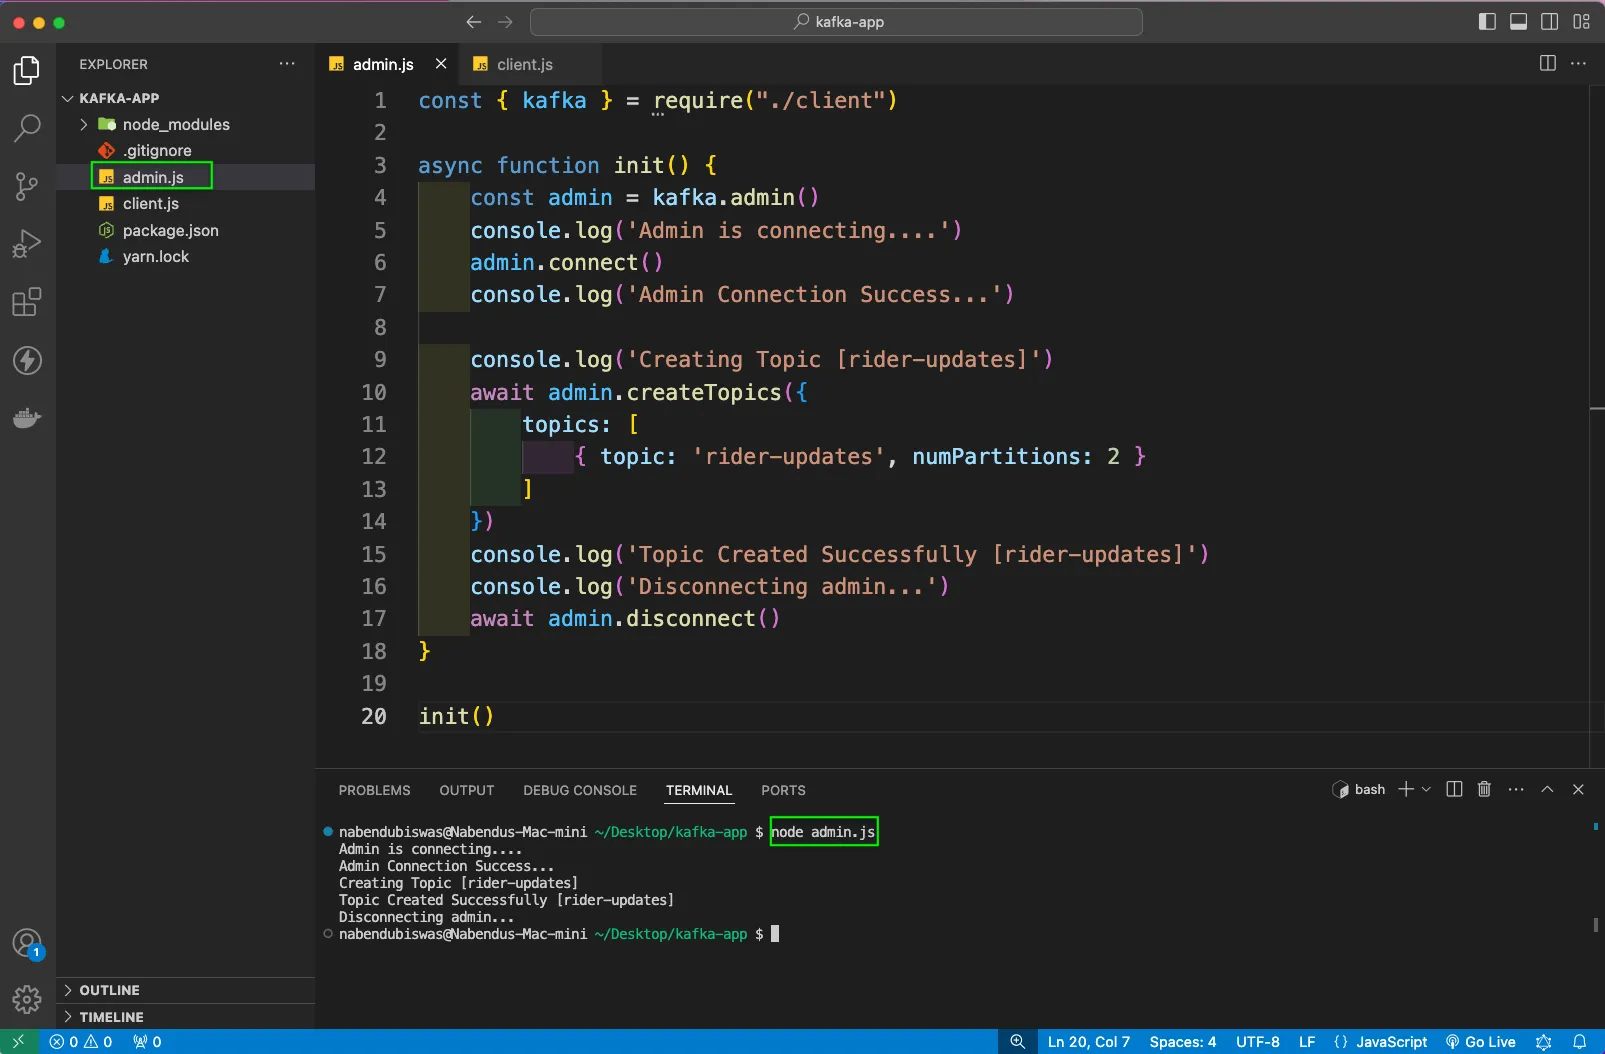
After that create an admin.js file. Here, we are first importing the client. Next, we will create an async function called init(). Inside it we are first creating an admin.
We have consolelogs and with admin.connect() we are starting the admin. Now, we need to create topics. For this we have a createTopics() which takes an object as parameter.
Inside it we have a topics array, which again takes an object. We are giving the topic a name and the numPartitions which is 2 in our case. After having some console logs, we are disconnecting the admin.
Finally, we are calling the init() function. To run the admin we will give the command node admin.js from the integrated terminal.
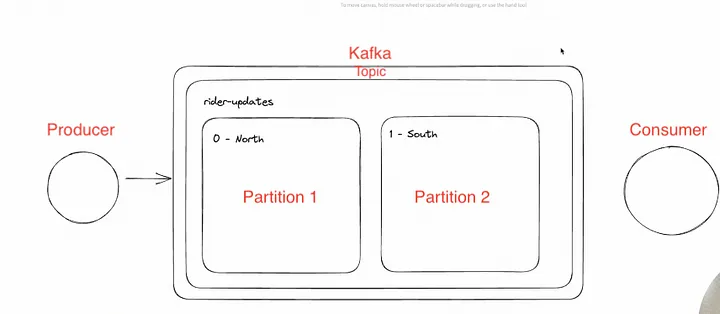
We have created something like below. Here, we have a topic and two partitions in it. Maybe the north and south as discussed earlier.
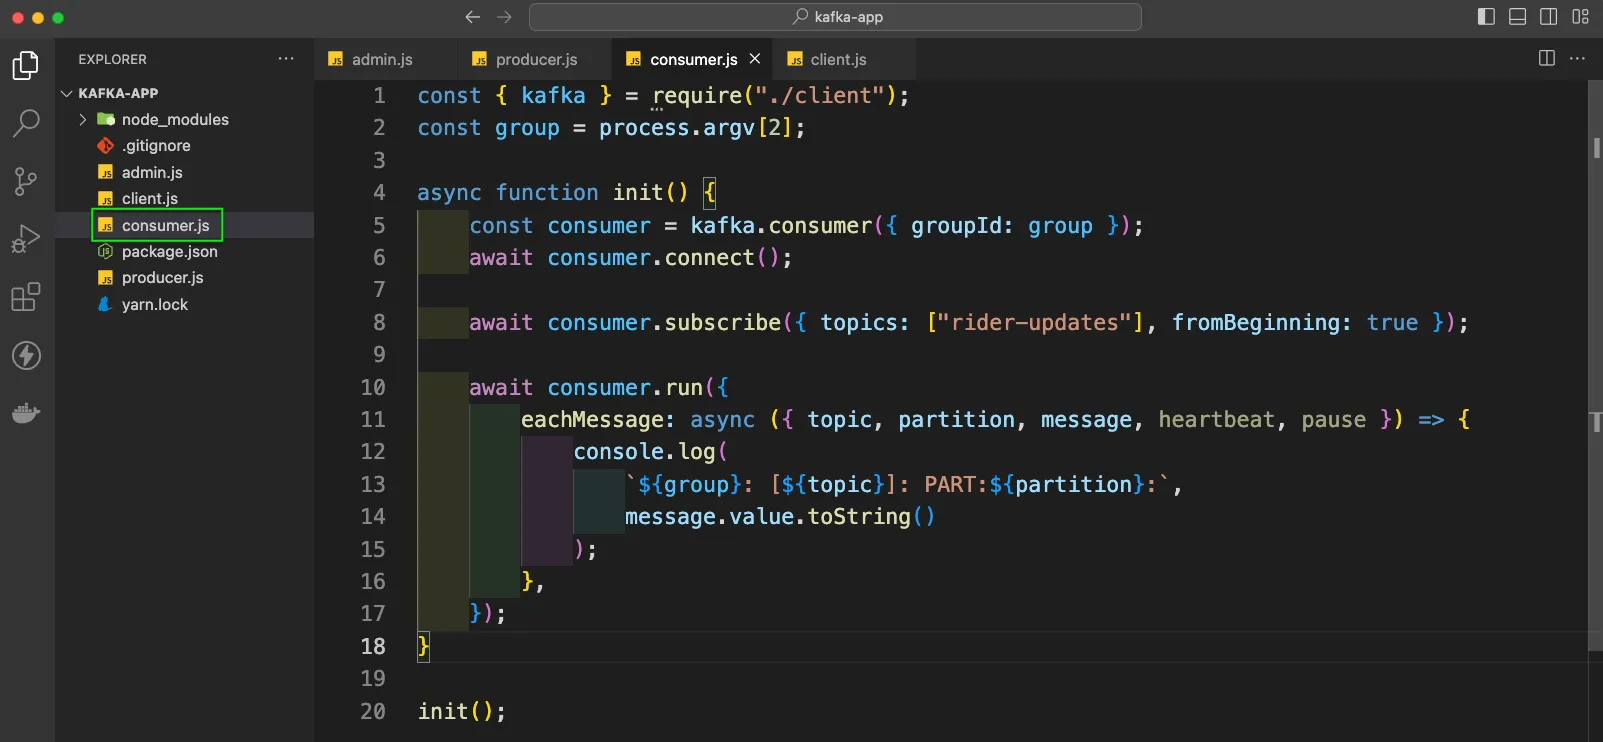
Now, we will create a consumer.js file and in it put the below code. Here, we are first importing client. Then we have a group constant, which is from argument.
Now, inside the async function init, we have a consumer constant. In this constant, we are passing the group in groupId. After that we are connecting the consumer.
Next, we need to subscribe to a topic, which is rider-updates in our case. Also have to pass a parameter of fromBeginning true.
Next, we are running the consumer and in a object using eachMessage(like a for loop). Here, we are console logging the group, topic, partition and the message.
Finally running the init() function.
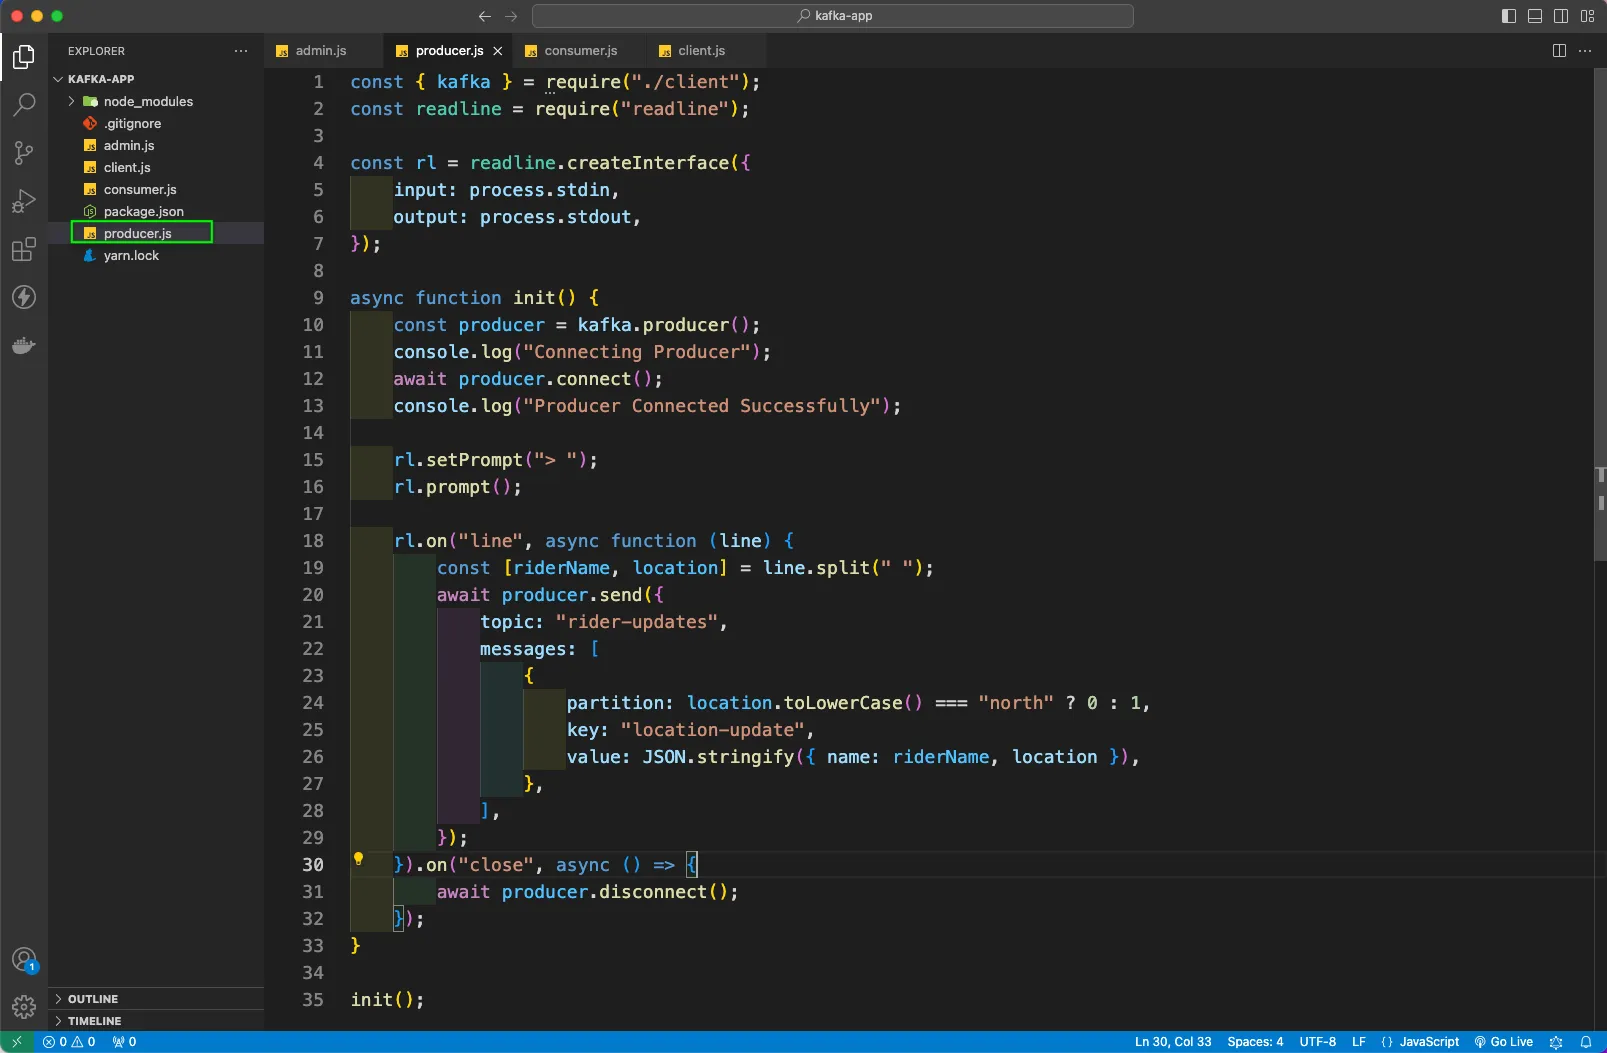
Now, we will create a producer.js file and in it put the below code. Here, we are importing client and readline. Next creating a constant rl we are using readline.createInterface() to take the input and output from the user.
After that we have the async init function. Here, we are creating a producer and then connecting it. Then with rl.setPrompt(“> “) we will give a > to out prompt. Next, we will start our prompt.
After that with rl.on() we will track what the user have written in line. We have an async function as the second parameter. Here, we are using line.split(“ “) to get the two inputs from the user.
Now, we have the producer.send(), where the topic name is rider-updates. The message will go to partion 0, if north or else to the other one. In the value we are passing riderName and location.
We also have a close for the on, where we are disconnecting the producer. Finally, we are running the init().
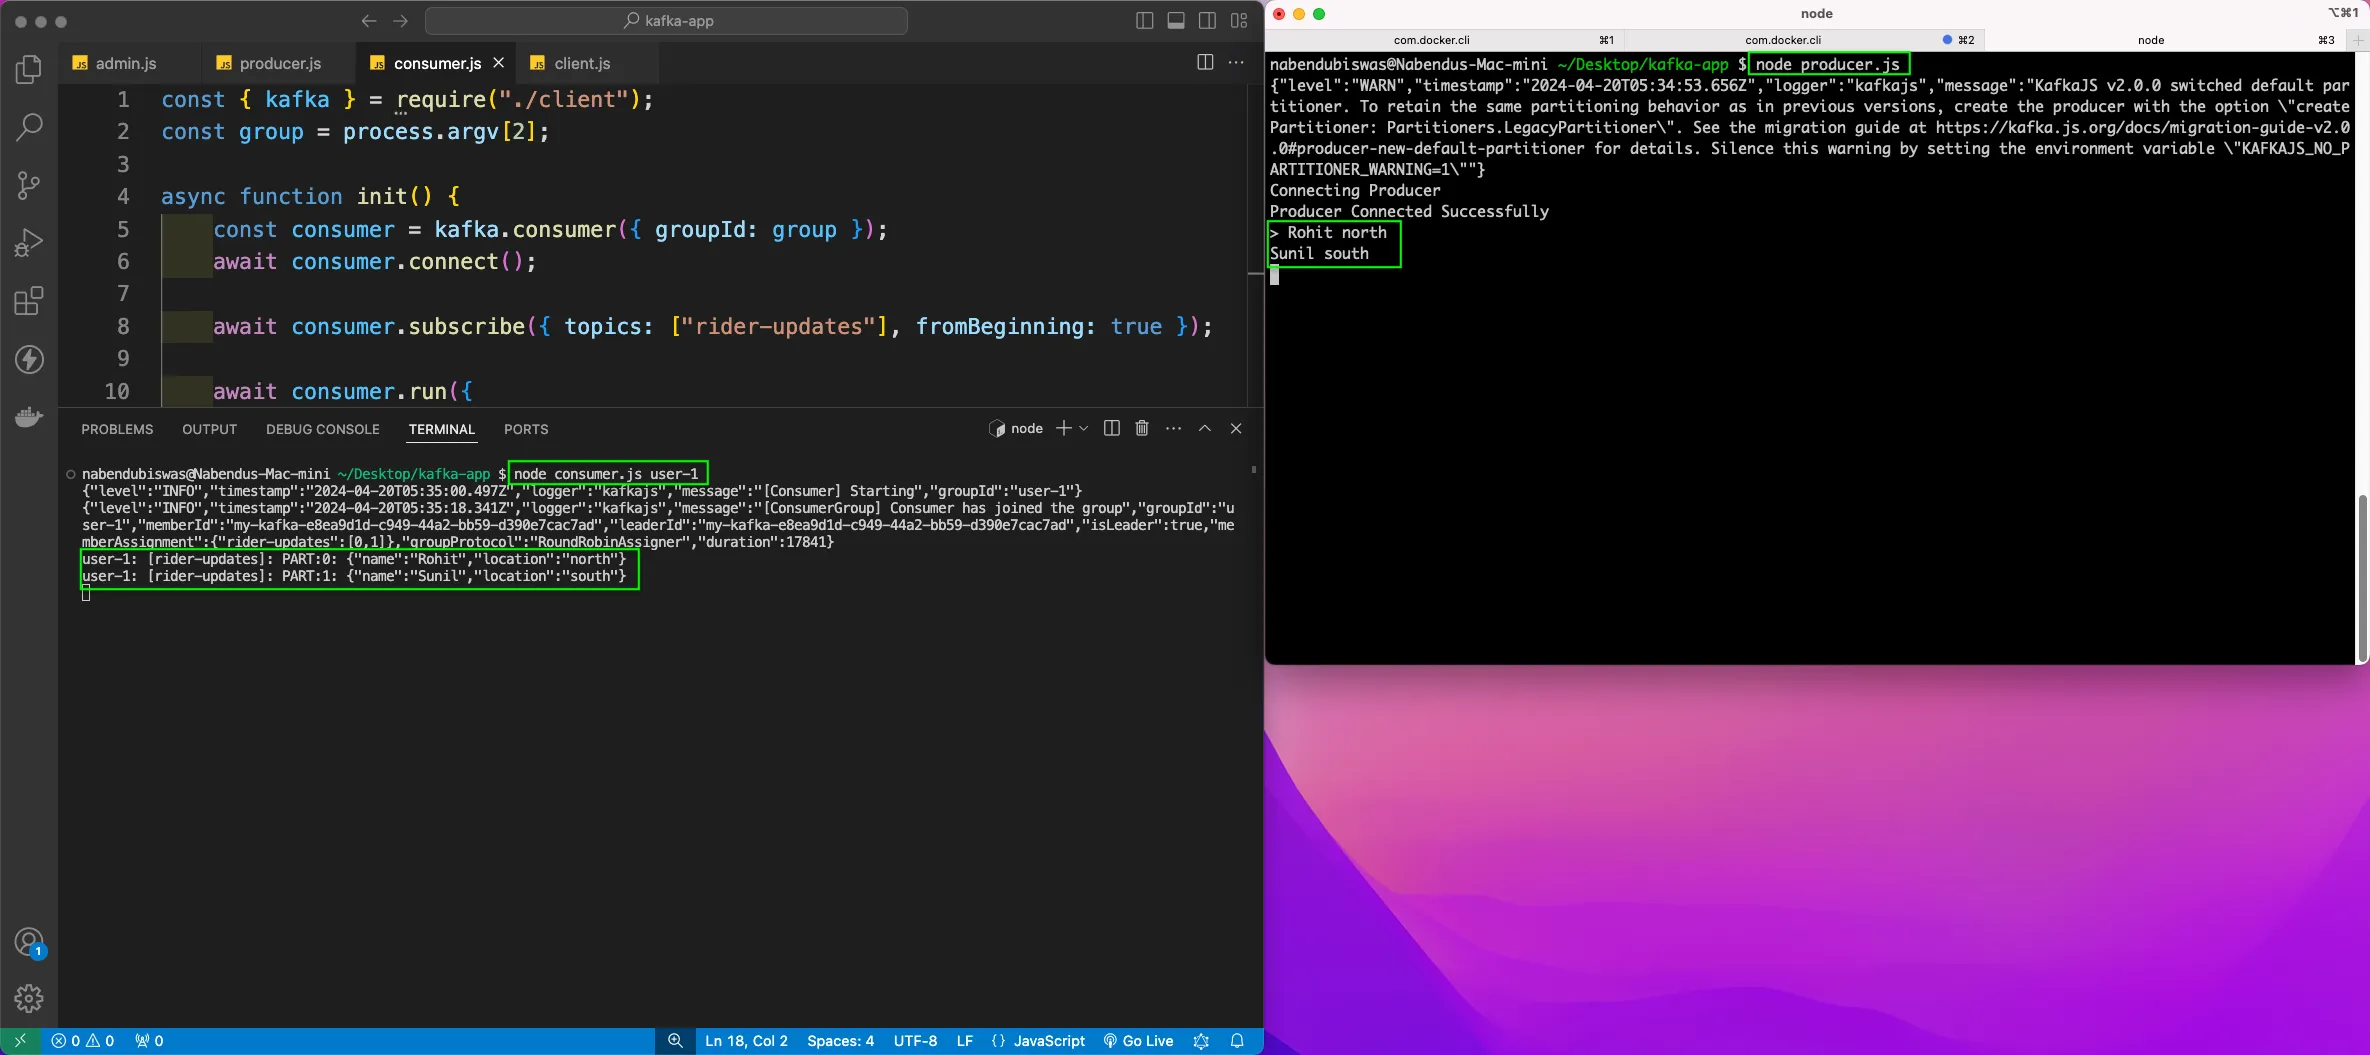
First, open a new terminal and give the command node producer.js to run the producer. Here, it will give a >, where we have given or first message of a rider with north. Then the second message of a rider with south
Now, open the integrated terminal and run the command node consumer.js user-1.Here, user-1 is the group name. We can see in console that the user-1 group is consuming both messages from the producer.
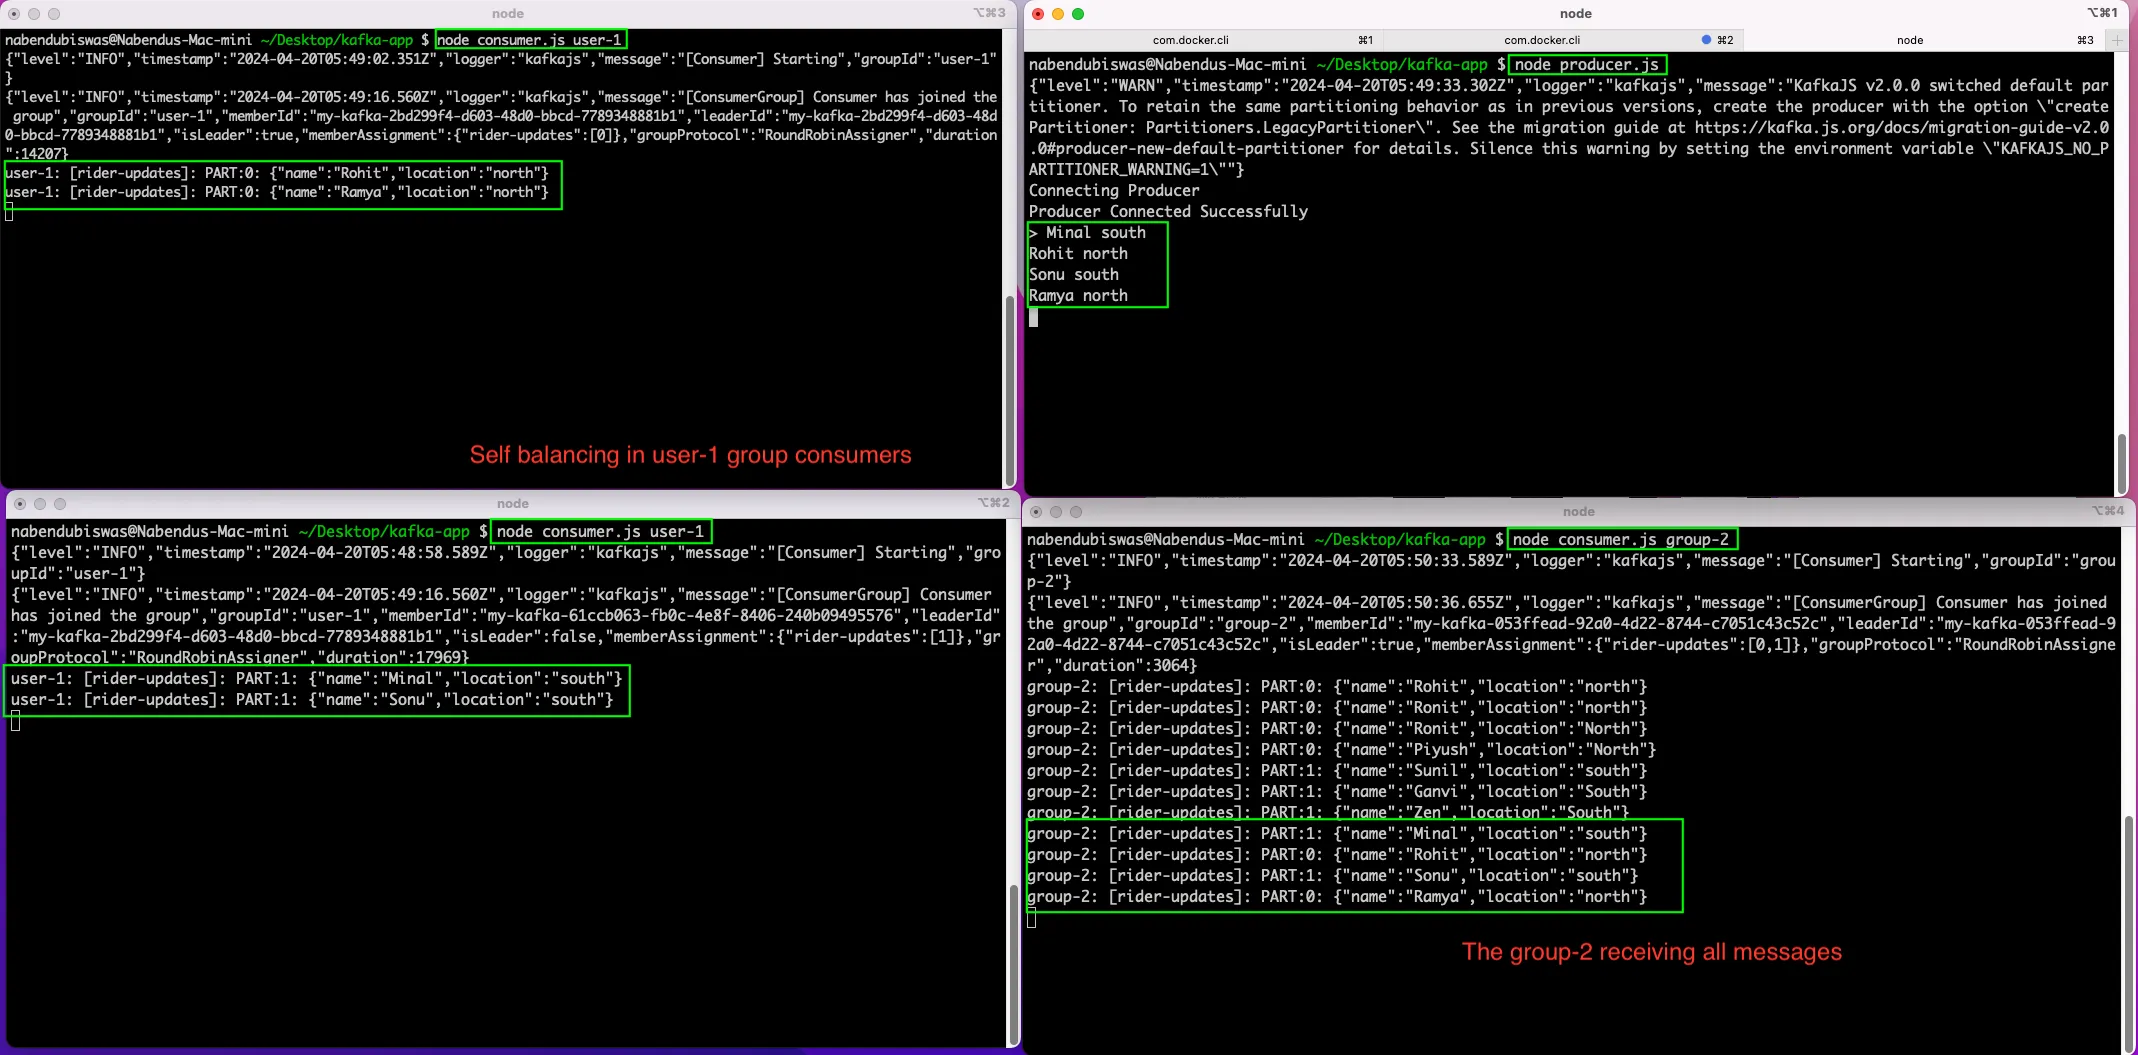
Now, again open the producer in a terminal and pass four messages. Now, we have open two consumers with user-1 group and we can see the self-balancing with two messages each. The first consumer gets north messages and second consumer gets south messages.
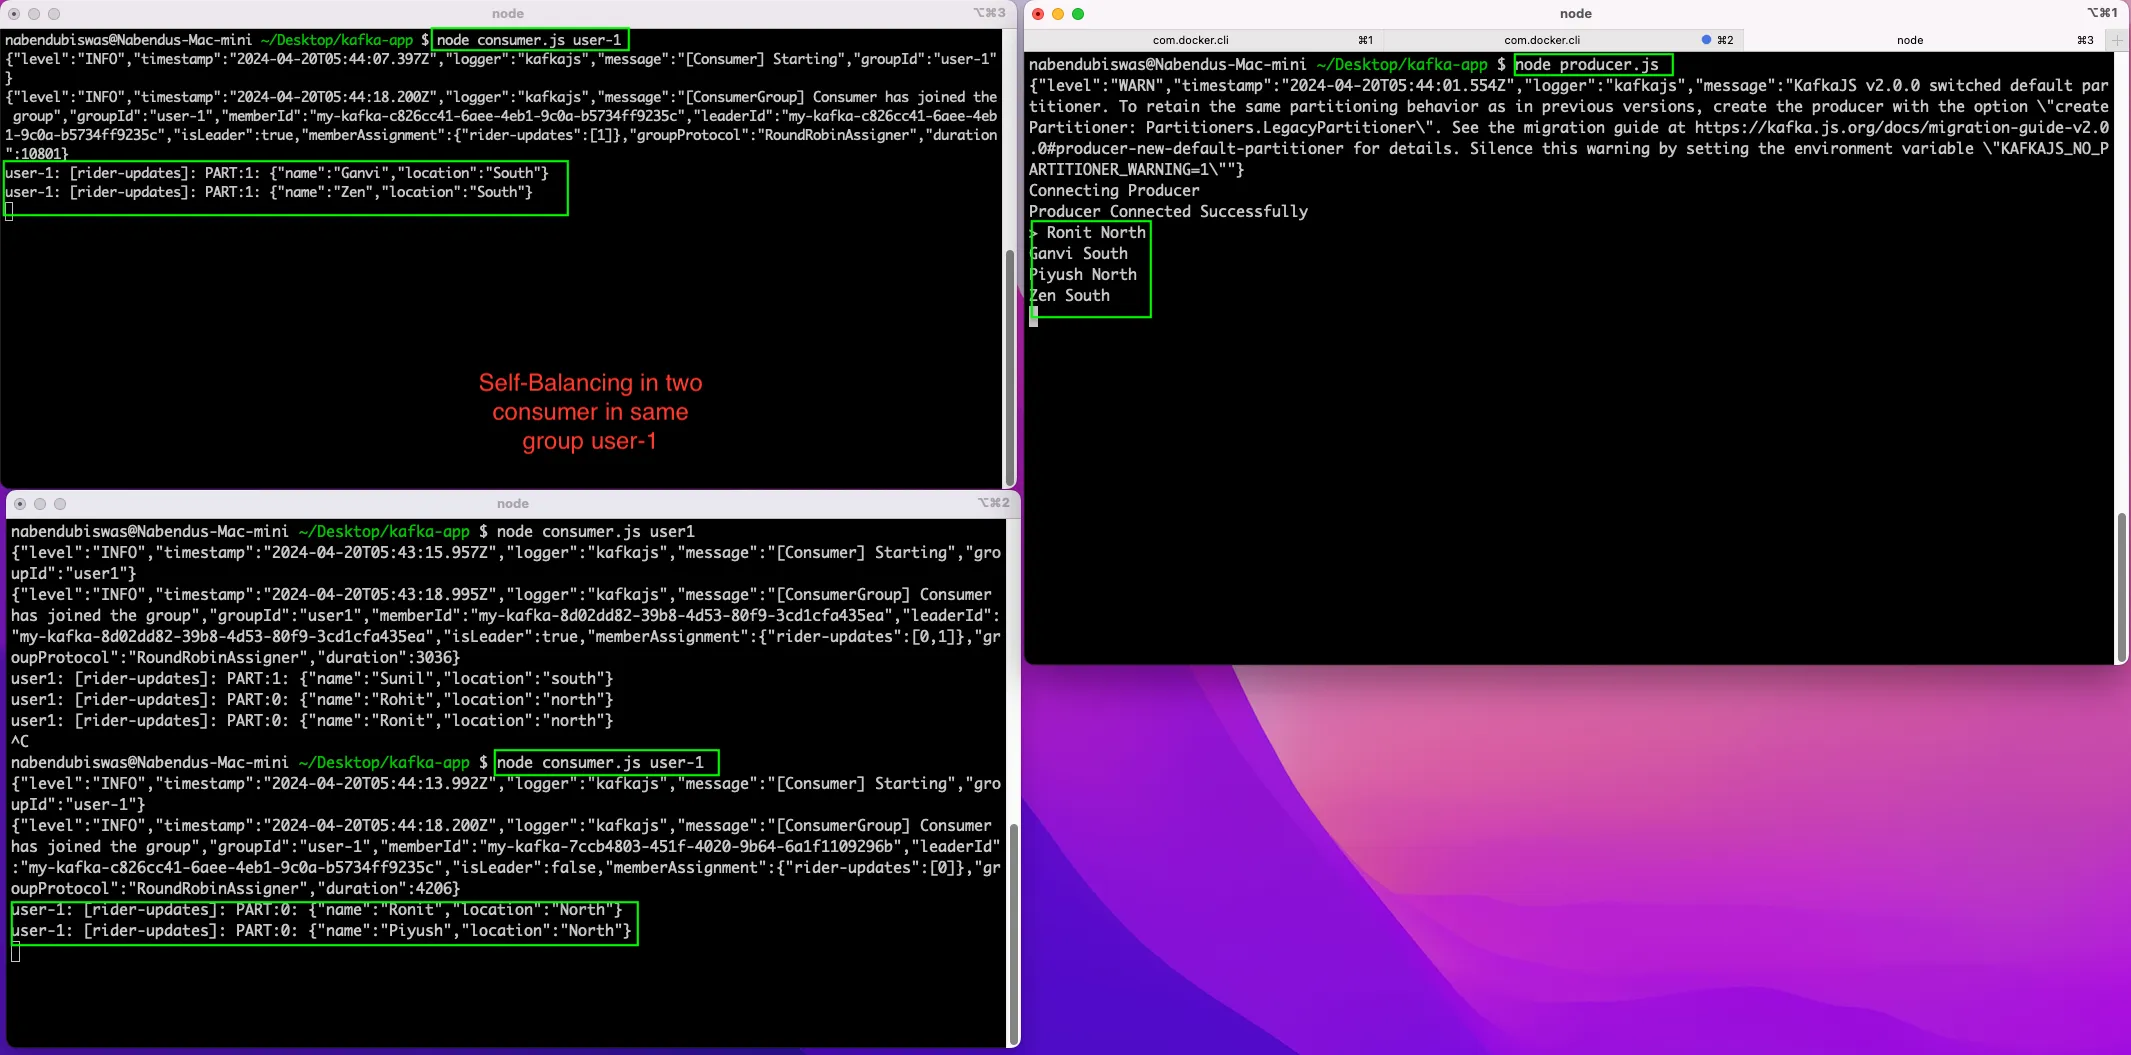
Again, we are running the producer and sending four messages. This time again we have two consumers in group user-1, behaving as earlier.
But we also have a consumer running on group-2 and it will receive all the messages.
This completes our post and you can find the code for the same here.