Employee Mgmt System in MERN - 1
ReactJS
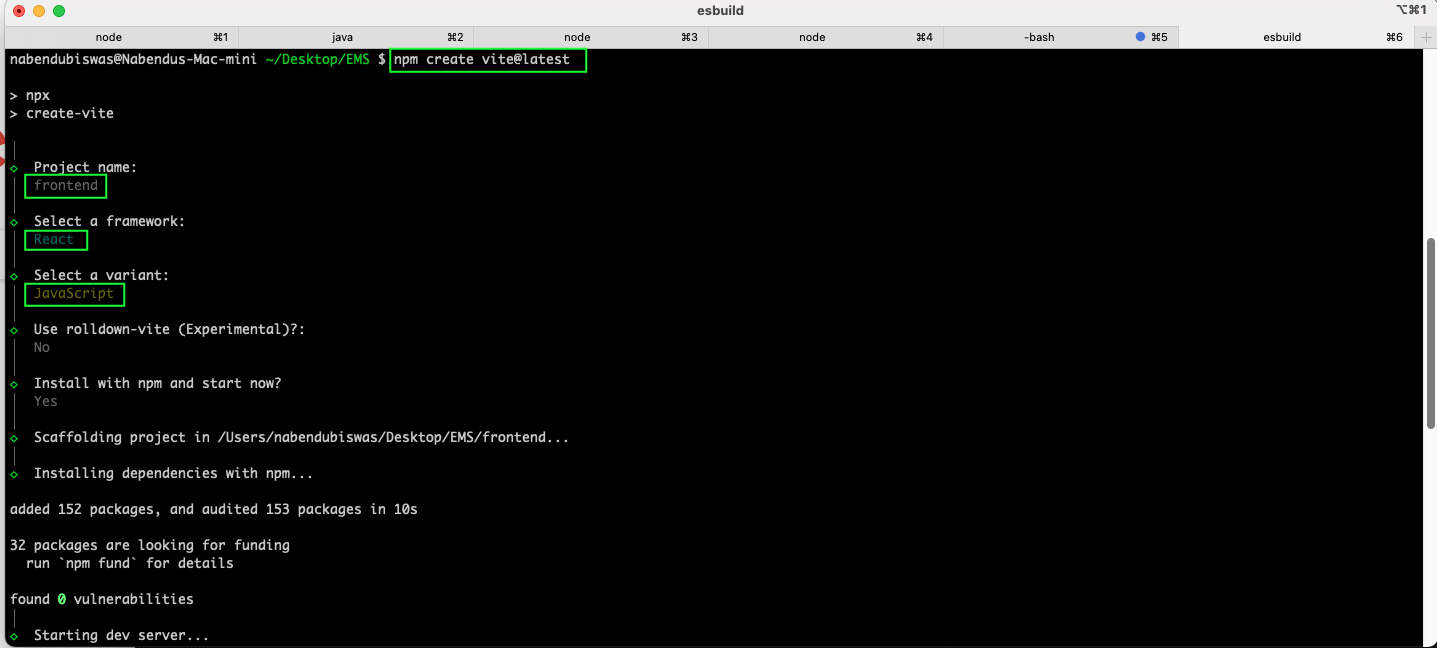
In this post we will create an Employee Management System using MERN stack. This project and post have been inspired by this YouTube playlist. So, from the terminal after creating a folder EMS give the below command. And also the name and framework as mentioned.
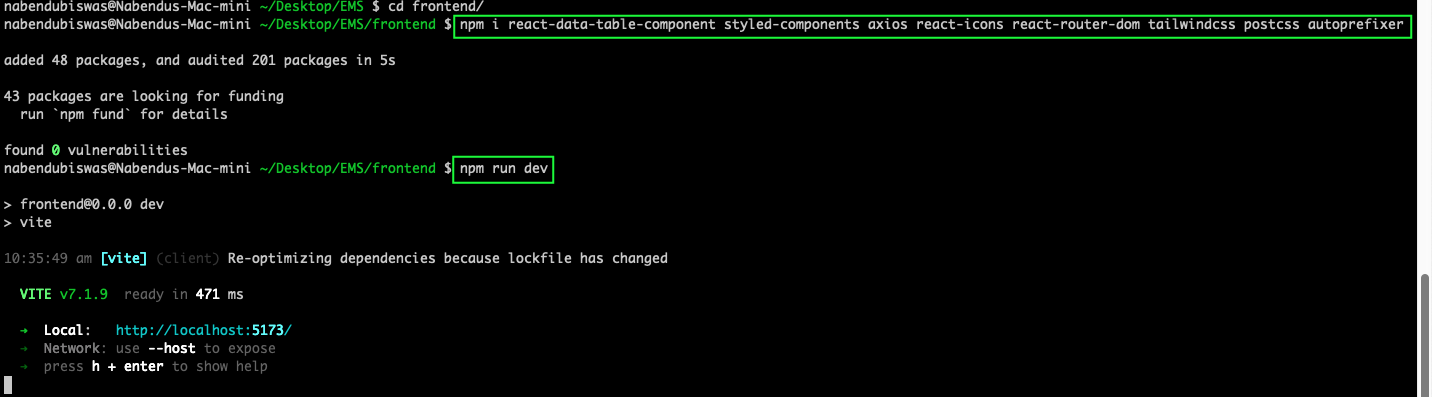
After that go inside the frontend folder we will install the required dependencies and also start the project with npm run dev
Now, remove all the data from App.css file
Also, remove all the data from index.css file
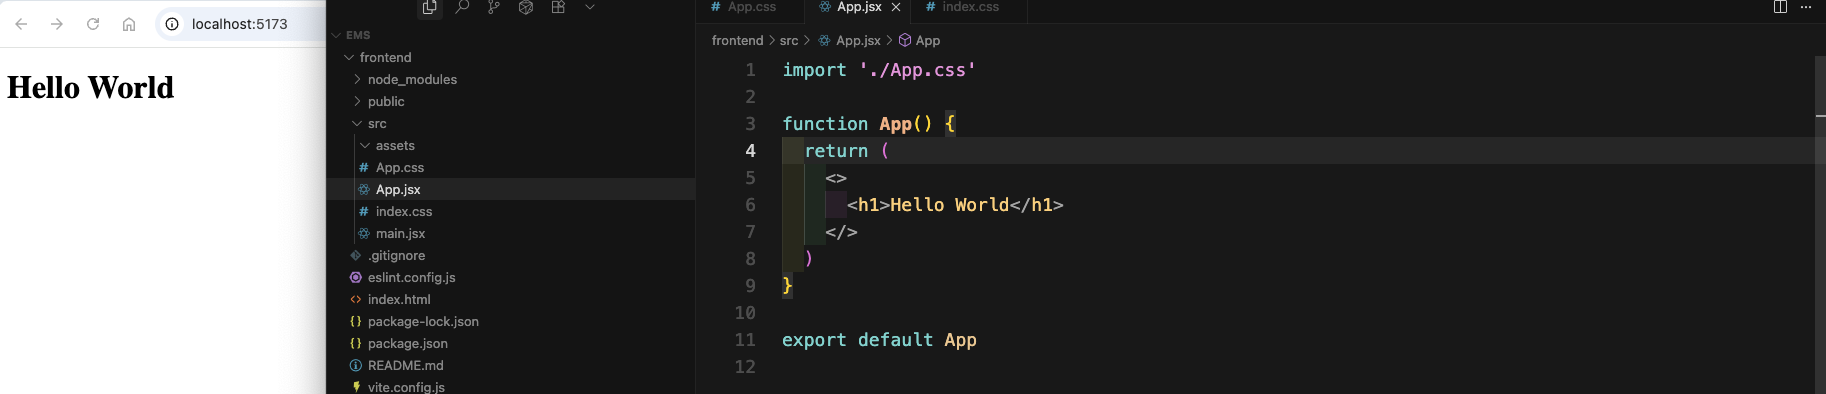
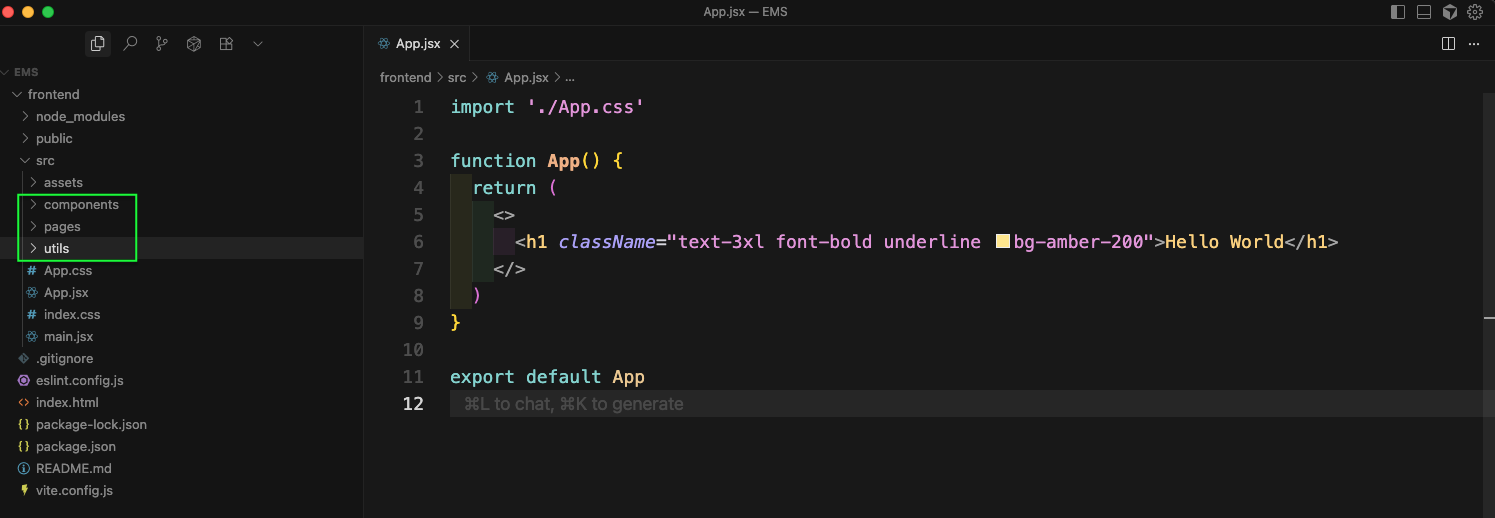
Now, we have removed all the data from App.jsx file and added the basics Hello World
Next, we will add tailwind dependencies in our frontend

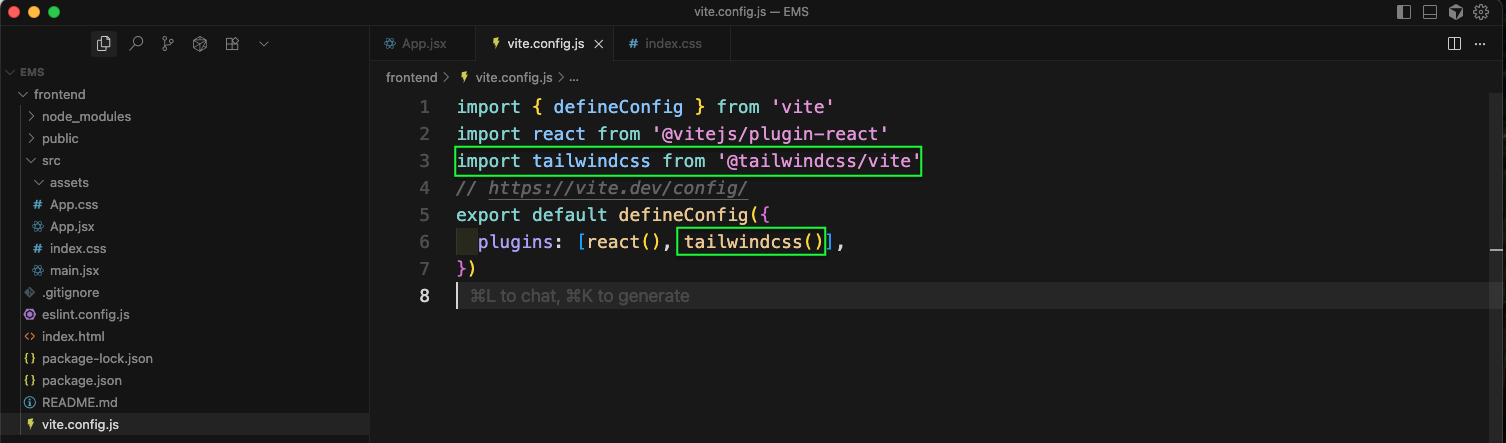
For further adding tailwind we need to update the vite.config.js file.
Also, add the below line in index.css file.

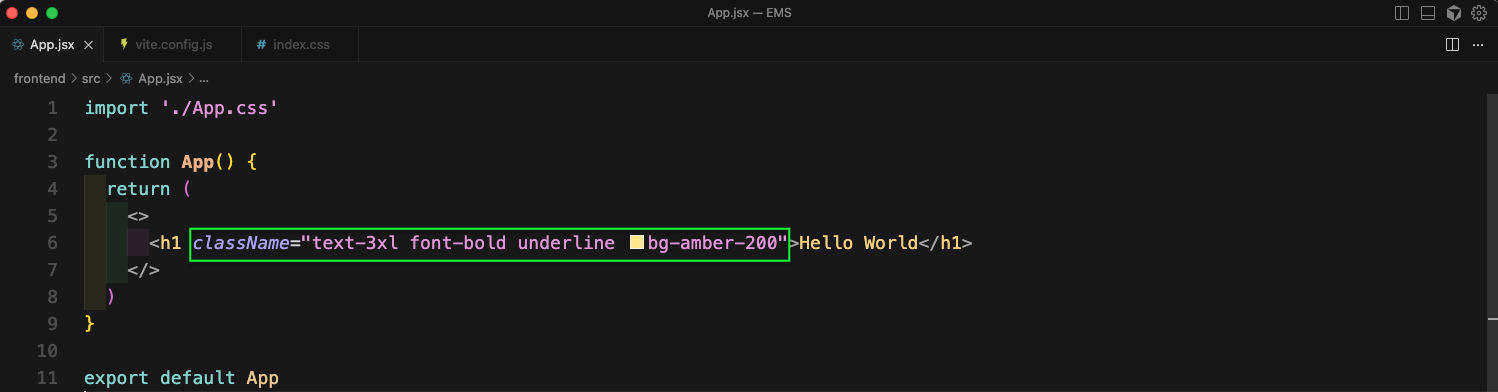
Now, it's time to test Tailwind CSS. So, we added some classes in App.jsx file.
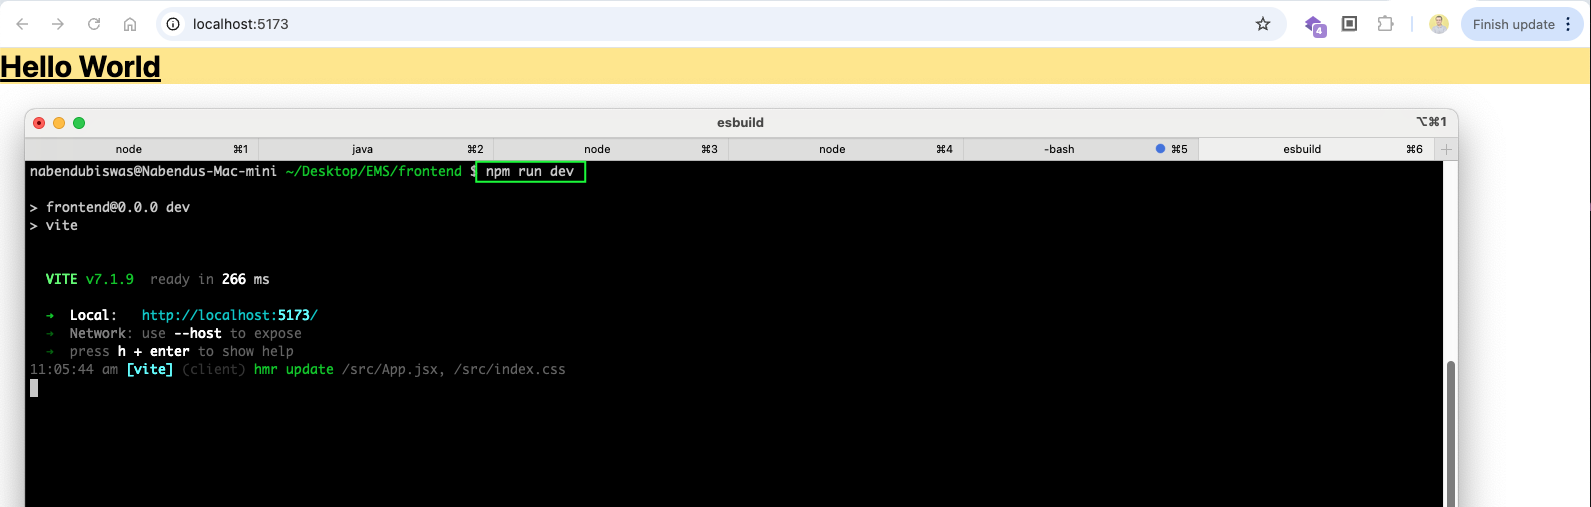
Now, again running npm run dev will show the tailwind in localhost
Now, create the folder of components, pages and utils inside src folder.
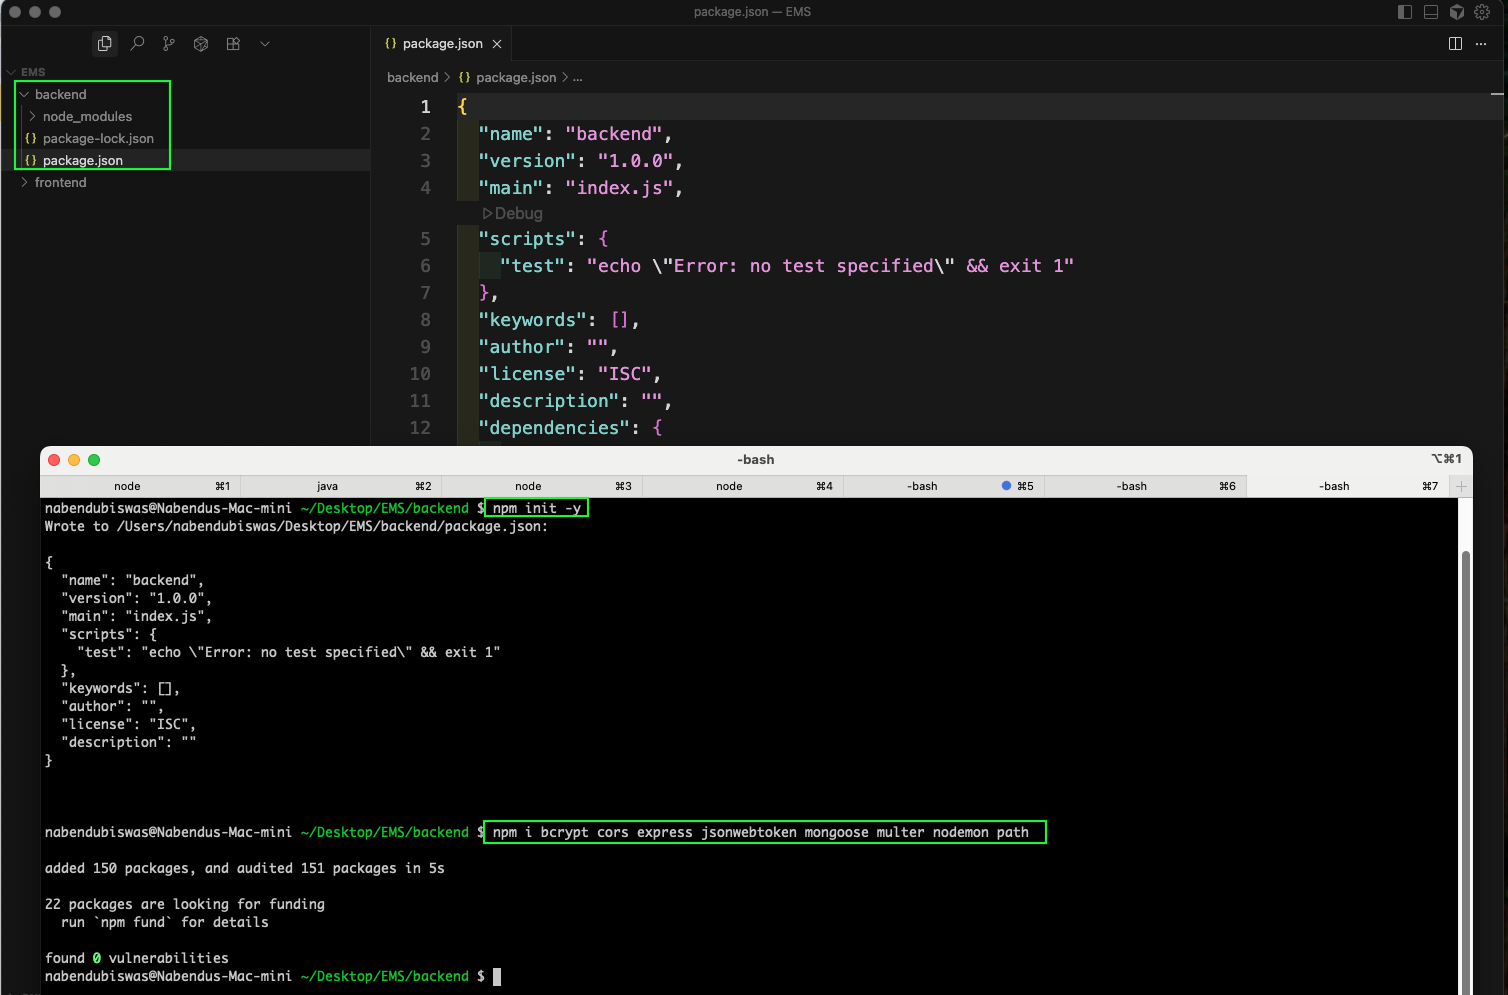
We will start with basic setup of backend now. So, create a backend folder inside EMS folder. Here give the below commands in the image below.
Now, create a .gitignore file inside backend folder and add the below data in the image

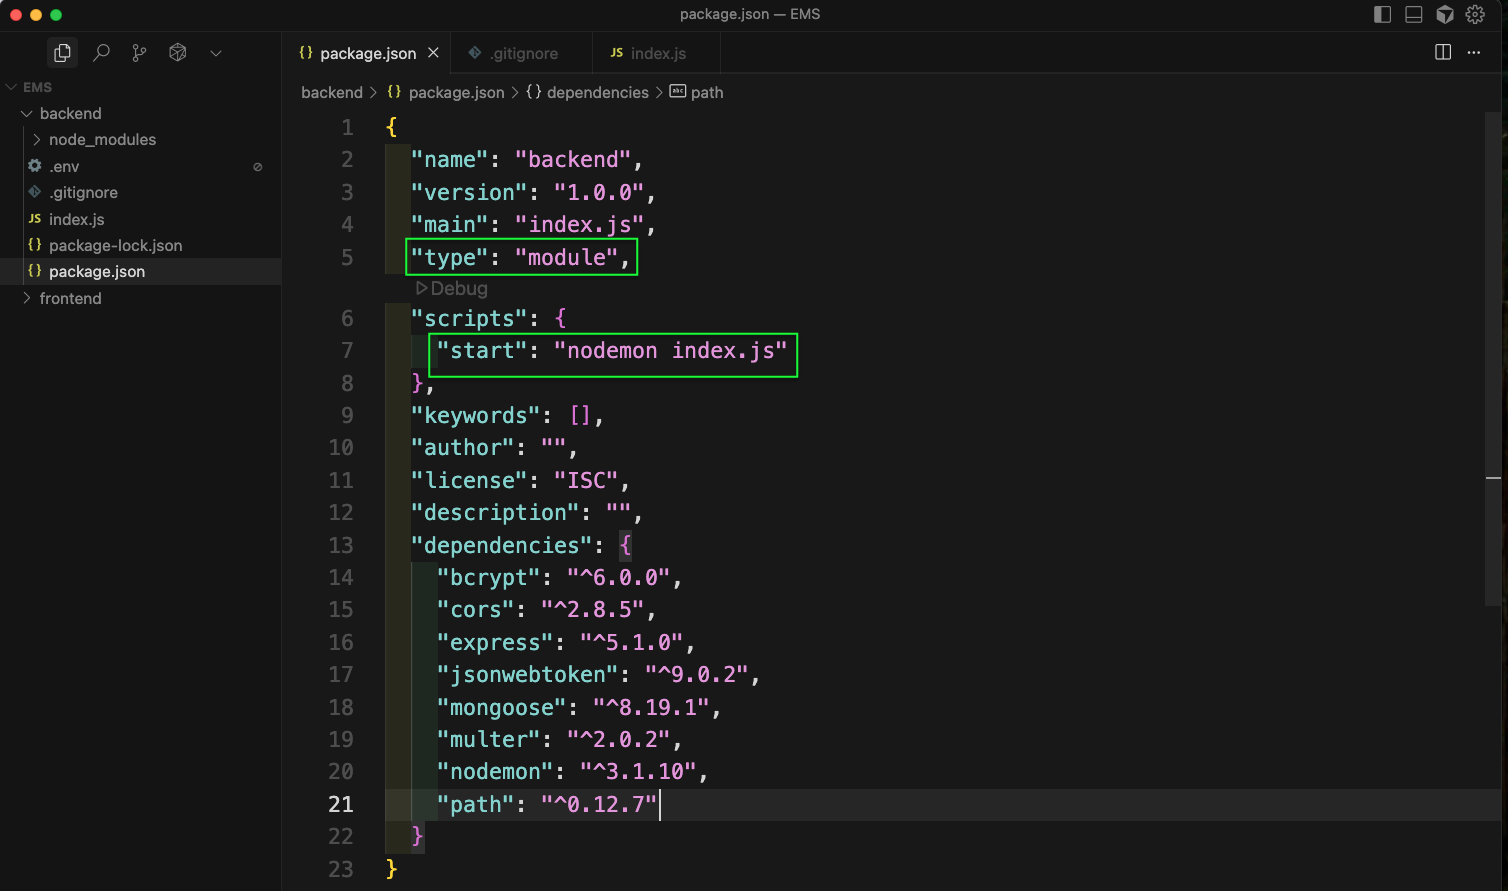
Also, in the package.json file, we will make the below changes.
Next create a .env file and add the PORT data in it.

Also, in the package.json file, we will add the below.
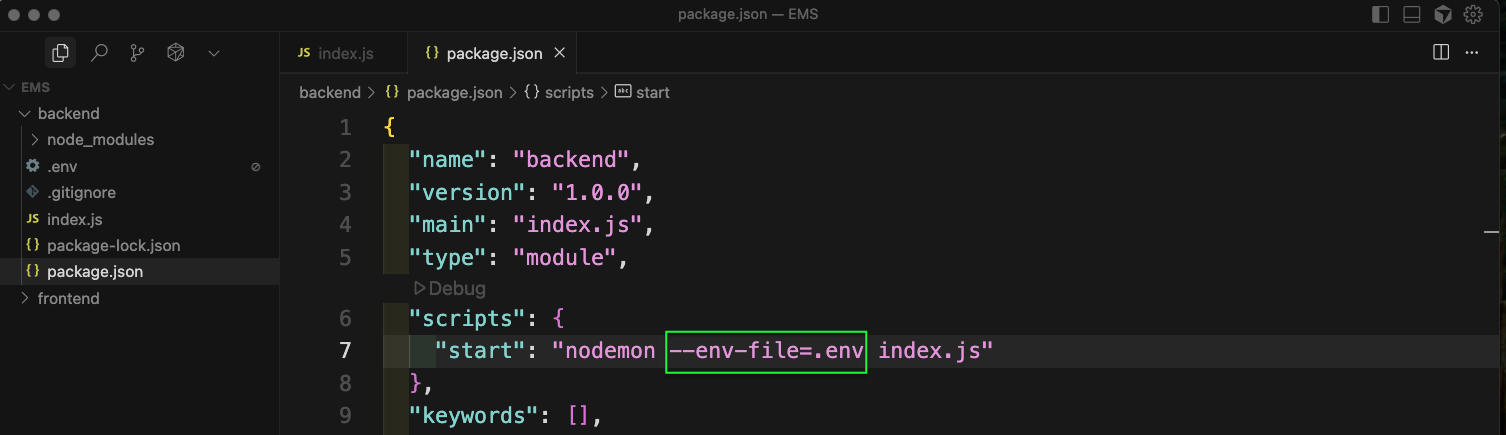
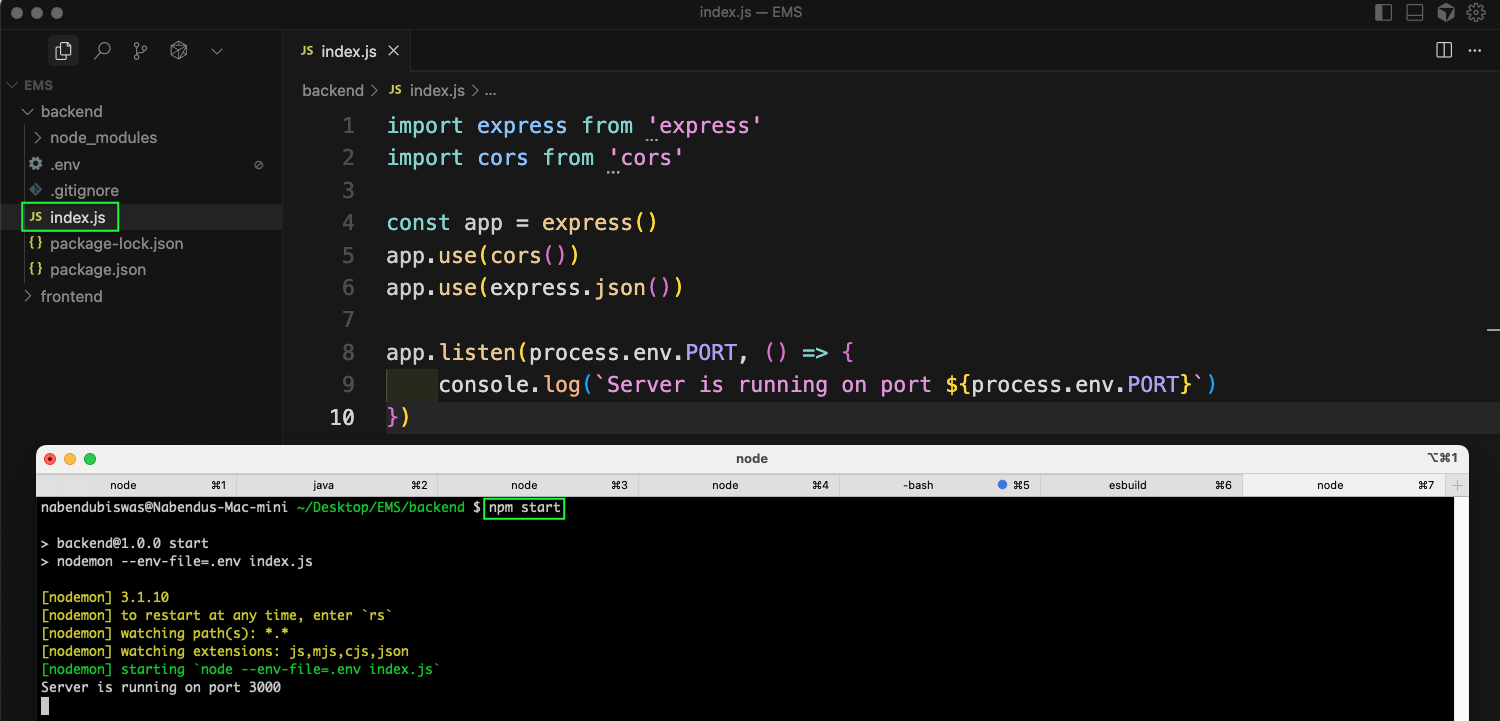
Next, we will update the index.js file and add the below code. Also, will do npm start
Next, create a models folder and an User.js file inside it. Add the code in it to add the model of User.

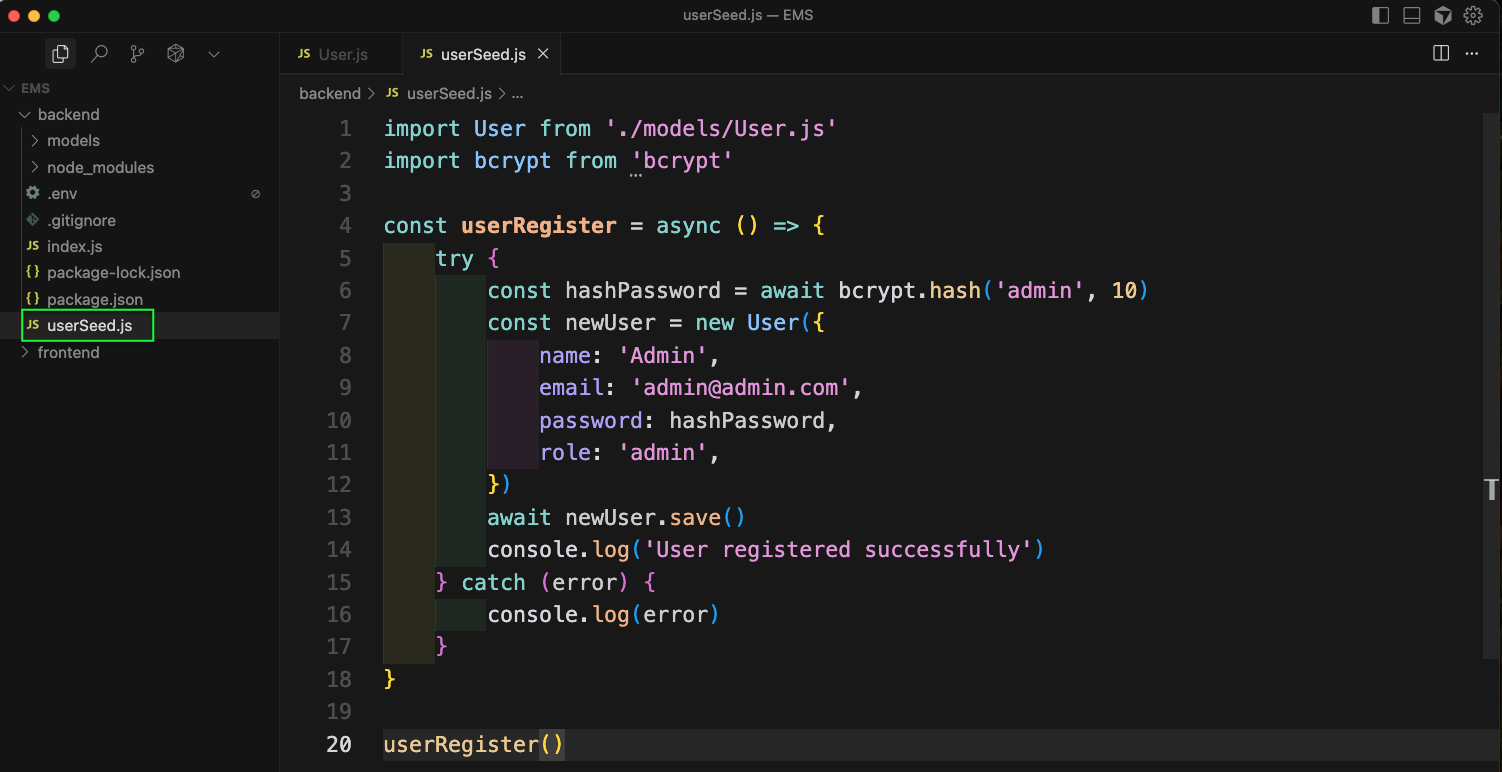
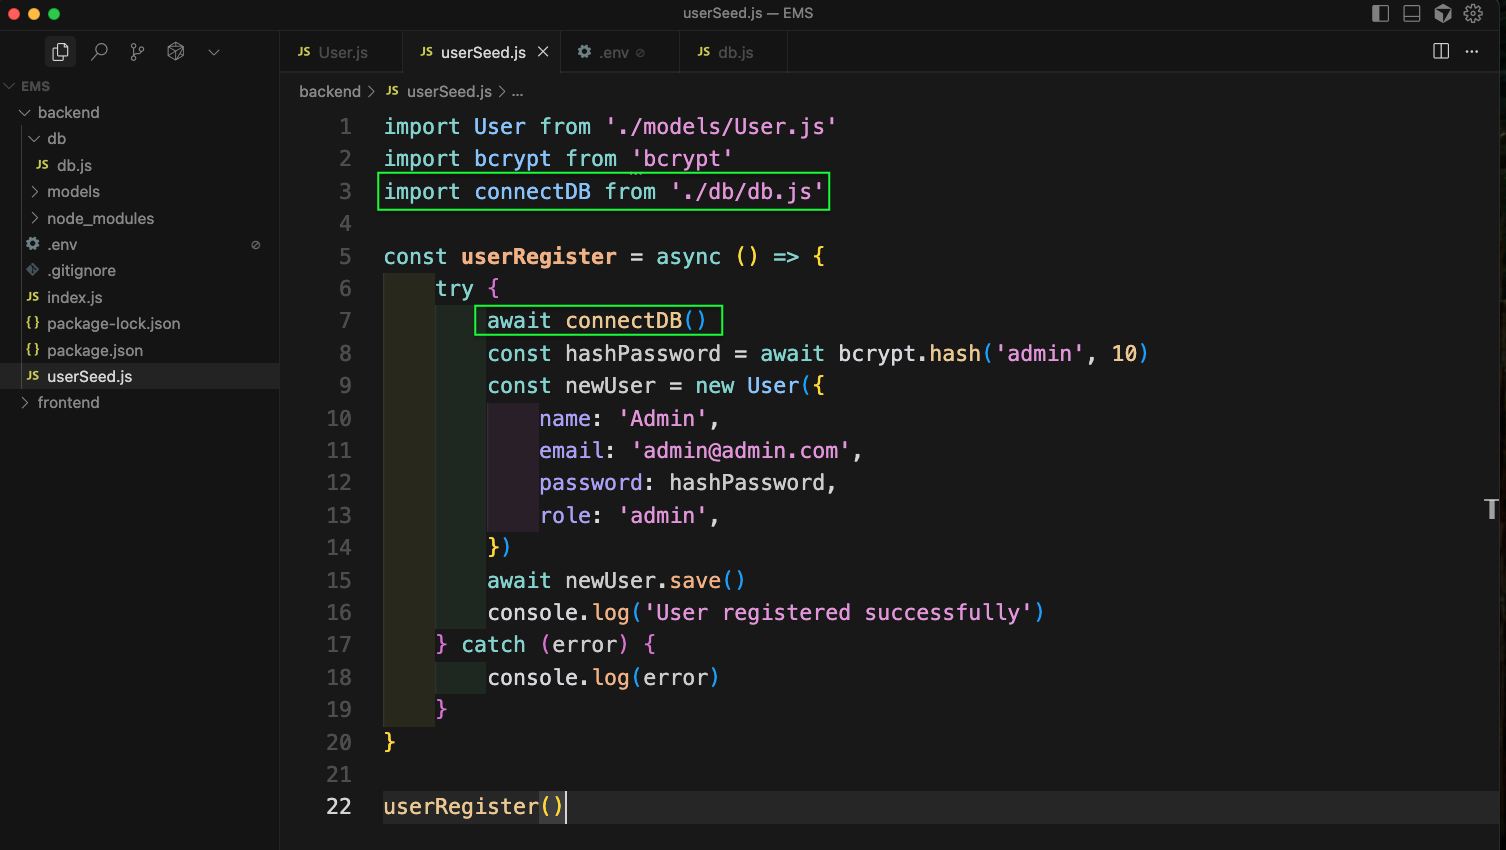
We will also add the code to create seed data, by creating a file userSeed.js file. Here create a function userRegister which have the code to create a new User with default admin credentials.
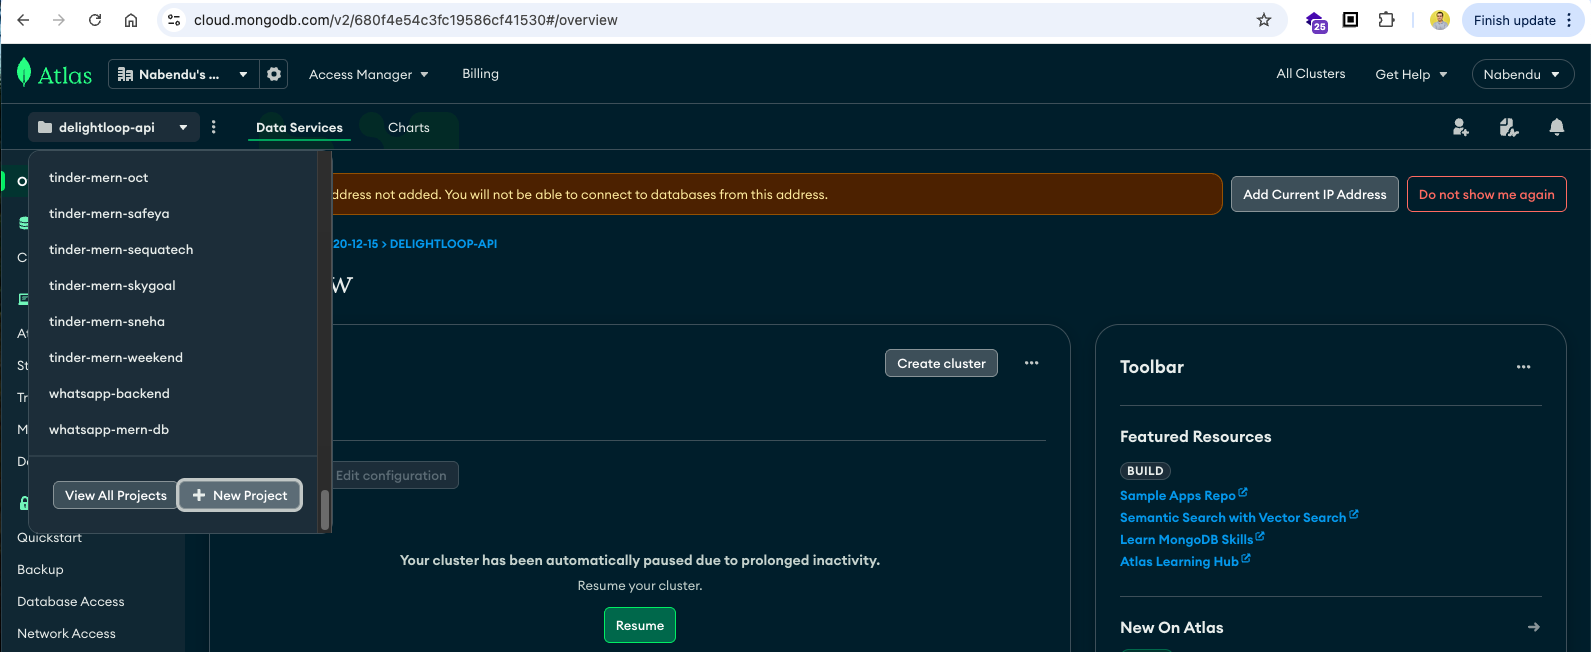
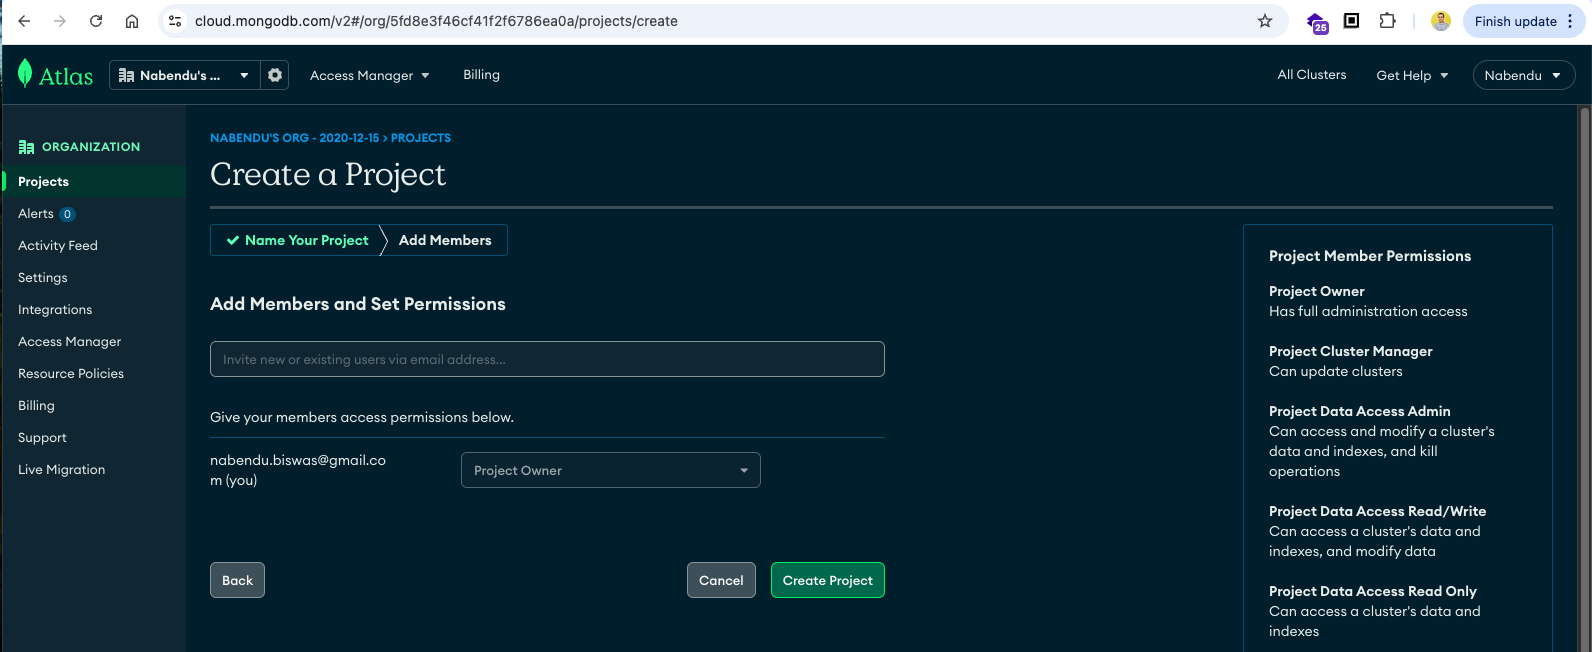
Now, we will create a new MongoDB database in mongodb cloud. Here, click on New Project
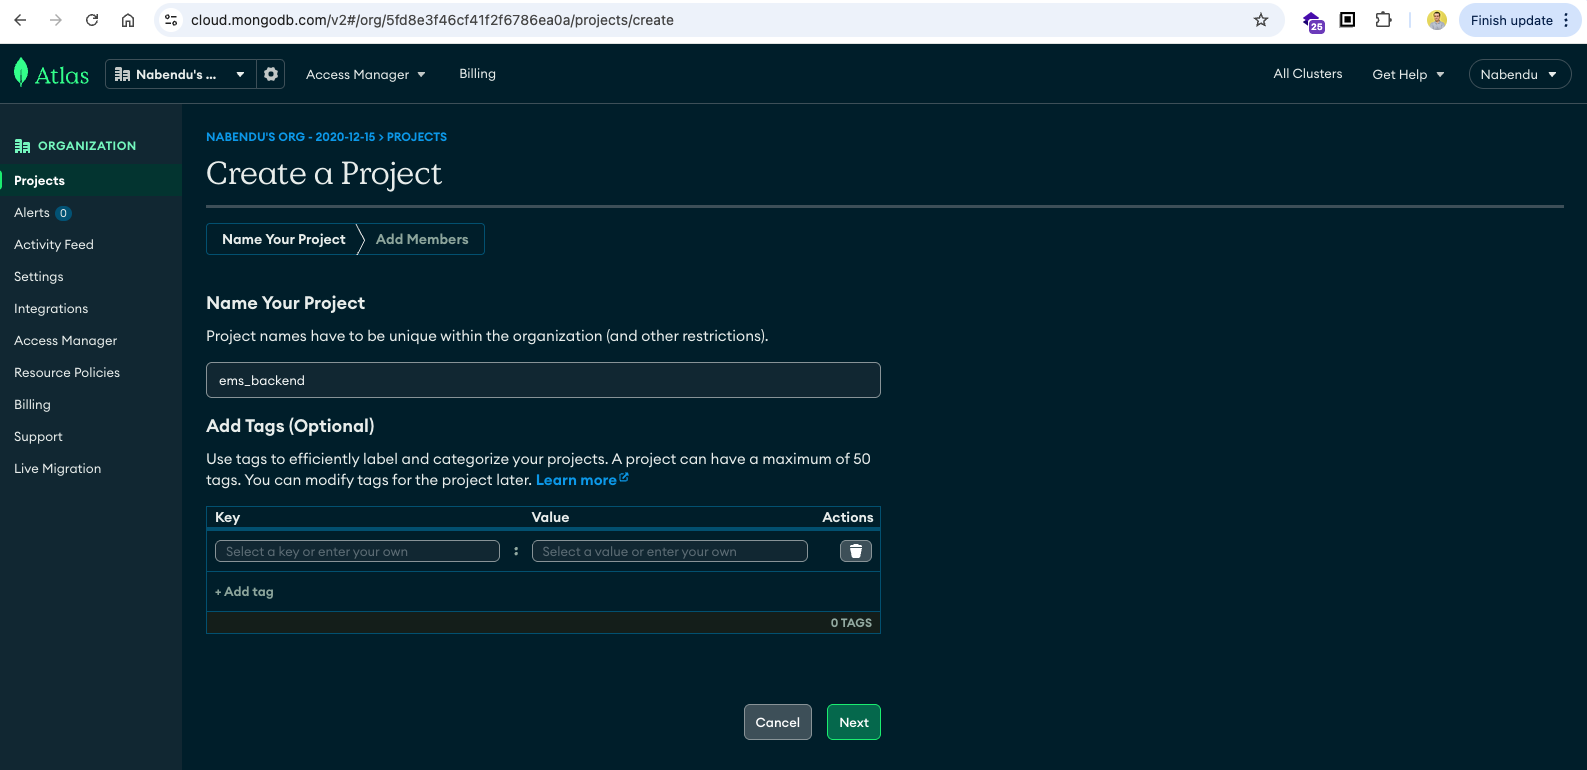
In the next page we will give the project name of ems_backend and click on Next button.
In the next page just click on Create Project button.
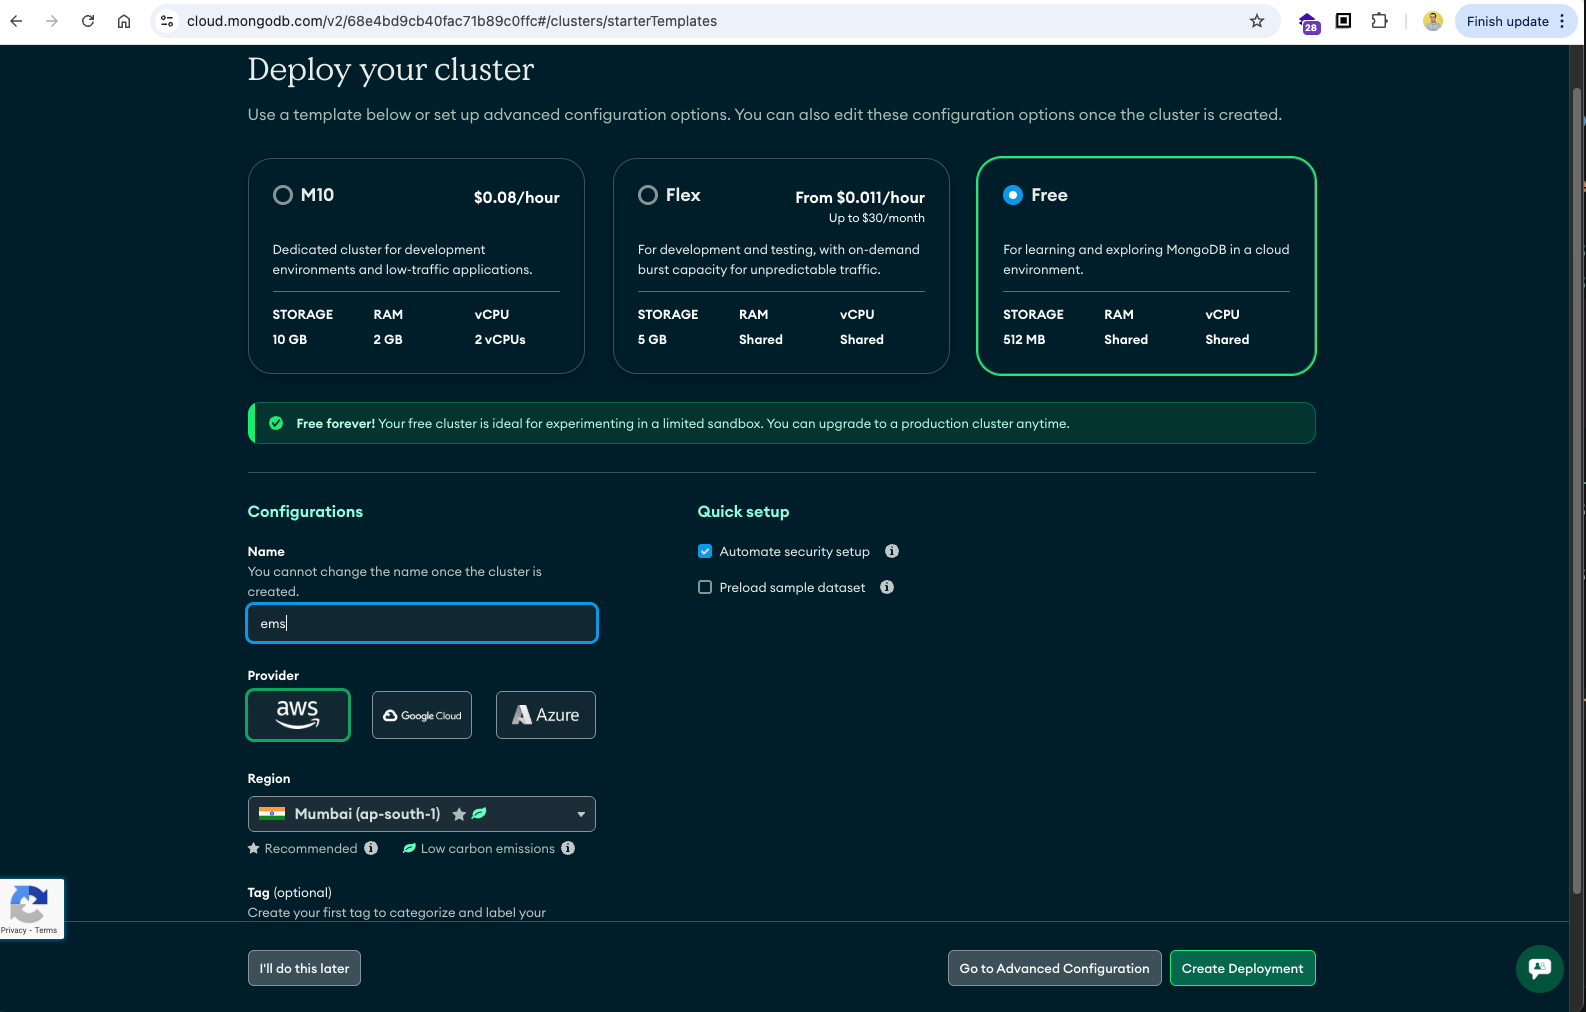
Now, we will choose the Free tier and click on Create Deployment
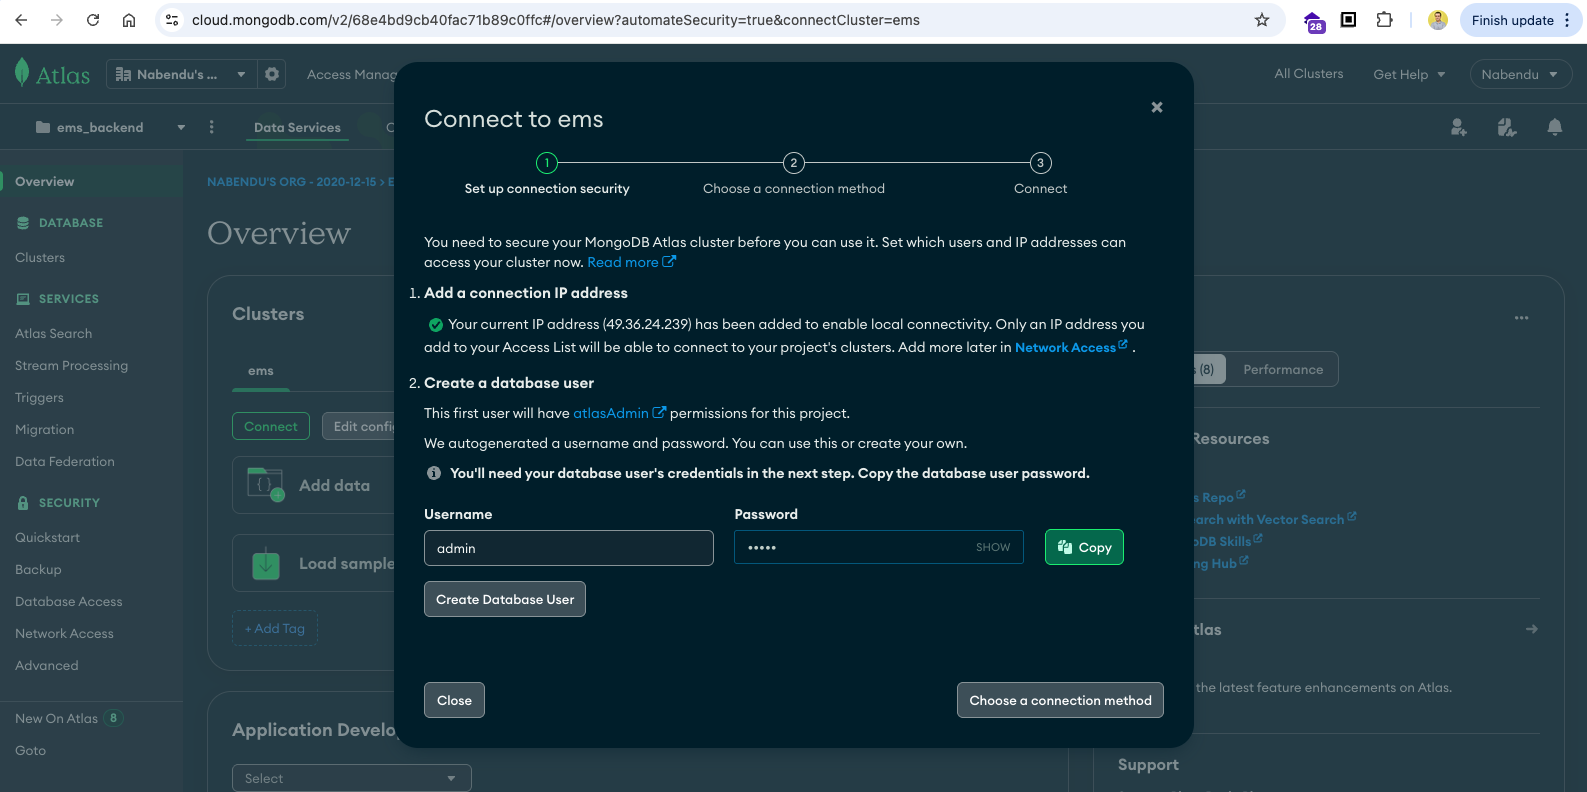
In the next pop-up we need to give the username and password for the database user.
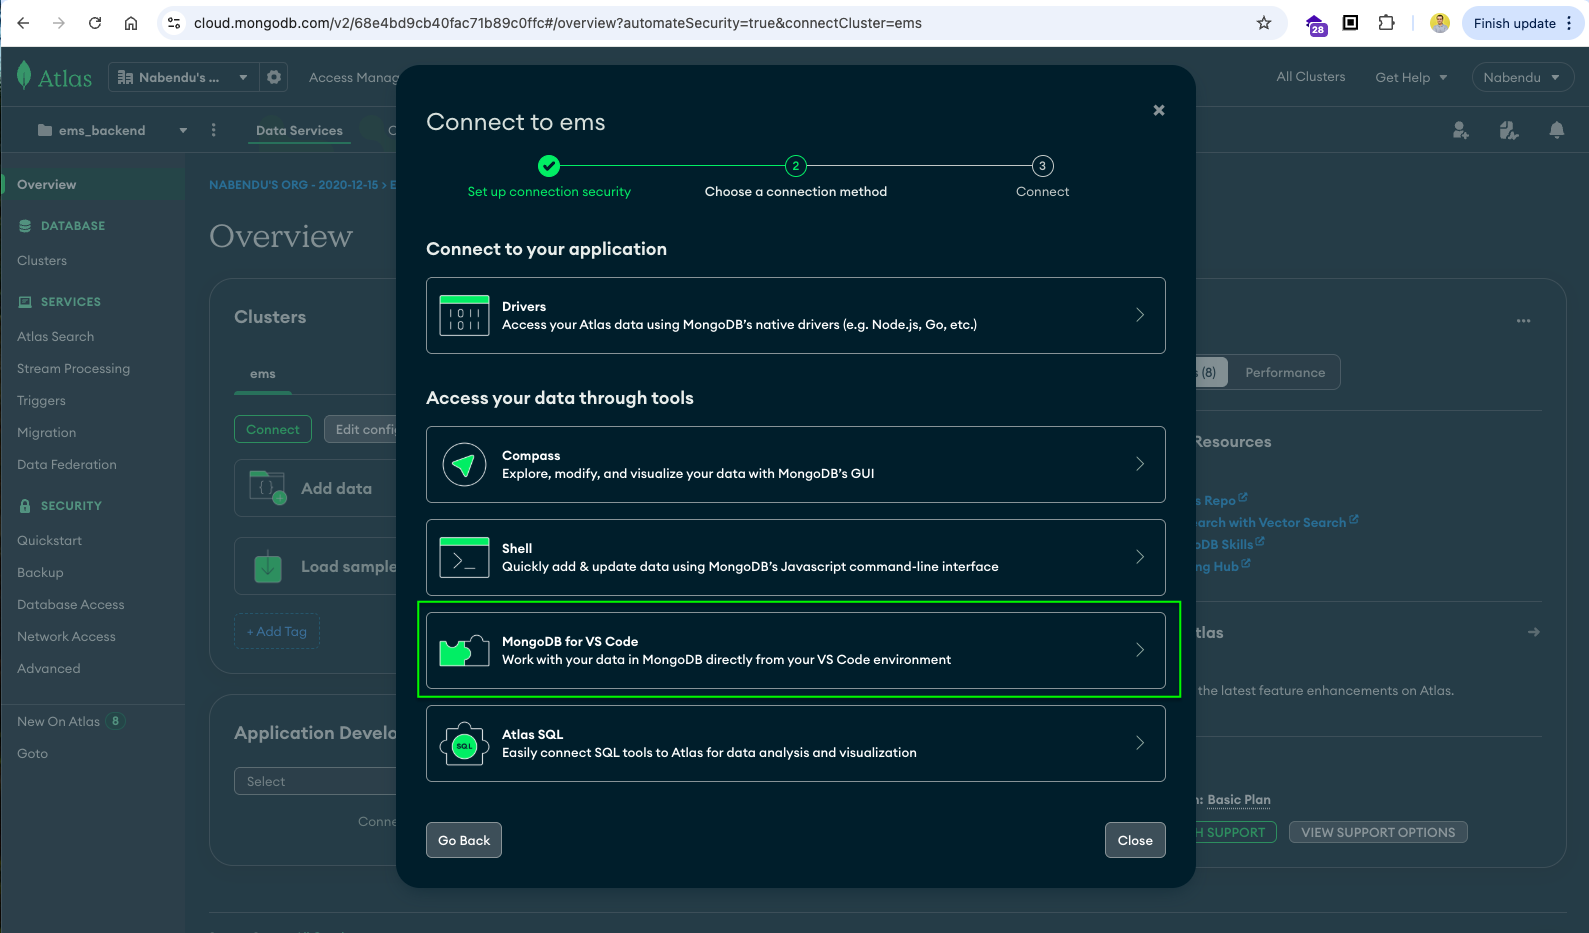
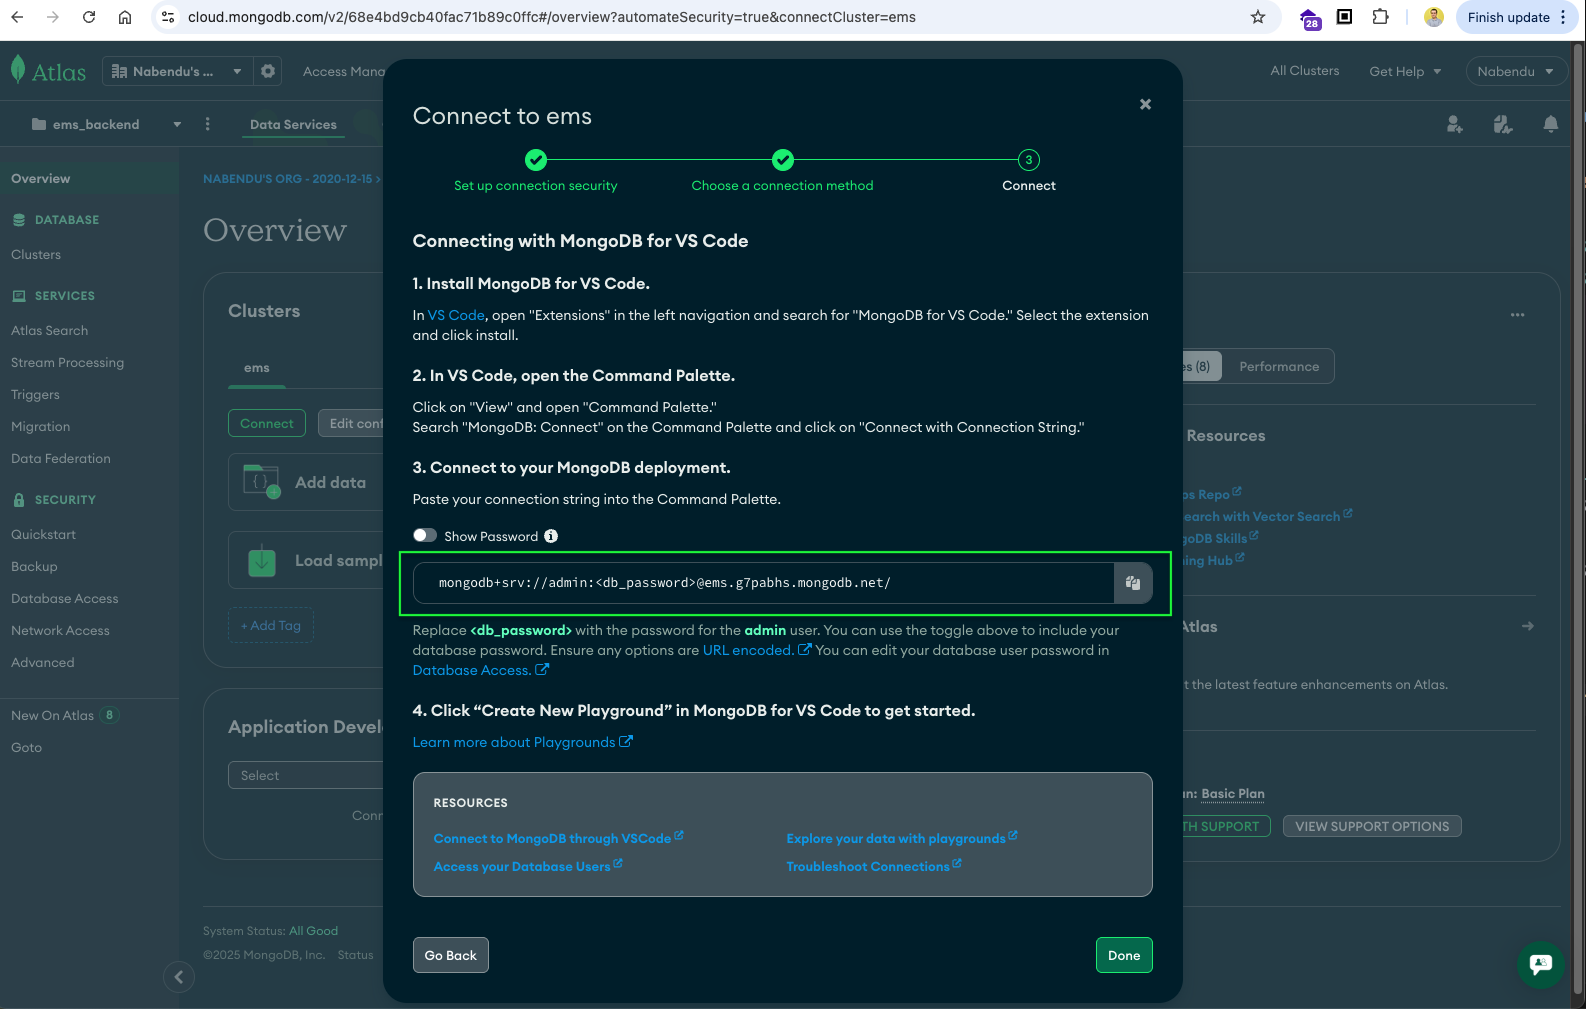
Now, select the MongoDB for VS Code.
Now, we will get the connection string which we need to copy.
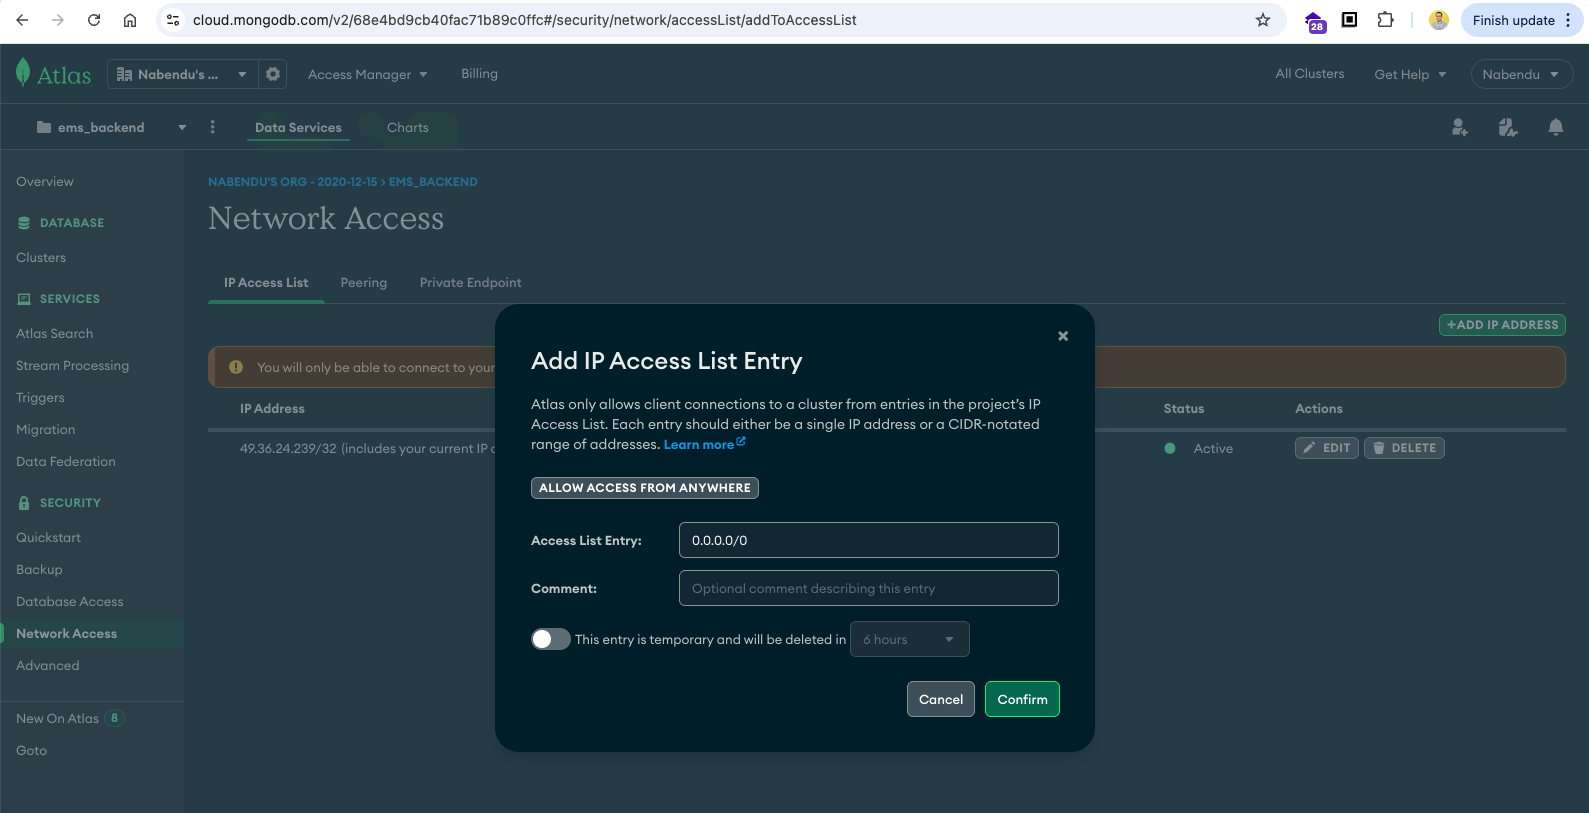
Now, go to the Network Access and select ALLOW ACCESS FROM ANYWHERE
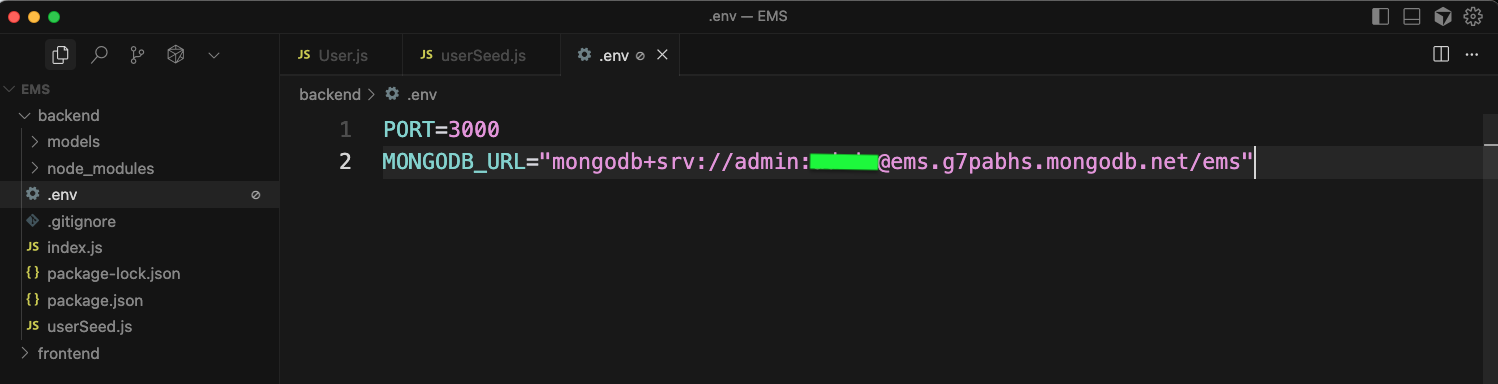
Back in the .env file we need to add MONGODB_URL with the connection string copied earlier.
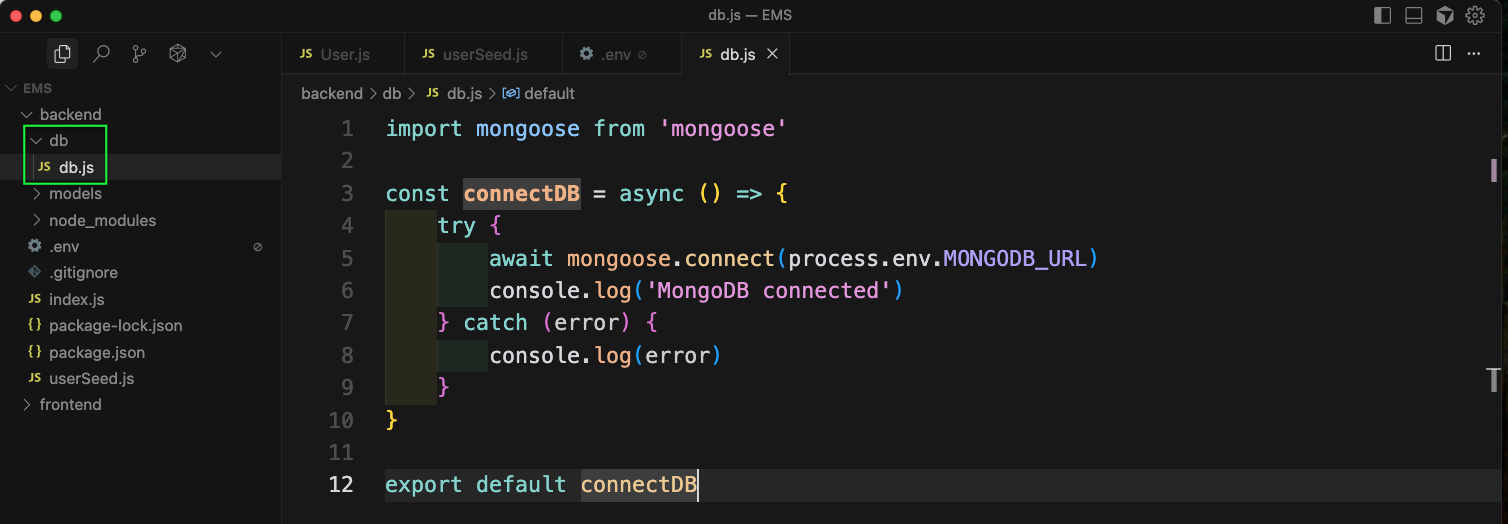
Now, inside the backend folder create a db folder and inside it db.js file. In it add the code from the image below, which is used to connect to the database.
Back in userSeed.js file will will add the highlighted code to connect to database.
Now, we will start the backedn also by running the below command from terminal.

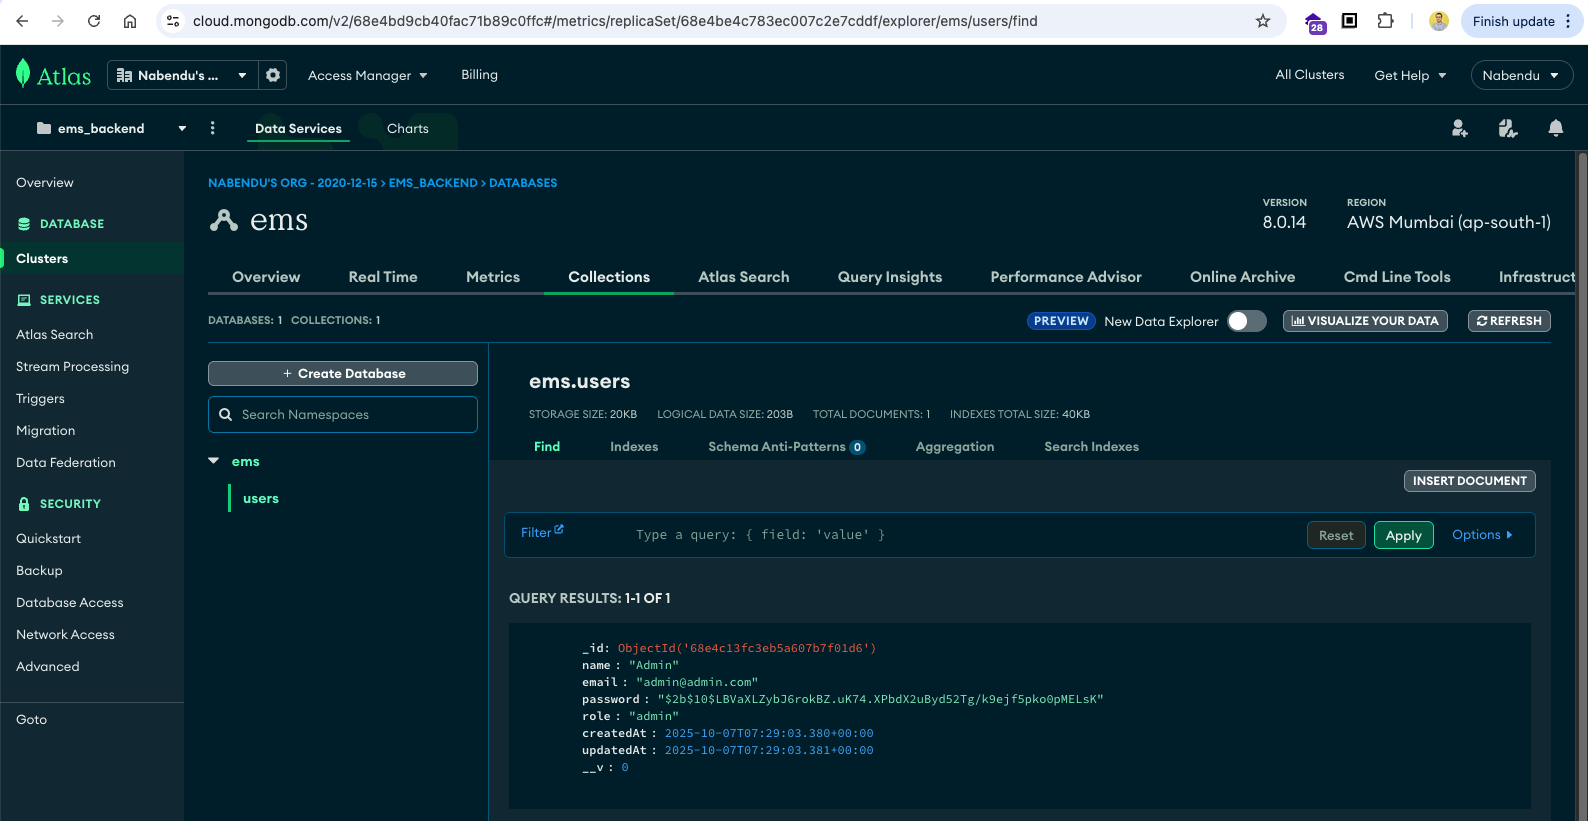
In the MongoDB cloud, we will see an users document been created.
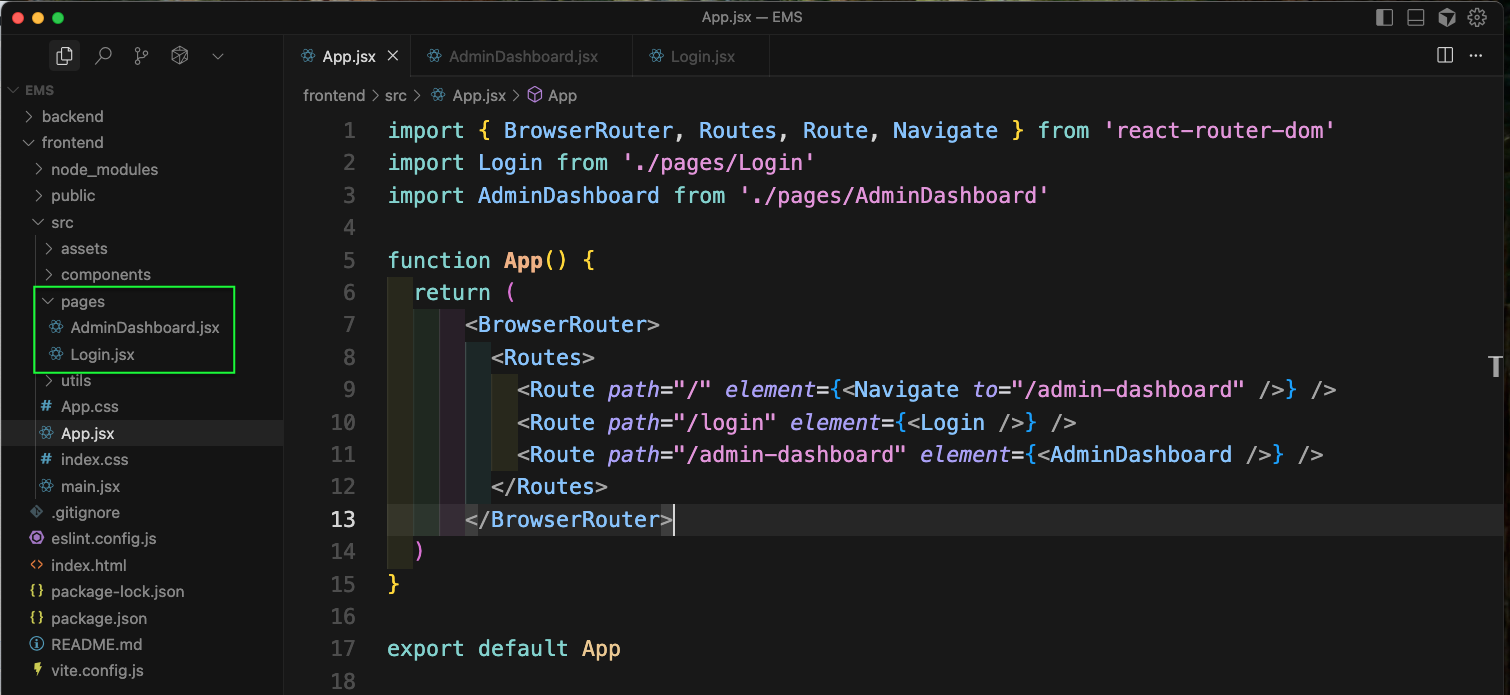
Back in the frontend, create a pages folder inside src folder. Inside it create the files mentioned in image. Also, in the App.jsx file, we will add our routing logic.
Now, in the Login.jsx file we will add the below code with Tailwind CSS classess.
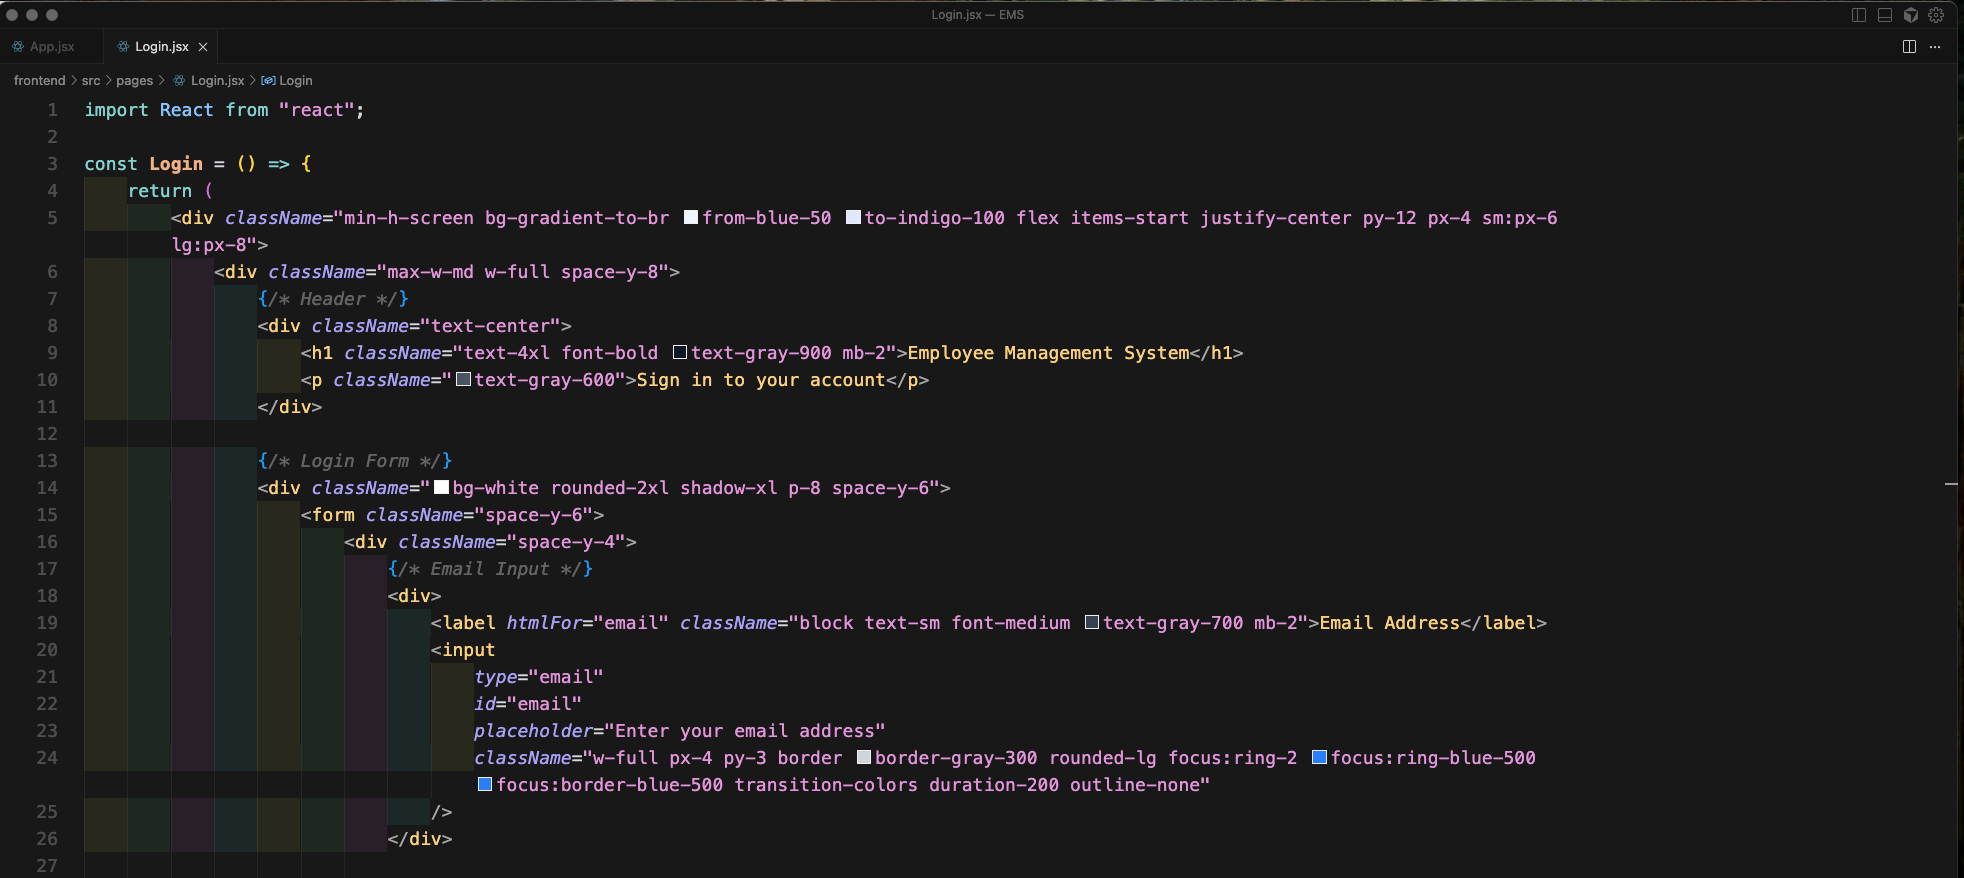
We will add some more data with Tailwind CSS classess.
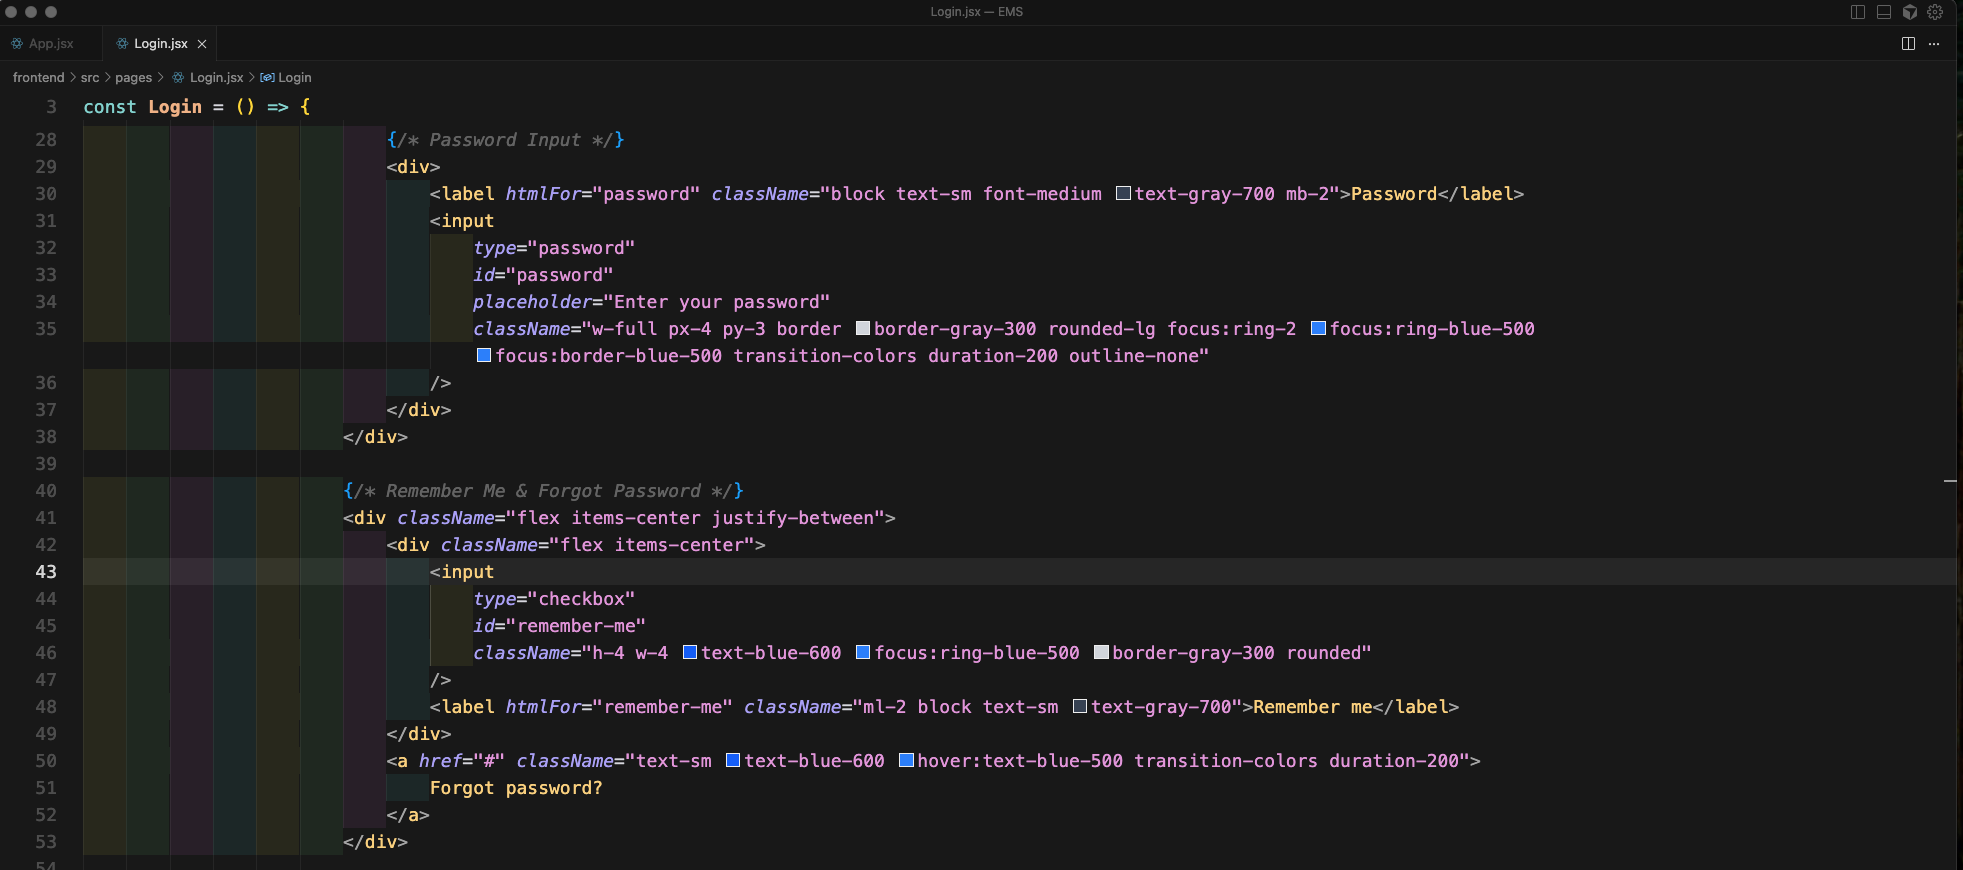
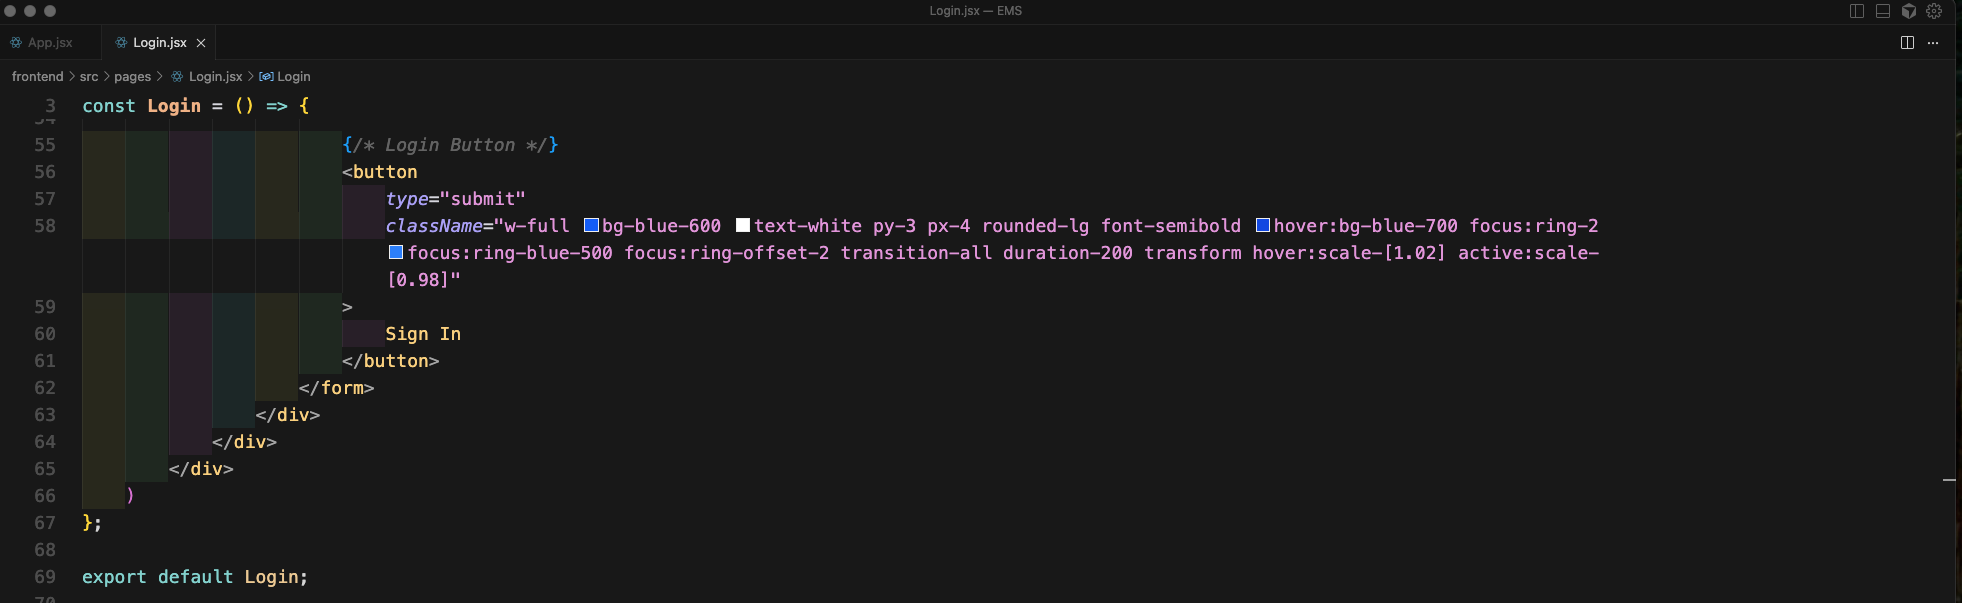
We will complete the Login.jsx file with below code.
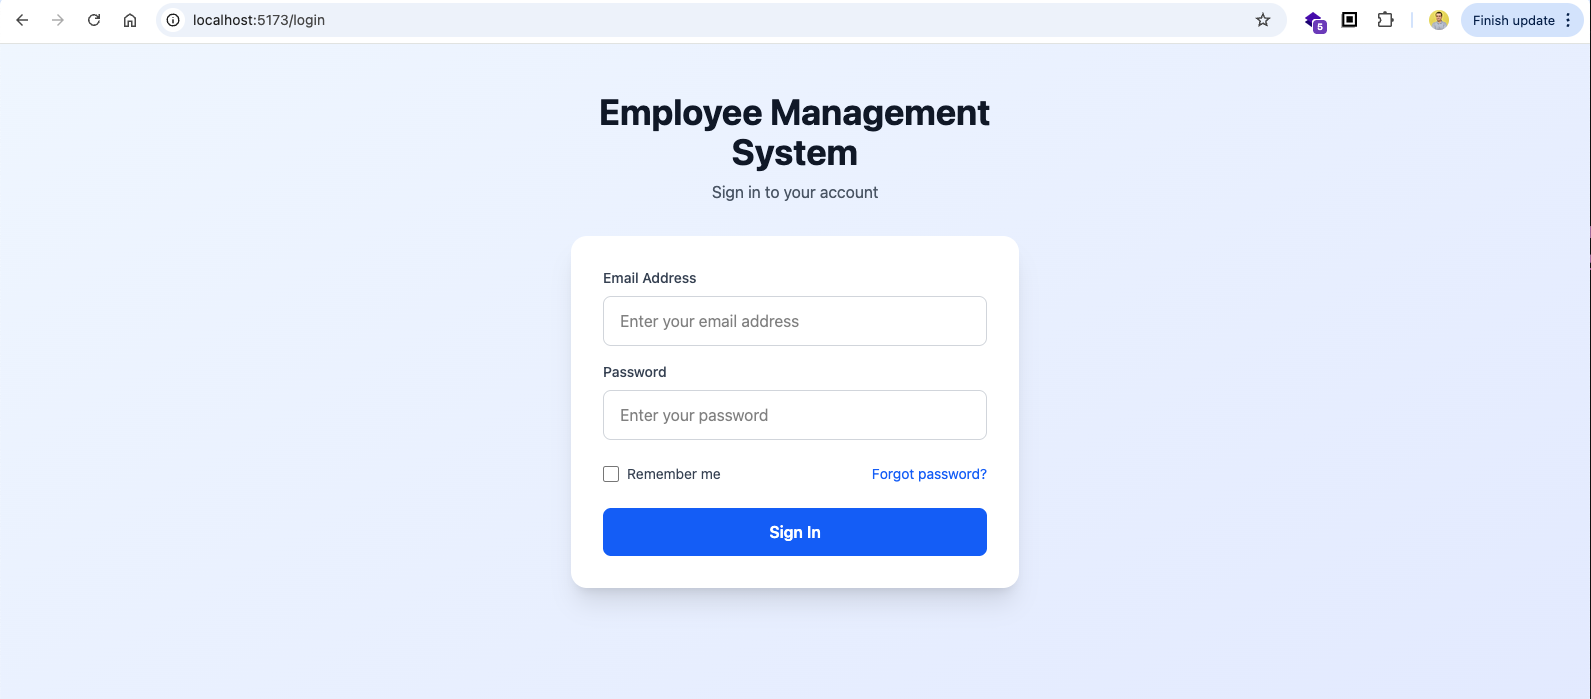
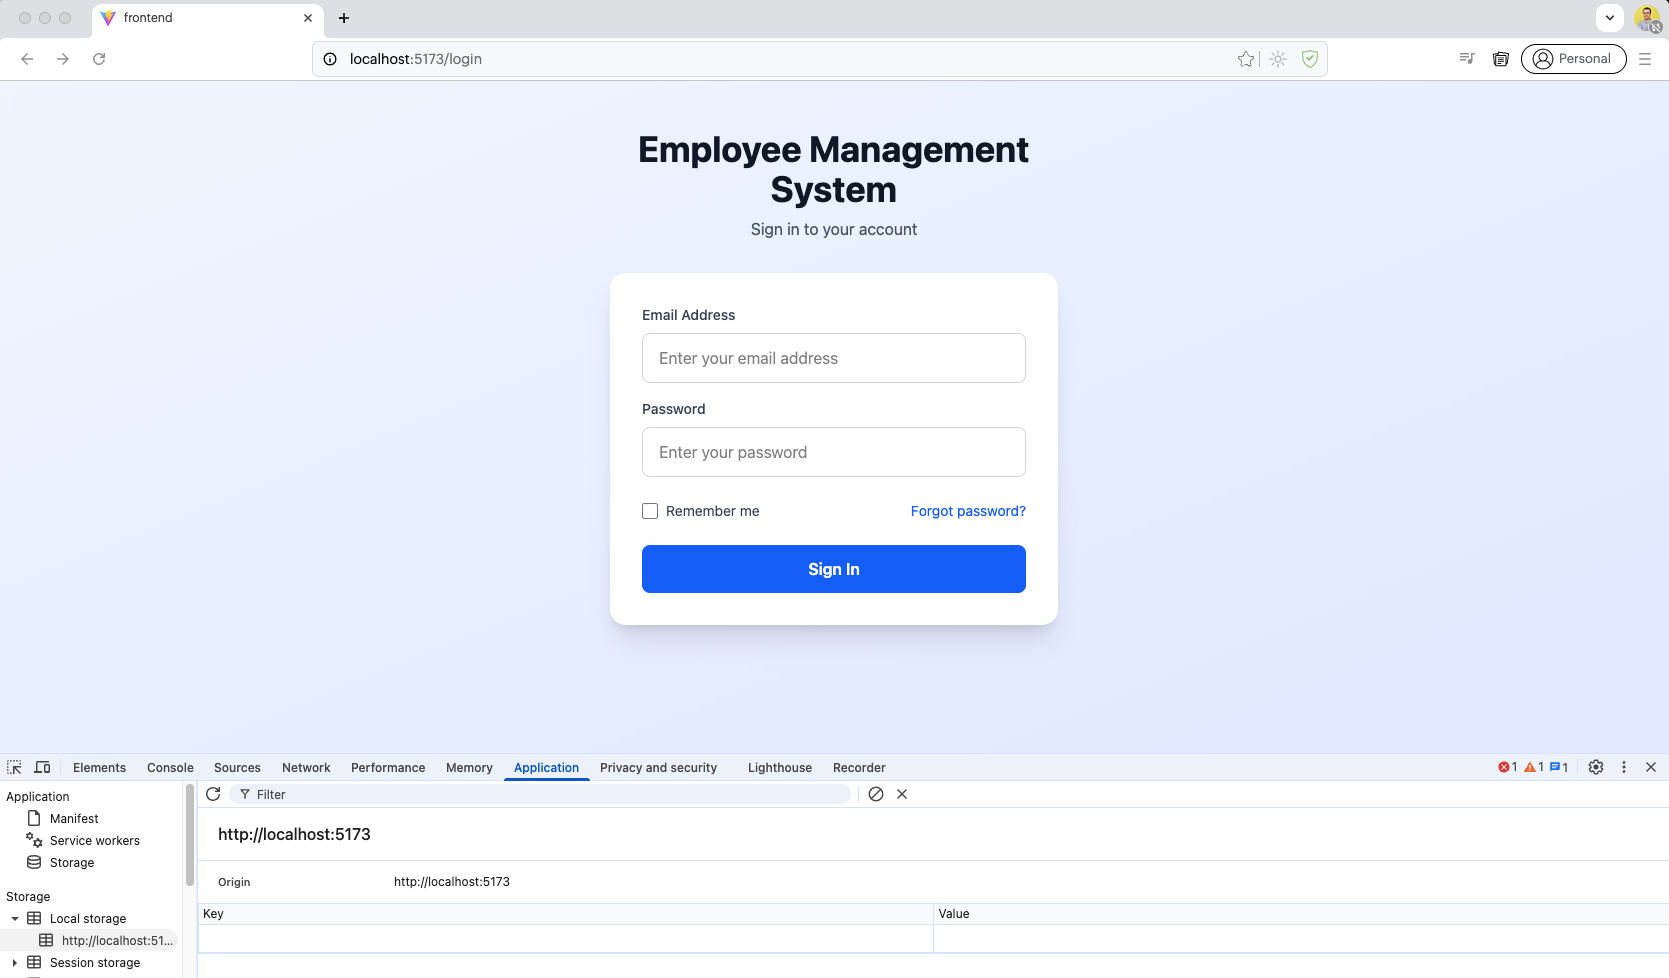
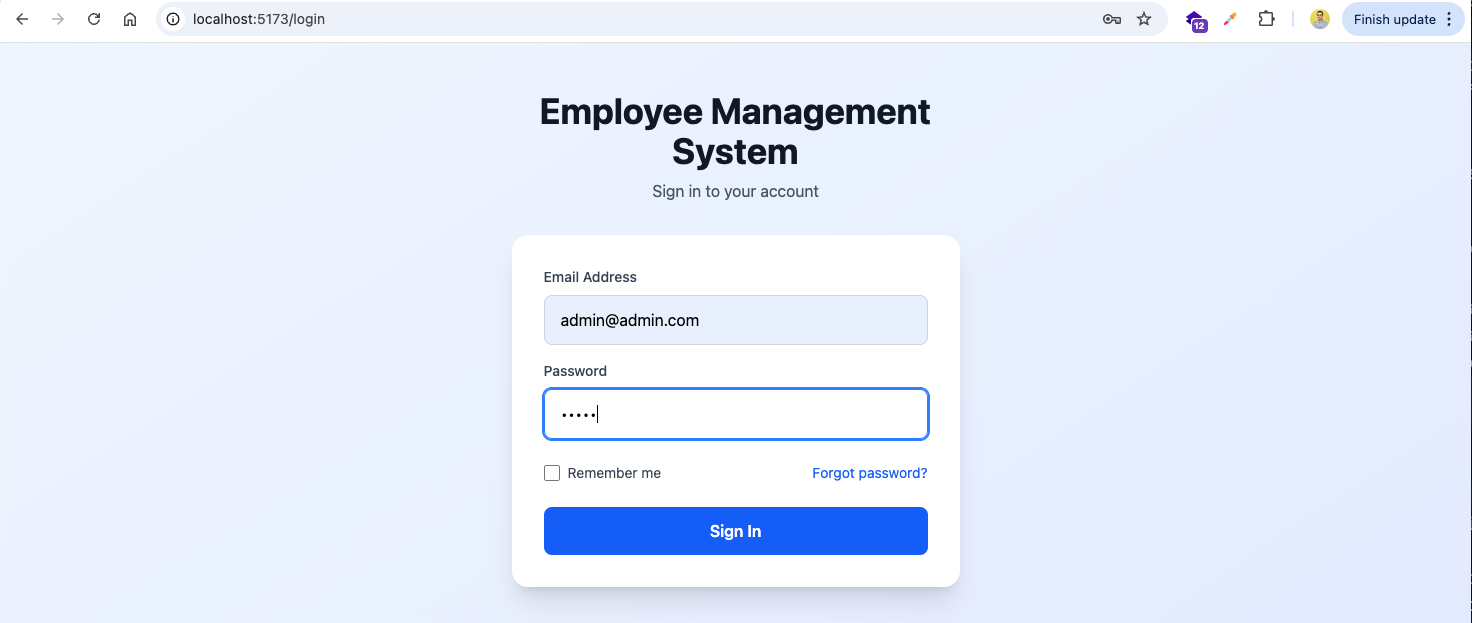
Now, going to http://localhost:5173/login will show this beautiful login screen.
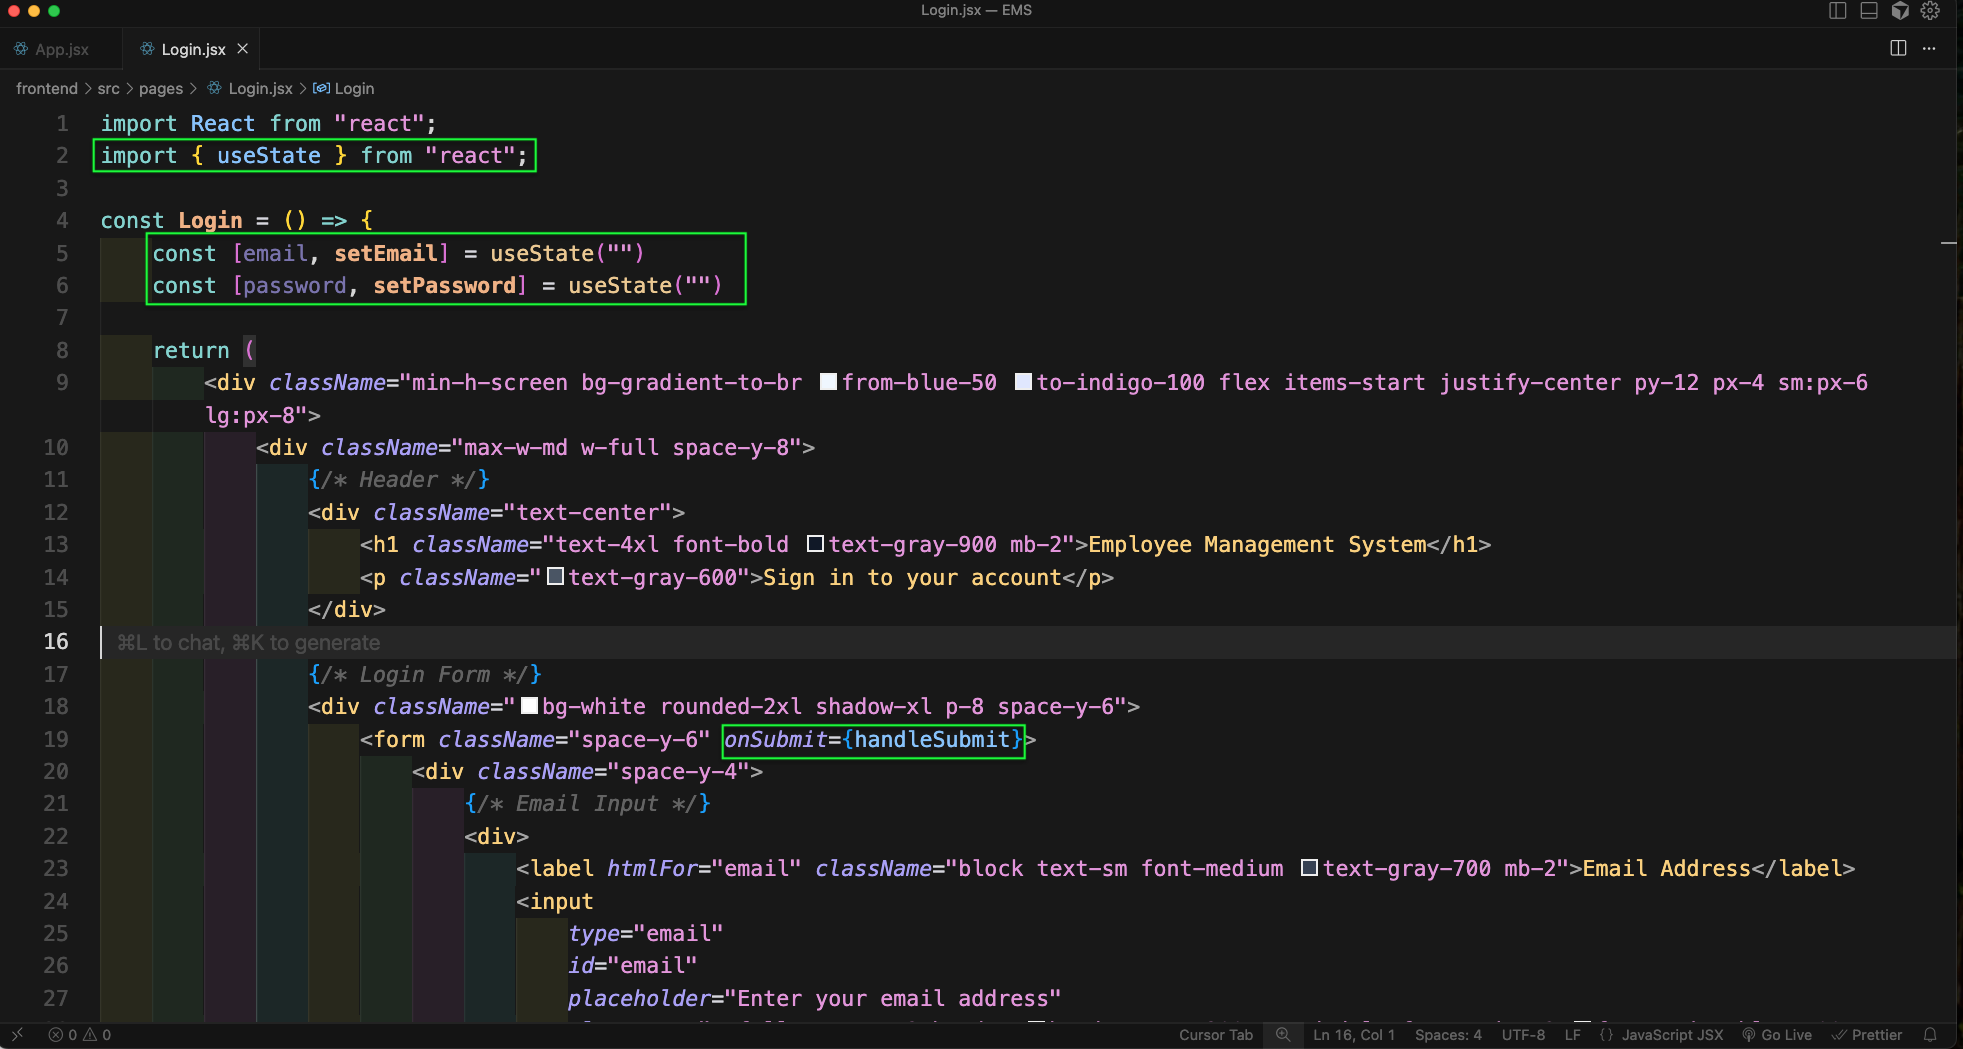
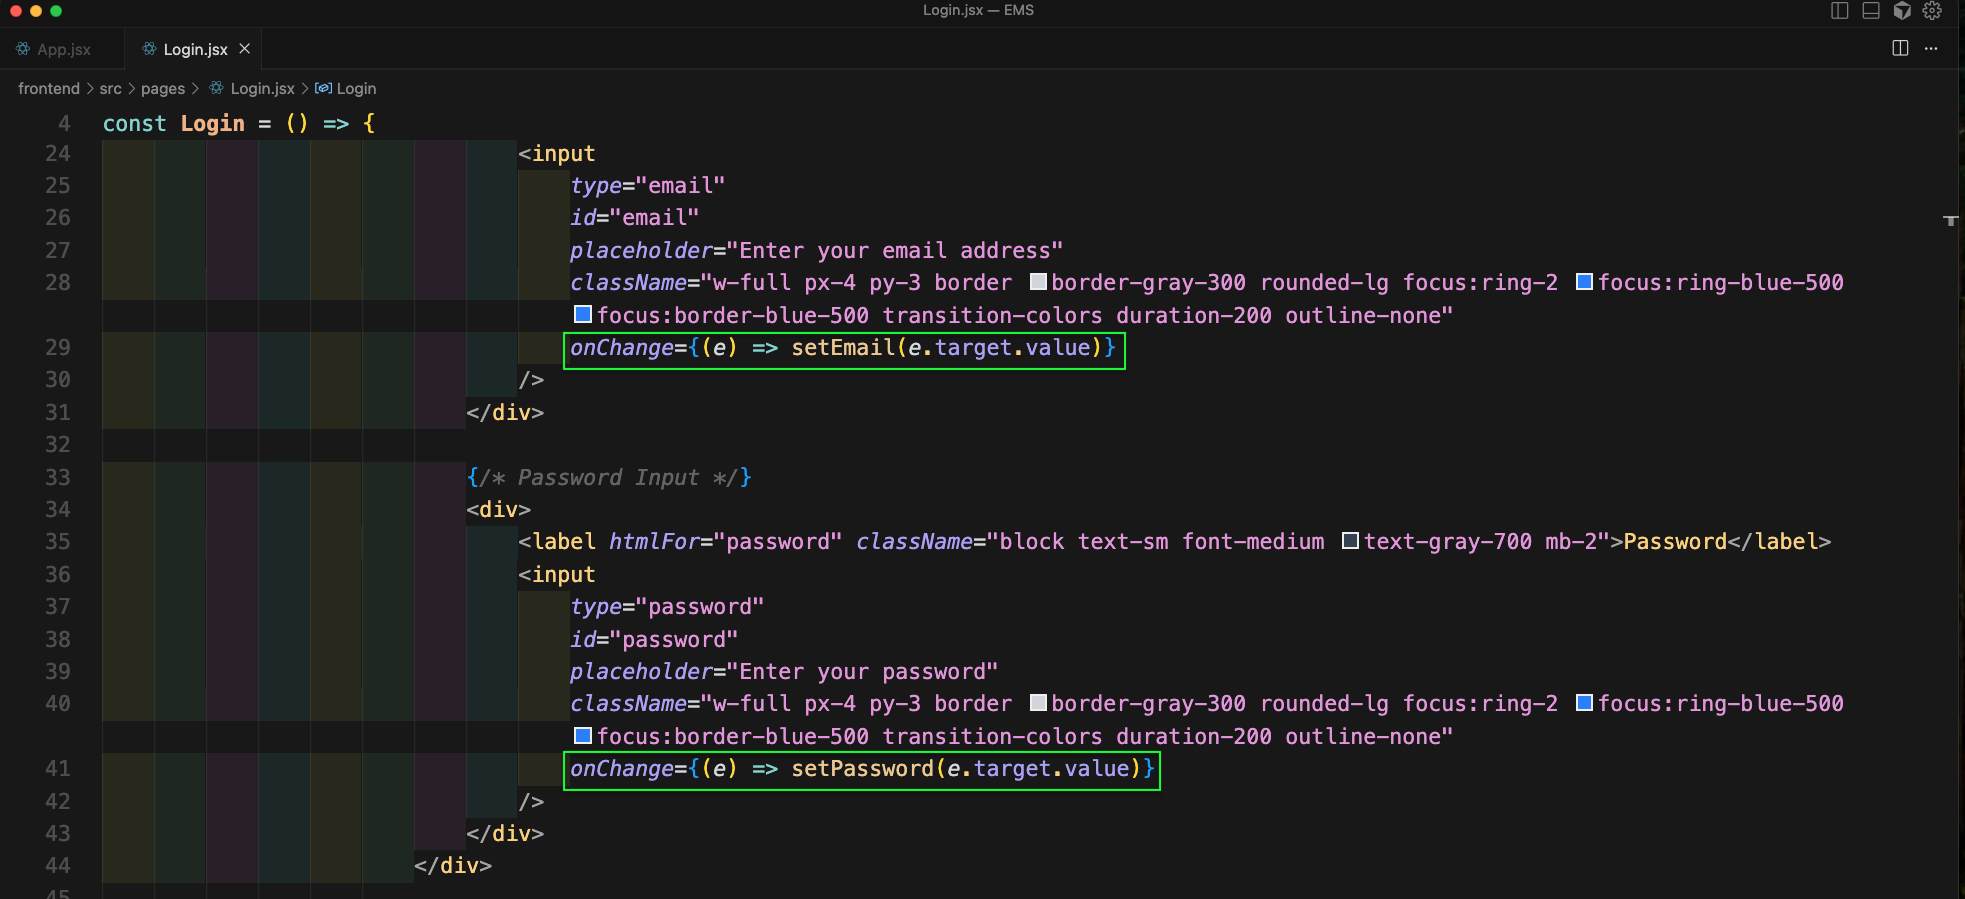
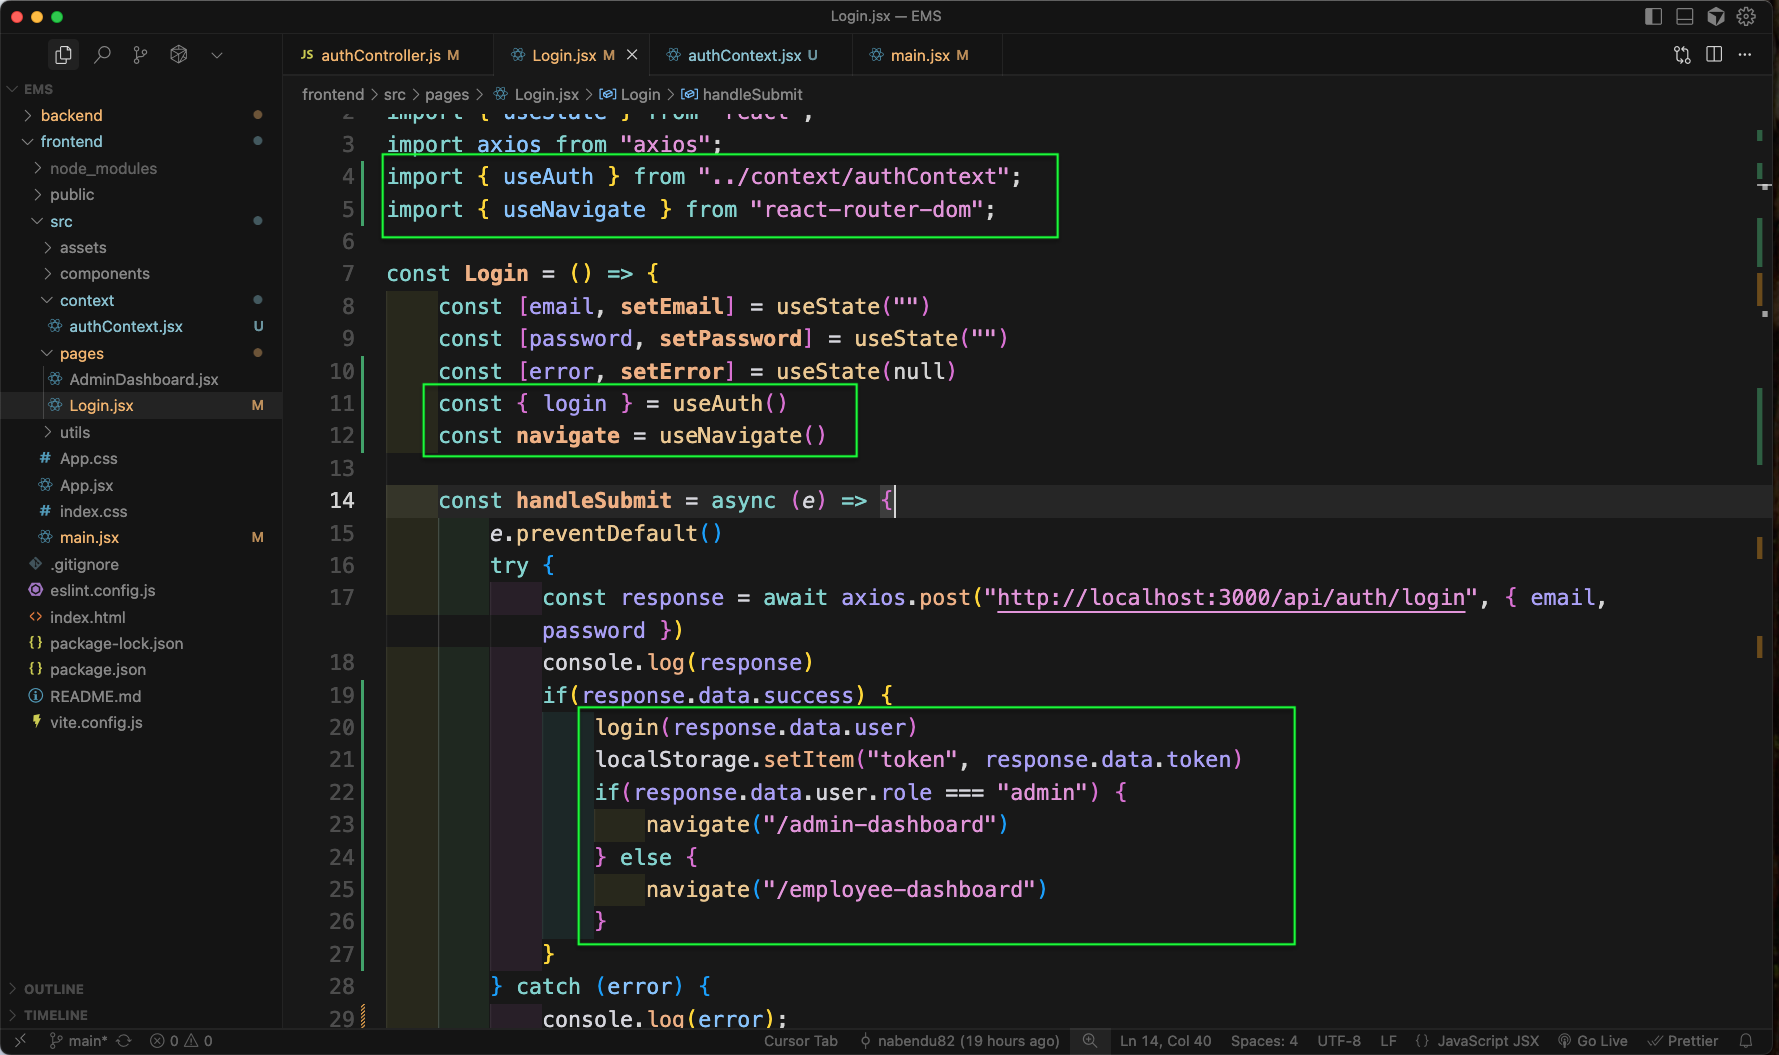
Next, back in Login.jsx file we will add state for email and password. And also an onSubmit in the form.
Now, we will also add onChange to email and password, input fields.
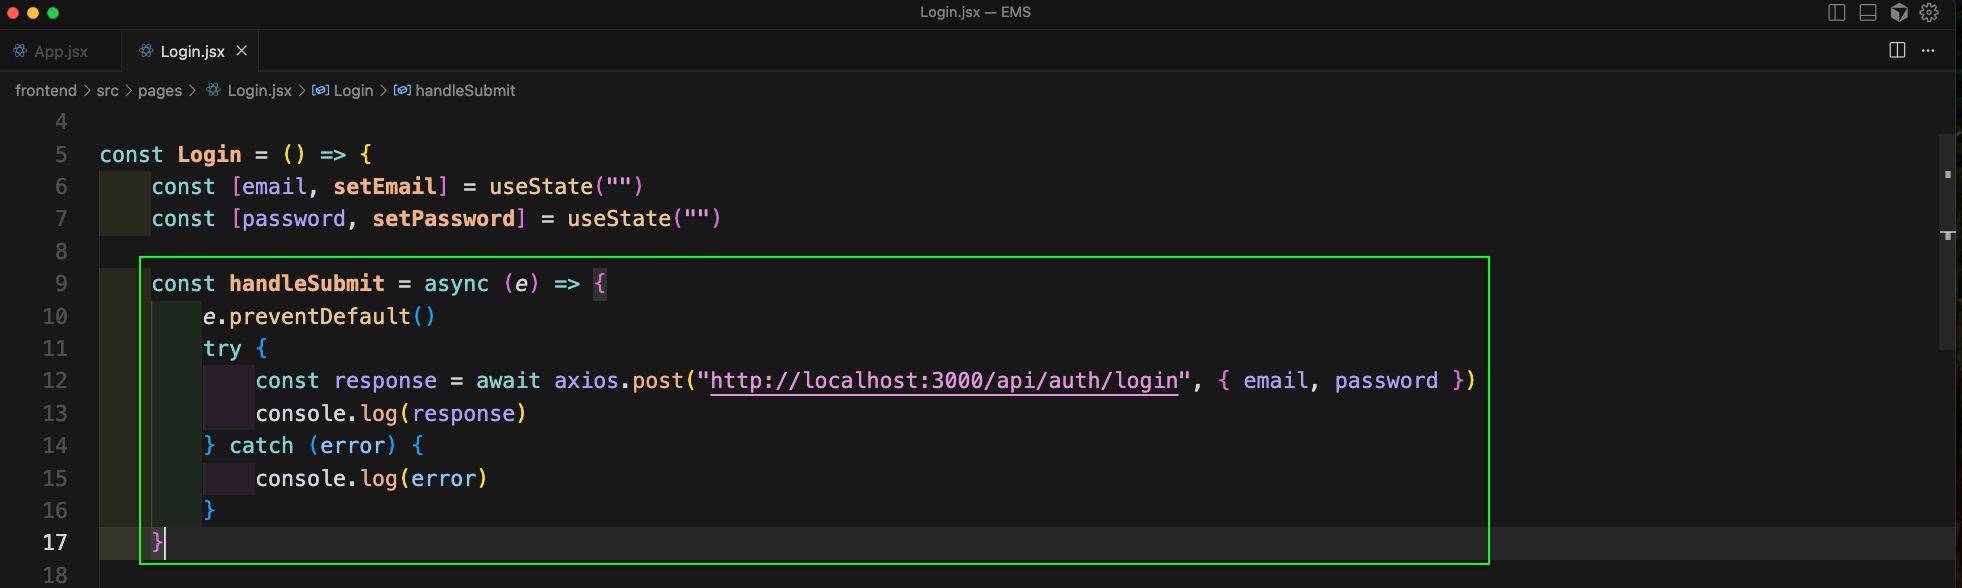
We will also add an handleSubmit function we send email and password data through axios POST request.
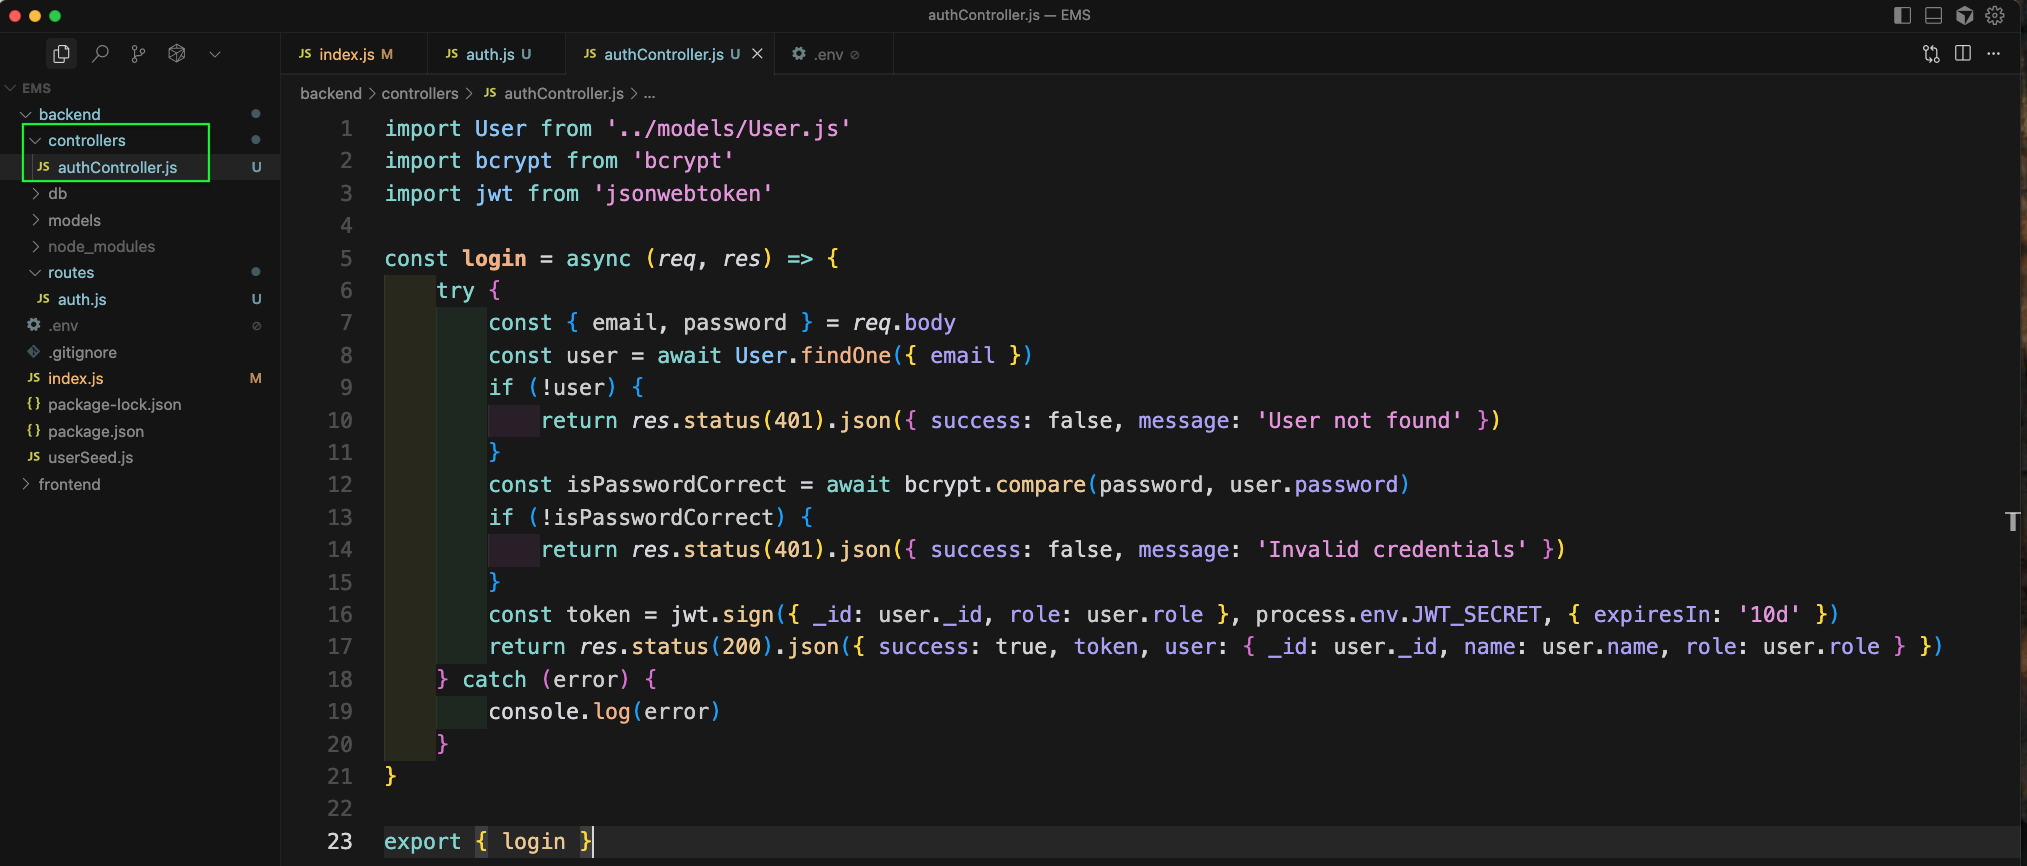
Now, we have to create the end point to be used in frontend. So, for that in backend folder create a controllers folder and then an authController.js file in it.
Create a login function in it, which compares the entered email and password to find if they are correct. After that it generates the JWT token and returns it back along with other data.
Next, in the .env file give a variable called JWT_SECRET and give any value to it.

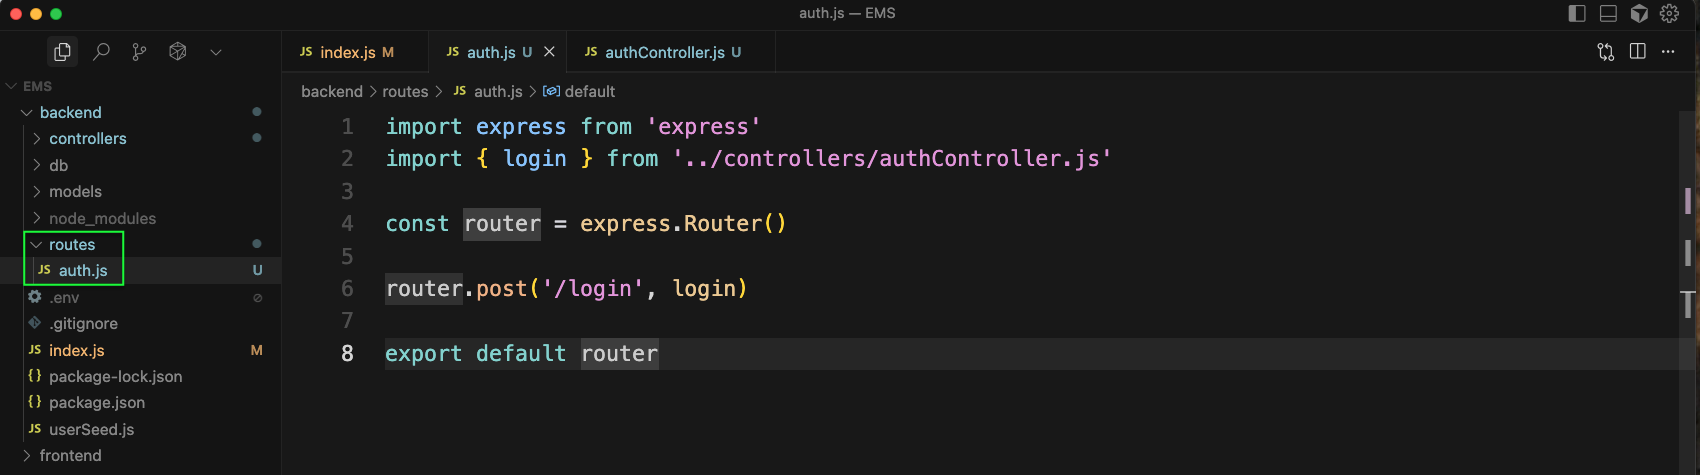
Now, in backend folder create a routes folder and inside it auth.js file. Here, we will use the authController.js file to get the login function. And also create the post for login.
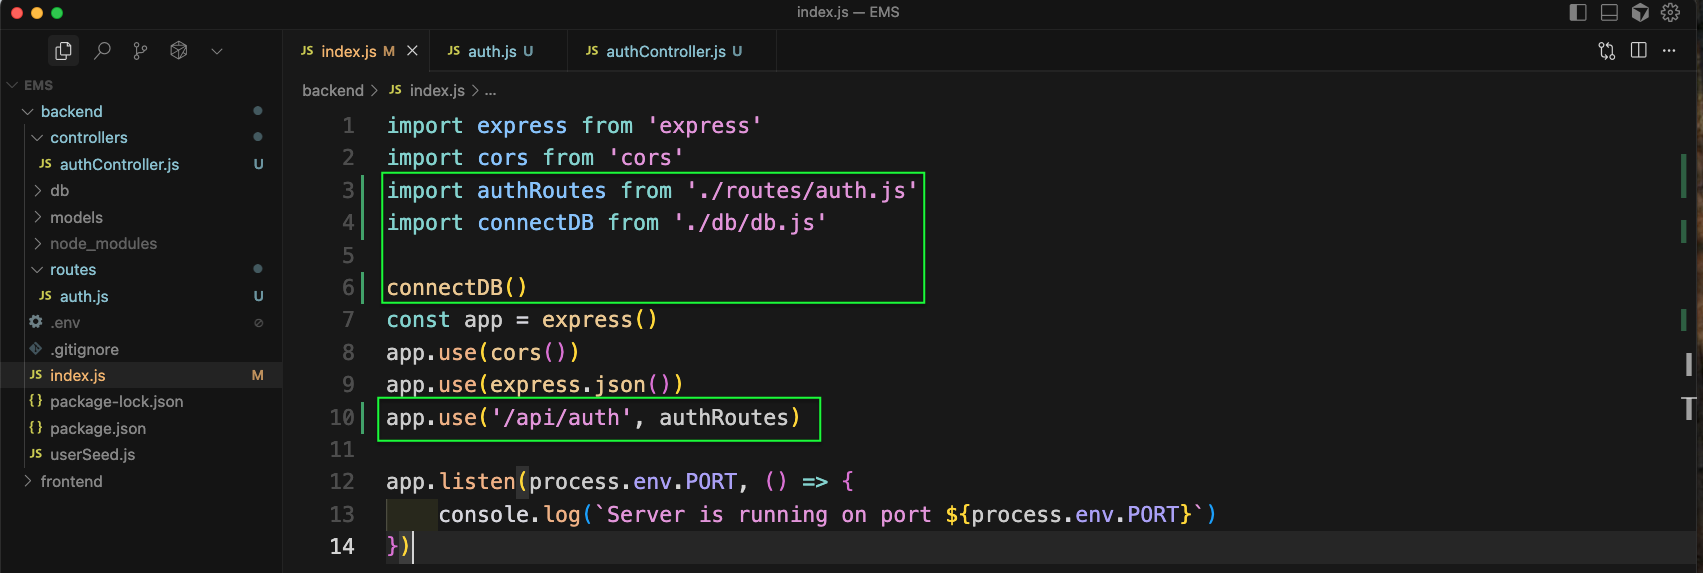
Now, in the index.js file we will import the authRoutes and connectDB and use them.
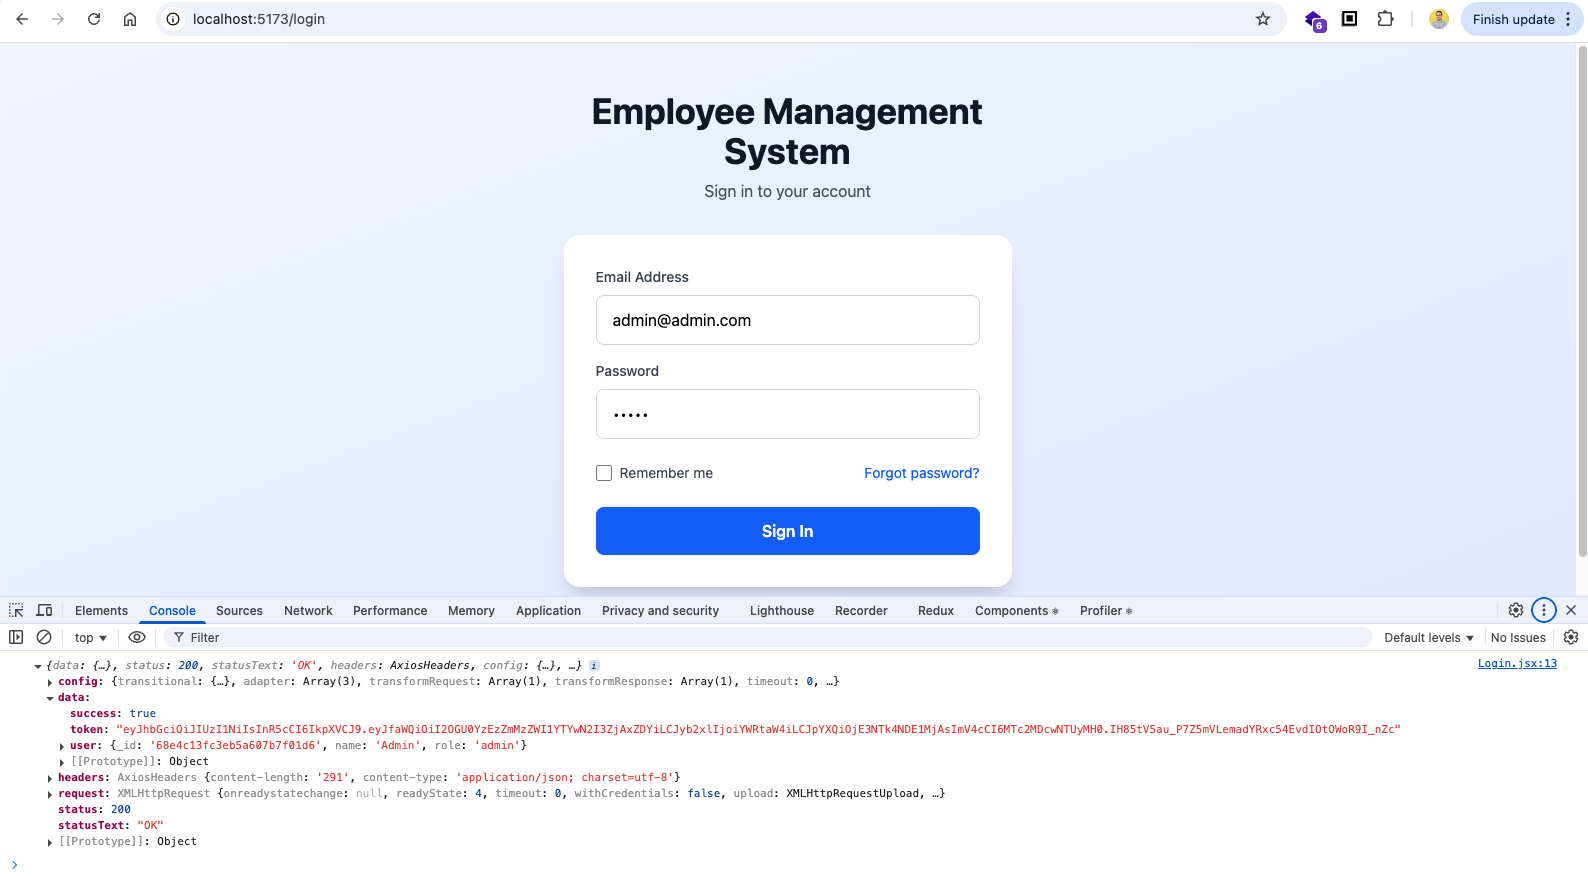
Now, going to http://localhost:5173/login and giving the correct email and password, will show everything is right in browser console.
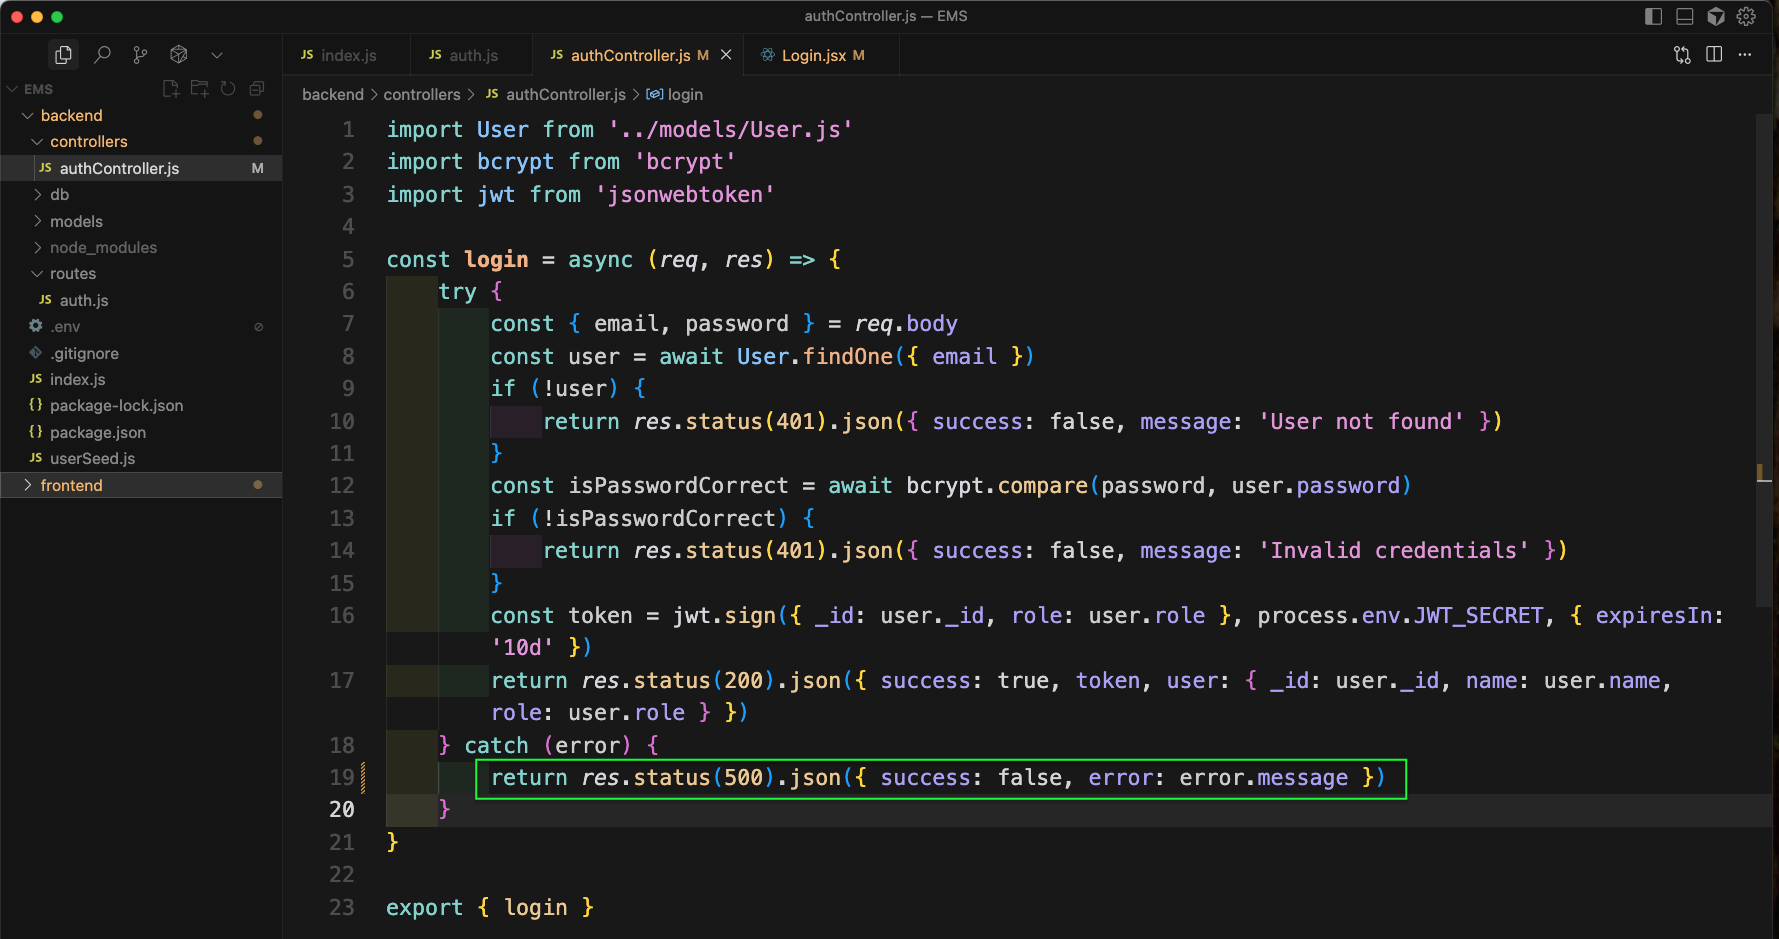
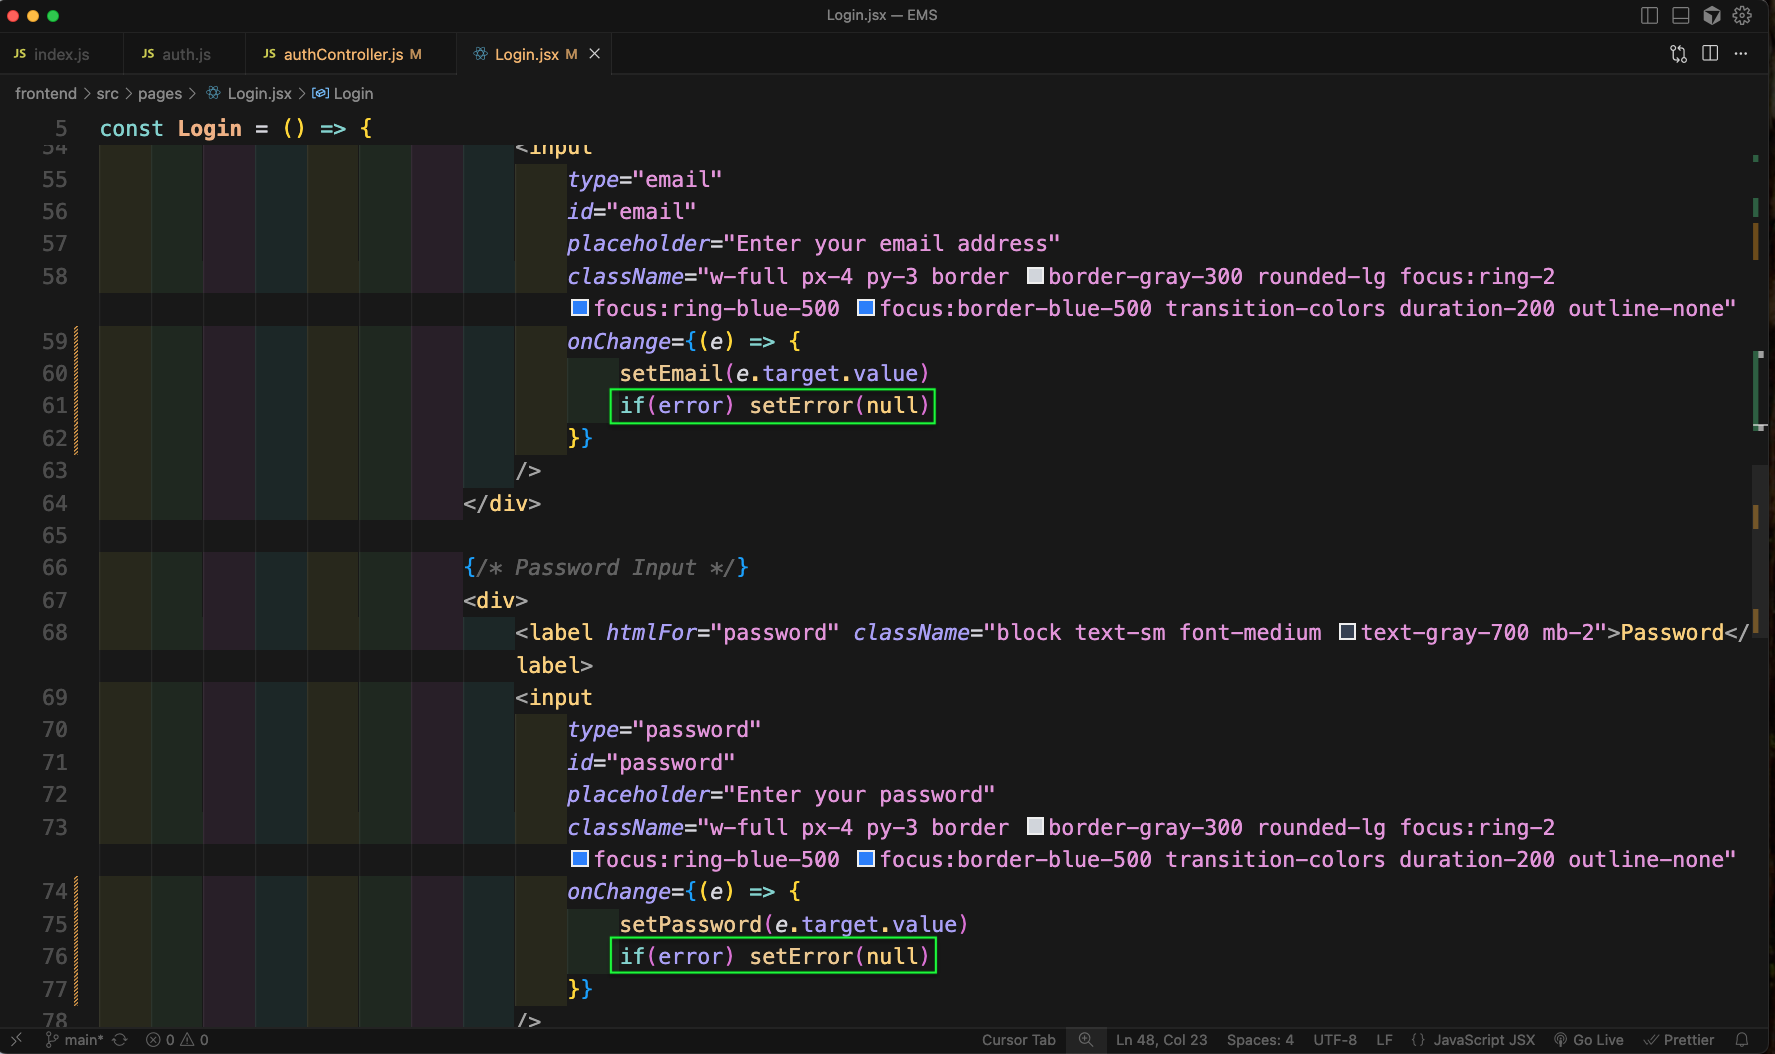
In the authController.js file we will change the return in catch block for error.
Back in the Login.jsx file we will add state for error and also update the try and catch data.

Next, we will also add code when we get error.
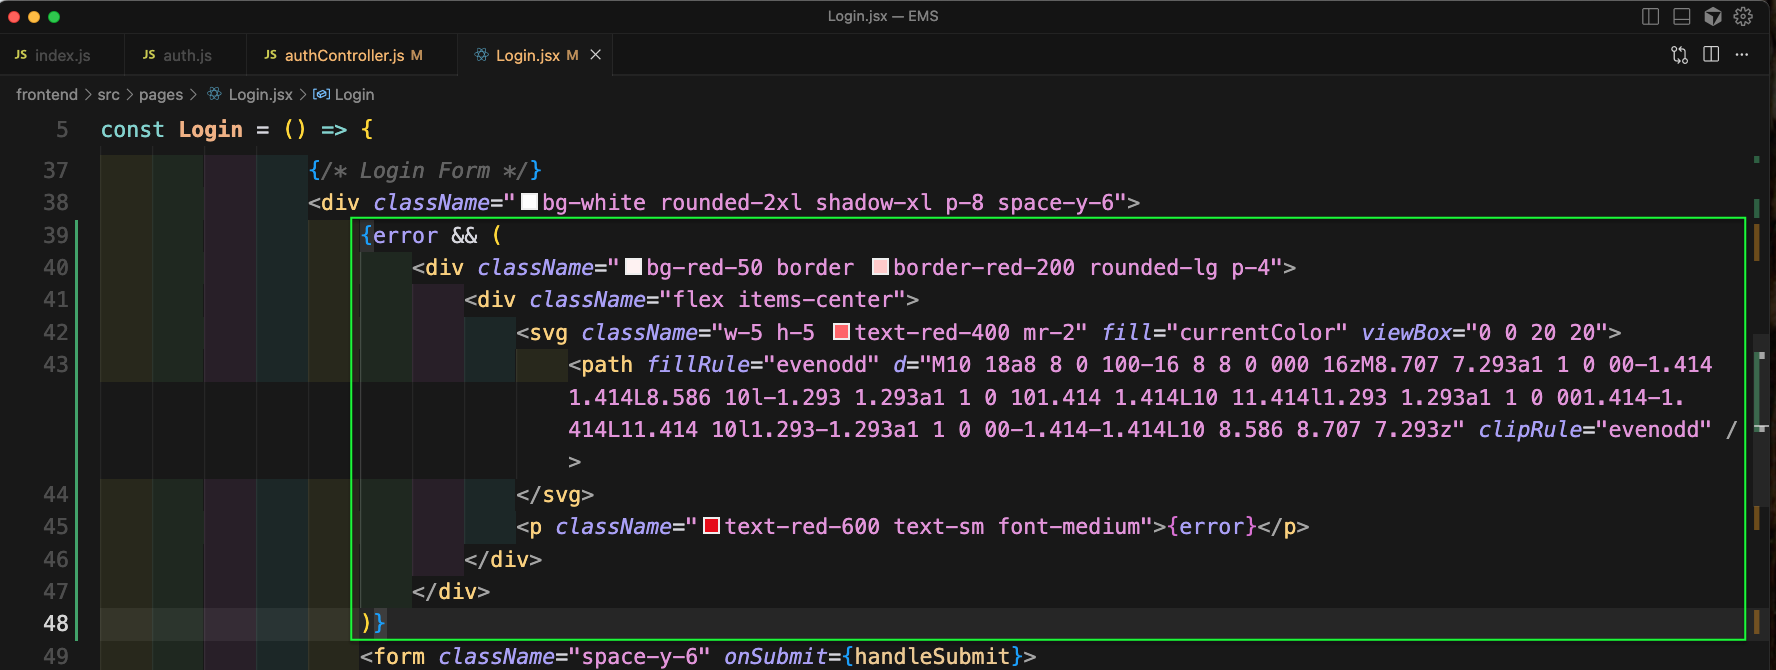
We will also add code for error, which will update the error state
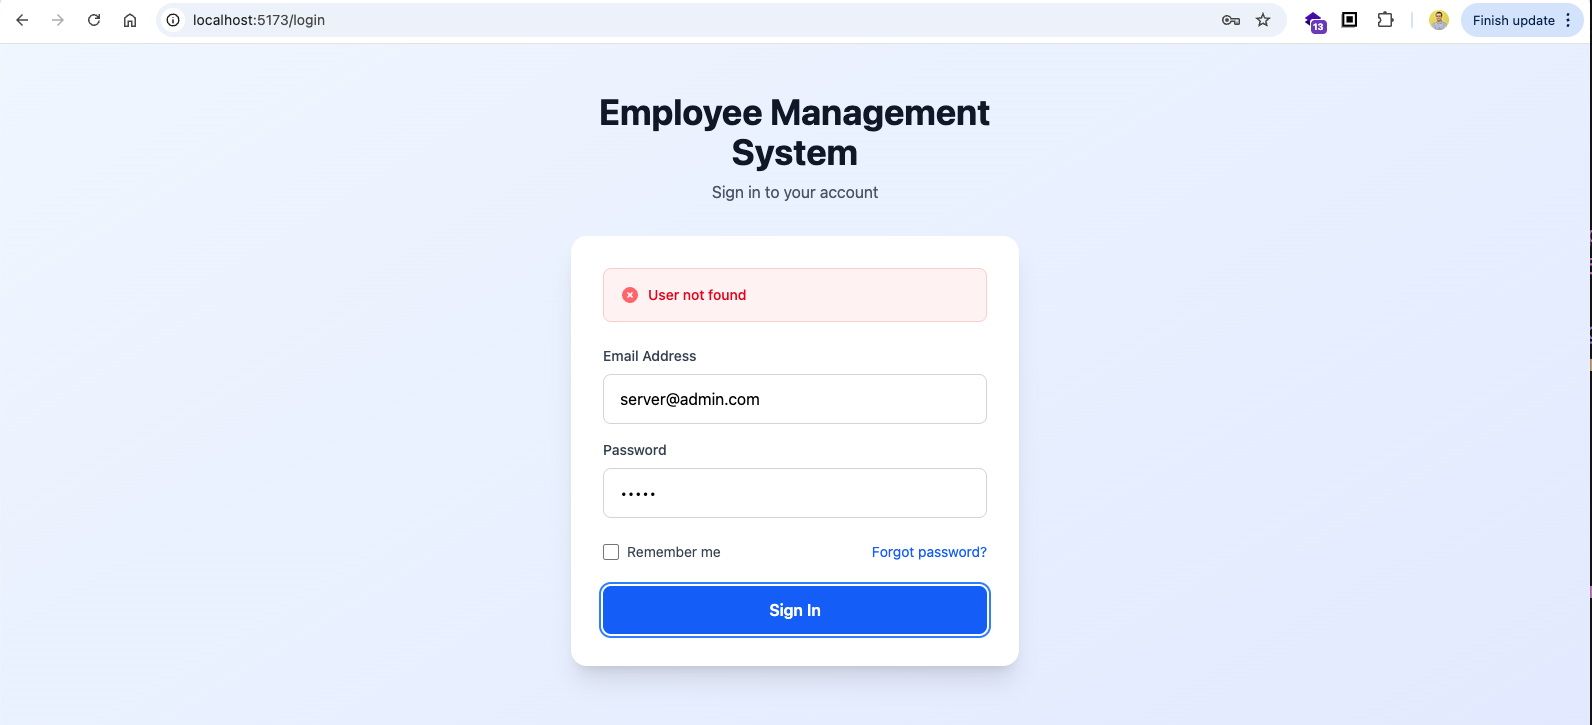
Now, in http://localhost:5173/login give a wrong email and we will get right error.
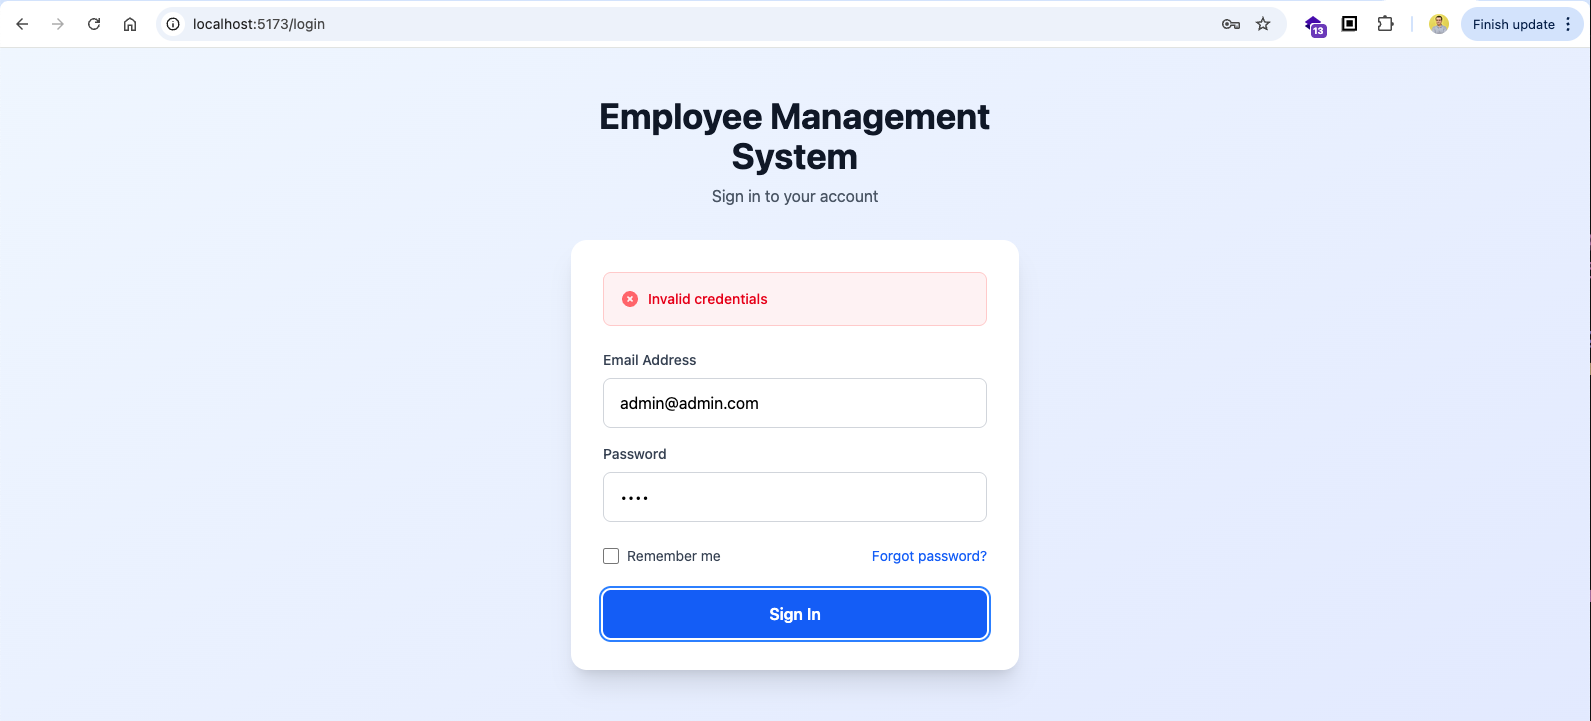
Also, if we give wrong password, we will get the correct error.
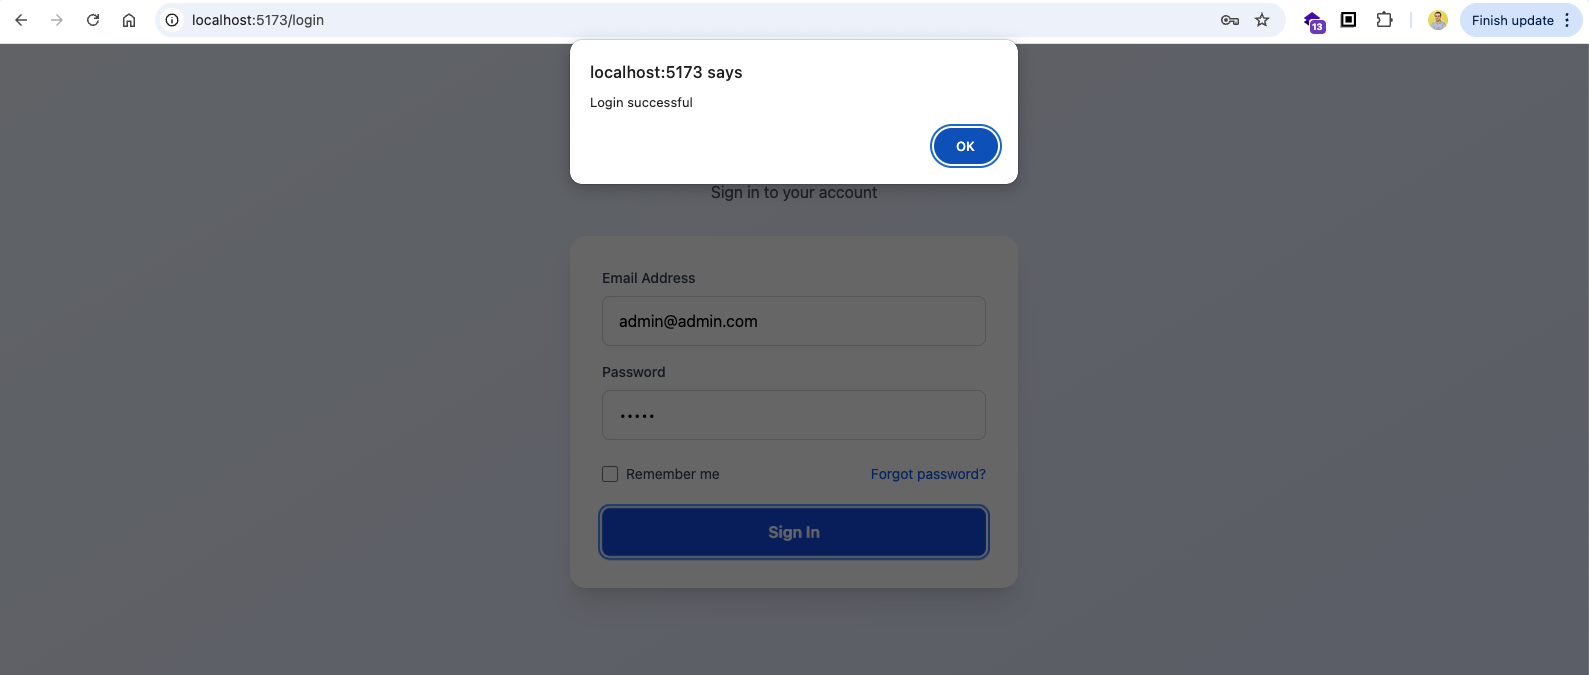
Only, if we give everything correctly we will get the alert for Login successful
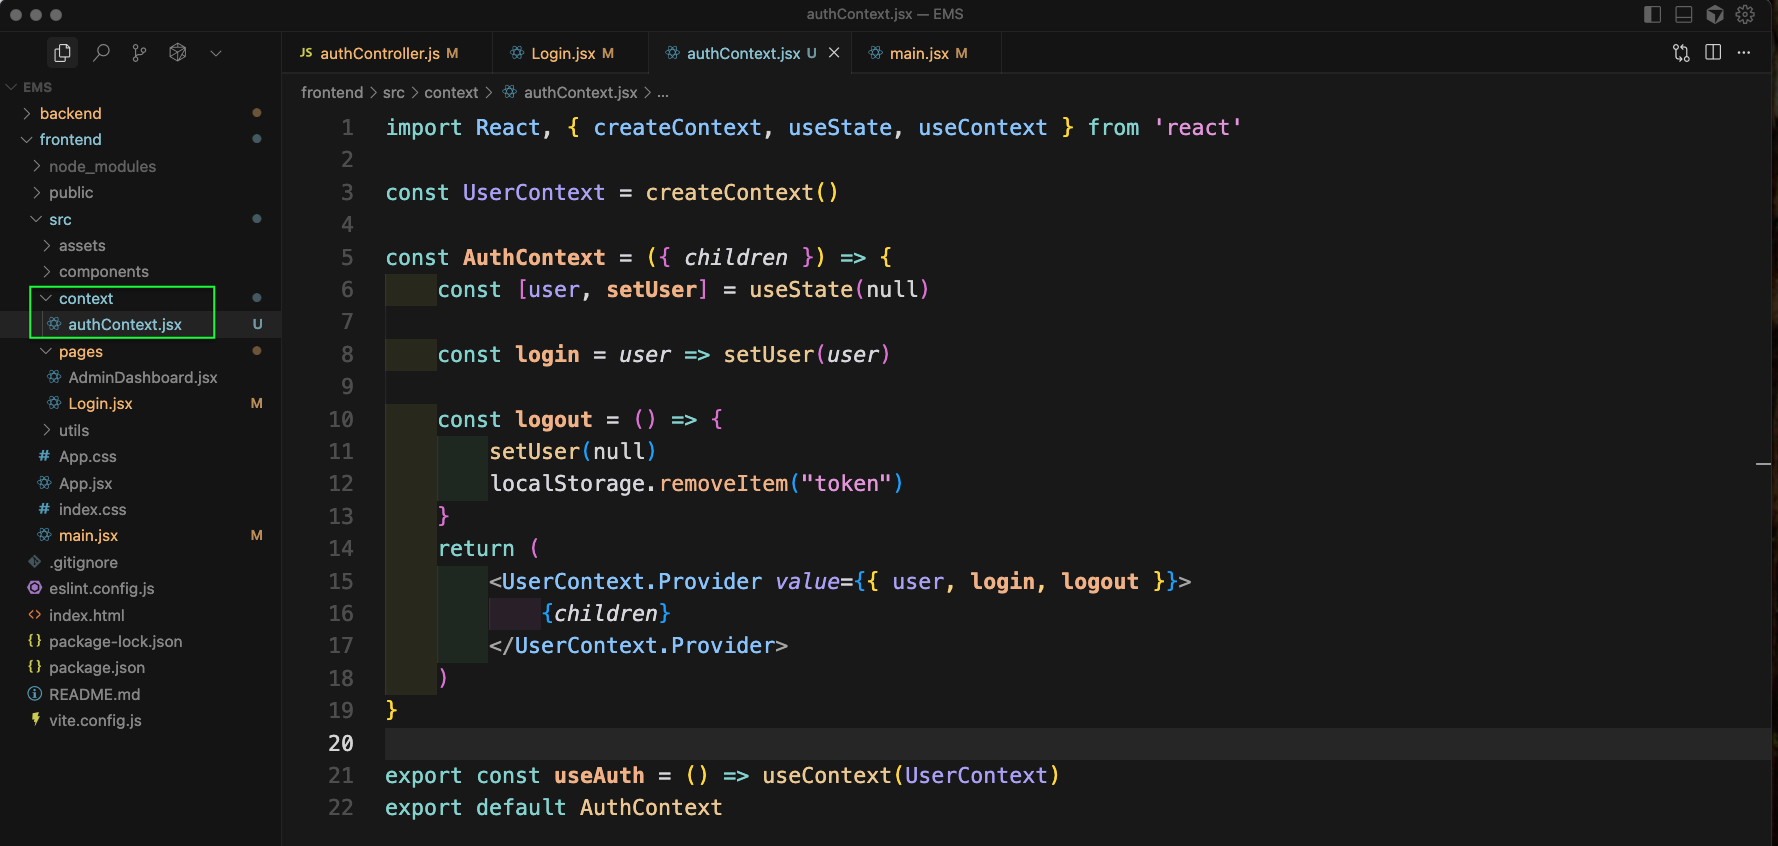
Now, inside the src folder we will create a context folder. And then a authContext.jsx file. Here, we will creat the context and create a Provider and pass the user, login and logout.
Back in the Login.jsx file we will import the useAuth and useNavigate. Then we will use the login and navigate inside the Login component.
After that if we have a success, we will pass the user in the login function. And will also use localStorage.setItem to add the token.
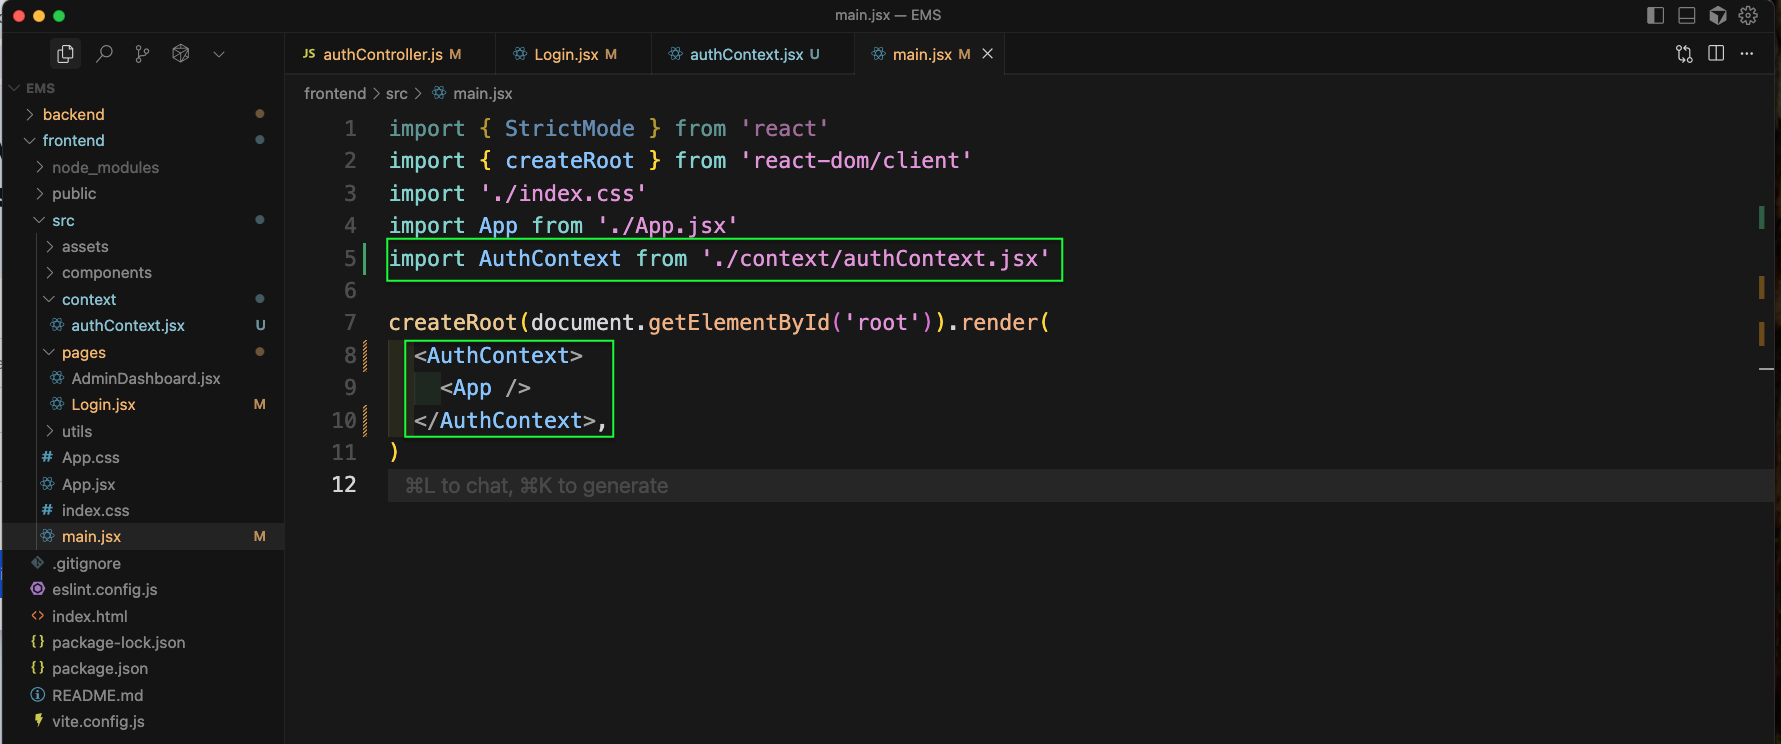
After that in the main.jsx file, we will use the AuthContext
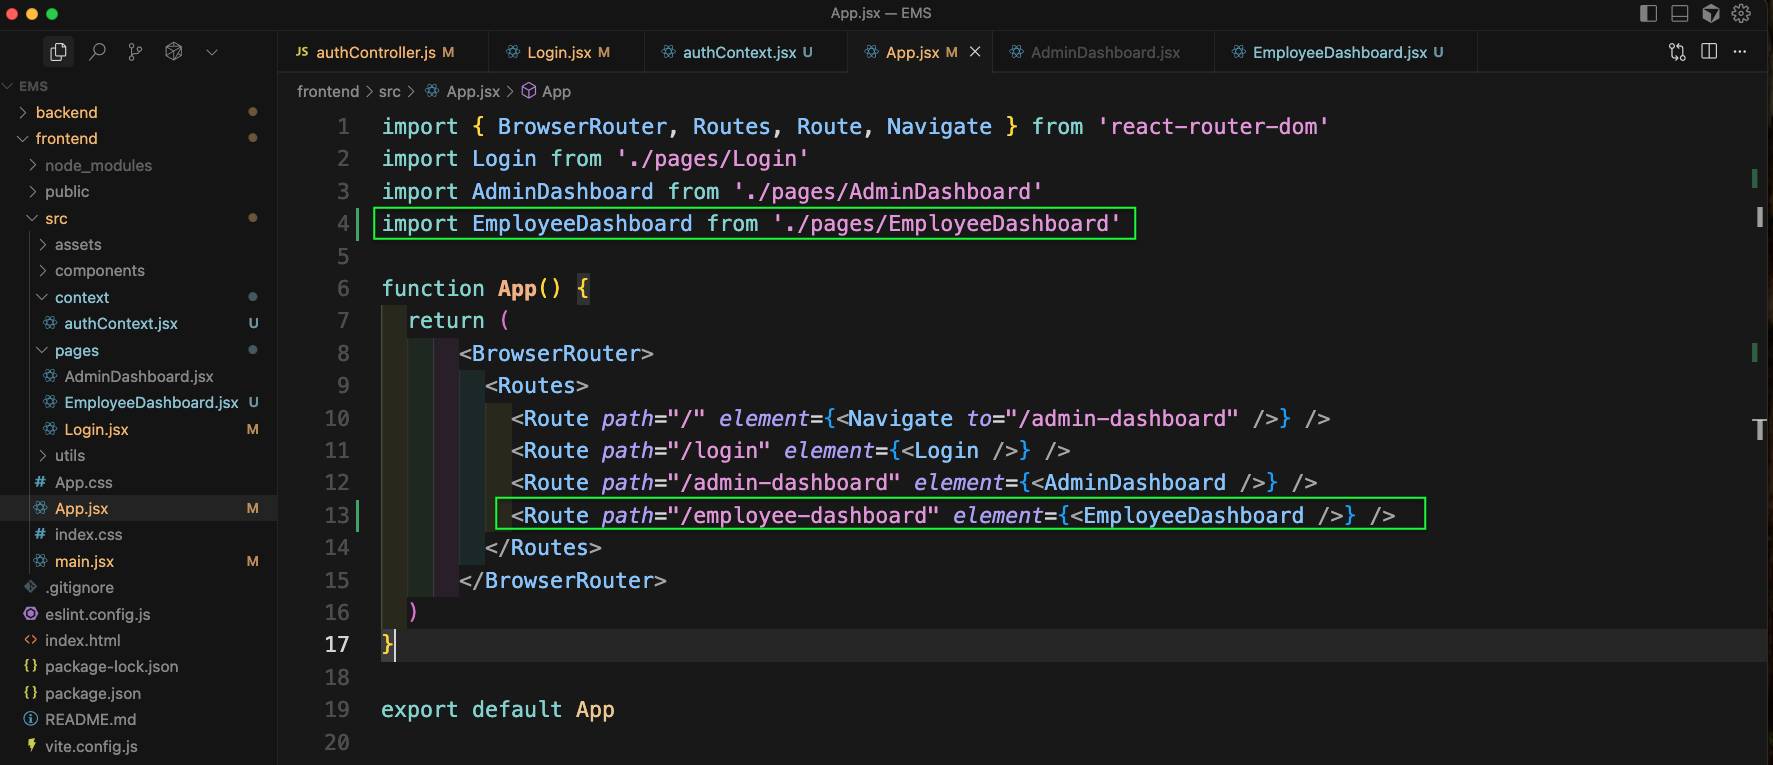
Now, in App.jsx file we will add the route for employee-dashboard which will call a component EmployeeDashboard
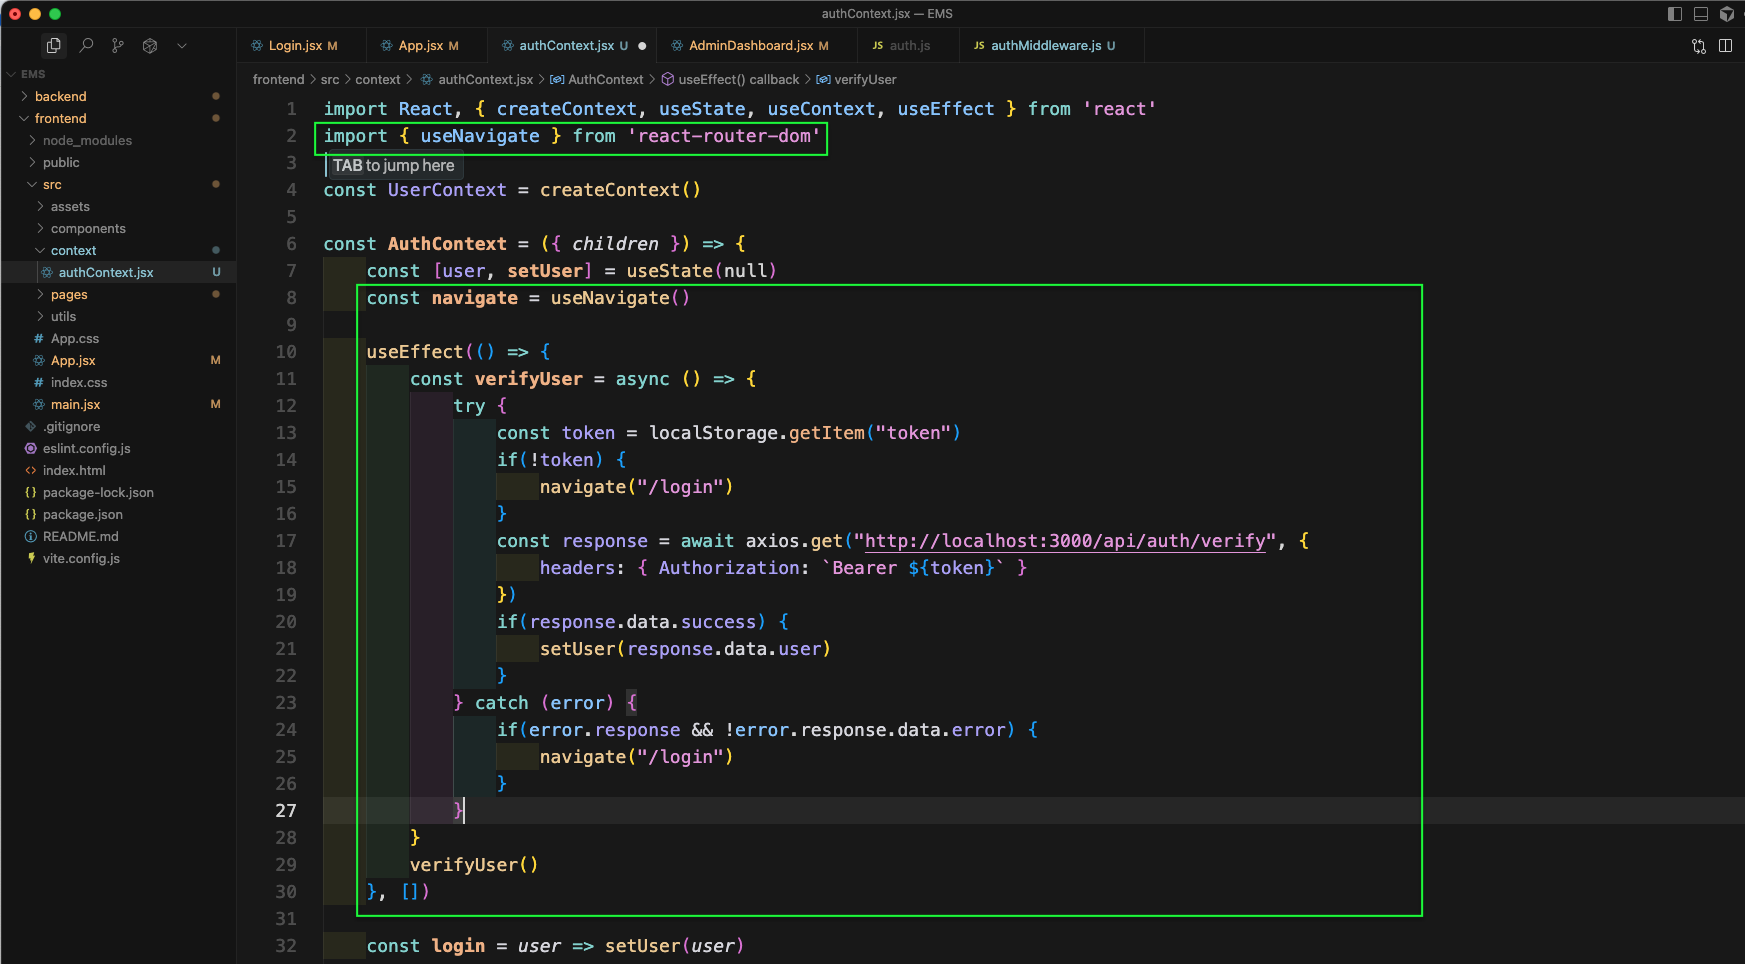
Now, in the authContext.jsx file we will use useNavigate. And then in useEffect we will call a route to verify the user using the stored token.
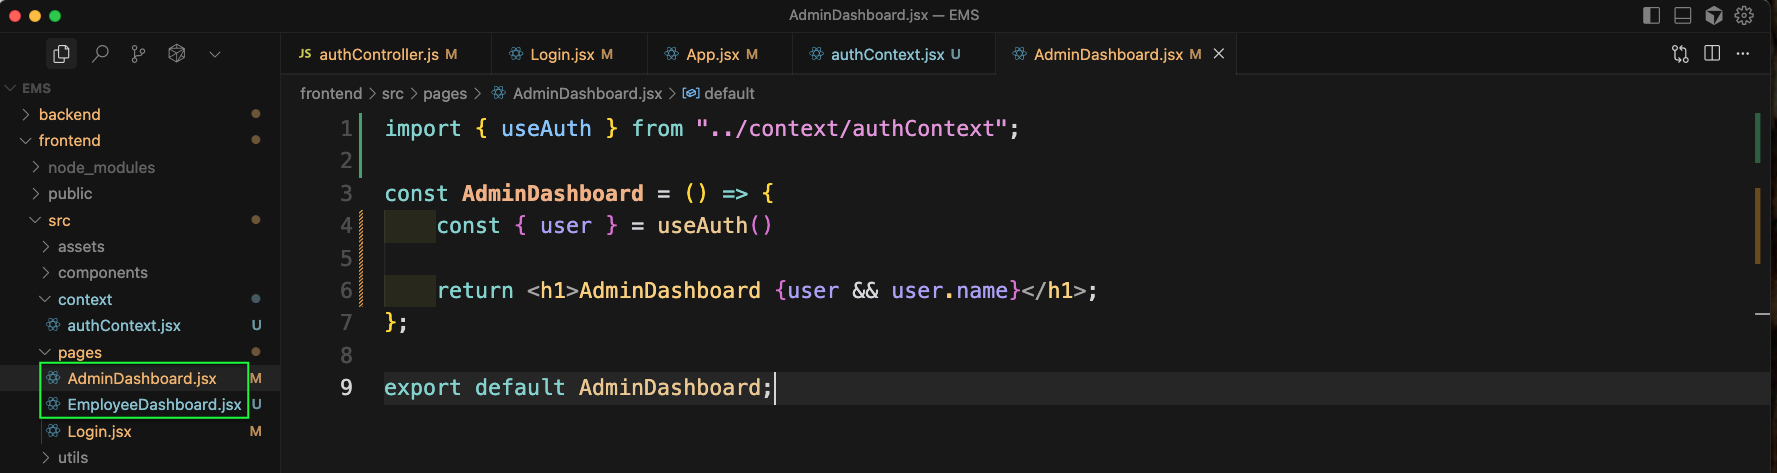
Now, we will create AdminDashboard.jsx and EmployeeDashboard.jsx file inside the pages folder. Here, we will create a simple AdminDashboard component first in AdminDashboard.jsx file.
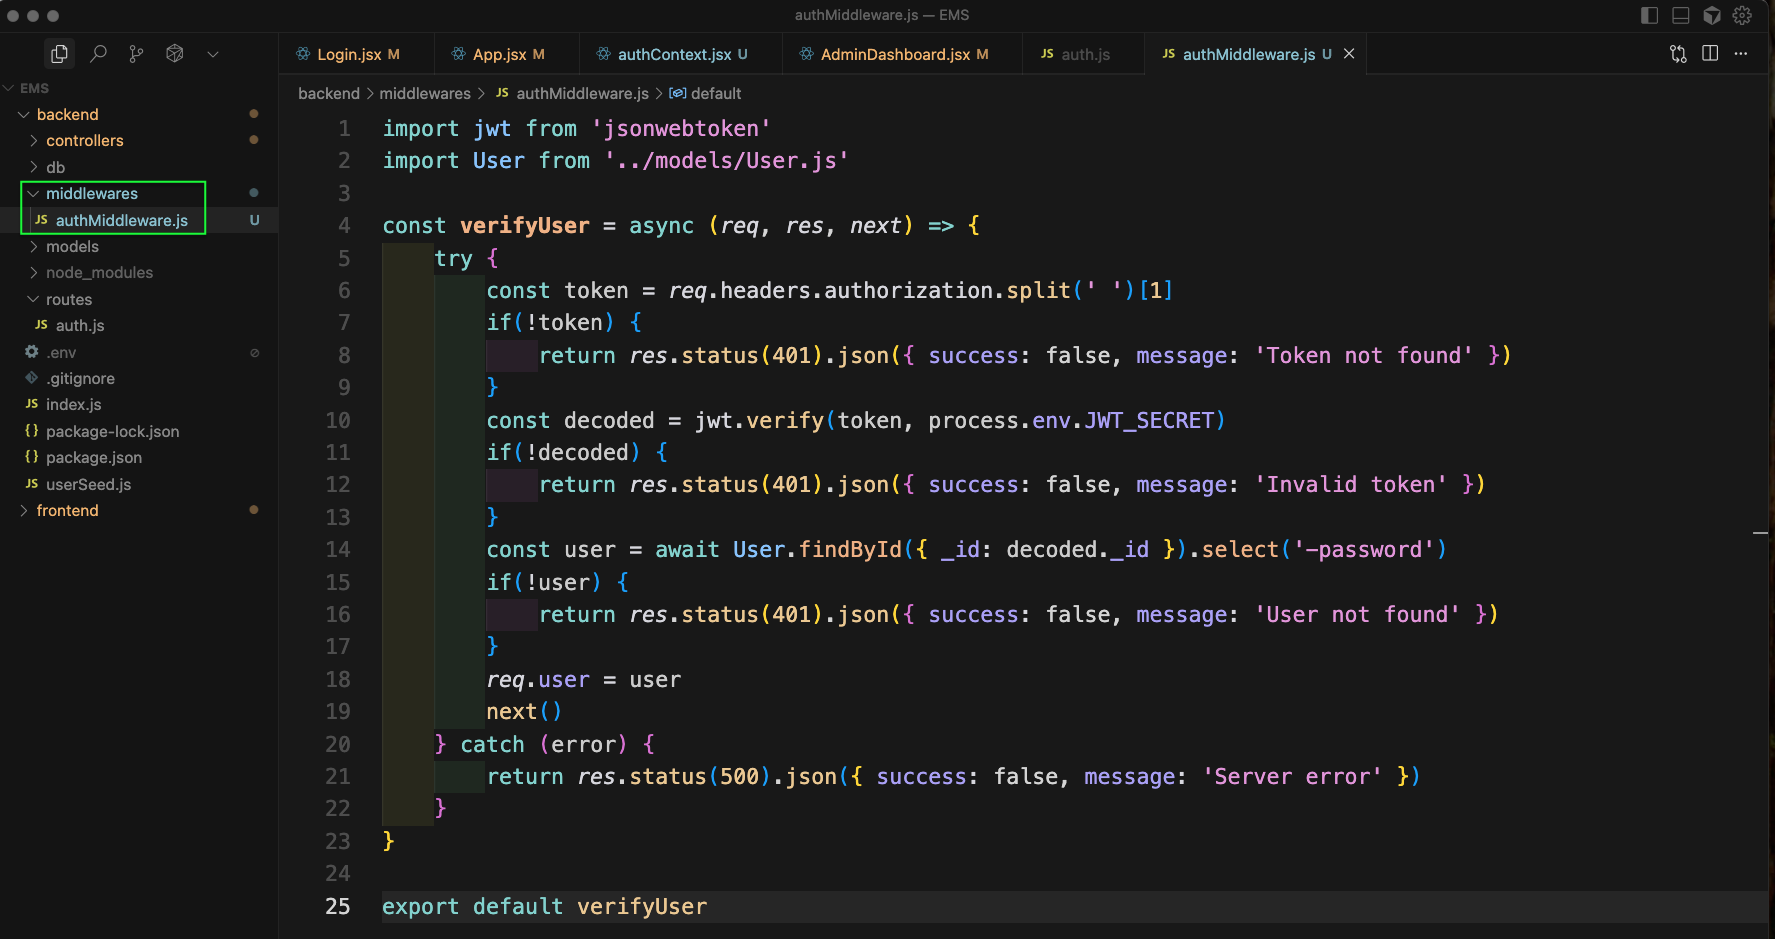
Back, in the backend folder, we will create a middlewares folder. And inside it authMiddleware.js file. Here, we will create a function verifyUser which will take the token and decode it with the JWT_SECRET.
Now, in authController.js file we will also add the verify function.

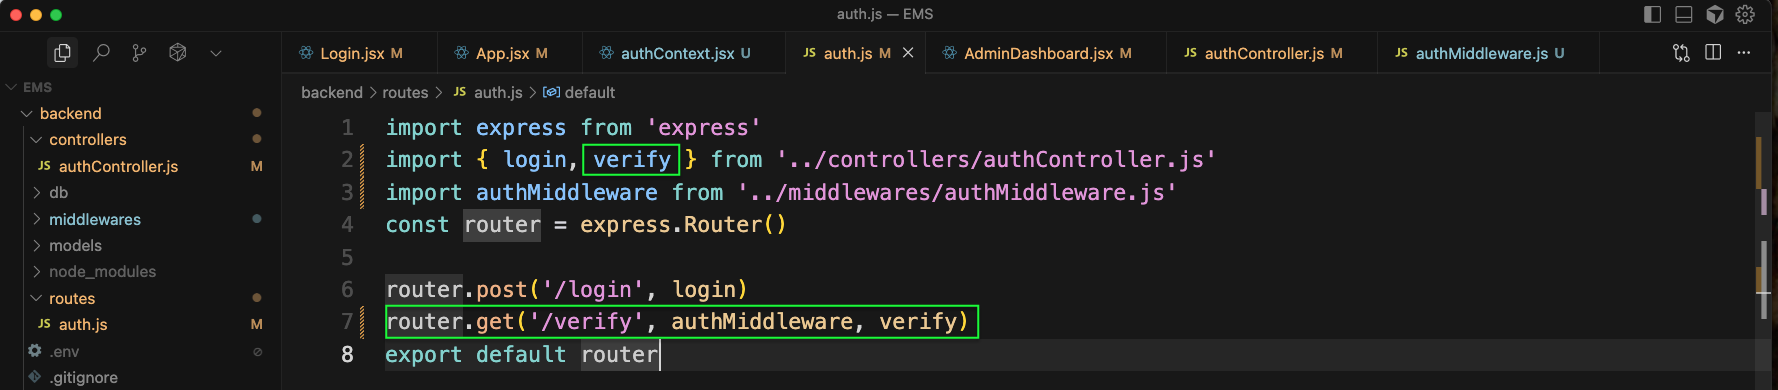
Next, in auth.js file we will add the new GET route of verify.
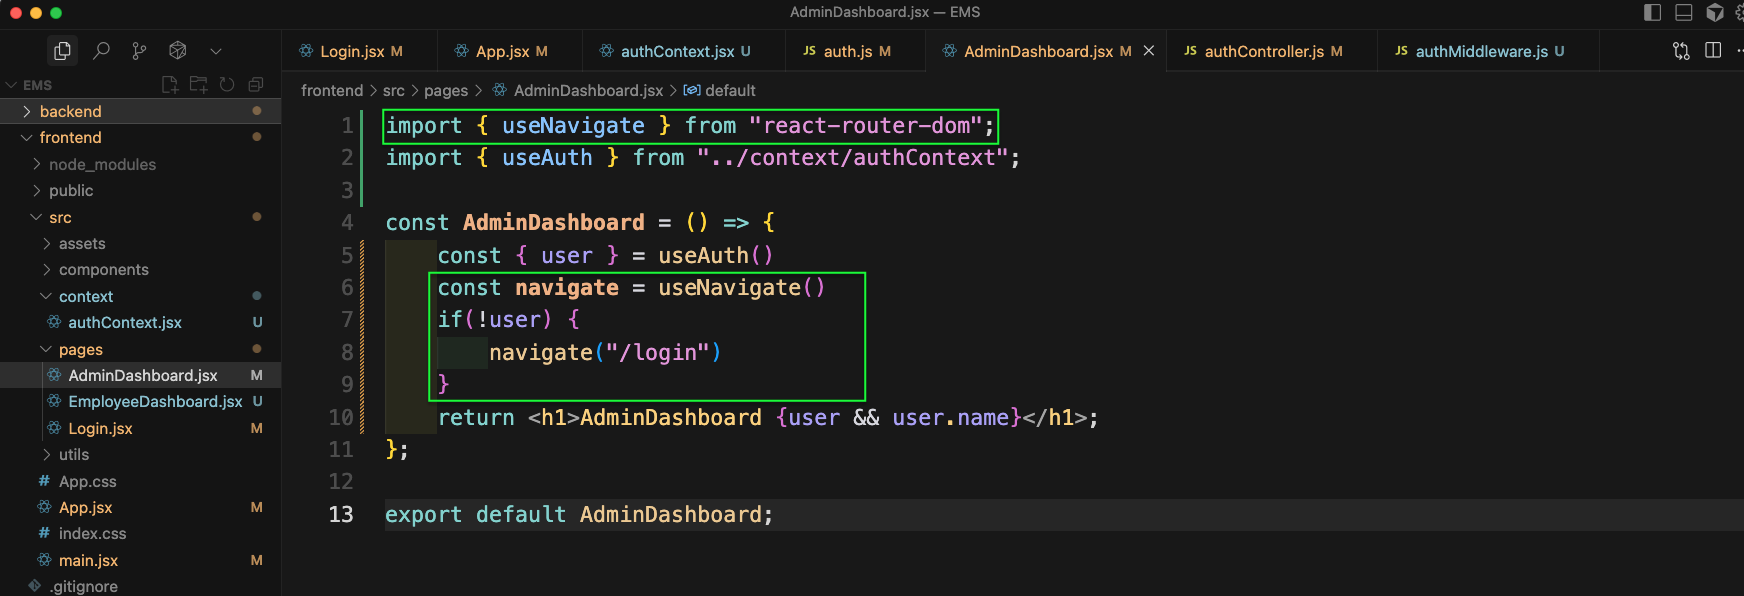
Now, in the AdminDashboard.jsx file, we will update the code to add navigate.
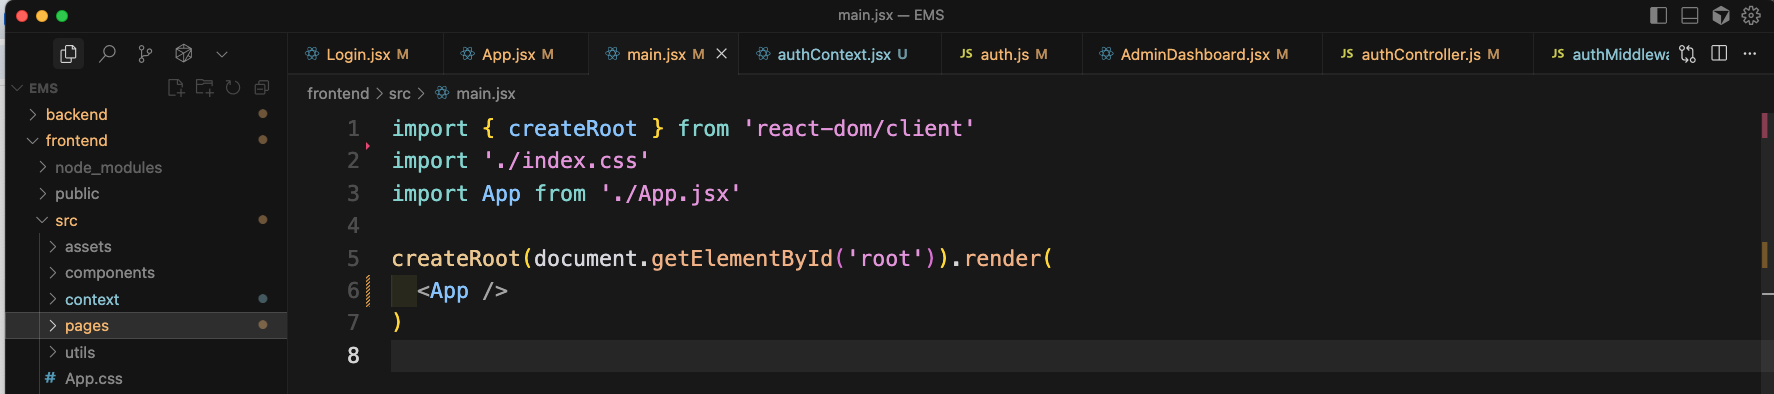
In the main.jsx file we will remove the earlier AuthContext
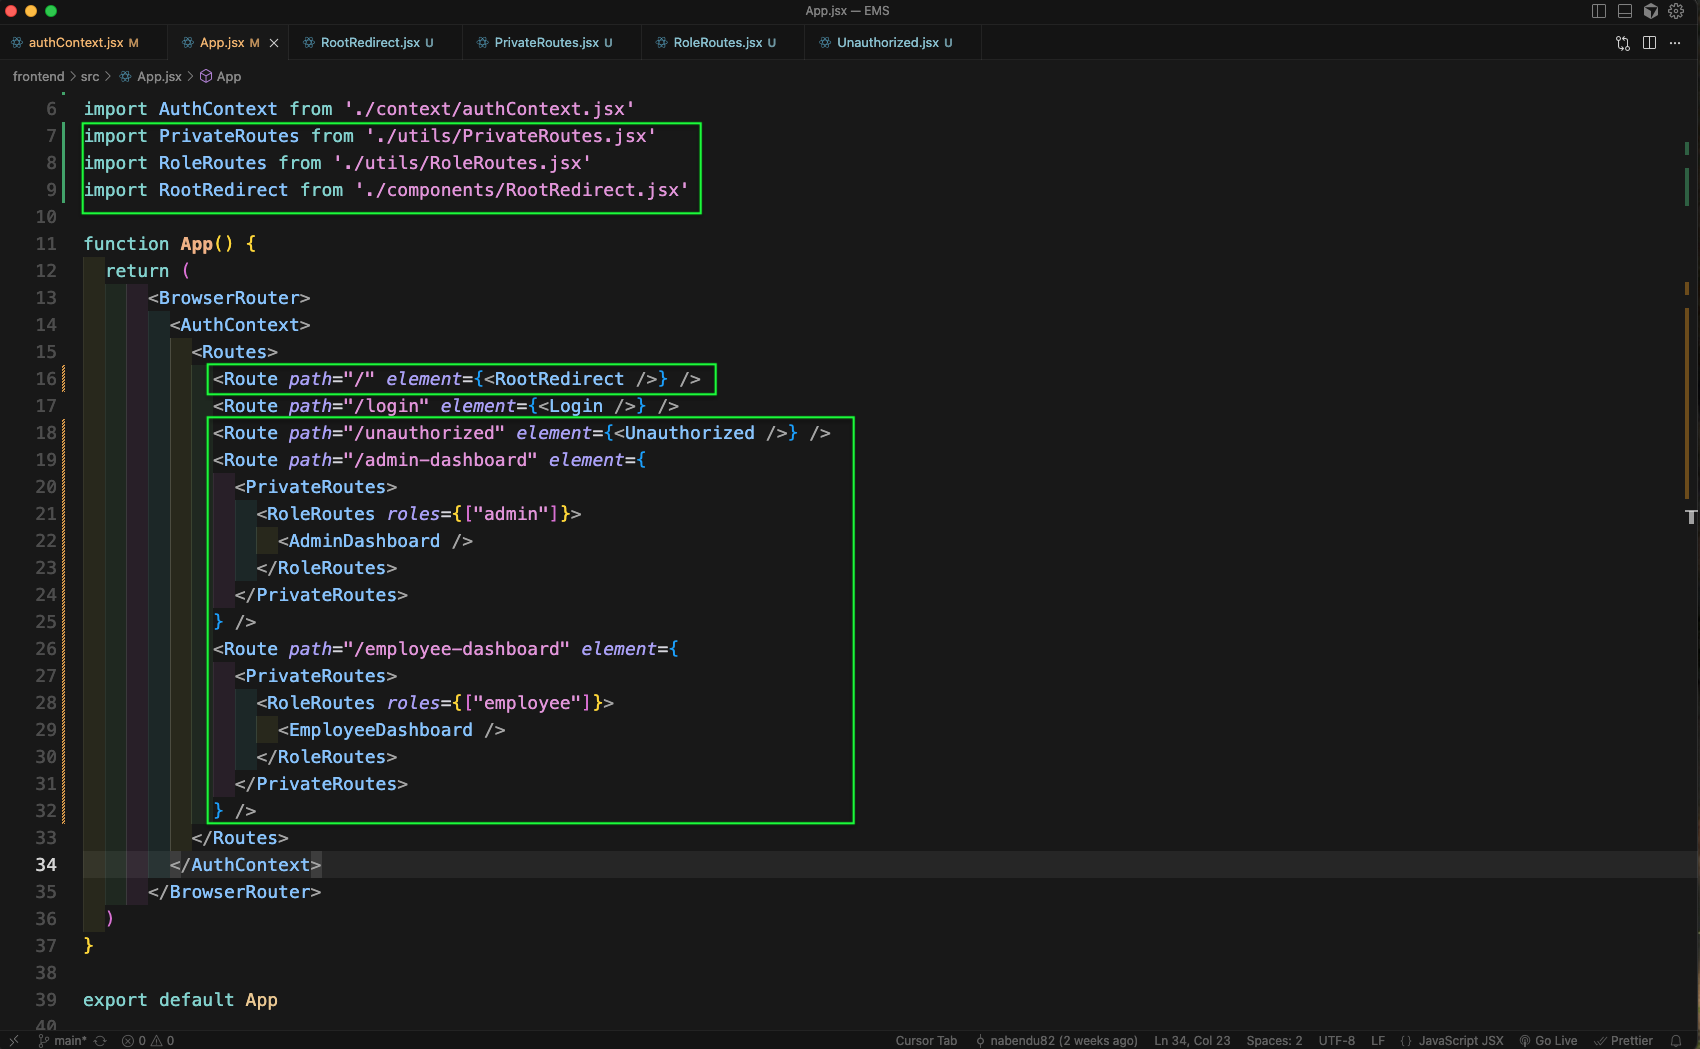
We will add the AuthContext in App.jsx file.

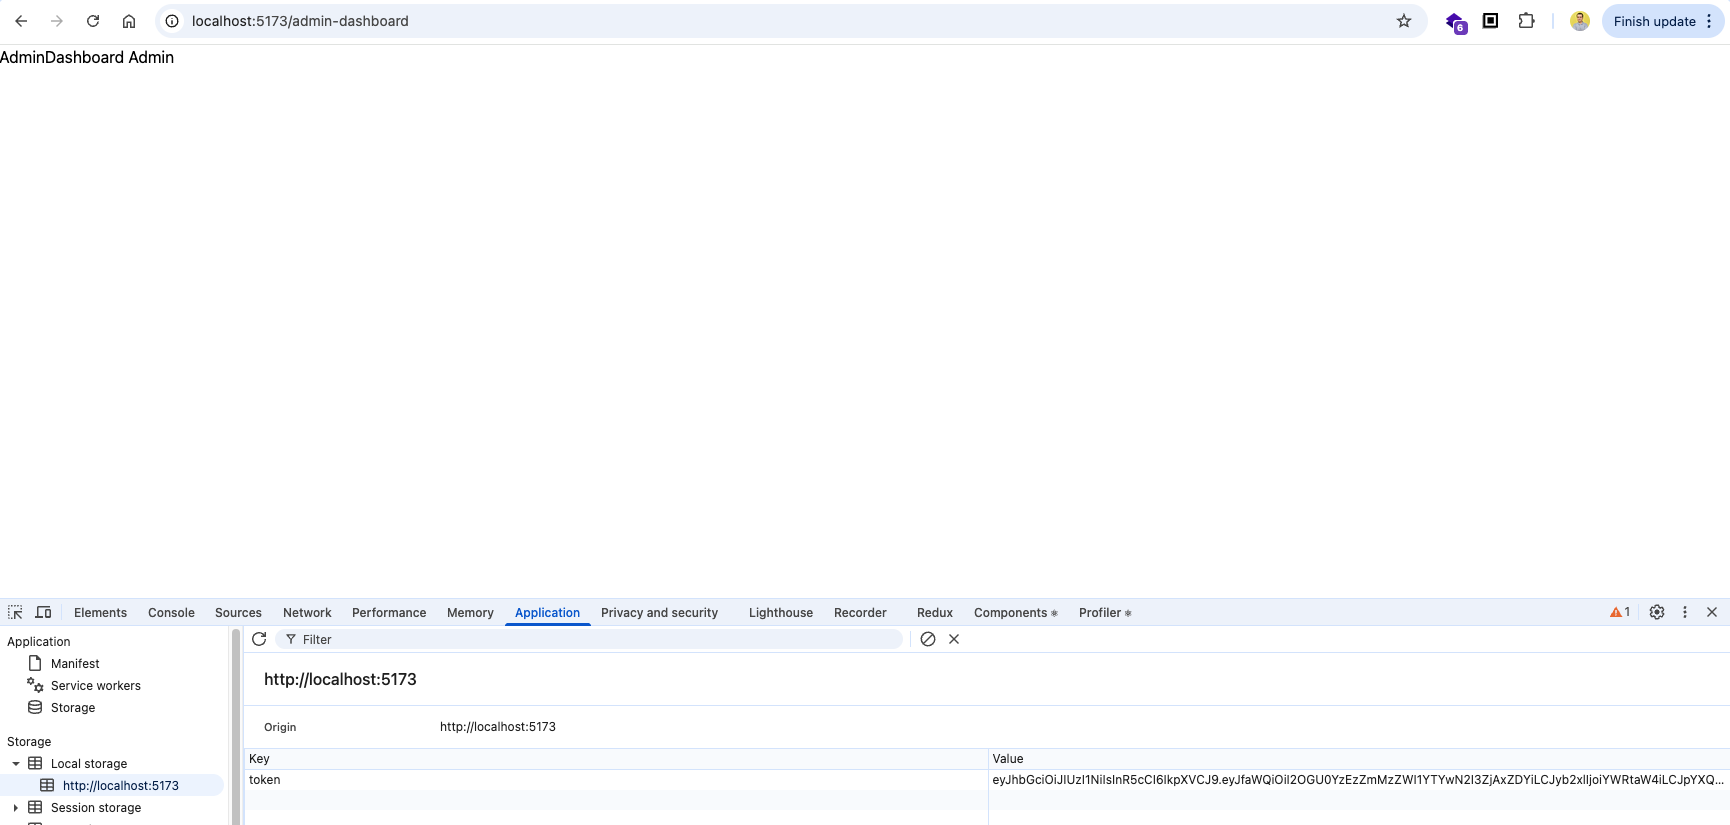
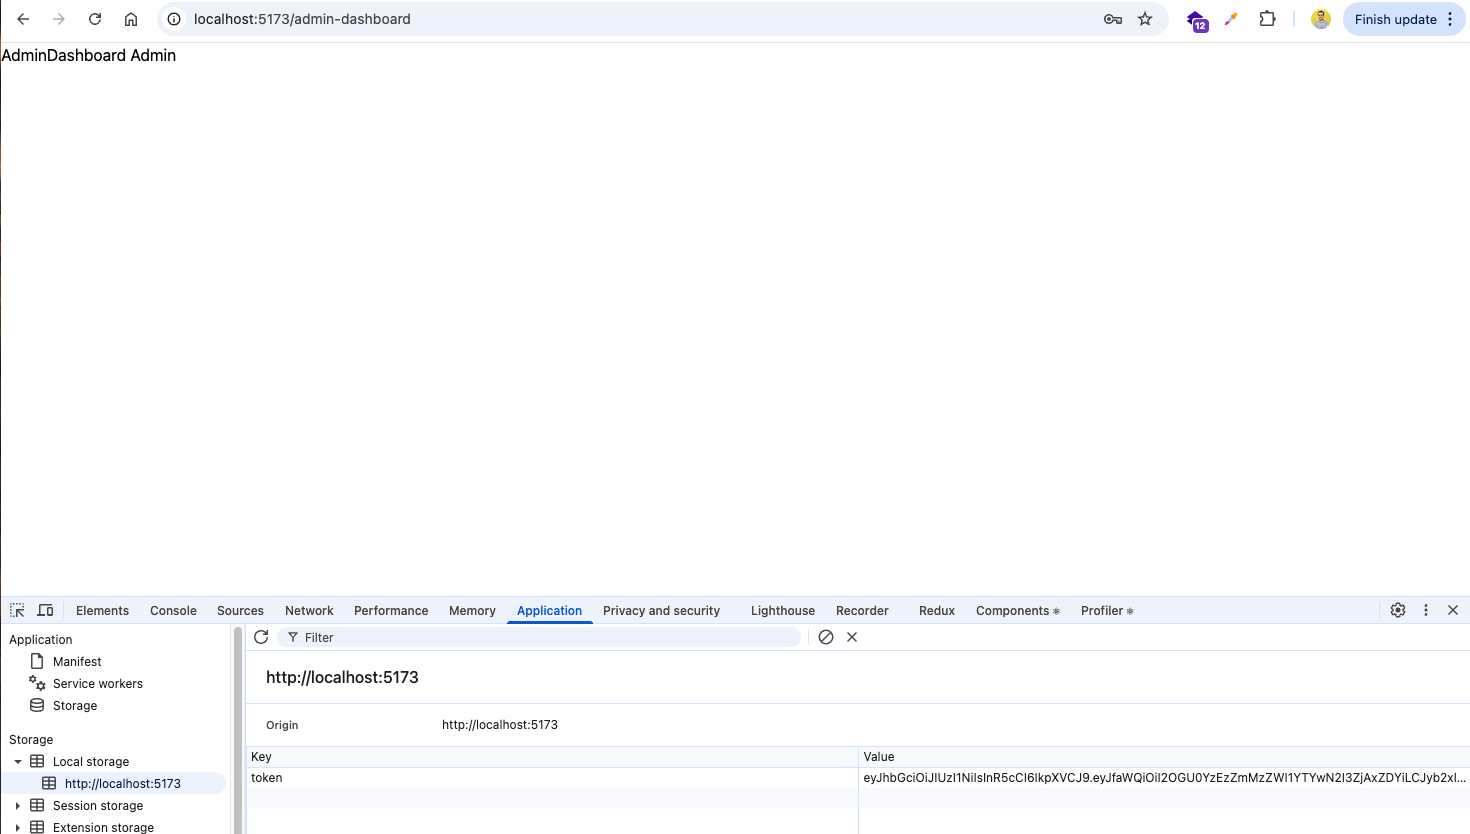
Now, go to http://localhost:5173/admin-dashboard and you will be taken to the right component. It also have the token stored.
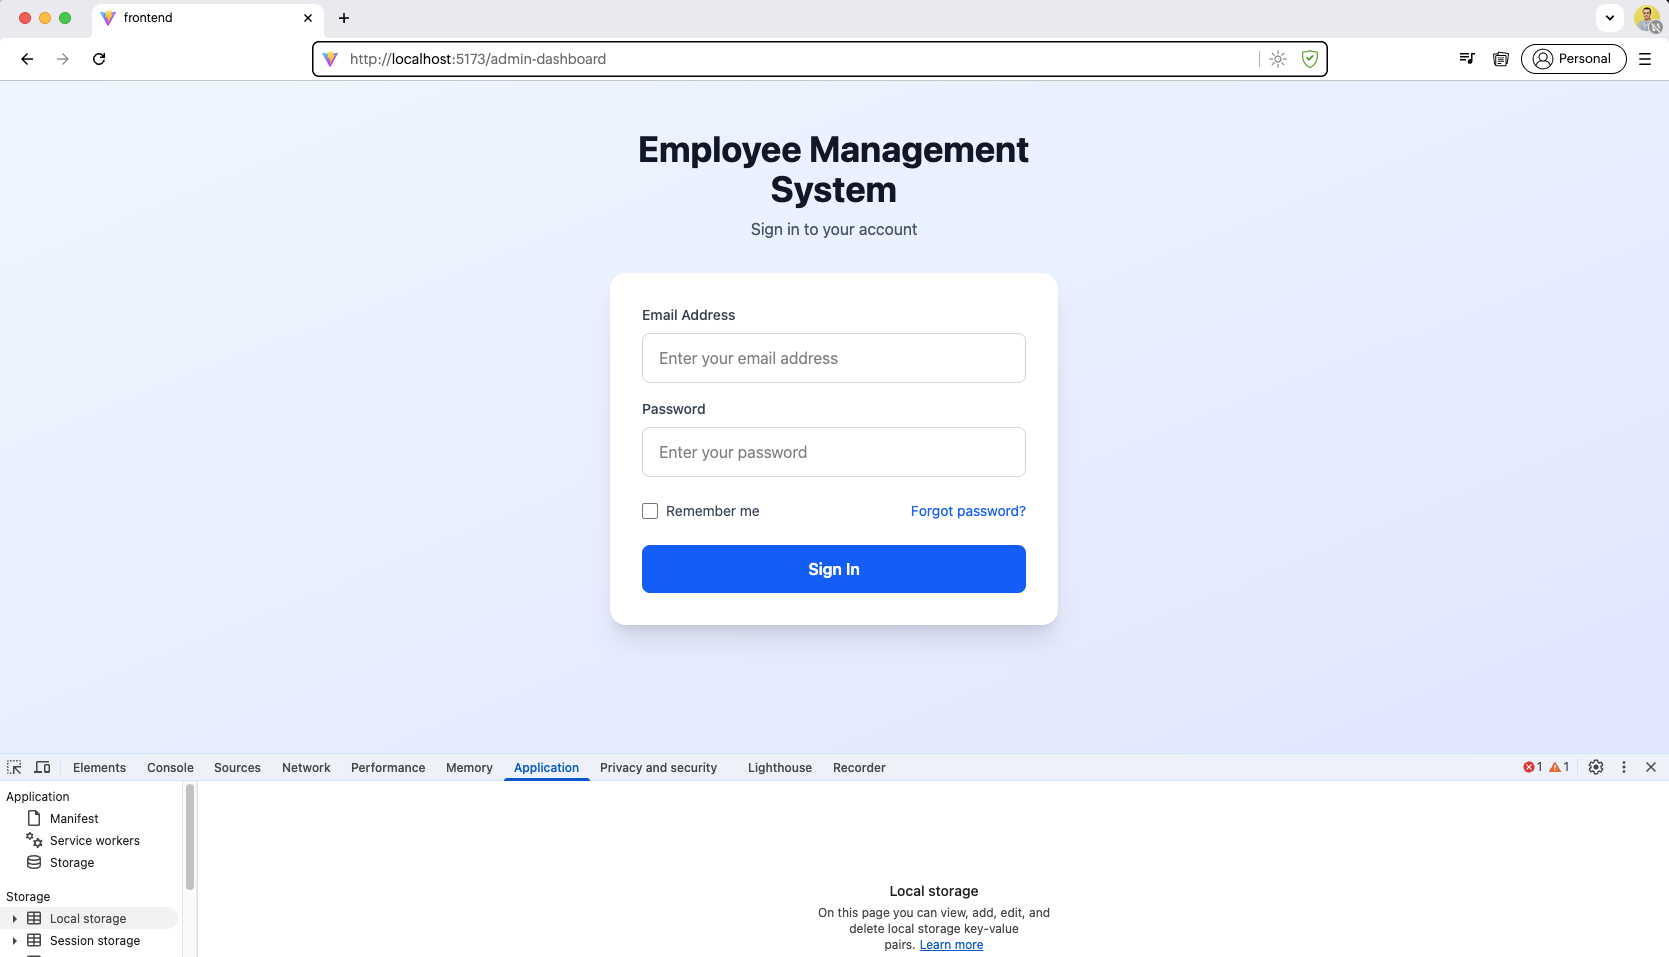
But if we go to http://localhost:5173/admin-dashboard in other browser, it will take us back to login.
Now, go to http://localhost:5173/login in the new browser and you will be in login
Now, we will update our code a bit to have proper token feature. For this in authContext.jsx file we will have a loading state first. Then we will update some more code.
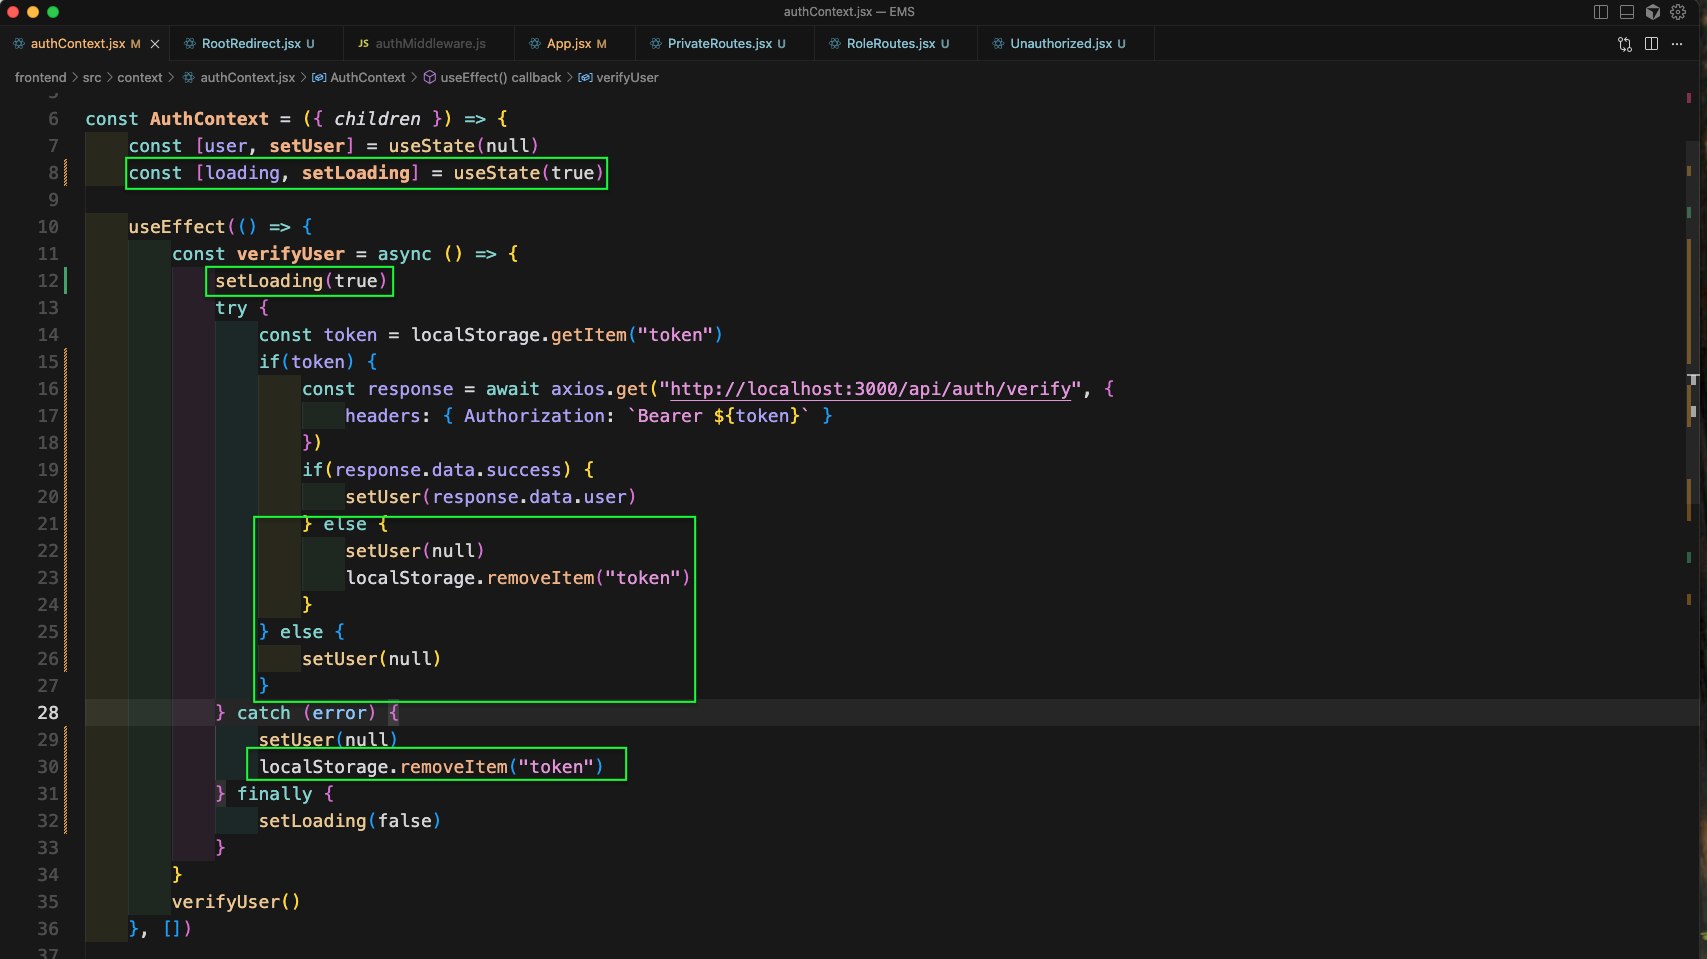
We will also add the code for login and logout in authContext.jsx file.
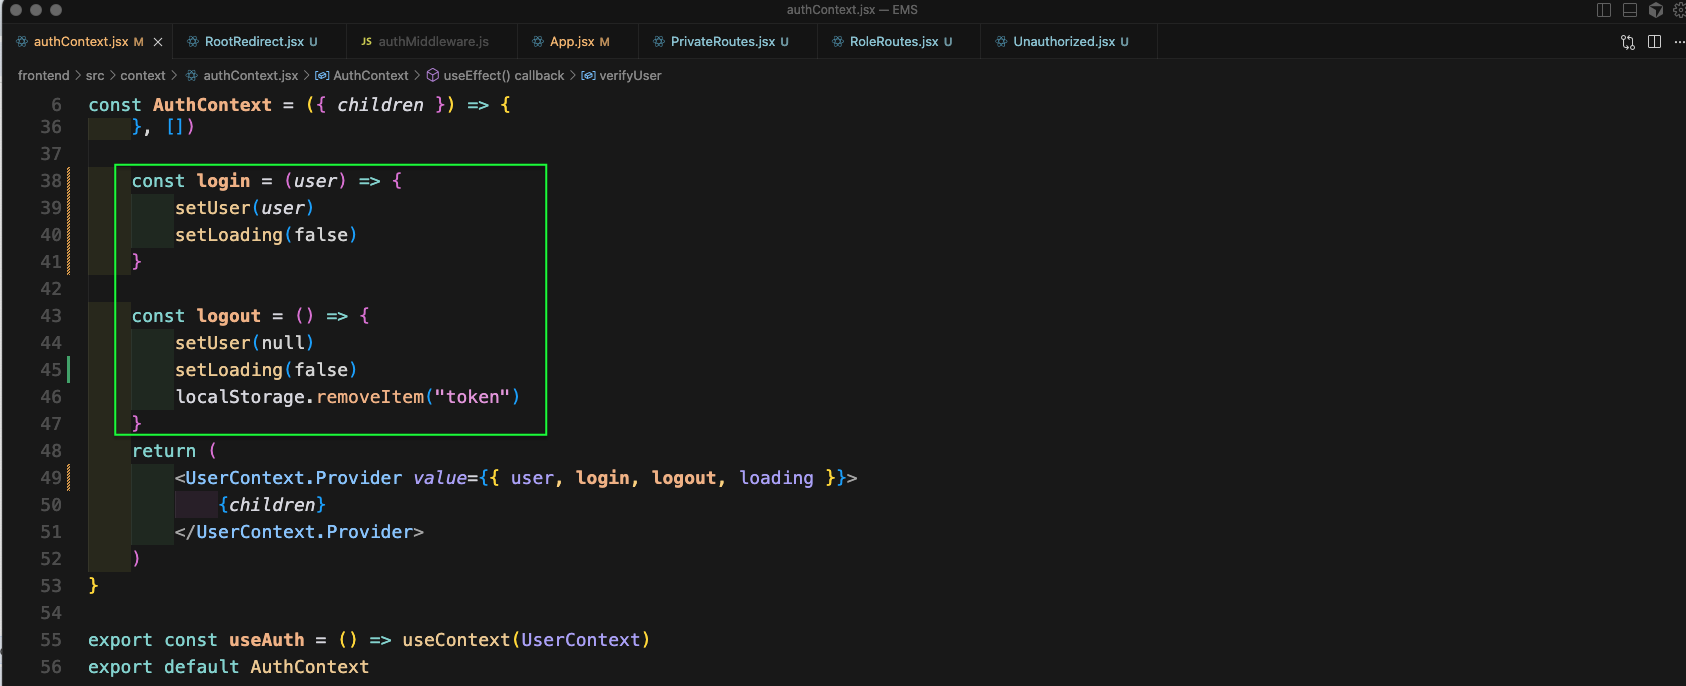
In the App.jsx file we will add Private Routes for admin-dashboard.
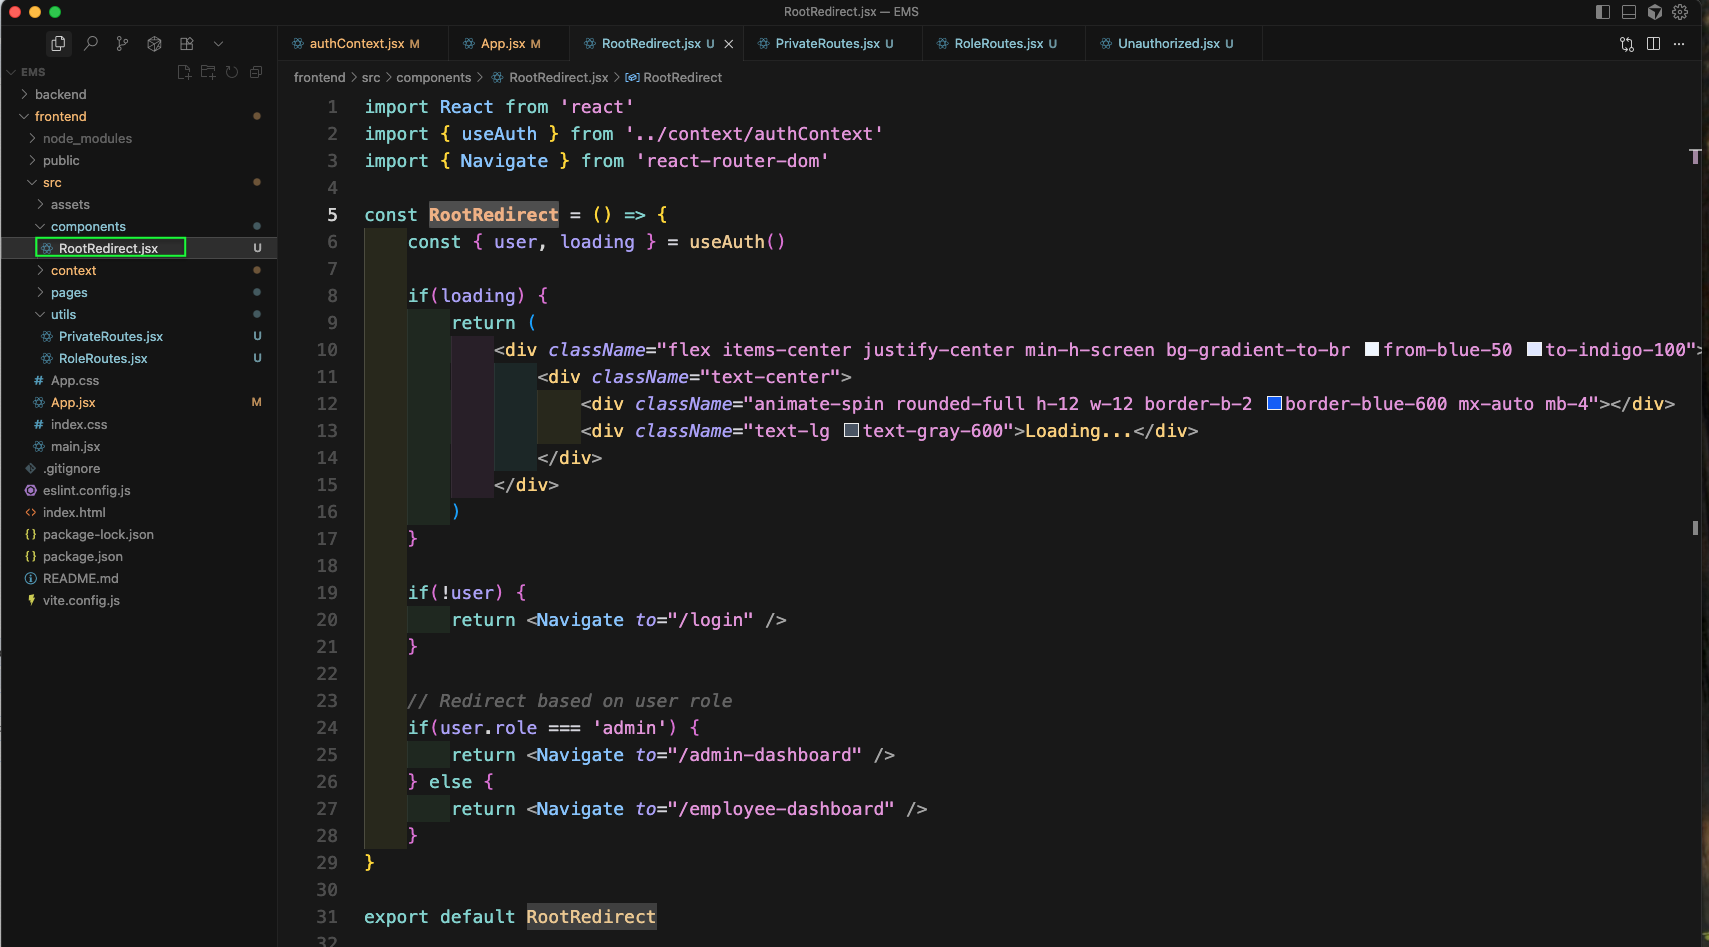
Now, inside the components folder create RootRedirect.jsx file. Here, we will use user and loading from authContext. The loading will be used to show an spinner. And rest of code is self explanatory.
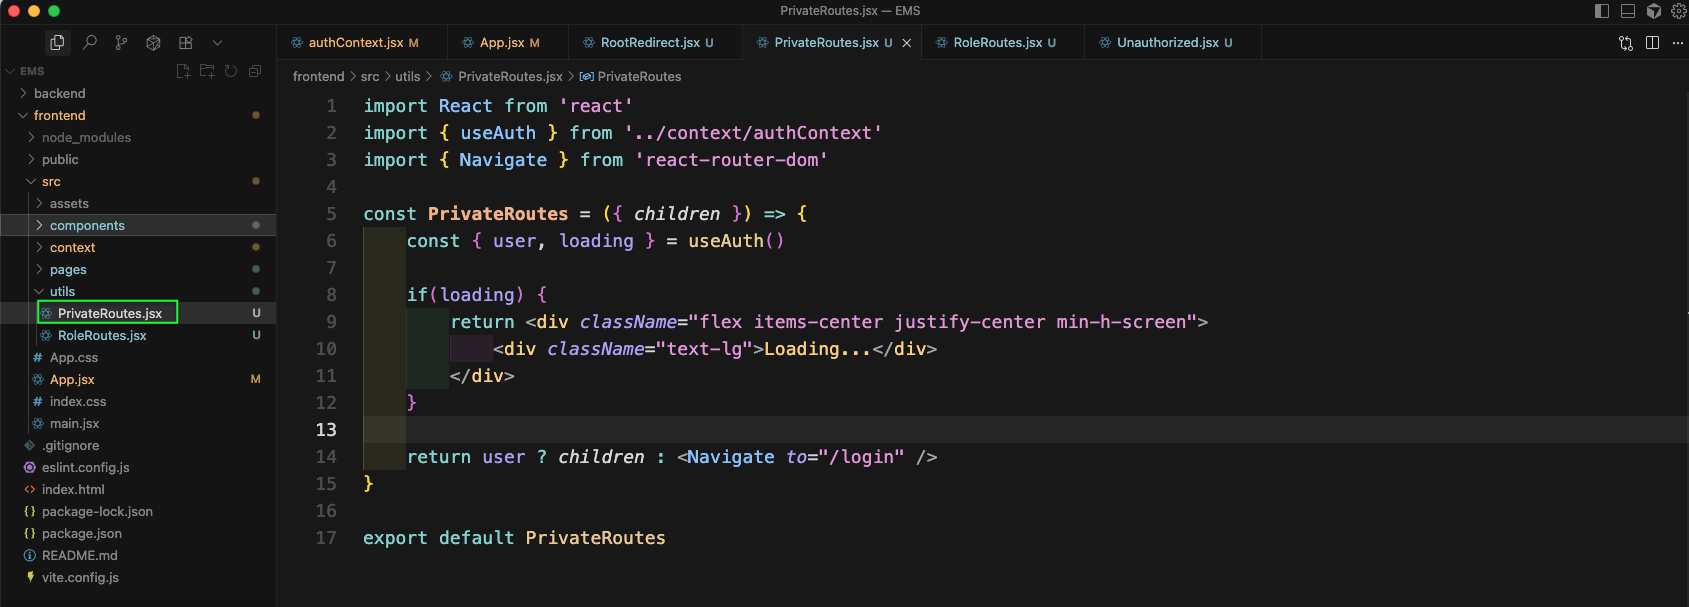
Now, in the utils folder create PrivateRoutes.jsx file and add the code in the image below. Again we will use user and loading from authContext. The loading will be used to show an spinner. And rest of code is self explanatory.
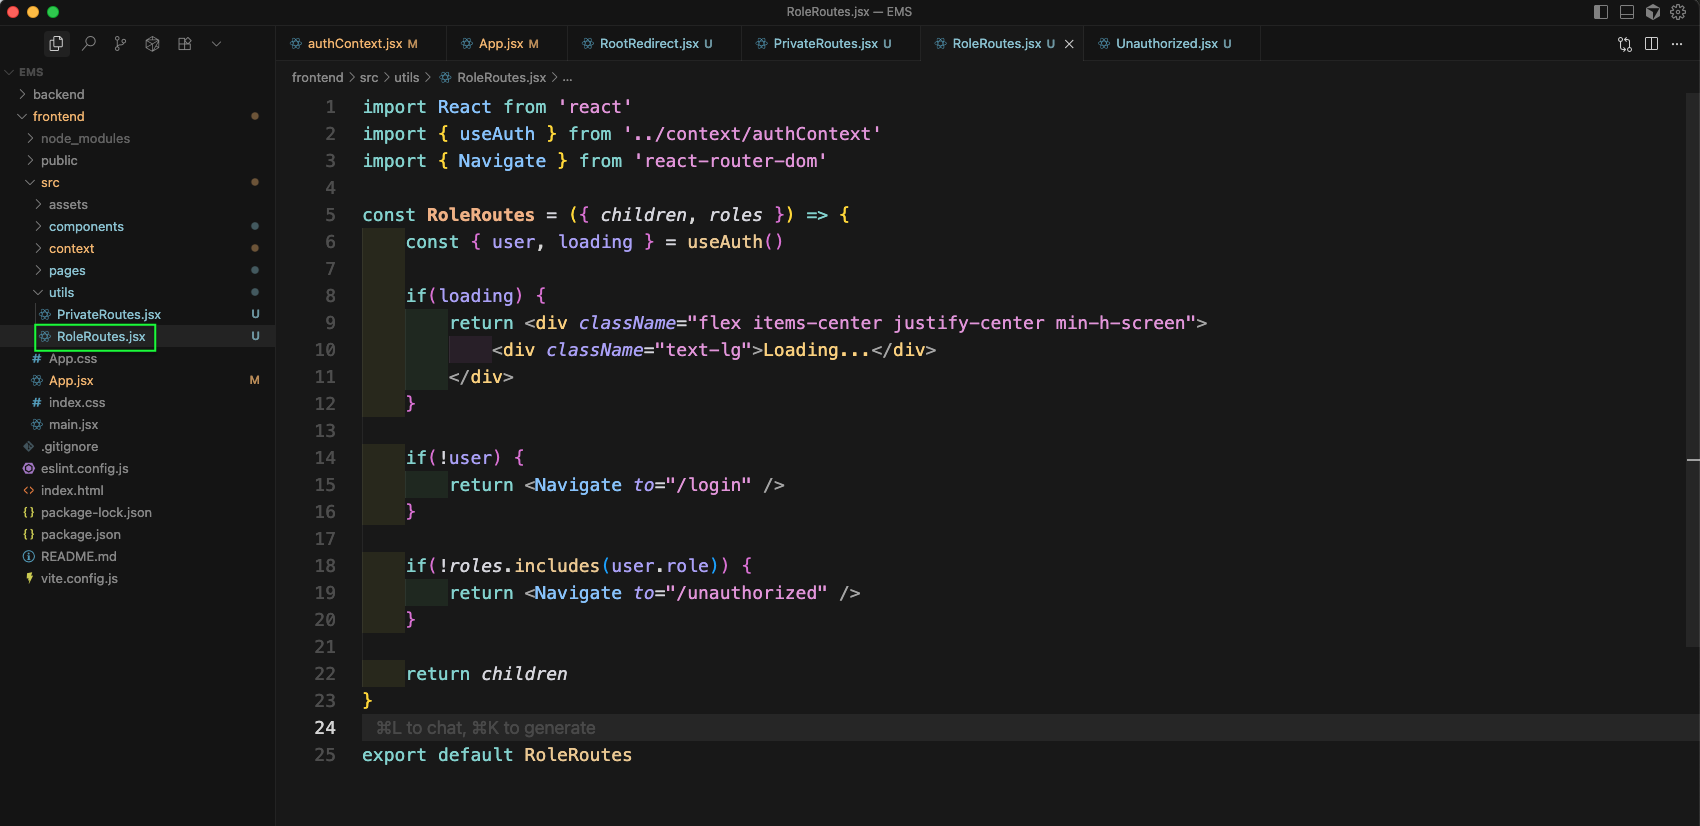
Next, in the utils folder create RoleRoutes.jsx file and add the code in the image below. Again we will use user and loading from authContext. The loading will be used to show an spinner. And rest of code is self explanatory.
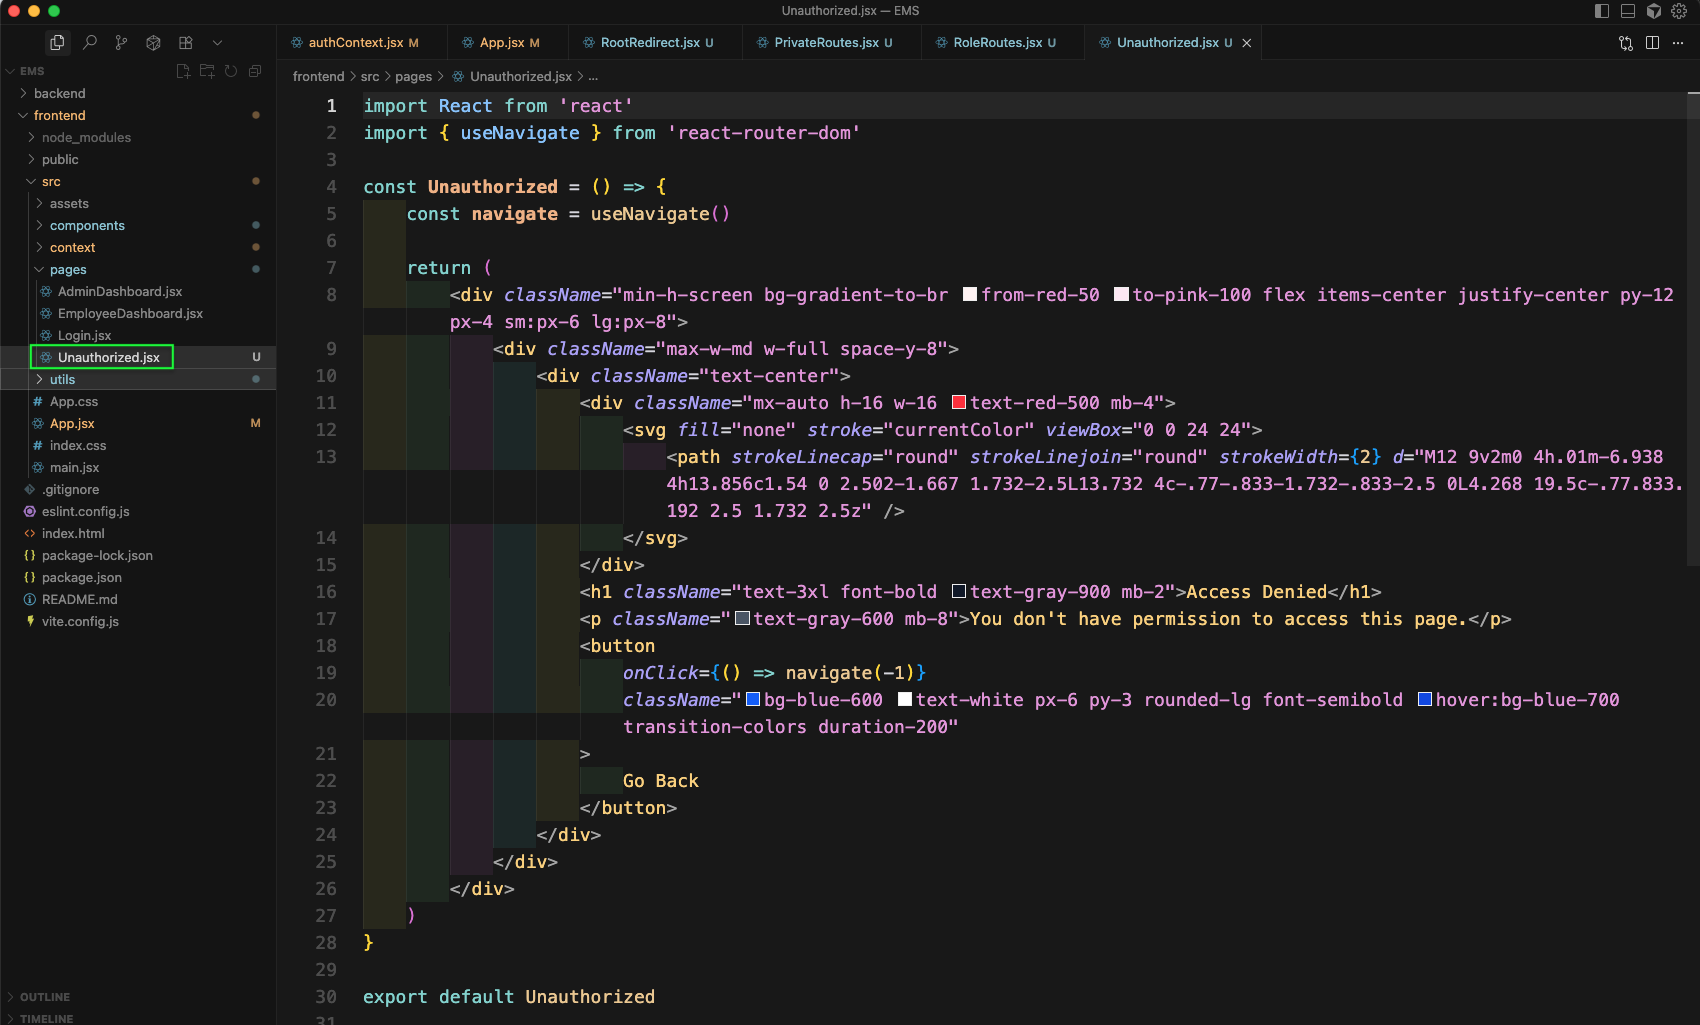
Now, we will create an Unauthorized.jsx file inside pages folder. It will show a nice Access Denied page.
Now, in browser login again from Login page.
And it will take you to Admin dashboard in http://localhost:5173/admin-dashboard We can also see the token been stored here.
Now, open another tab in same browser and go to http://localhost:5173

And you will be taken to Admin dashboard in http://localhost:5173/admin-dashboard

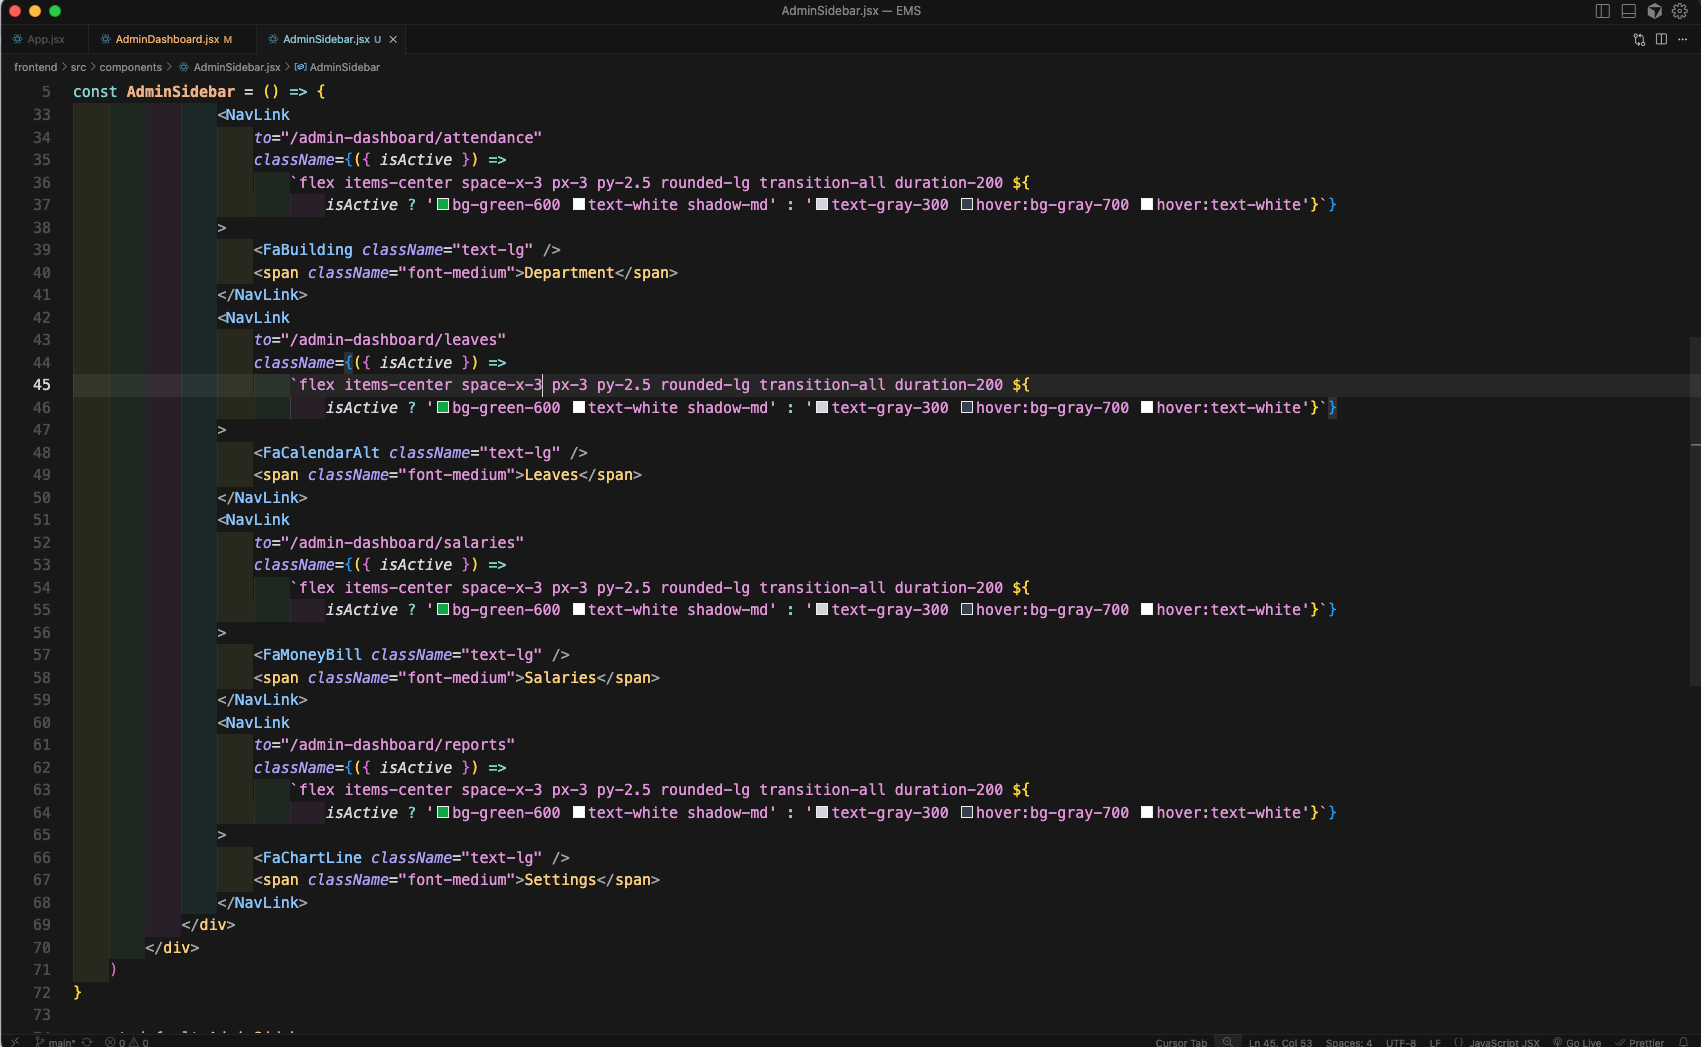
Now, we will update the AdminSidebar.jsx file, which will contain lot of tailwind css.
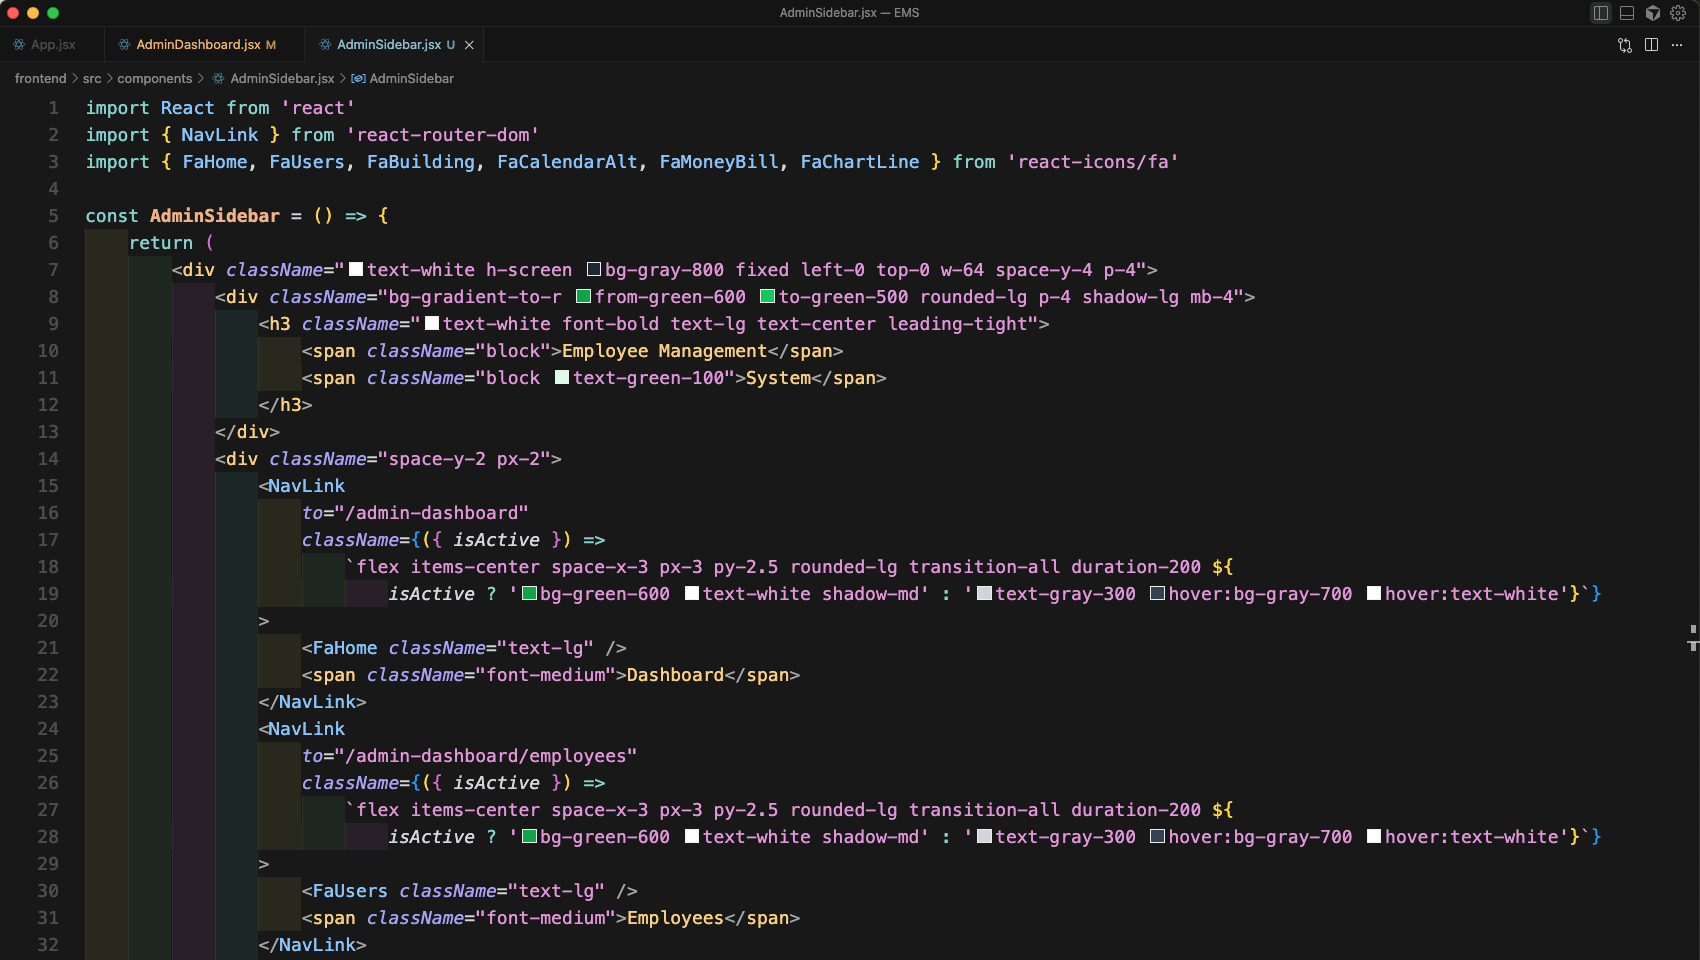
We will update it a bit more.
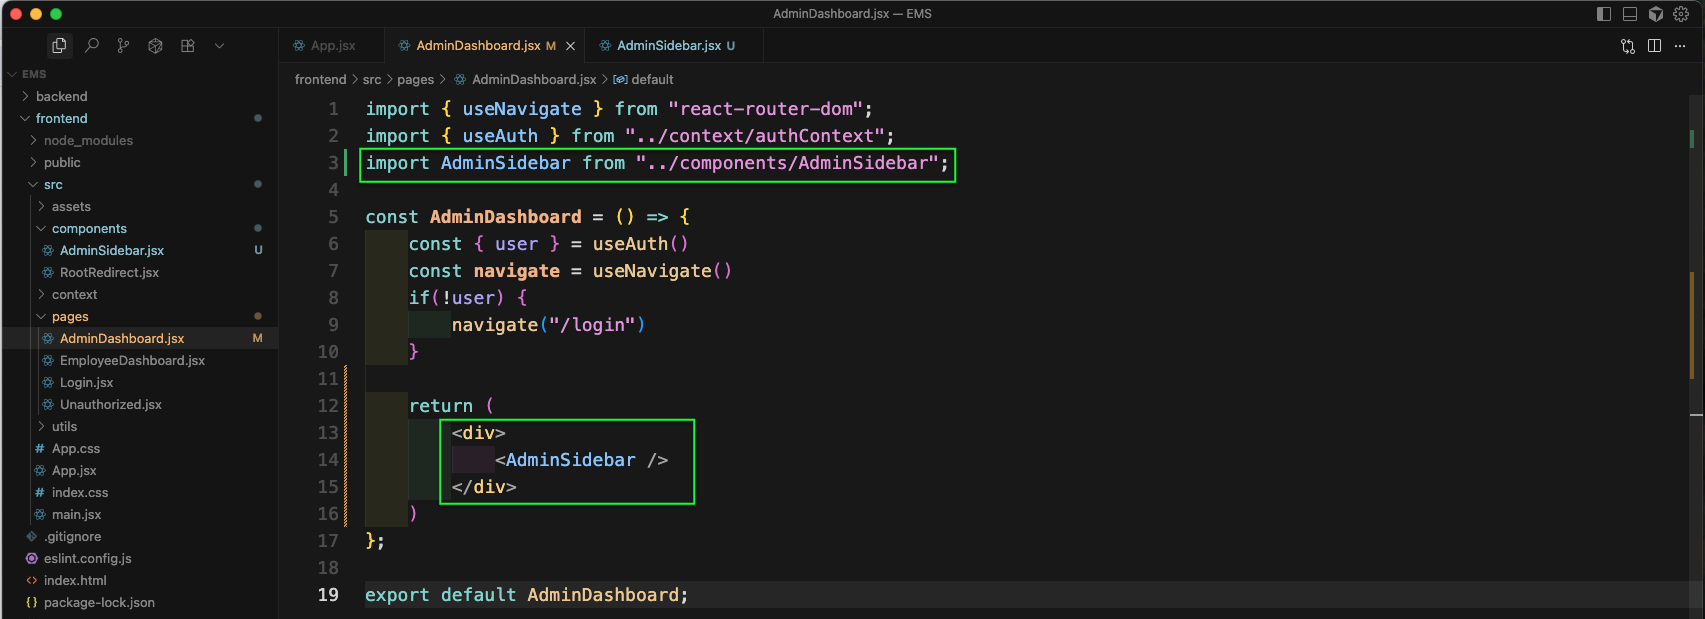
Next, we will call the AdminSidebar from the AdminDashboard.jsx file.
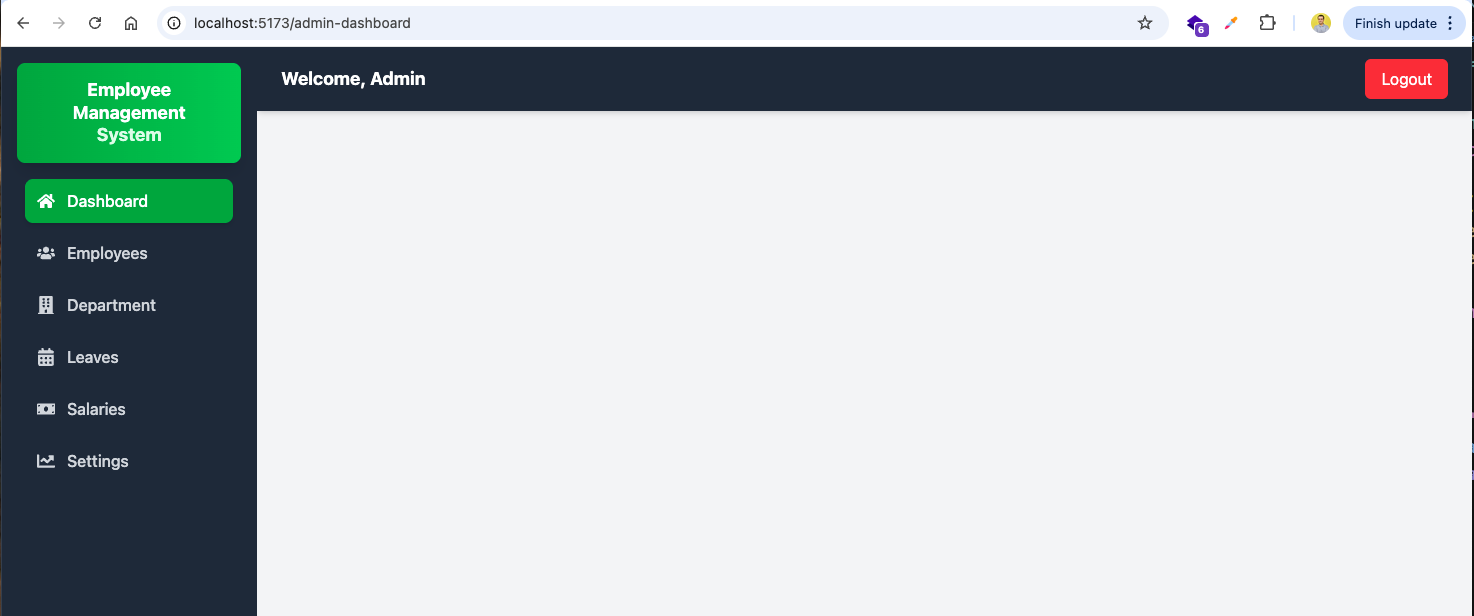
Now, in http://localhost:5173/admin-dashboard we can see the perfect Sidebar.

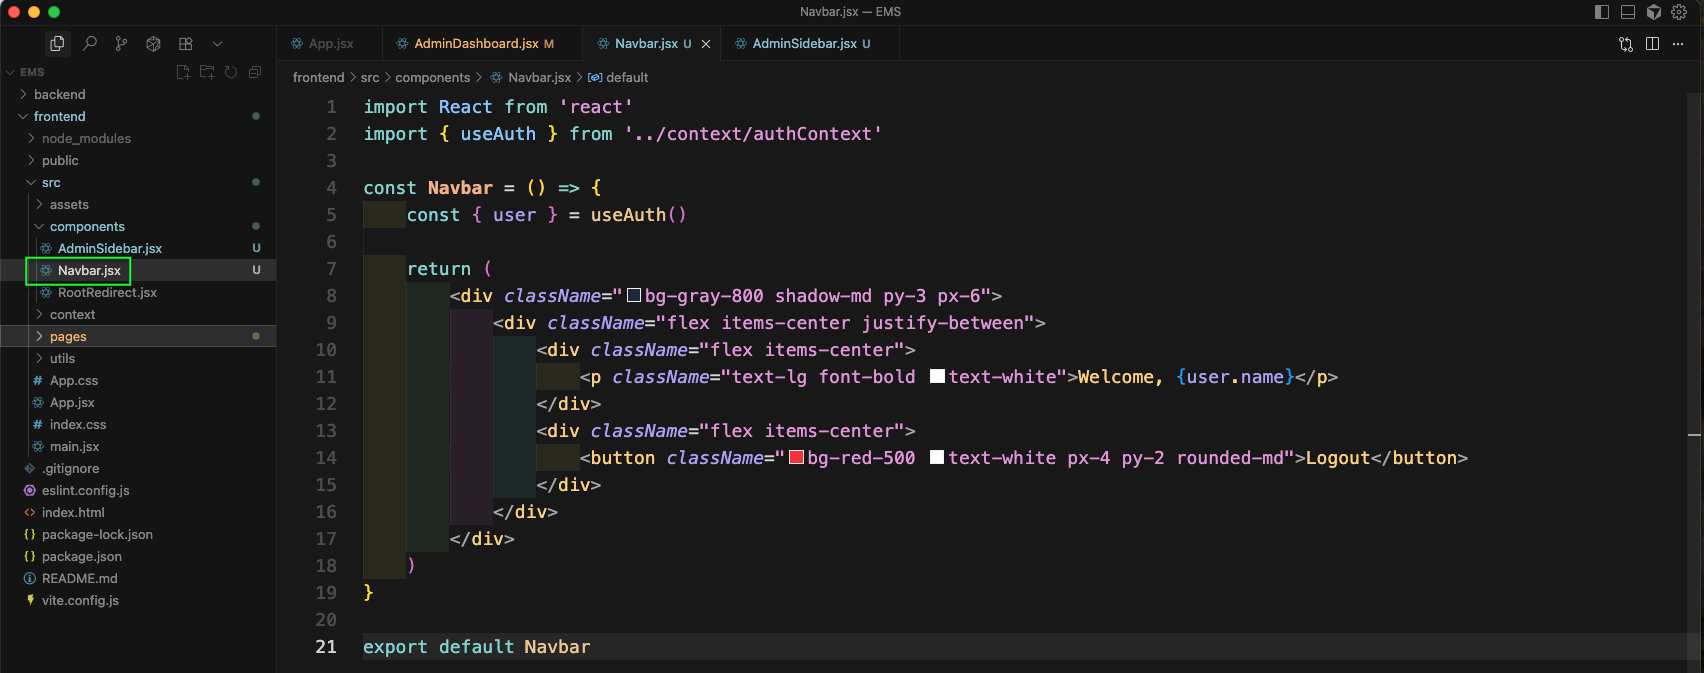
Now, create Navbar.jsx file inside components folder. Here, we have written the basic code with some tailwind css.
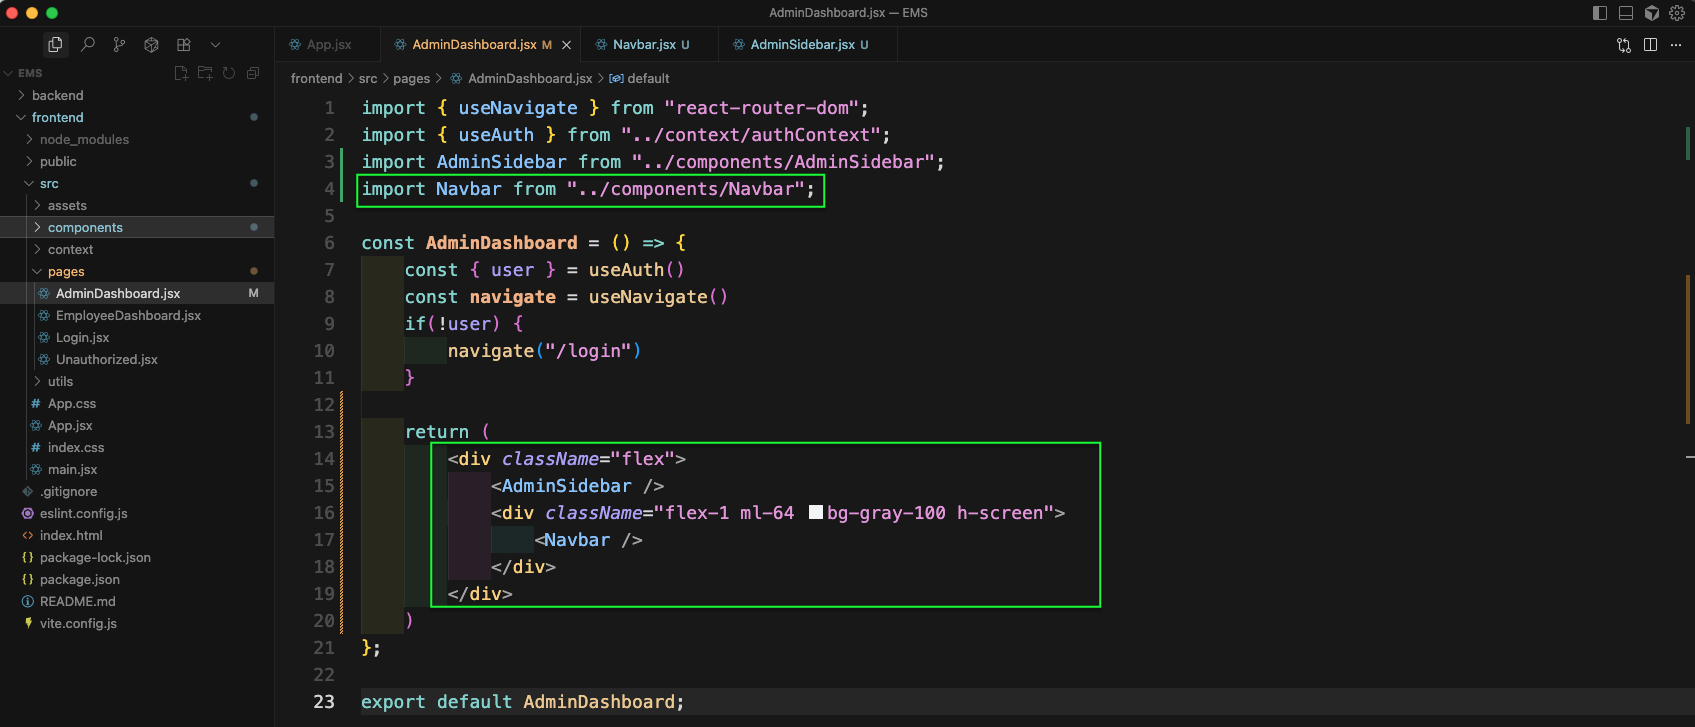
Now, we will render the Navbar component from the AdminDashboard.jsx file.
Now, we will see the Navbar also in http://localhost:5173/admin-dashboard
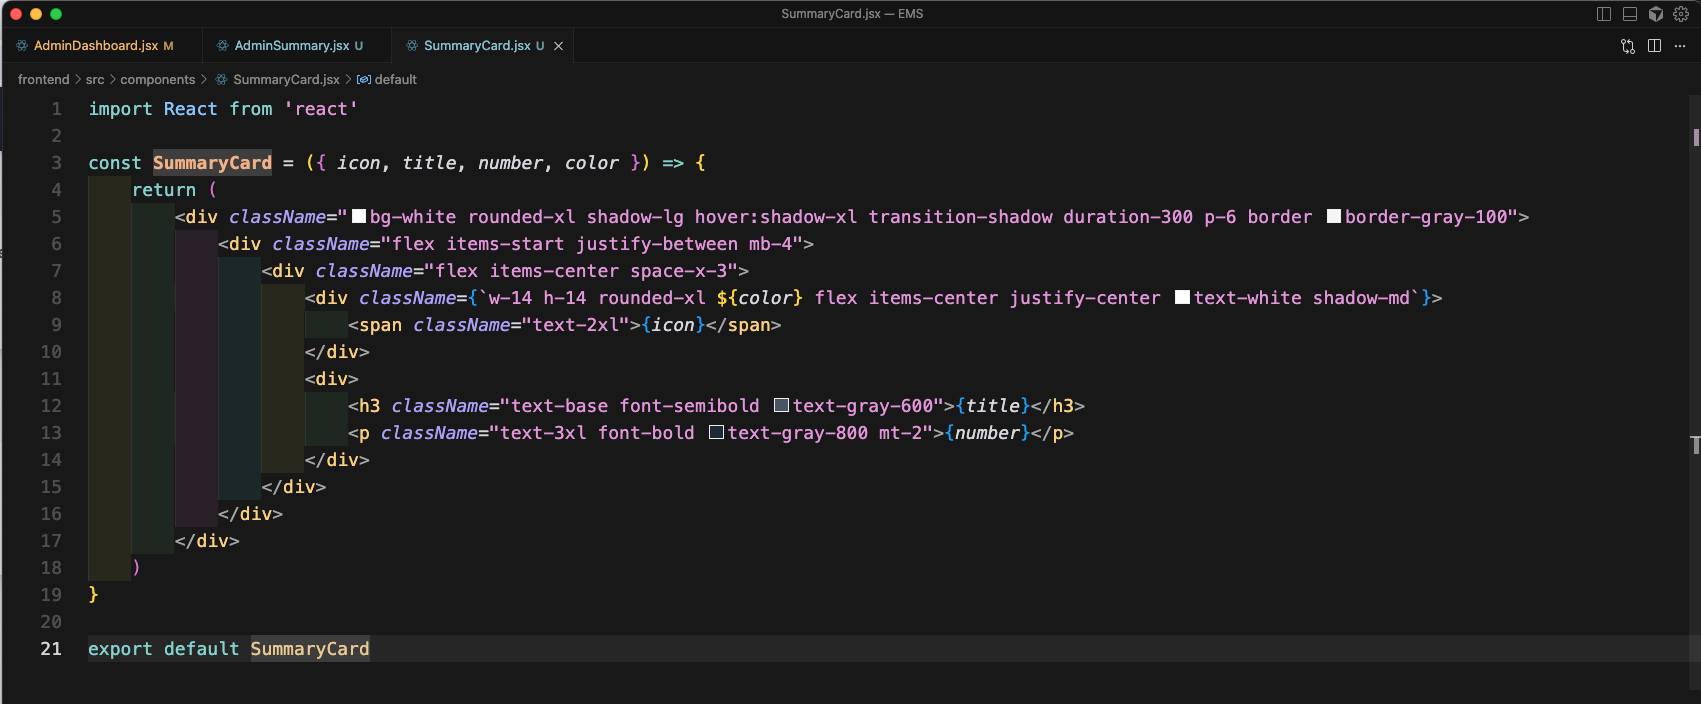
Now, we will create a SummaryCard.jsx file inside components folder. It will take icon, title, number and color as props and show them usinf tailwind CSS.
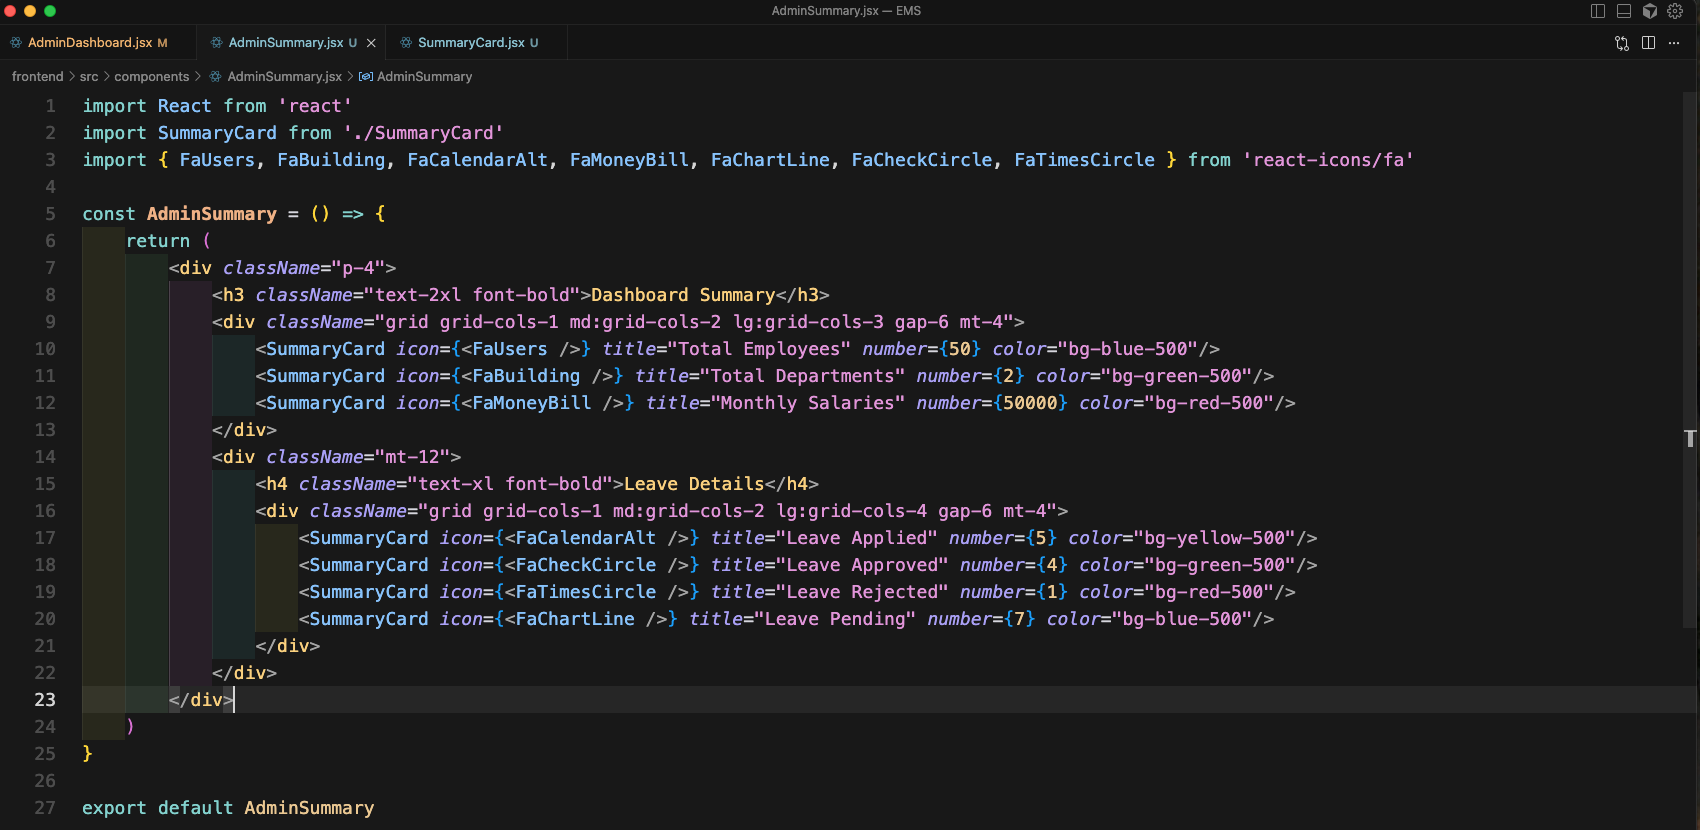
Now, we will create AdminSummary.jsx file ad with some tailwind css, call the SummaryCard component.
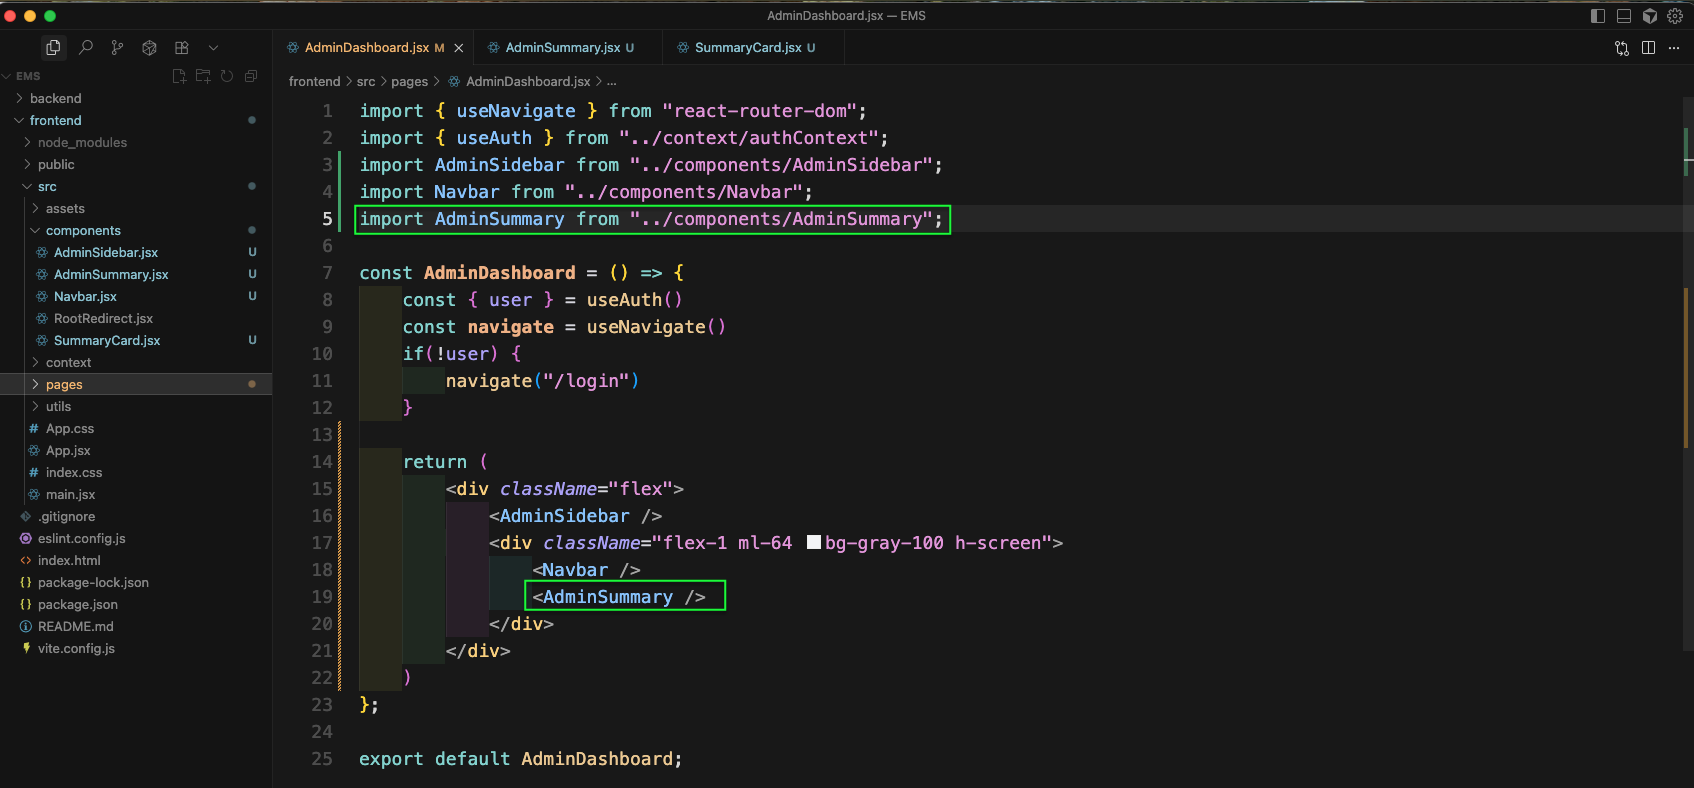
Now, we will call the AdminSummary from the AdminDashboard.jsx file.
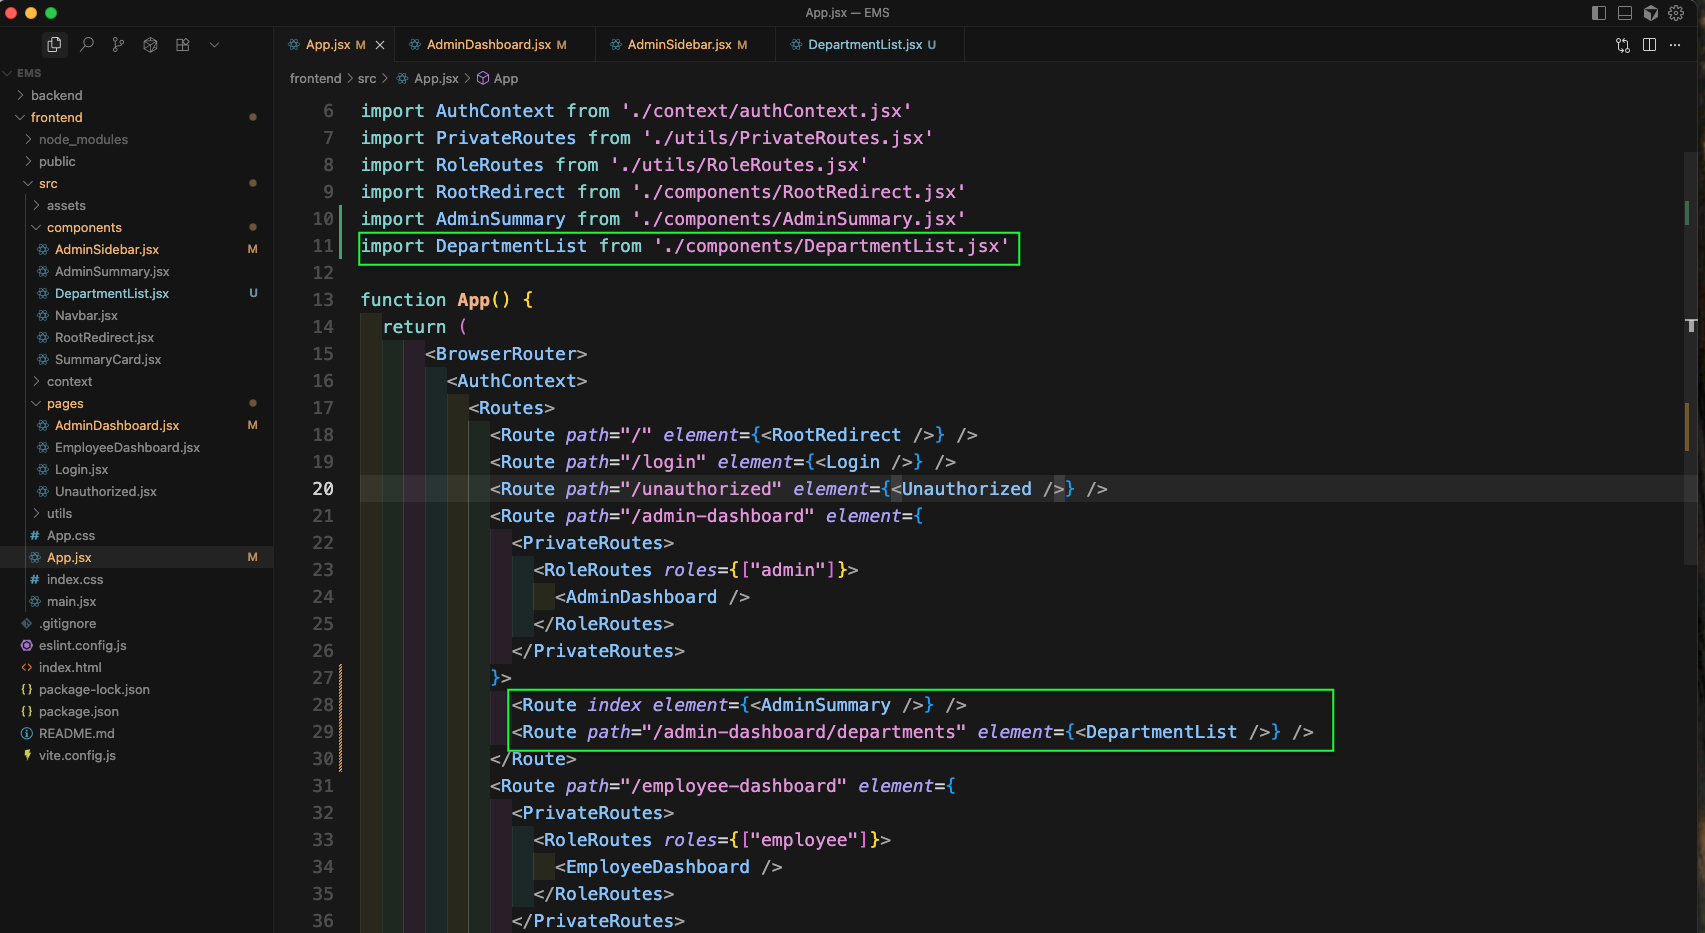
Now, we will update the Route to call the AdminSummary and DepartmentList
Now, the Admin Dashboard will look like below image.
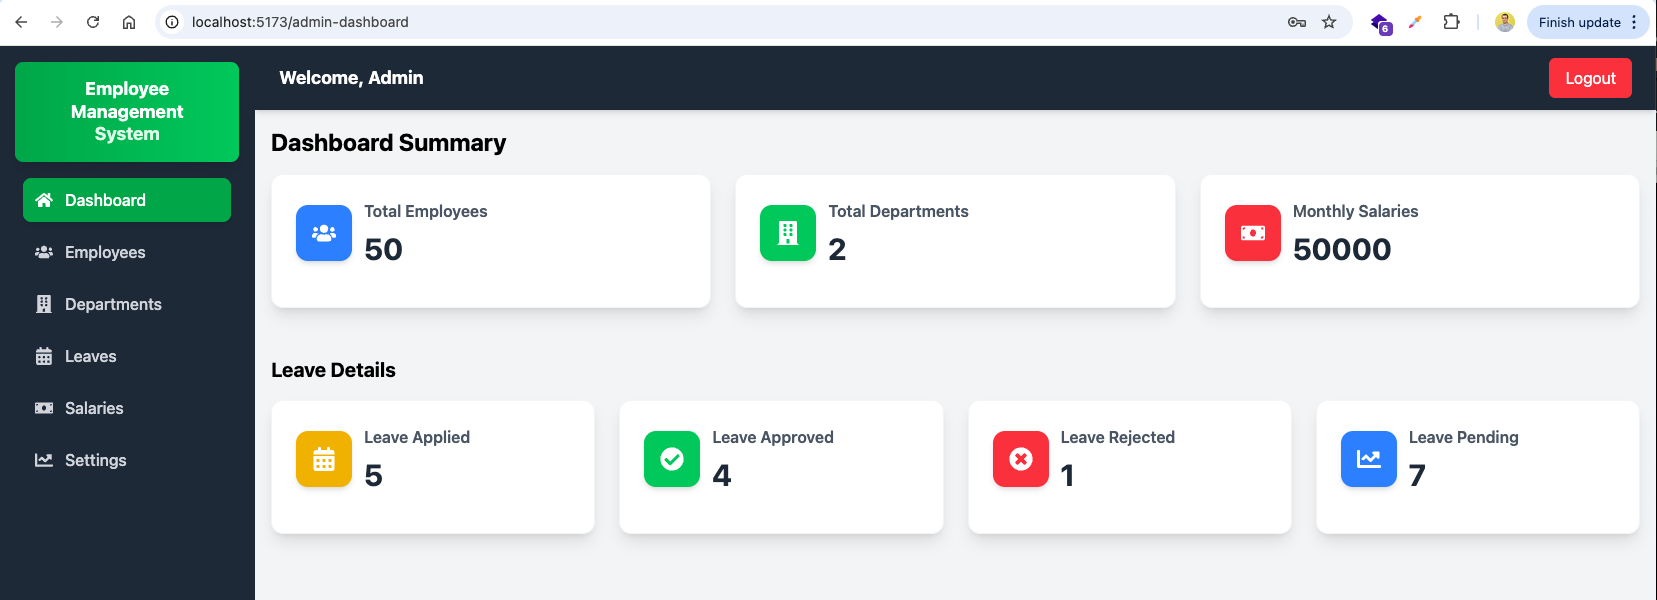
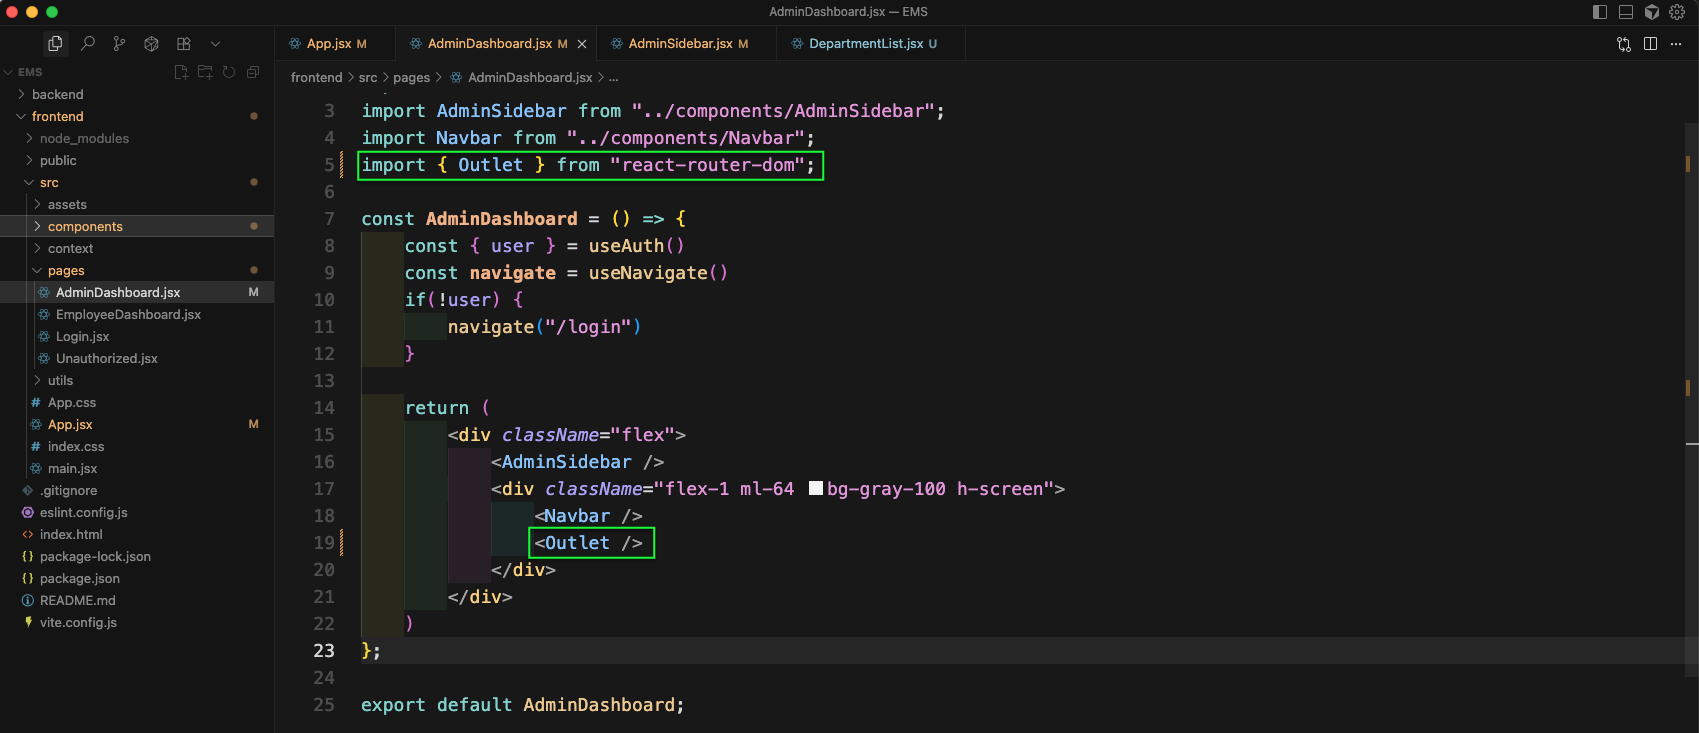
We will also add a Router Outlet in AdminDashboard.jsx file.
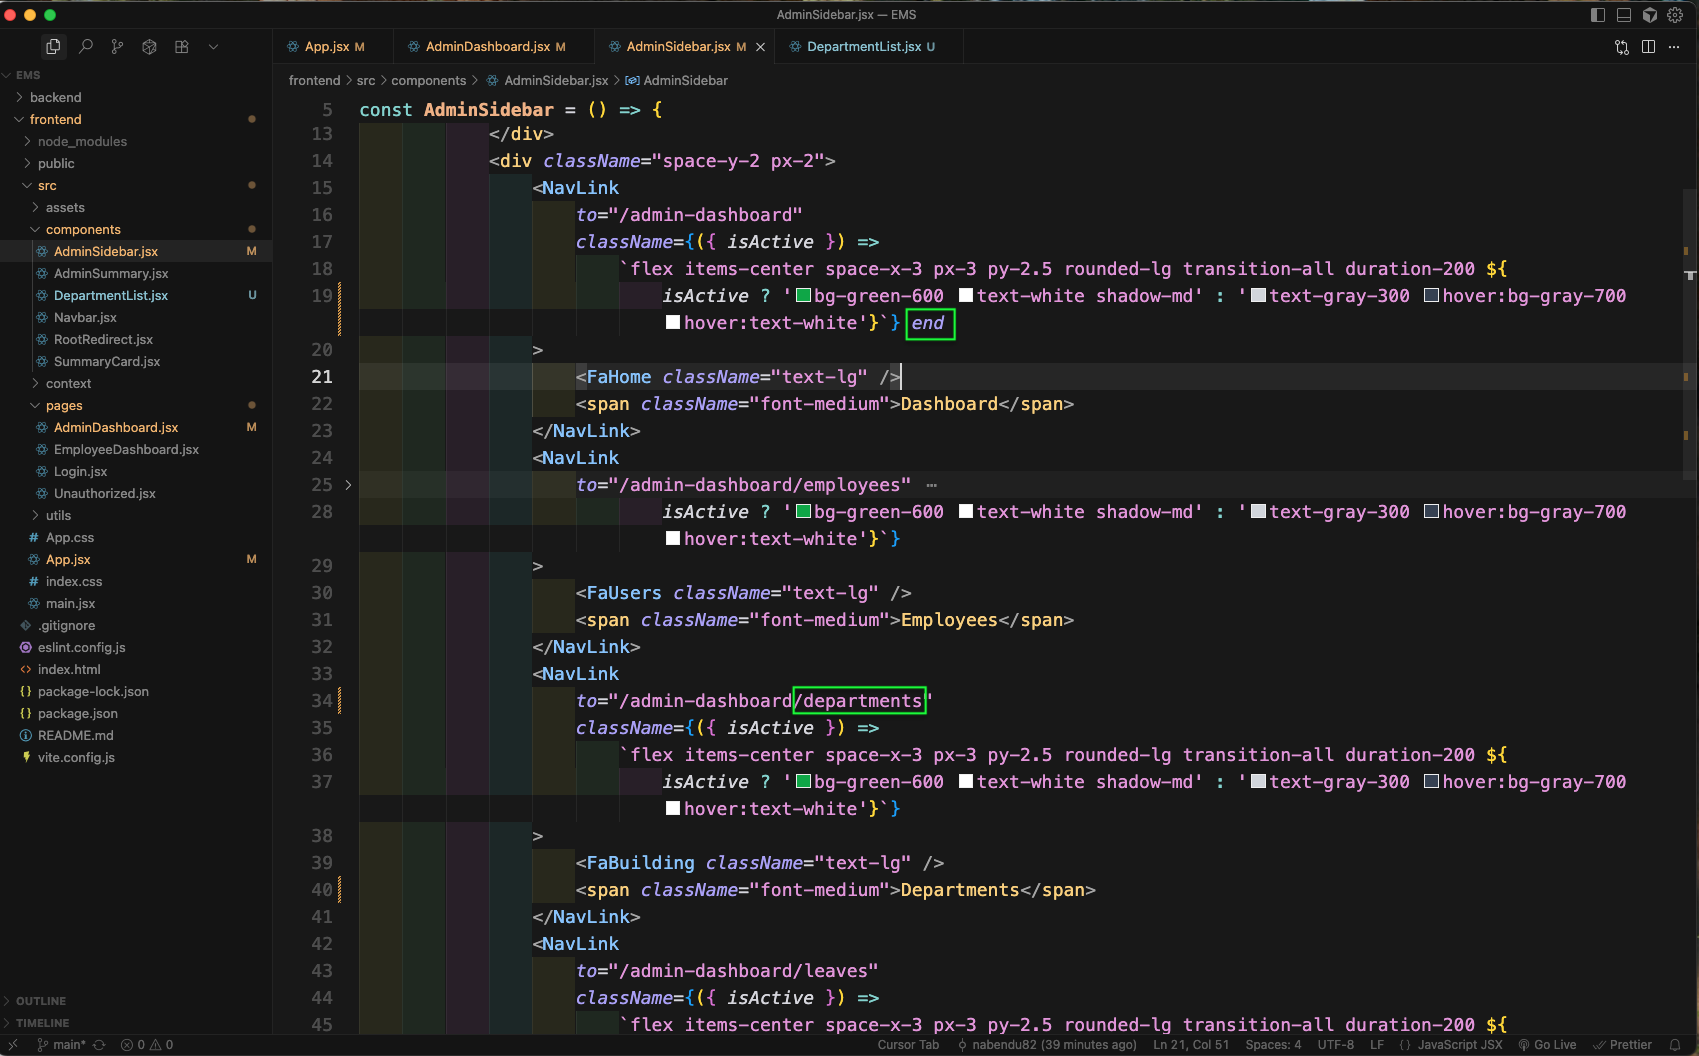
Now, in the AdminSidebar.jsx file we will update the correct endpoint for departments.
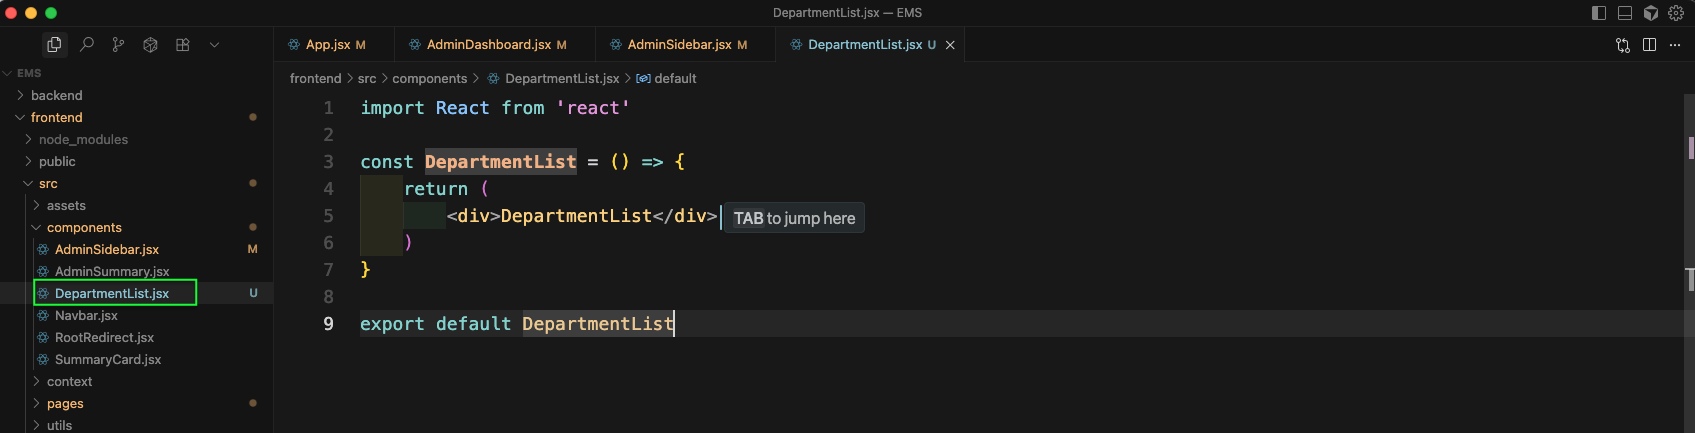
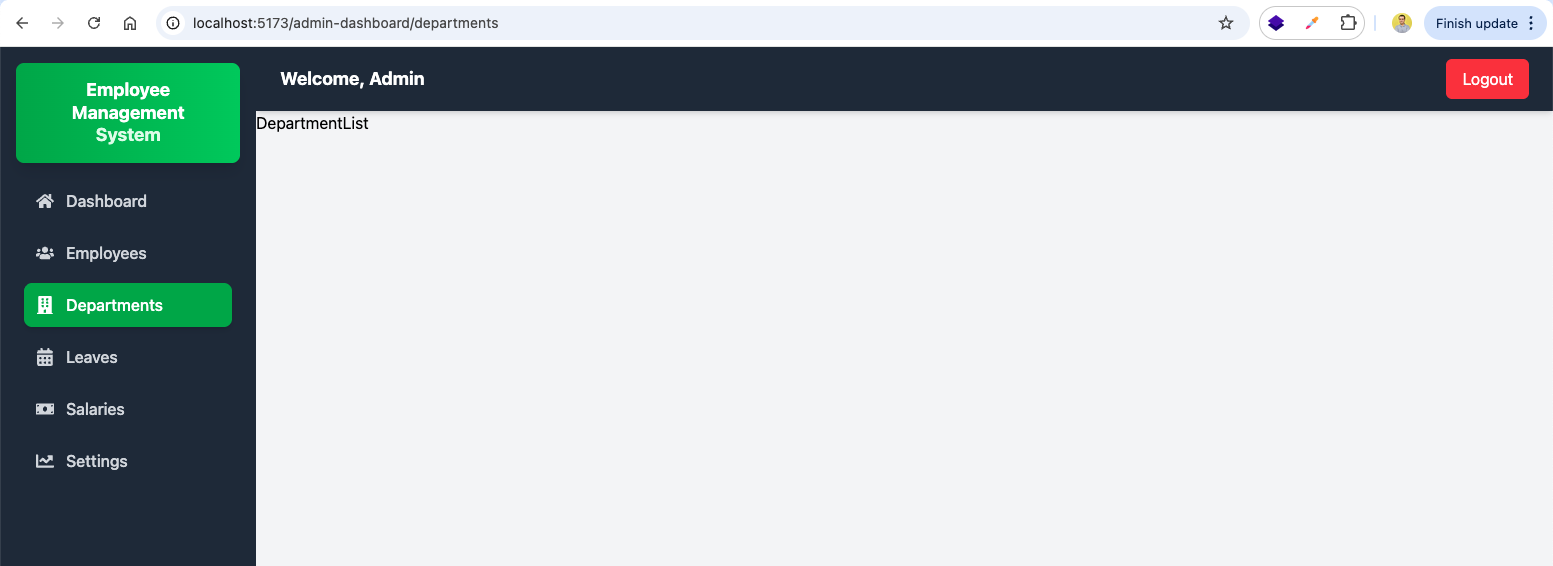
Now, create a file DepartmentList.jsx and add basic code in it.
Now, clicking on Departments on the sidebar will open the DepartmentList
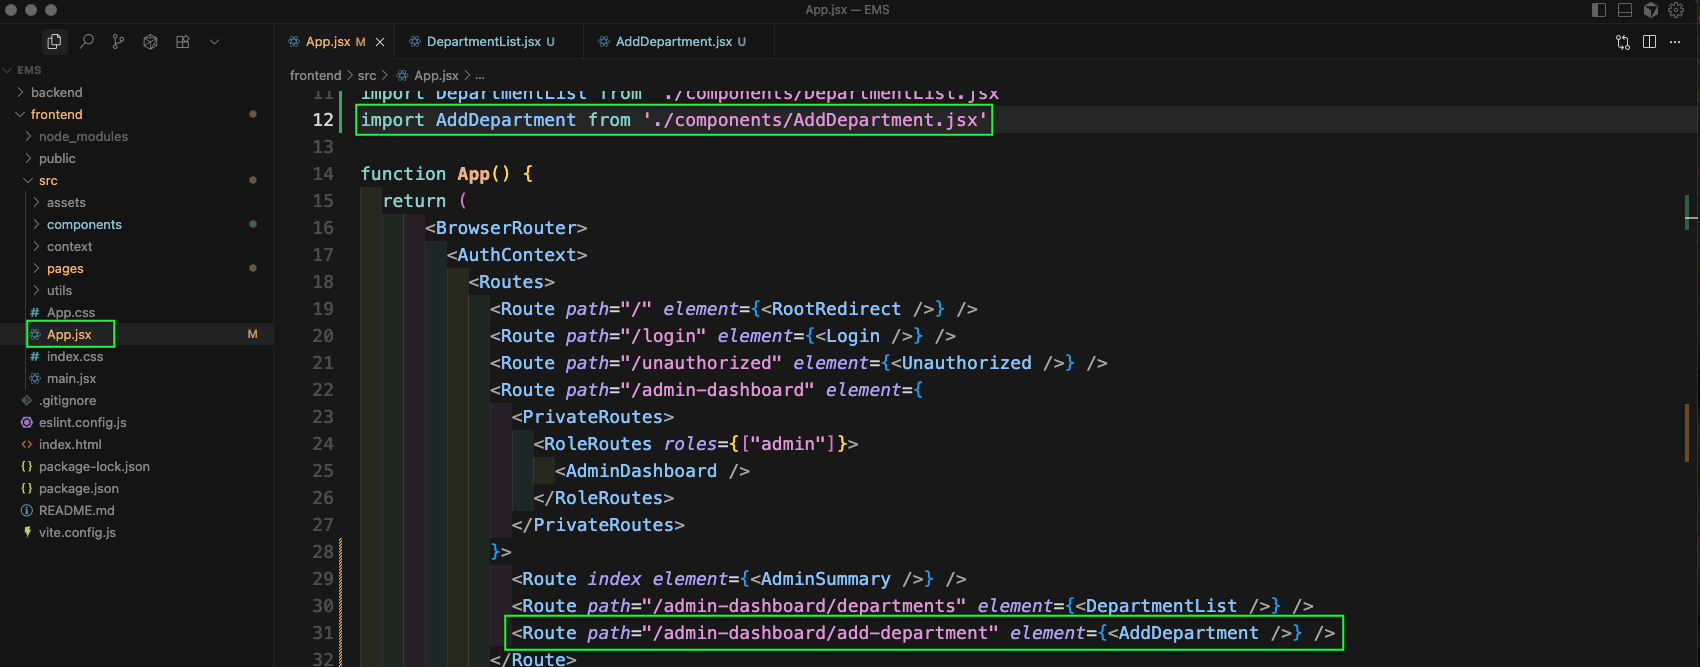
In the App.jsx file add the route for add-department, which will call the AddDepartment component.
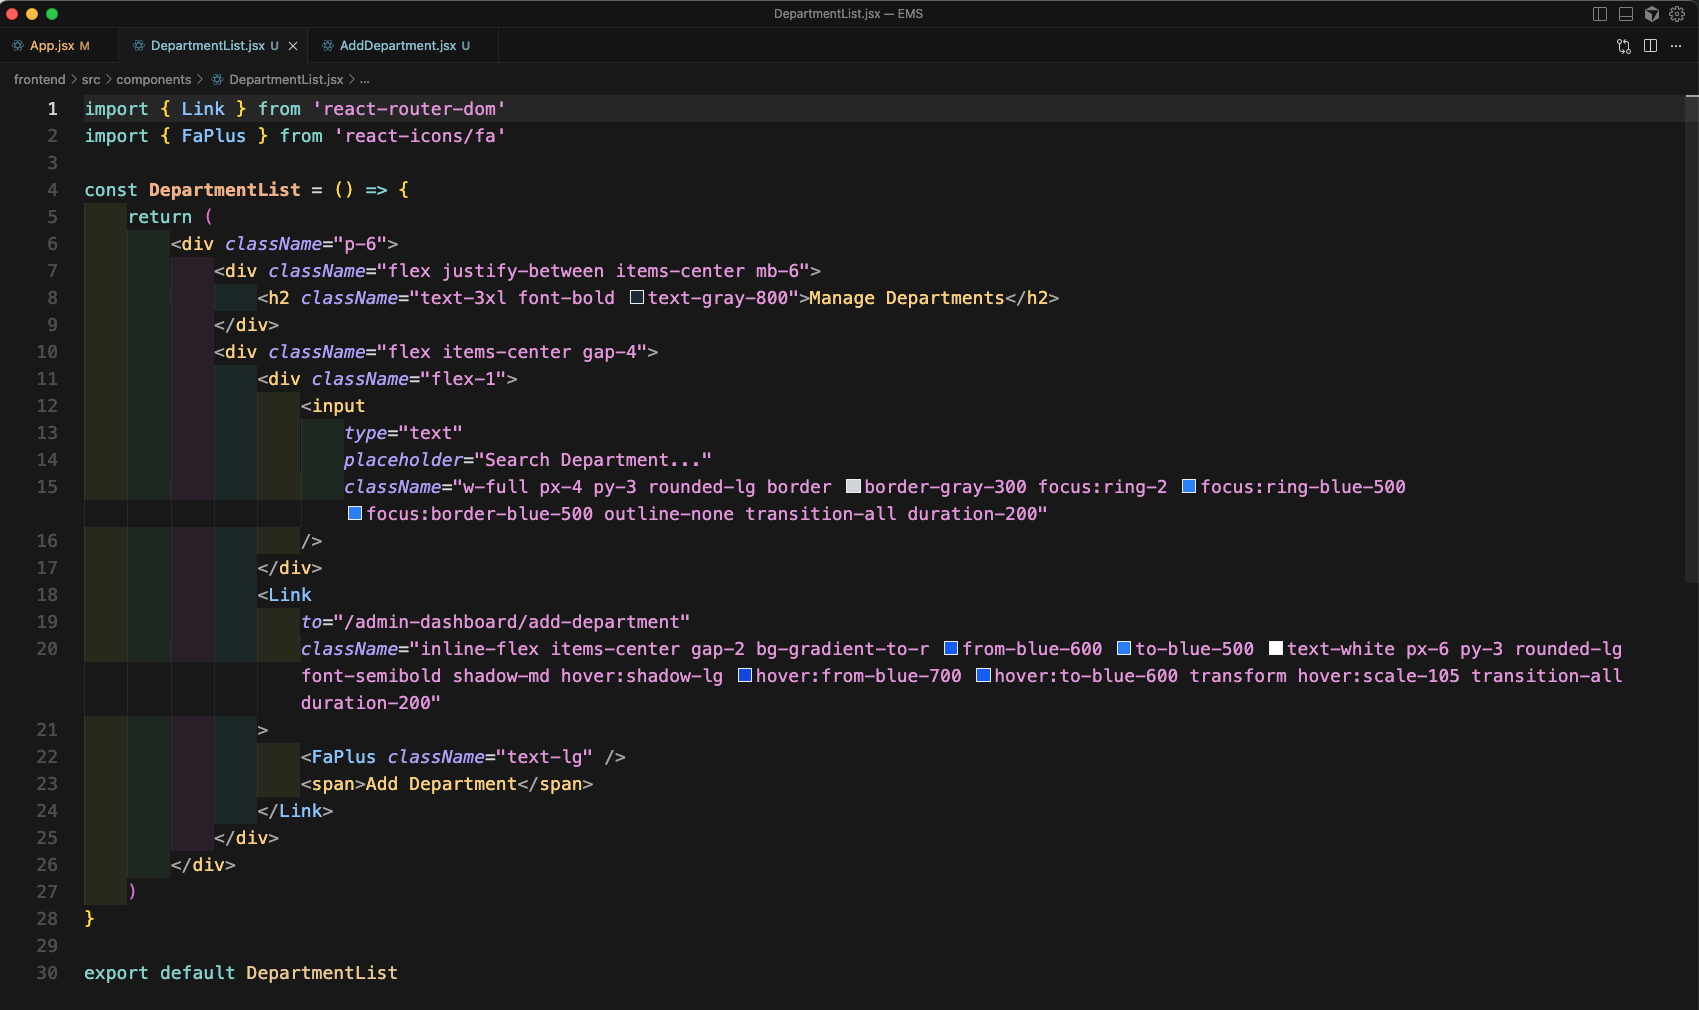
Next we will update the file DepartmentList.jsx. Here clicking on Add Department button will take to add-department route.
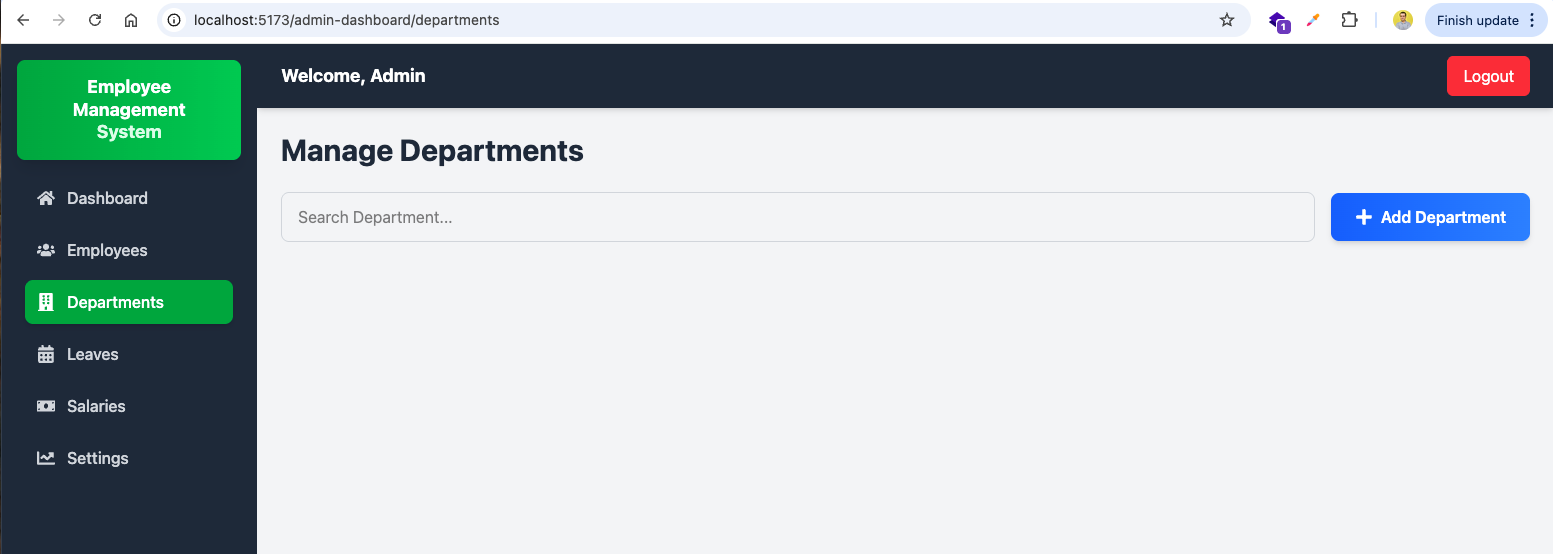
Now the Departments will show the nice looking UI.
Now, create an AddDepartment.jsx file and here add the basic code to show data.

Then we will add more code to show the complete data using tailwind css.
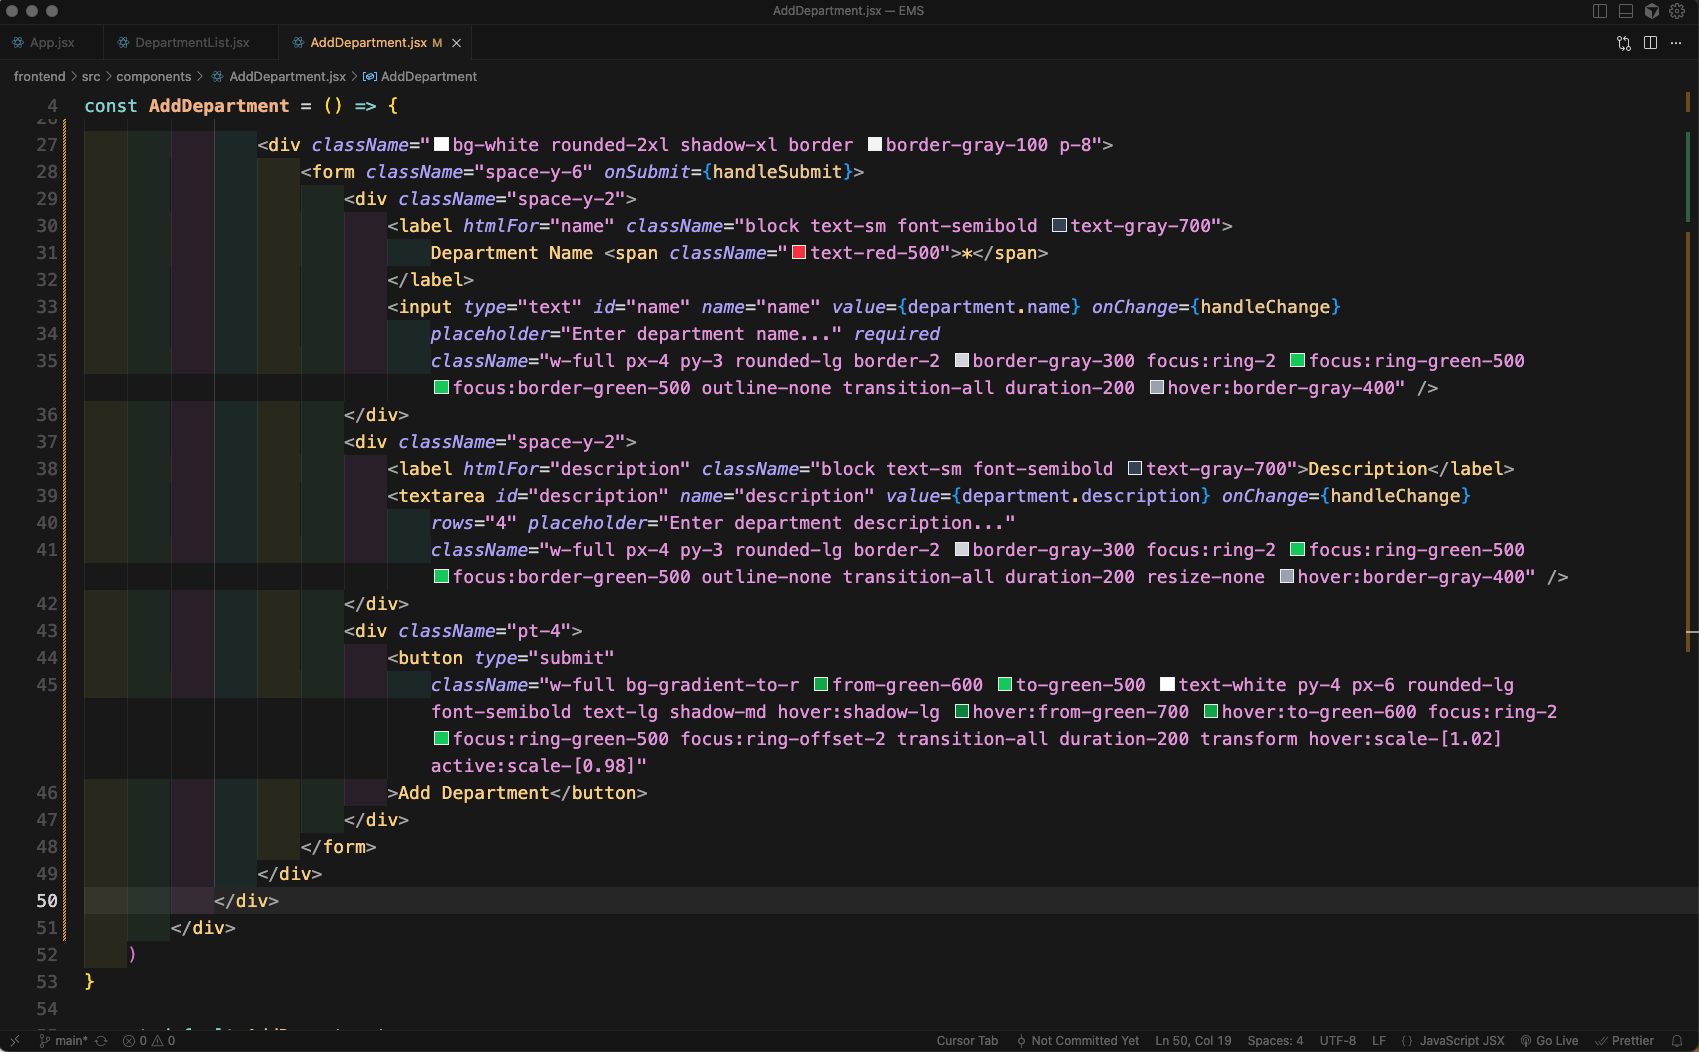
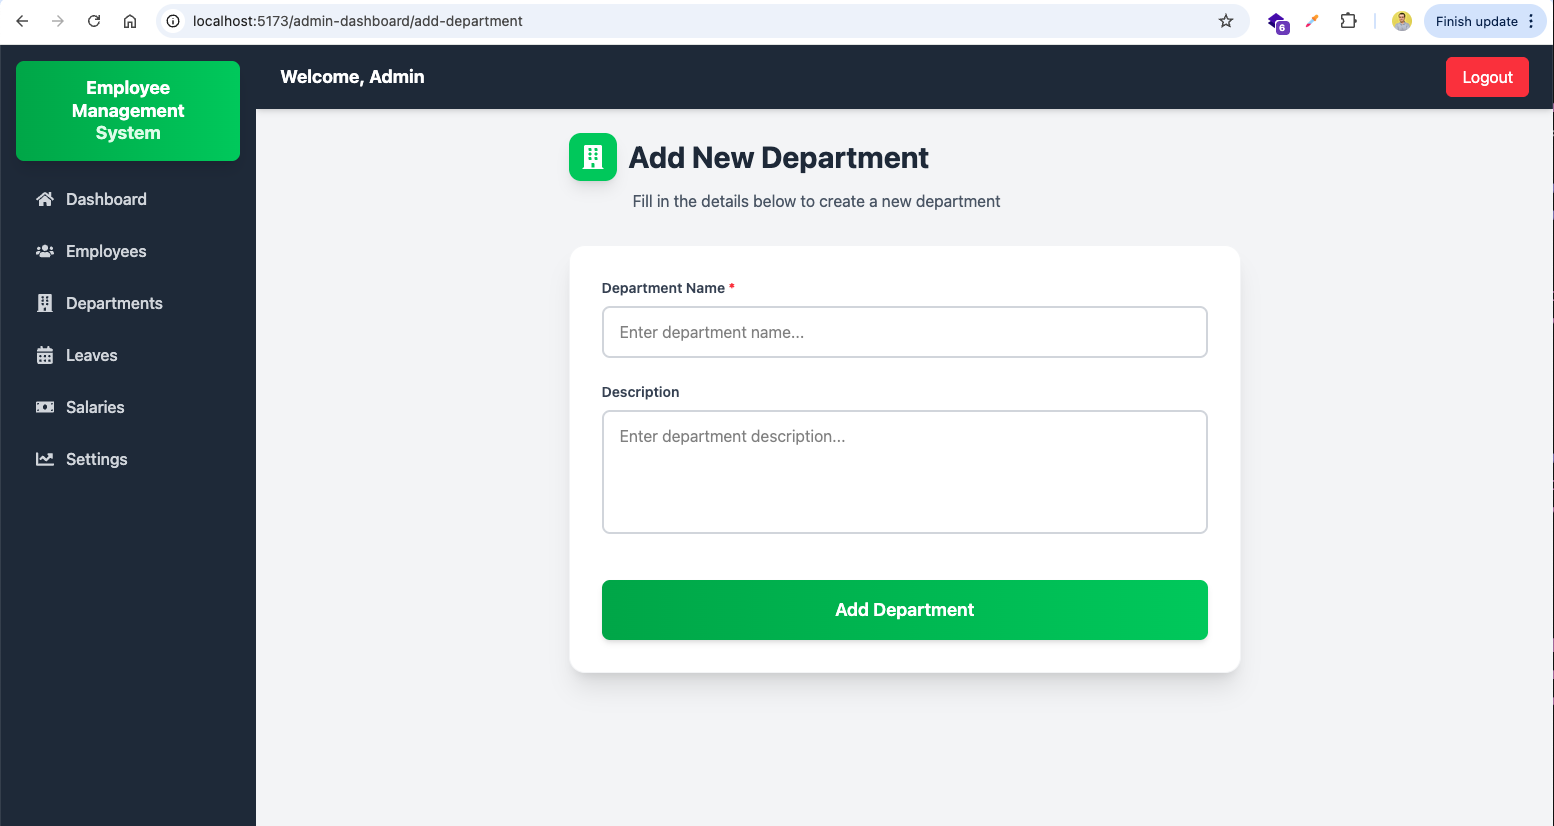
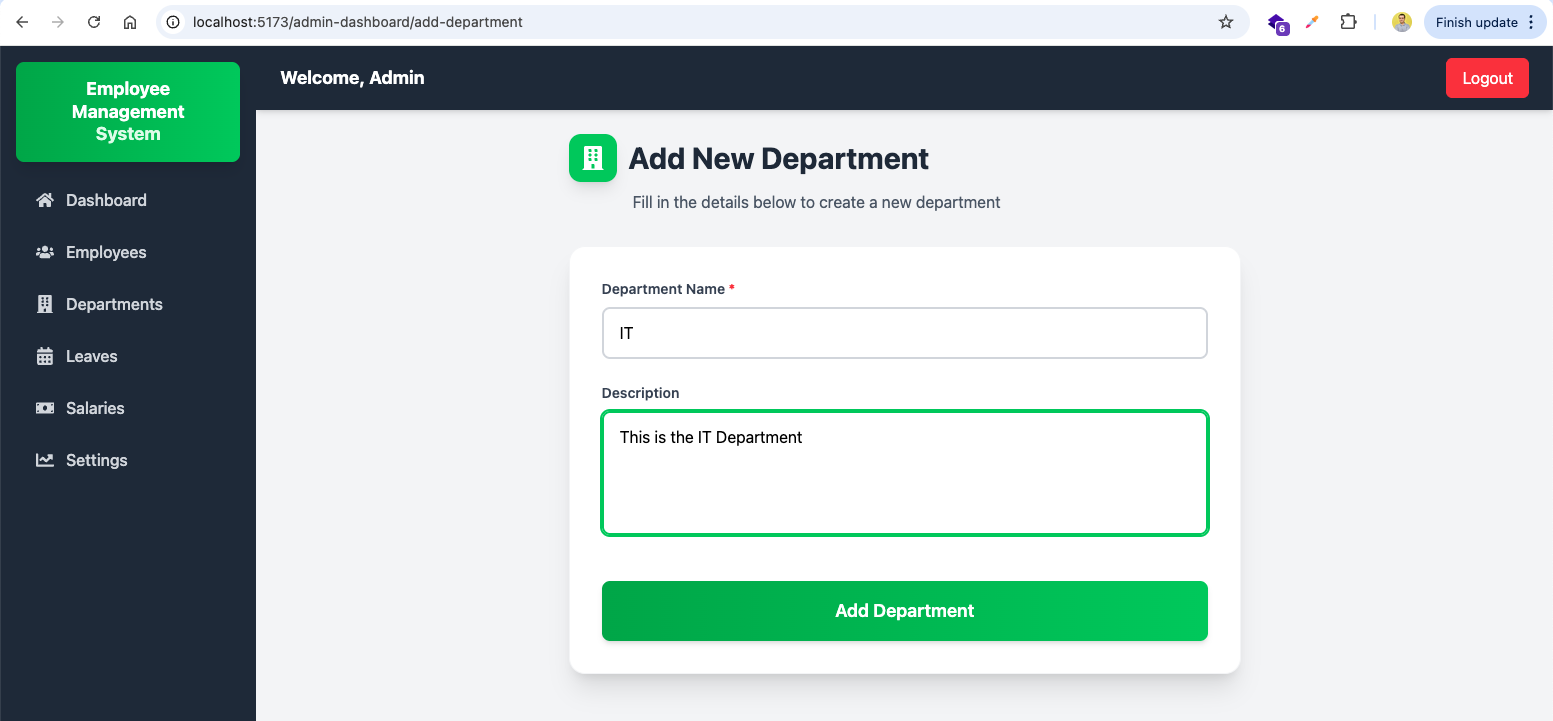
Now, clicking on Add Department button will take us to http://localhost:5173/admin-dashboard/add-department and will show this beautiful form.
We will update the AddDepartment.jsx file. Here, we will update the code for handleSubmit which will pass data to an POST api endpoint.

Now, we will add /api/department in index.js
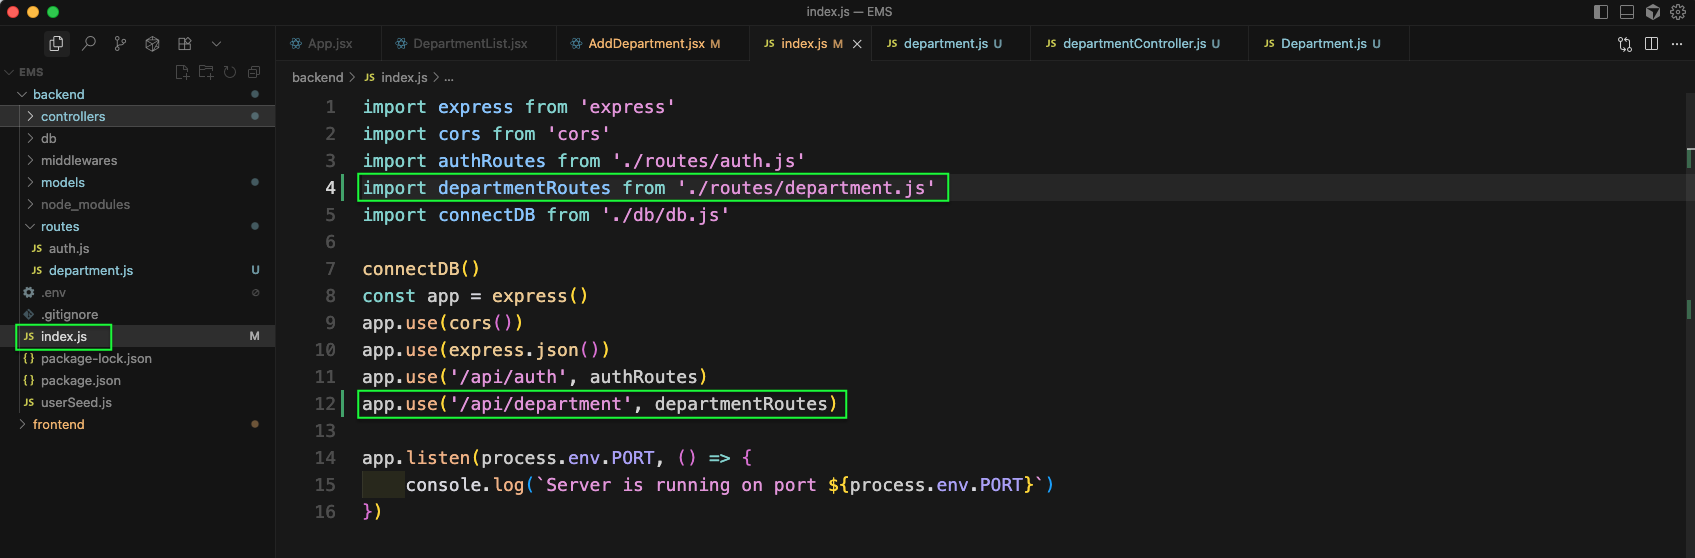
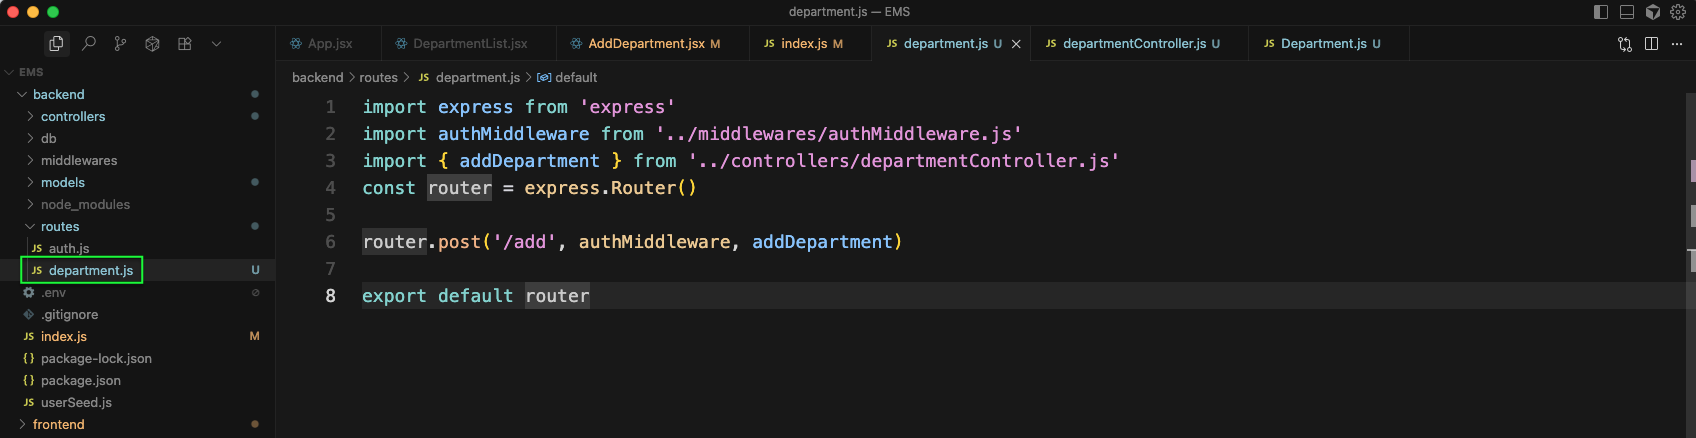
Now, we will create a department.js file inside the routes folder. Here, we will add the below code, which have a post route of add and calls addDepartment.
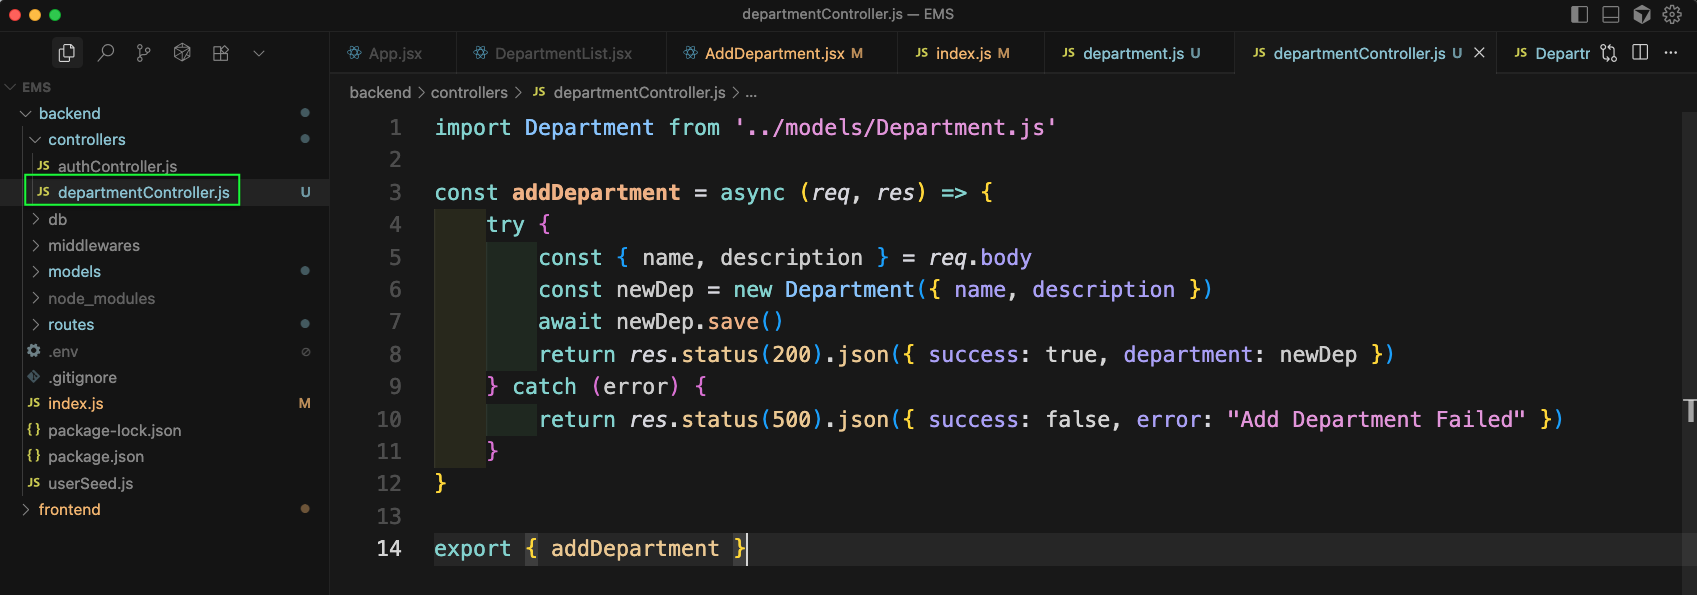
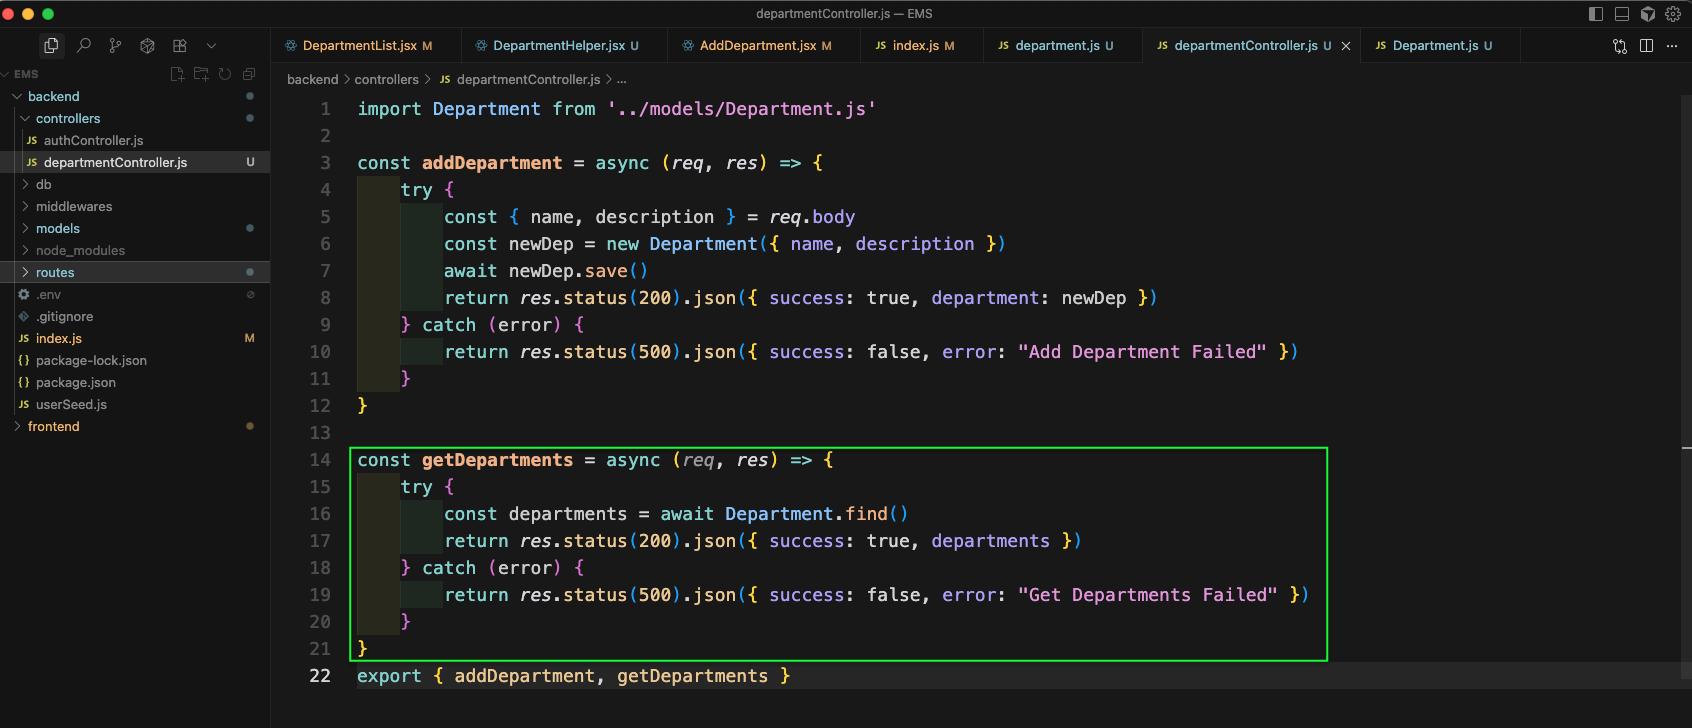
Now, create the departmentController.js file inside the controllers folder. Here, we are getting the name and description and using the Department model to save in the database.
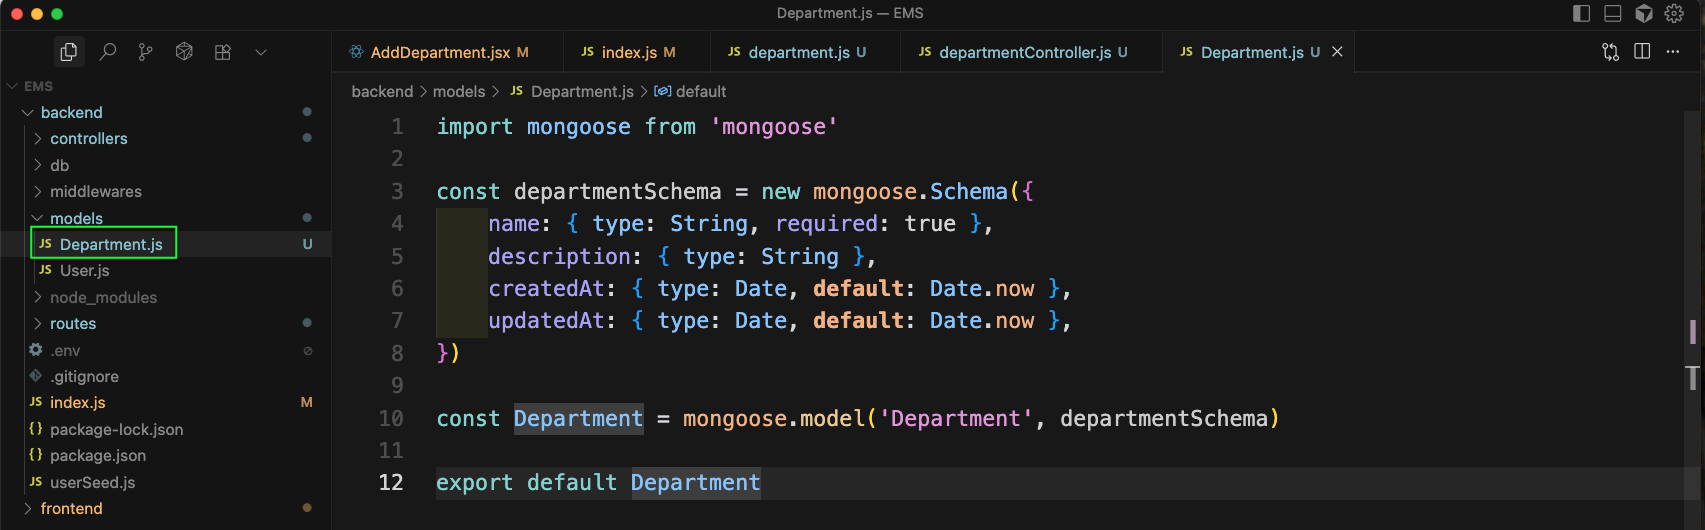
Now, inside the models folder, create Department.js file. Here, we have the basic schema code which have four fields of name, description, createdAt and updatedAt.
Now, back to http://localhost:5173/admin-dashboard/add-department and enter data and click on Add Department button.
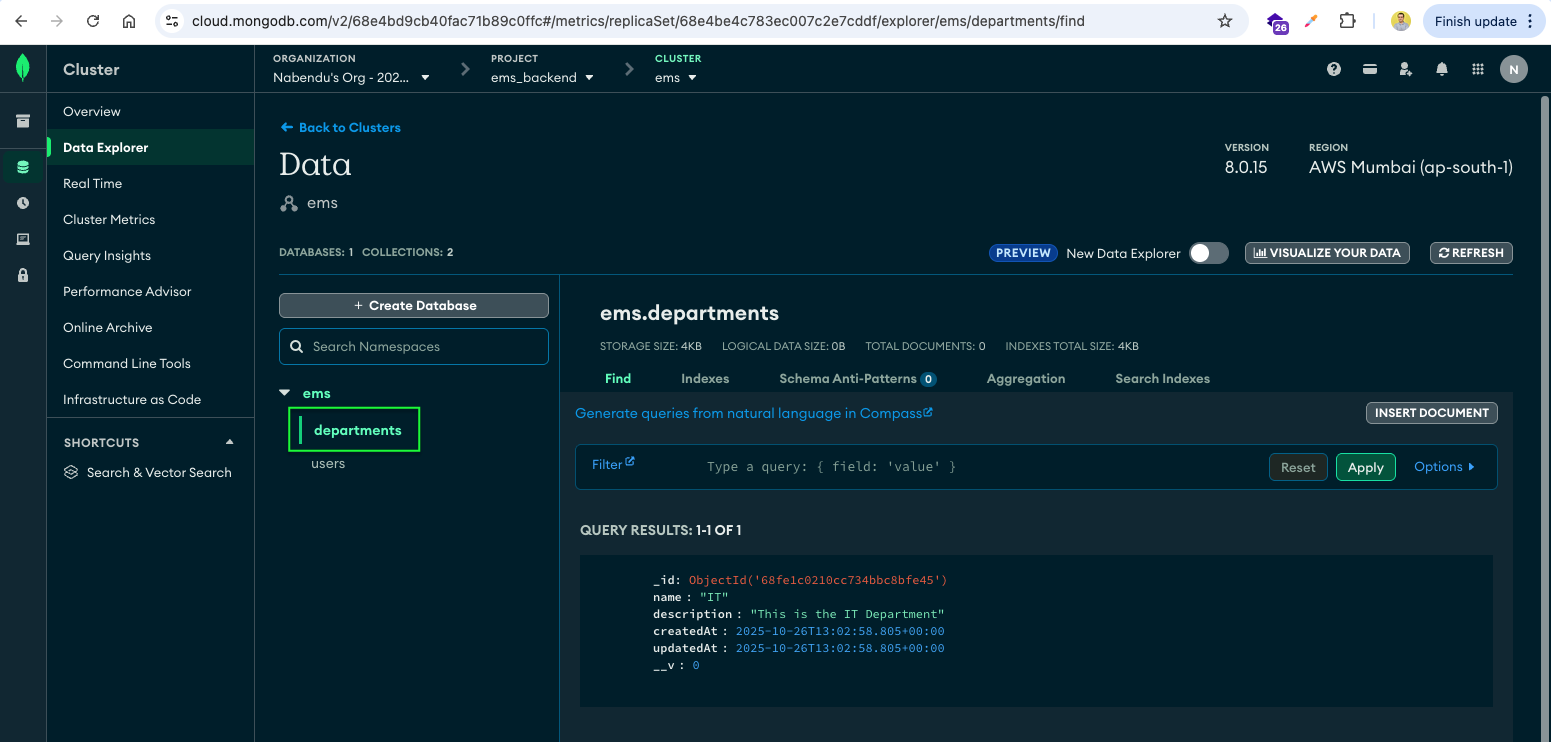
Now, in MongoDB database we will se the departments collection been created and also the document for newly created department created.
Back in the department.js file, we will add a new GET route which calls the controller getDepartments.
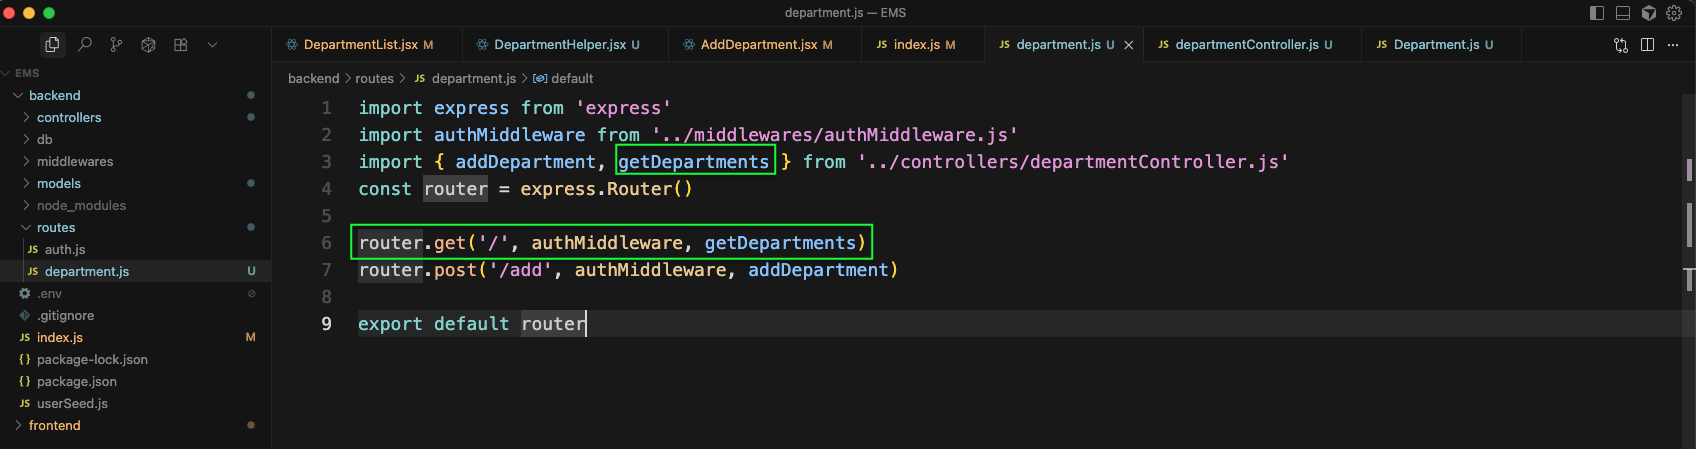
Back in the departmentController.js file, we will add the function of getDepartments.
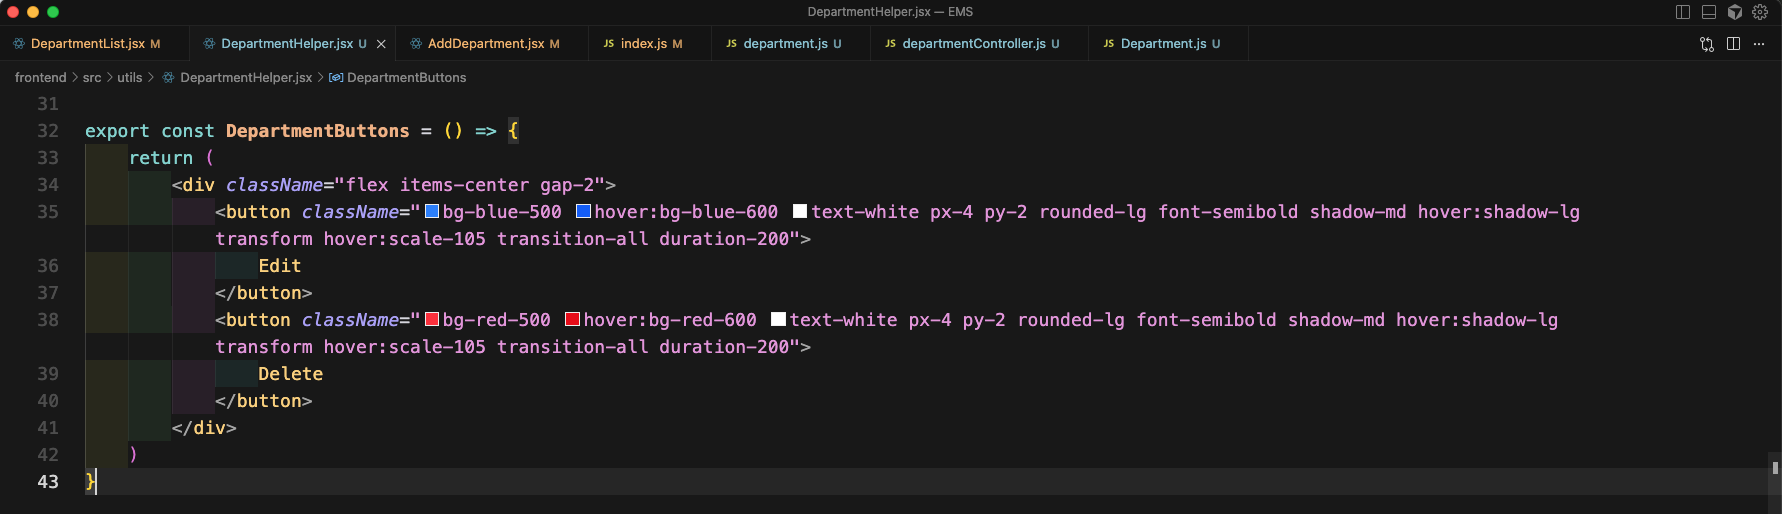
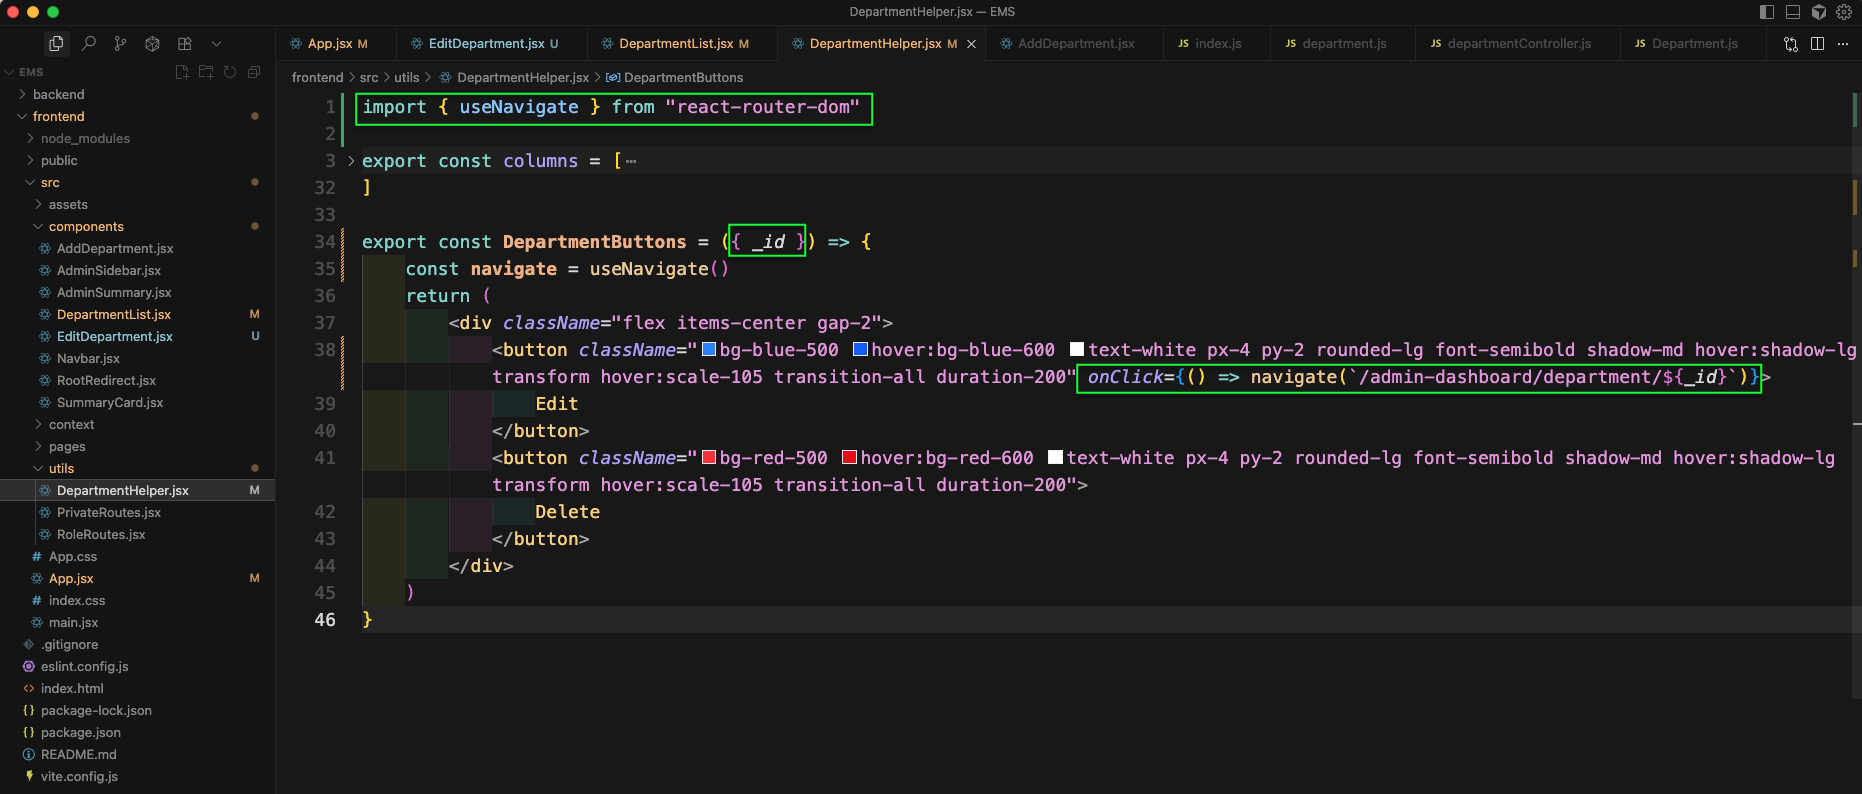
Now, in the utils folder, we will create DepartmentHelper.jsx file. Here, we will create a DepartmentButtons which basically have nice design with tailwind css.
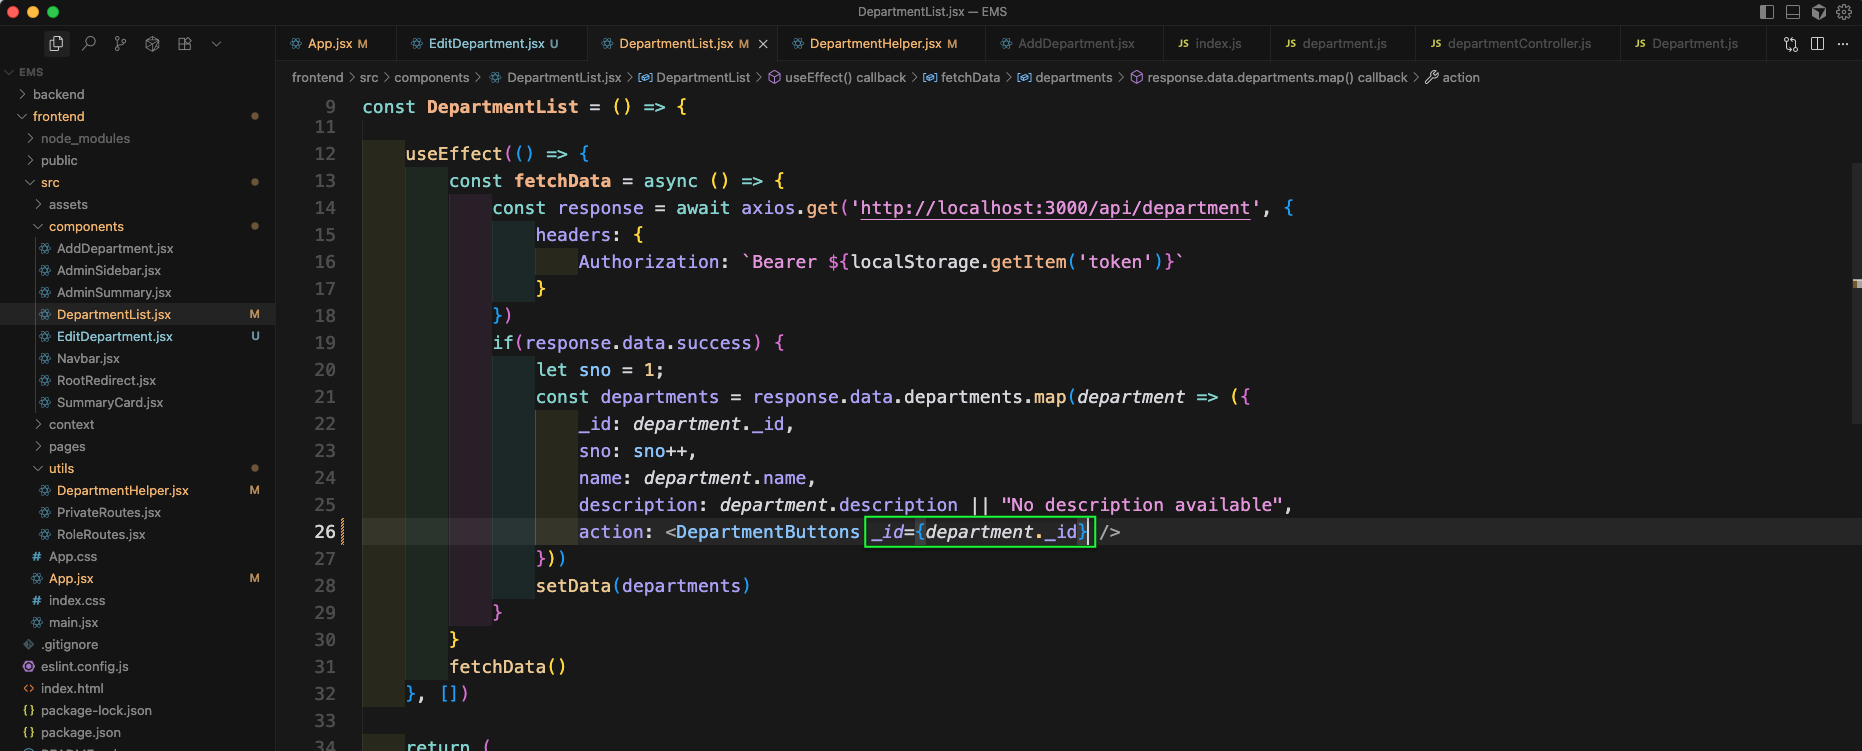
In the DepartmentList.jsx file we will add an useEffect which will call the department apiand will add the data with name and description to a data state variable.
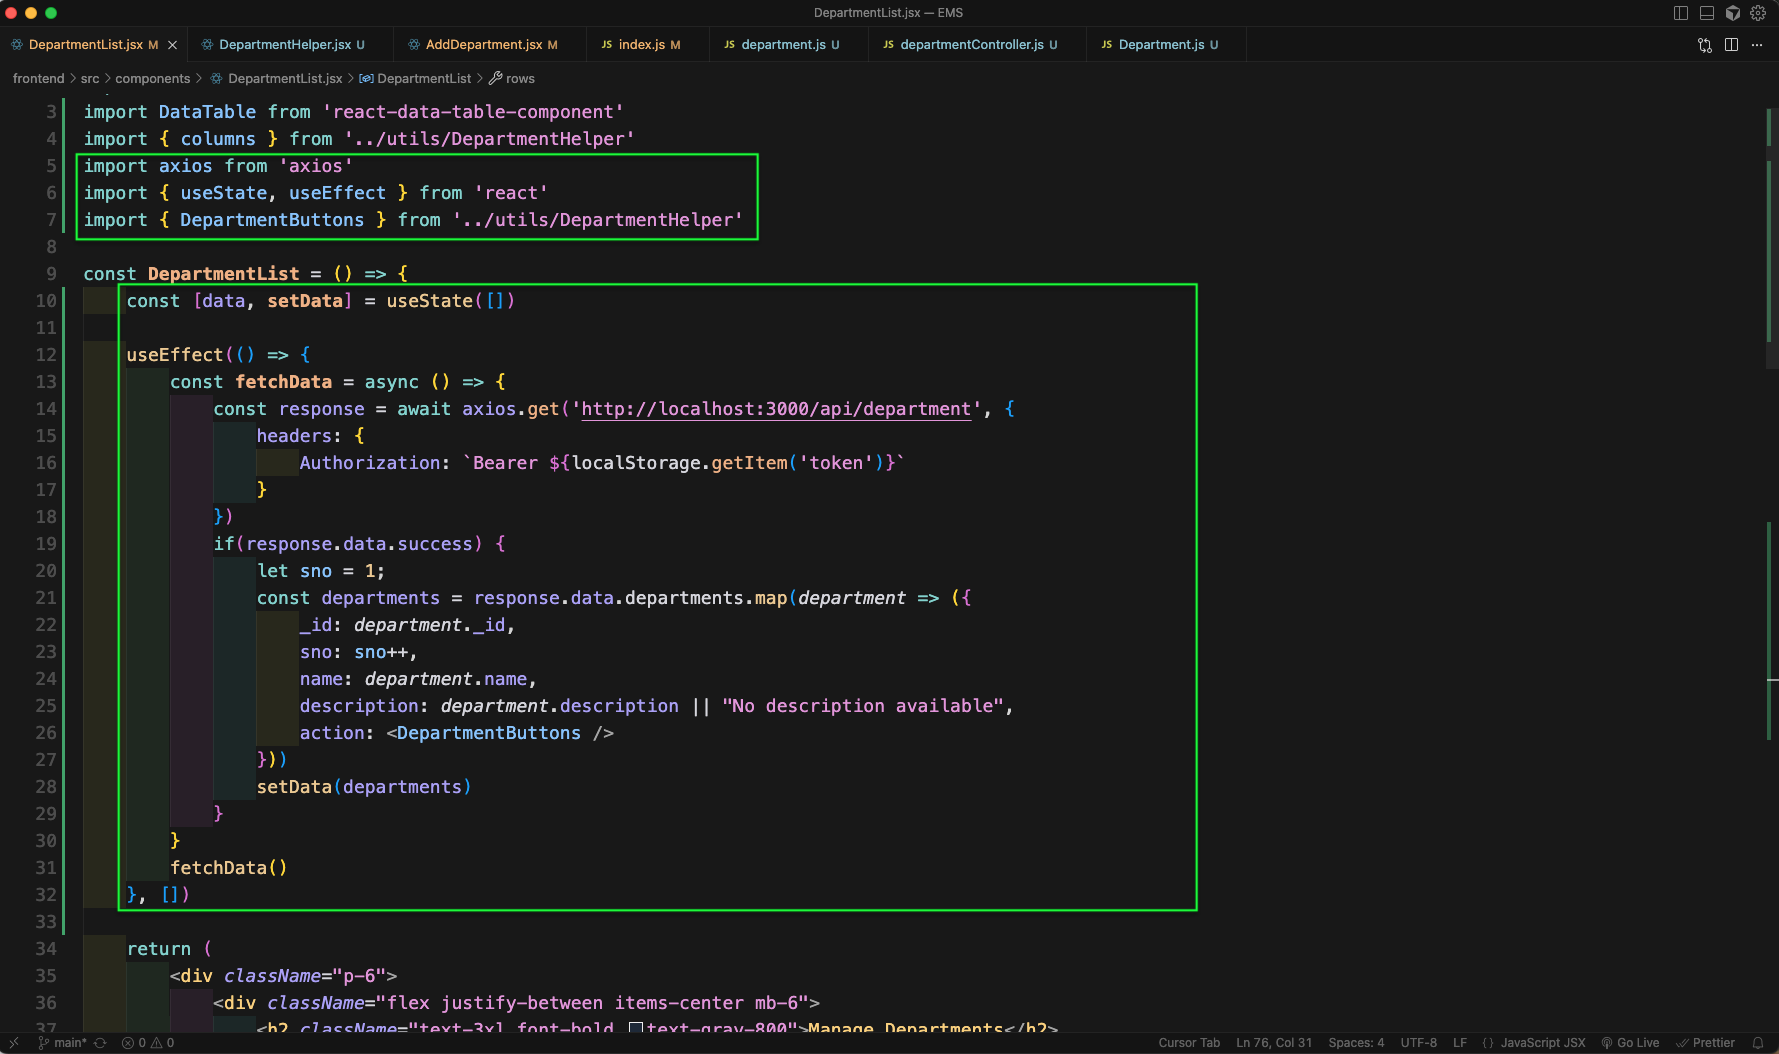
Now, we will add some more data in DepartmentList.jsx file. Here, we will use the DataTable to show all the data, which comes with pagination and other good things.
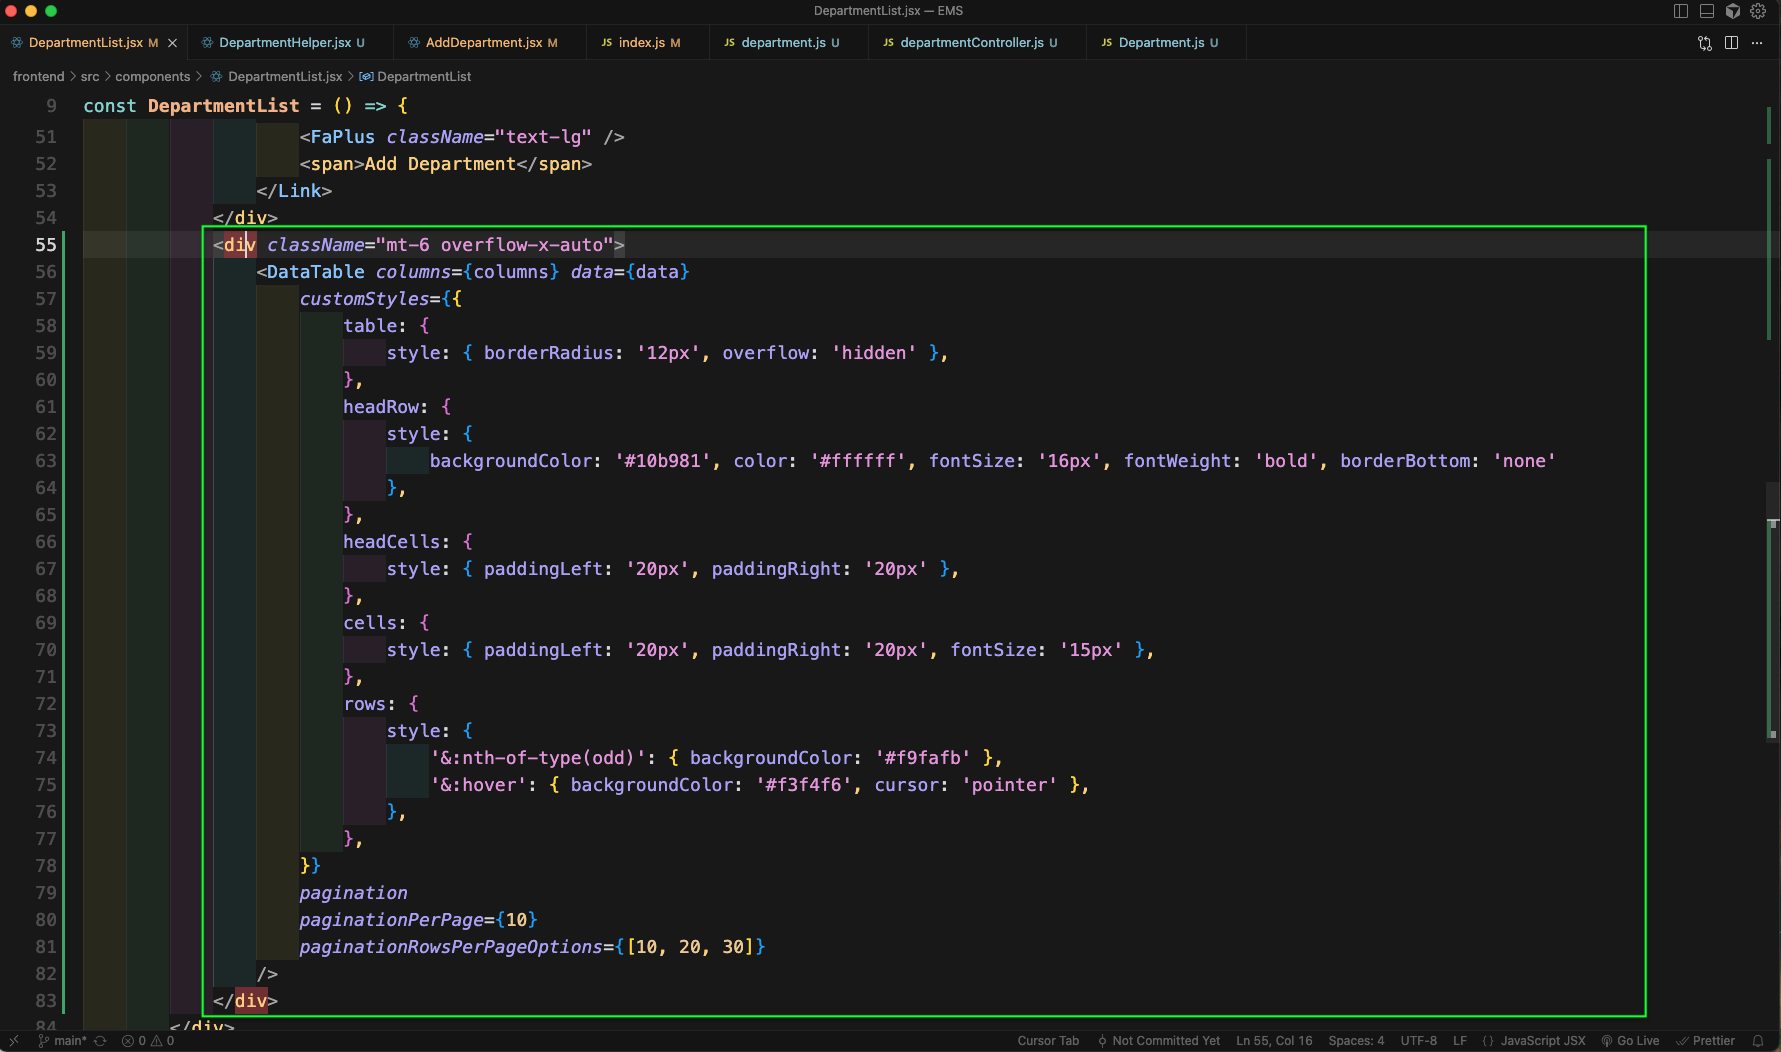
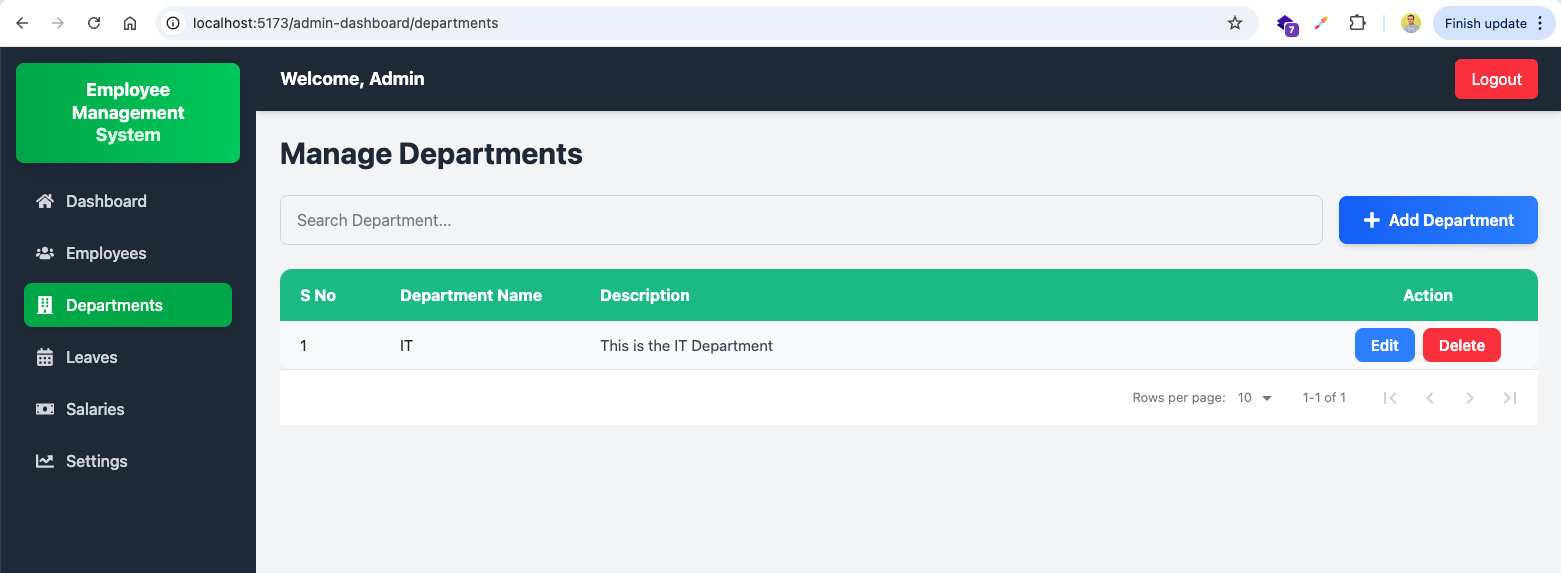
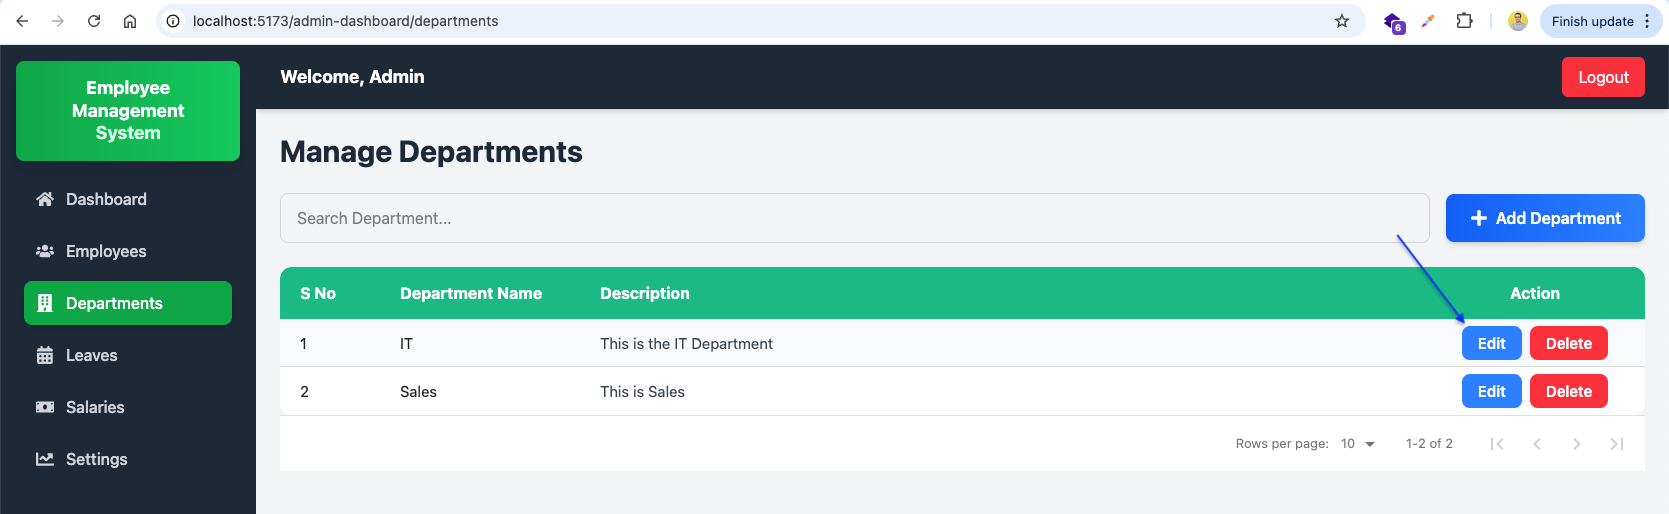
Now, in http://localhost:5173/admin-dashboard/departments we will see our department data in nice table.
Now, in the DepartmentHelper.jsx file we will update the Edit button. Here, we will get the _id in the params. And then in onClick will use it to navigate to the specific department.
Now, in the DepartmentList.jsx file we will get the params of _id
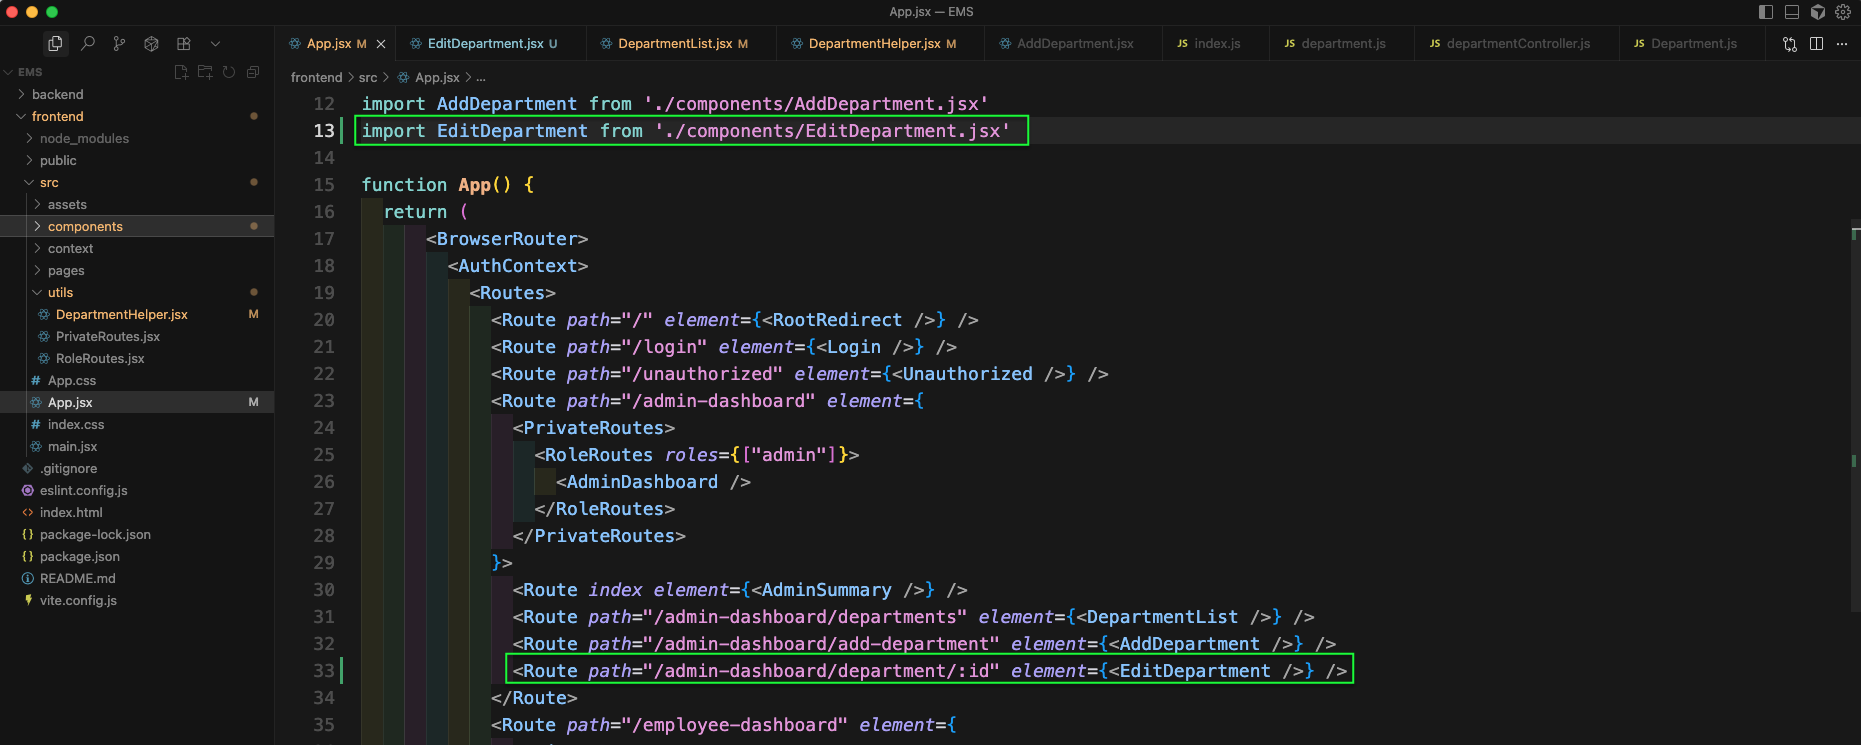
In App.jsx file, we will also create a new Route which will render the EditDepartment component.
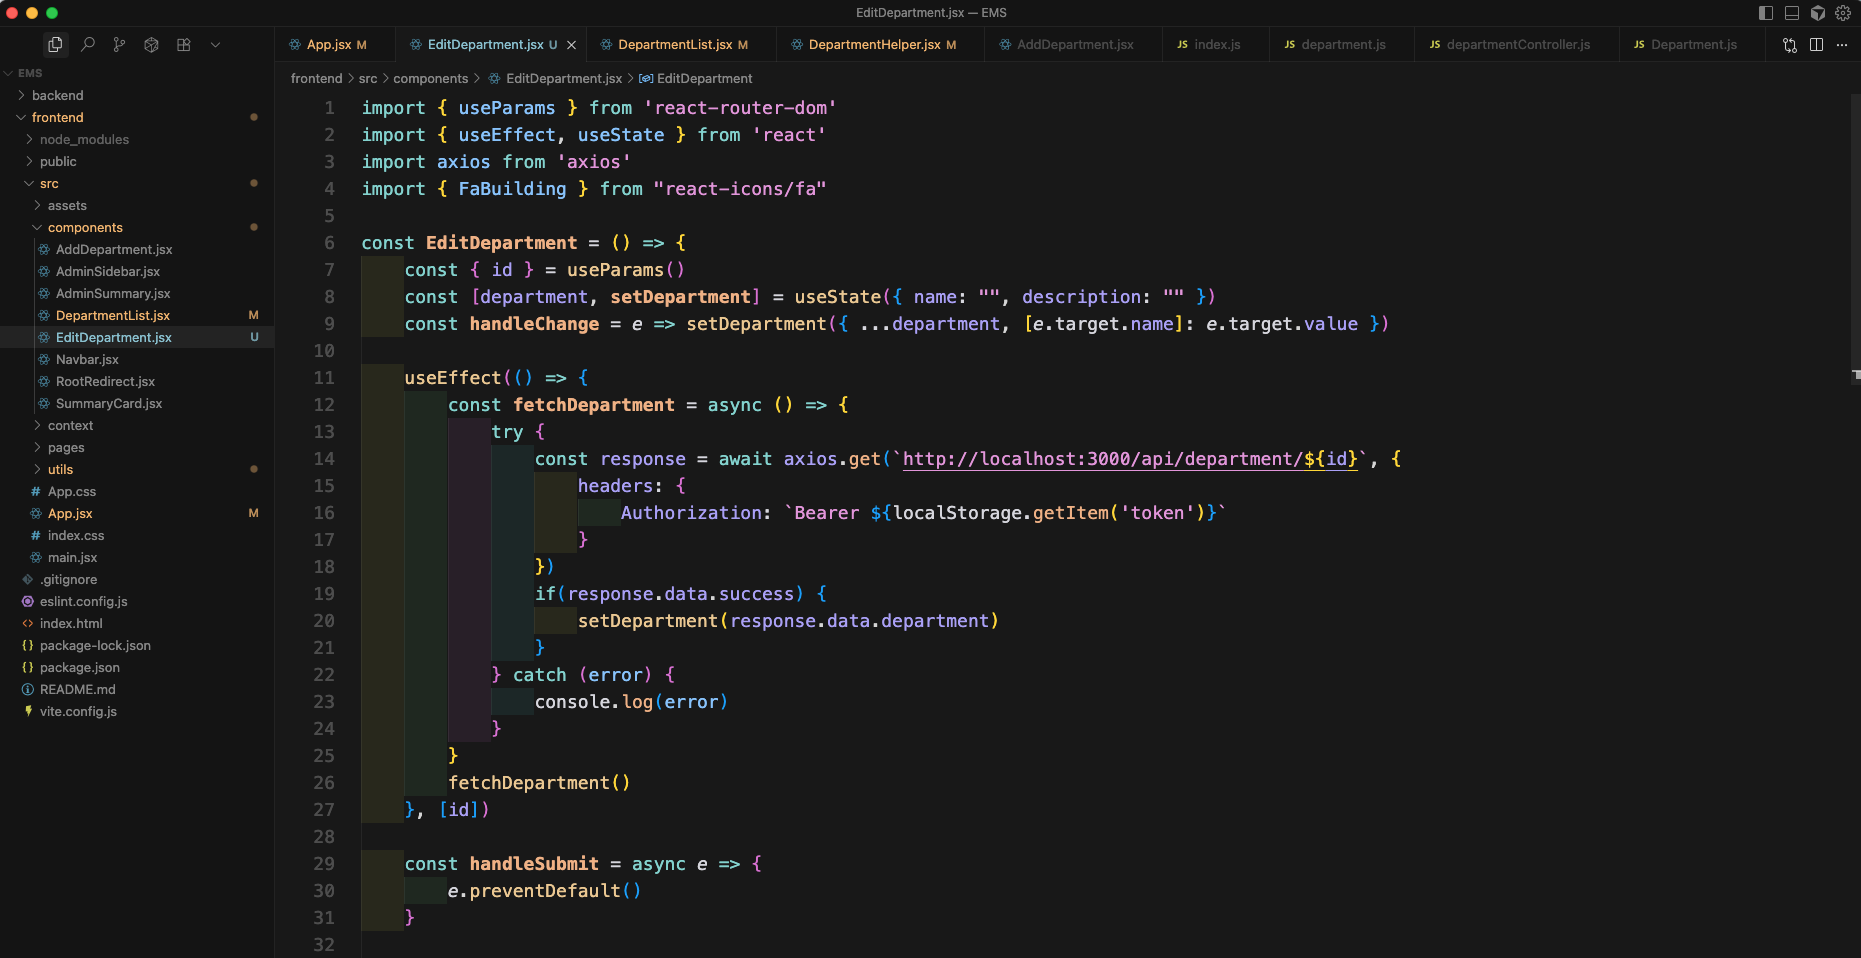
Now, in a new EditDepartment.jsx file, we will add the initial code. Here, we have an useEffect which will call the GET API to get the department details of this department.
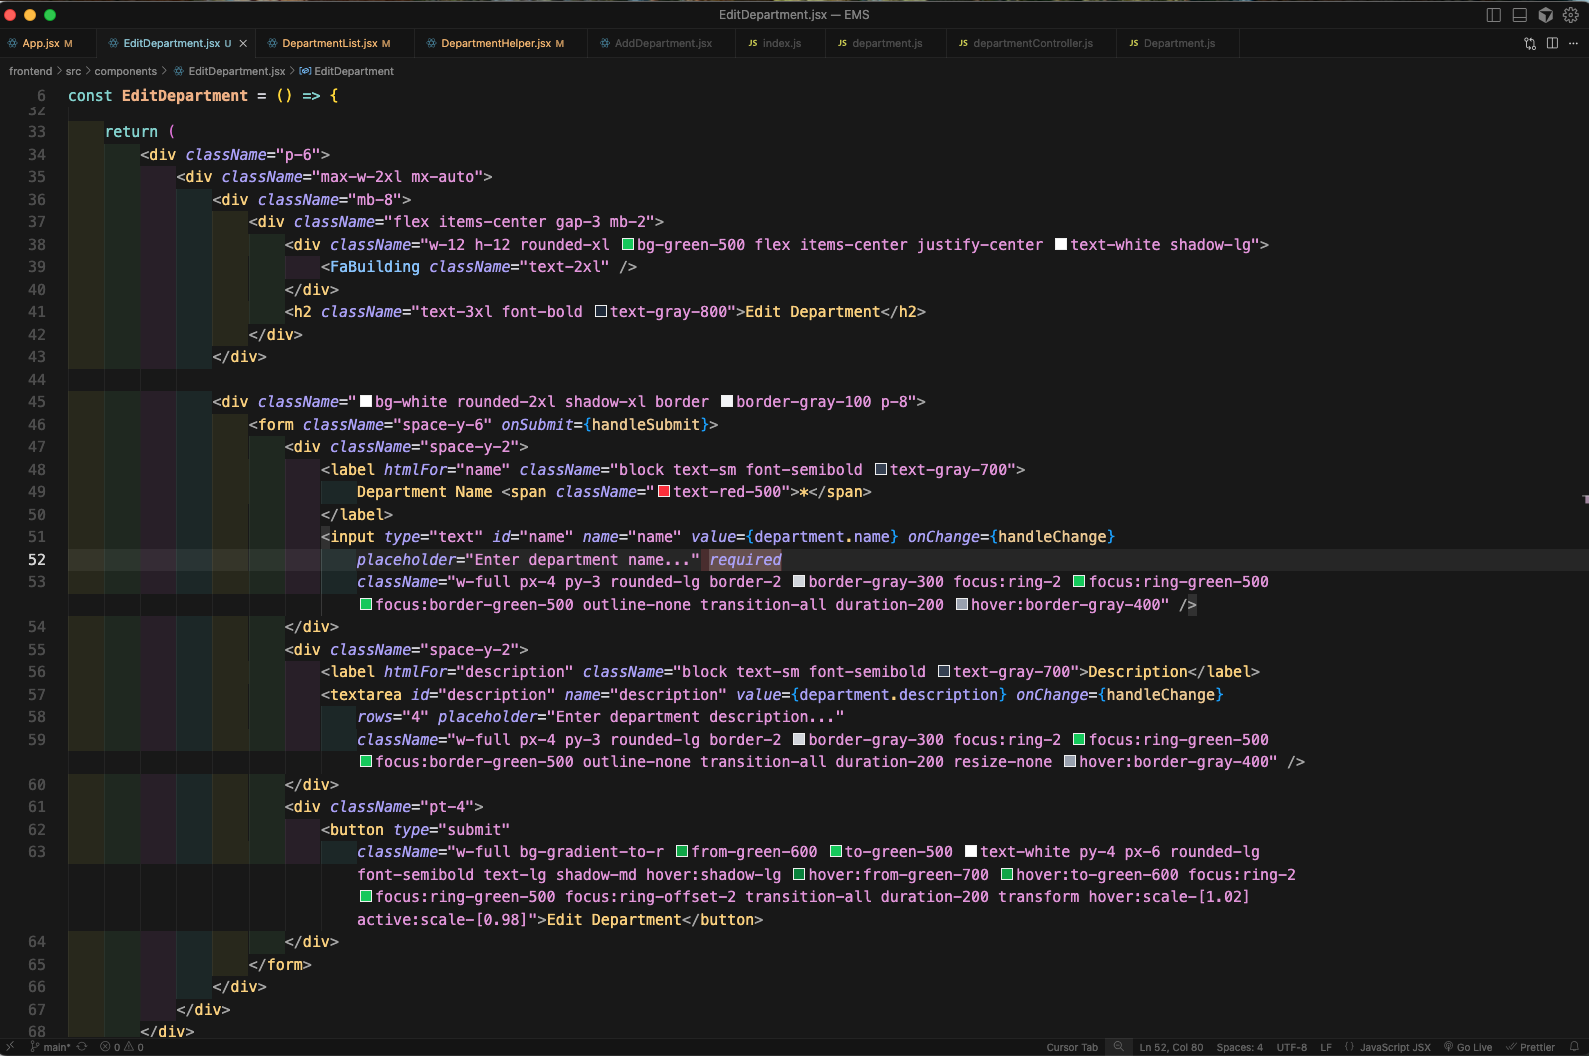
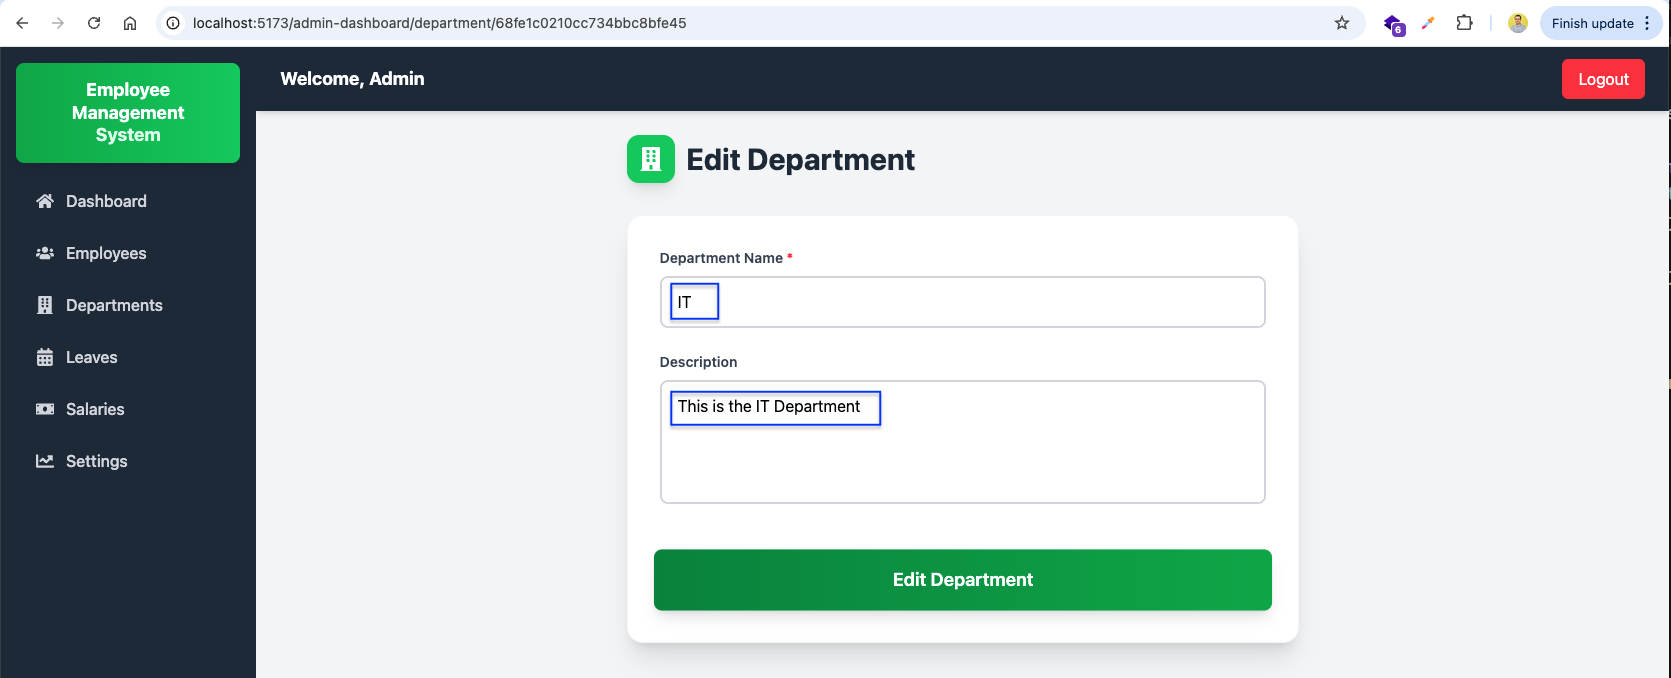
In the return statement of EditDepartment.jsx file, we will add a lot of tailwind css classess, to show various department data. And also an Edit Department button.
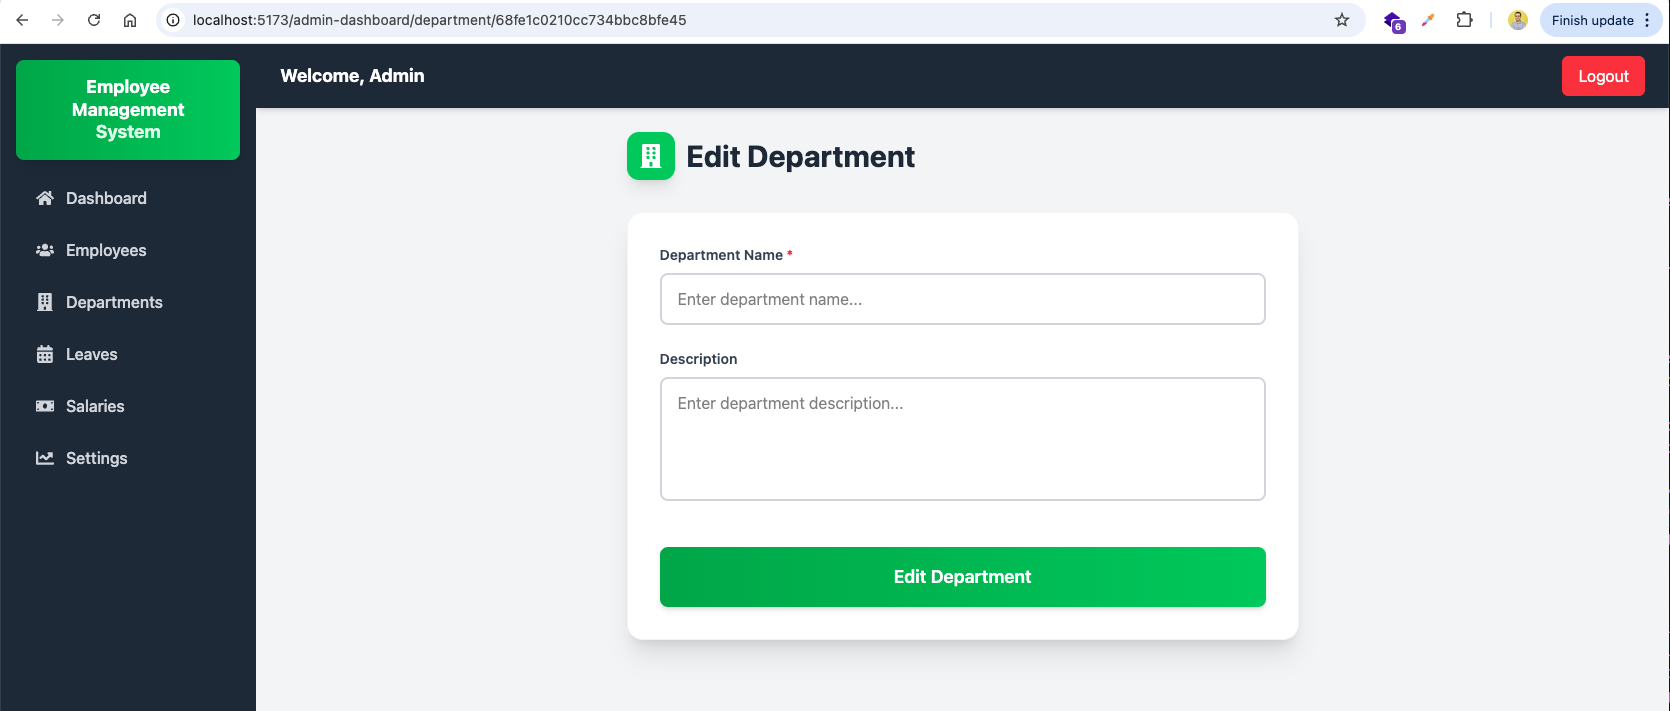
Now, clicking on the Edit button in http://localhost:5173/admin-dashboard/departments will take us the below page.
Now, in the department.js file, we will add a GET route, which will call editDepartment controller.
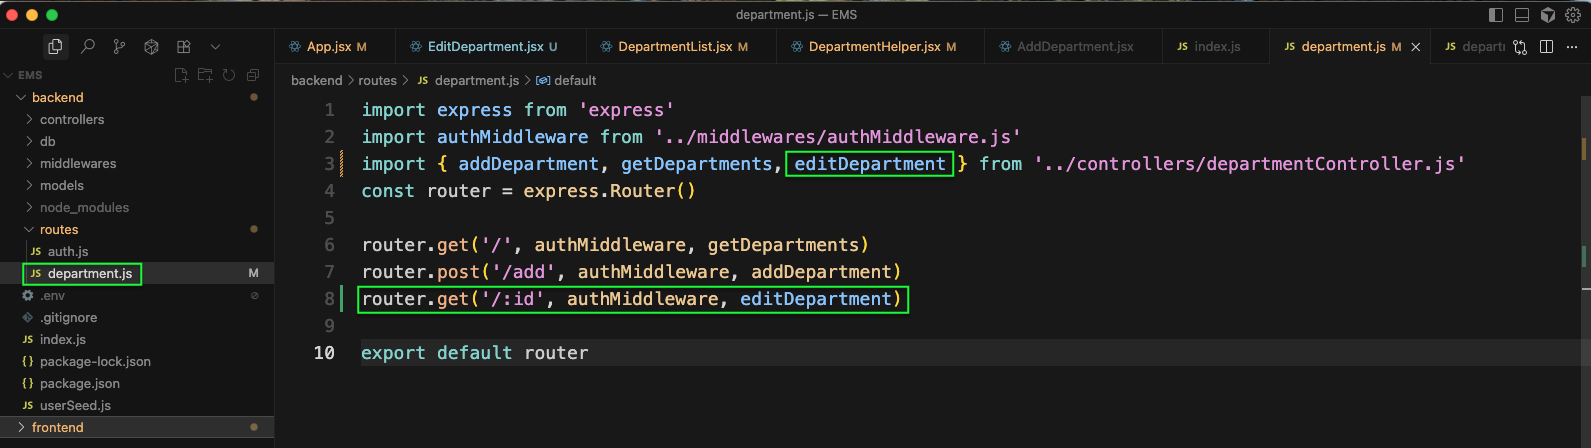
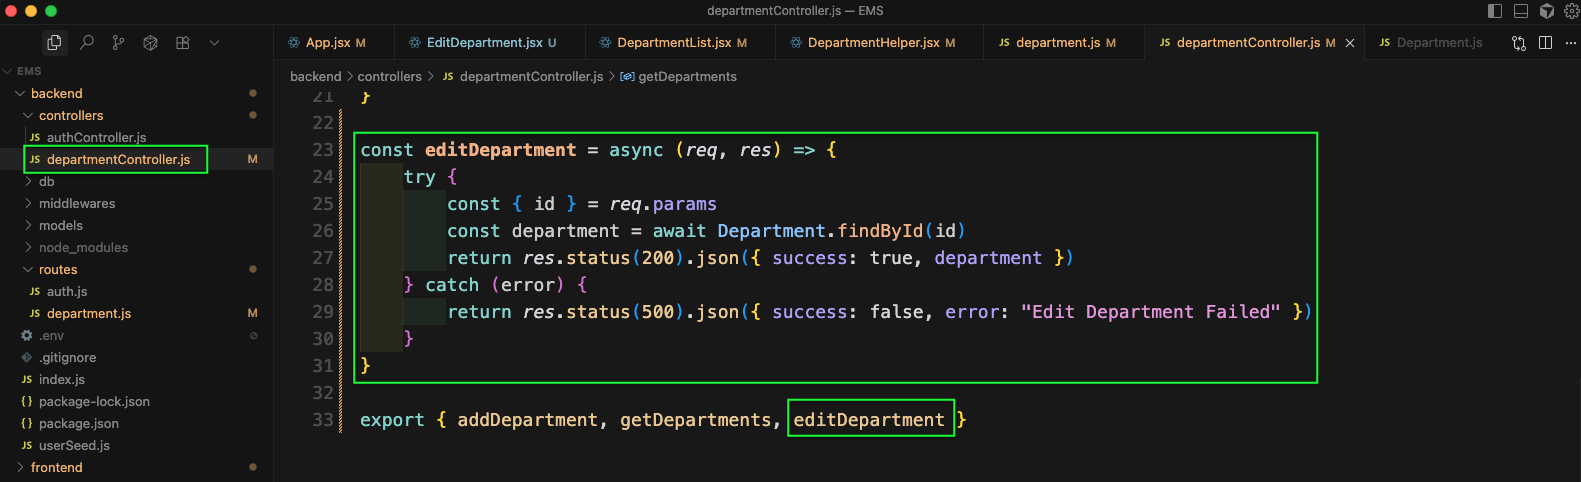
Now, we will add the editDepartment function in departmentController.js file.
Again in http://localhost:5173/admin-dashboard/departments we will click the Edit button.
Now, we will also get the data updated in Edit Department page.
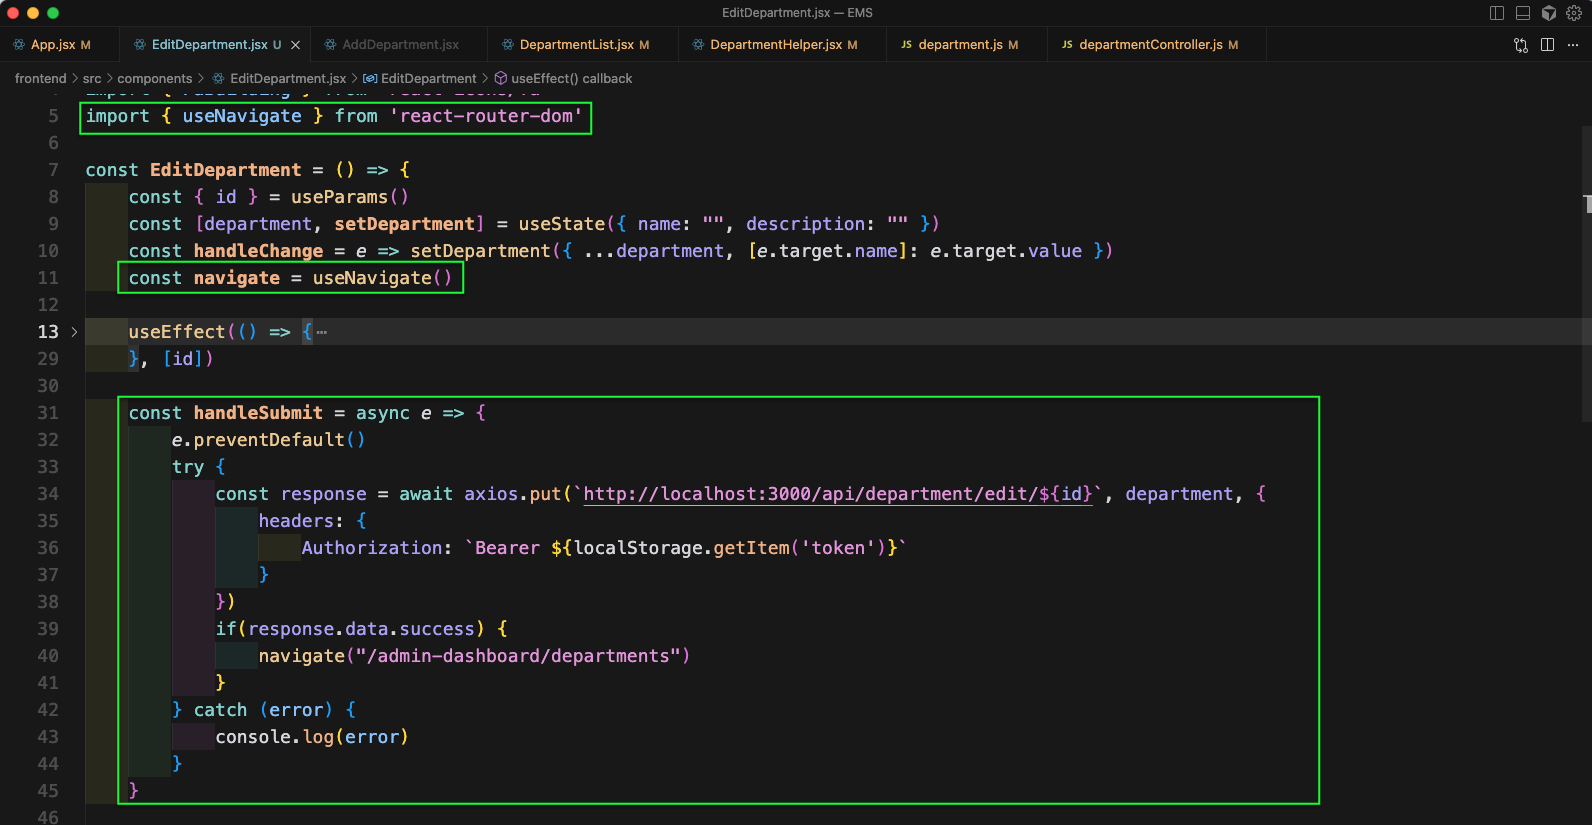
Now, in the EditDepartment.jsx file, we will update the handleSubmit function. Here, we will have a PUT call to edit the department.
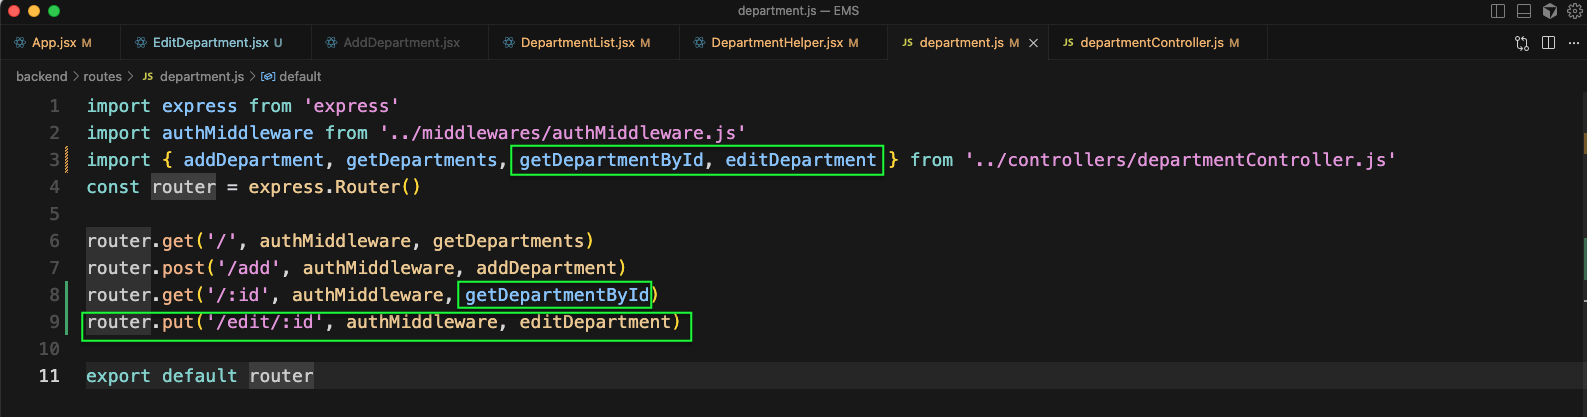
Now, in the department.js file, we will add a PUT route, which will call editDepartment controller. We will also change the name of the GET route created earlier to getDepartmentById.
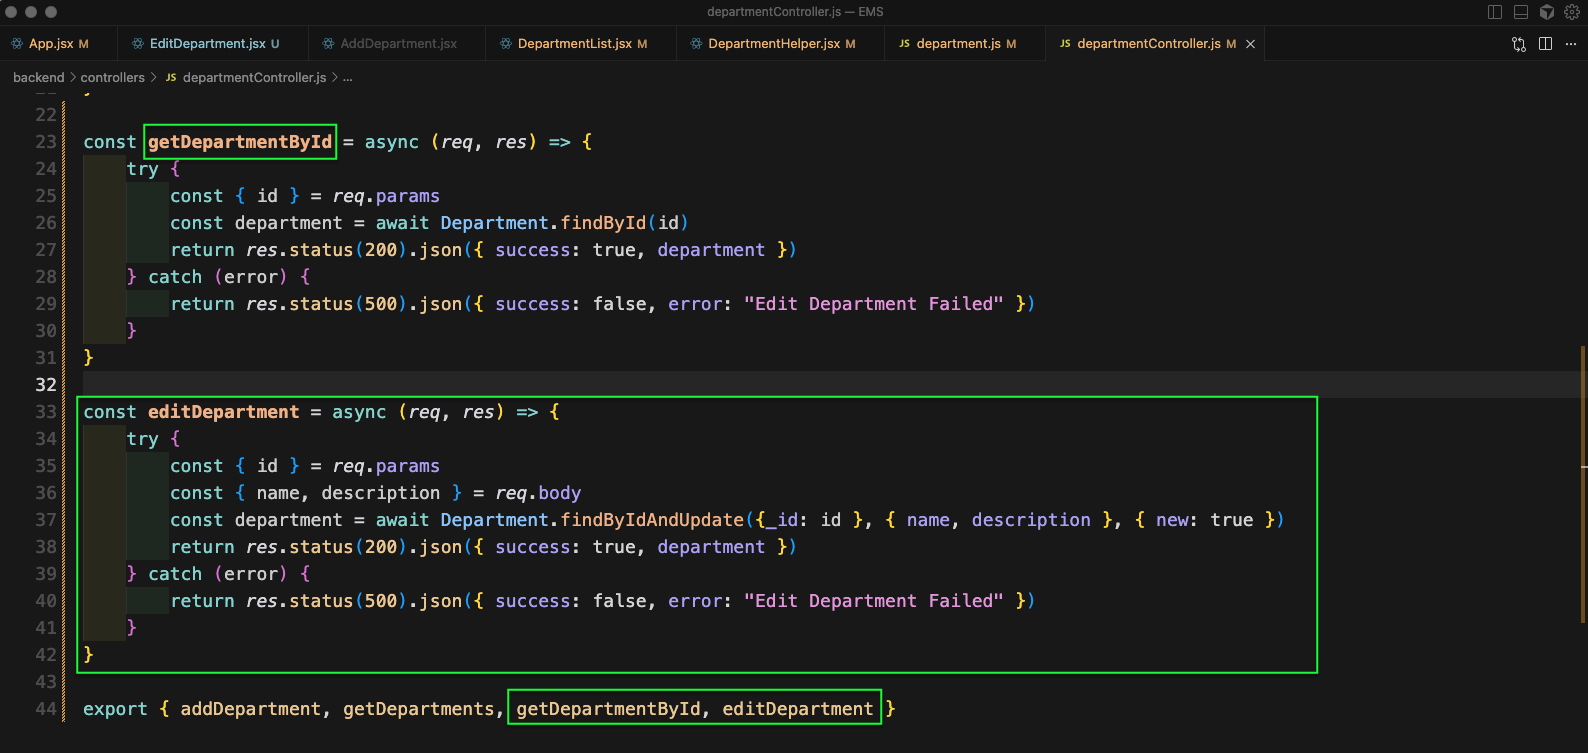
Now, we will add the editDepartment function in departmentController.js file. And also update the name of getDepartmentById.
Now in Edit Department page, we will update the Department Name and click on Edit Department button.

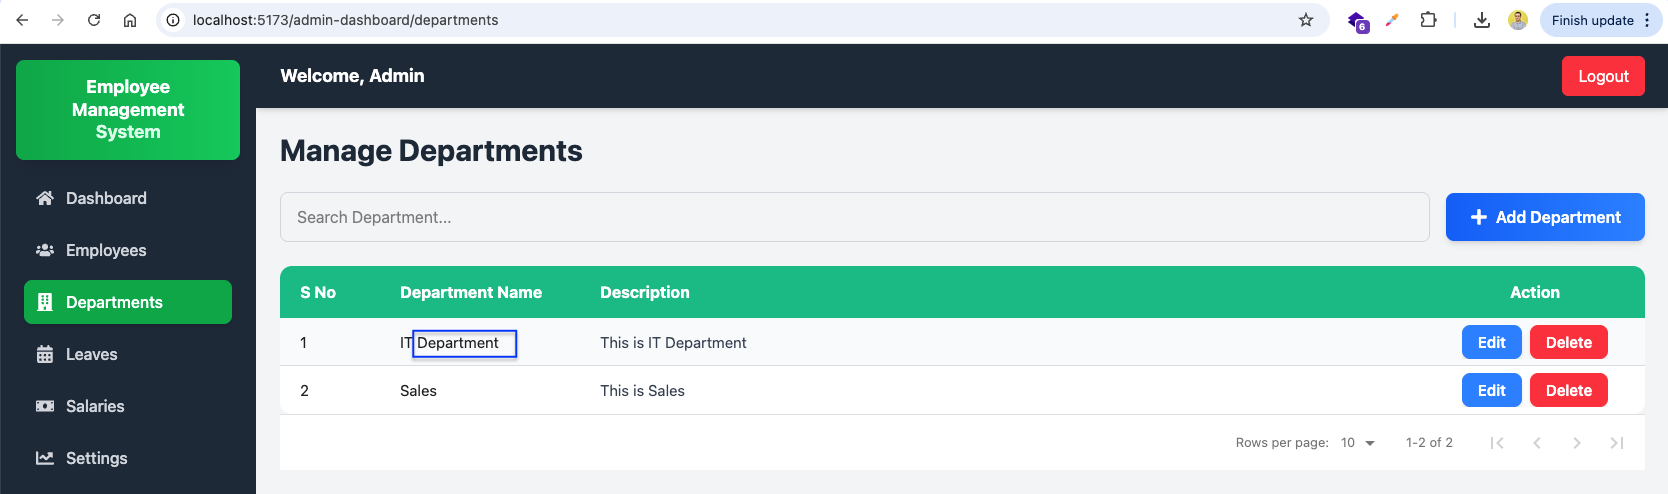
The changes will be reflected in http://localhost:5173/admin-dashboard/departments page.
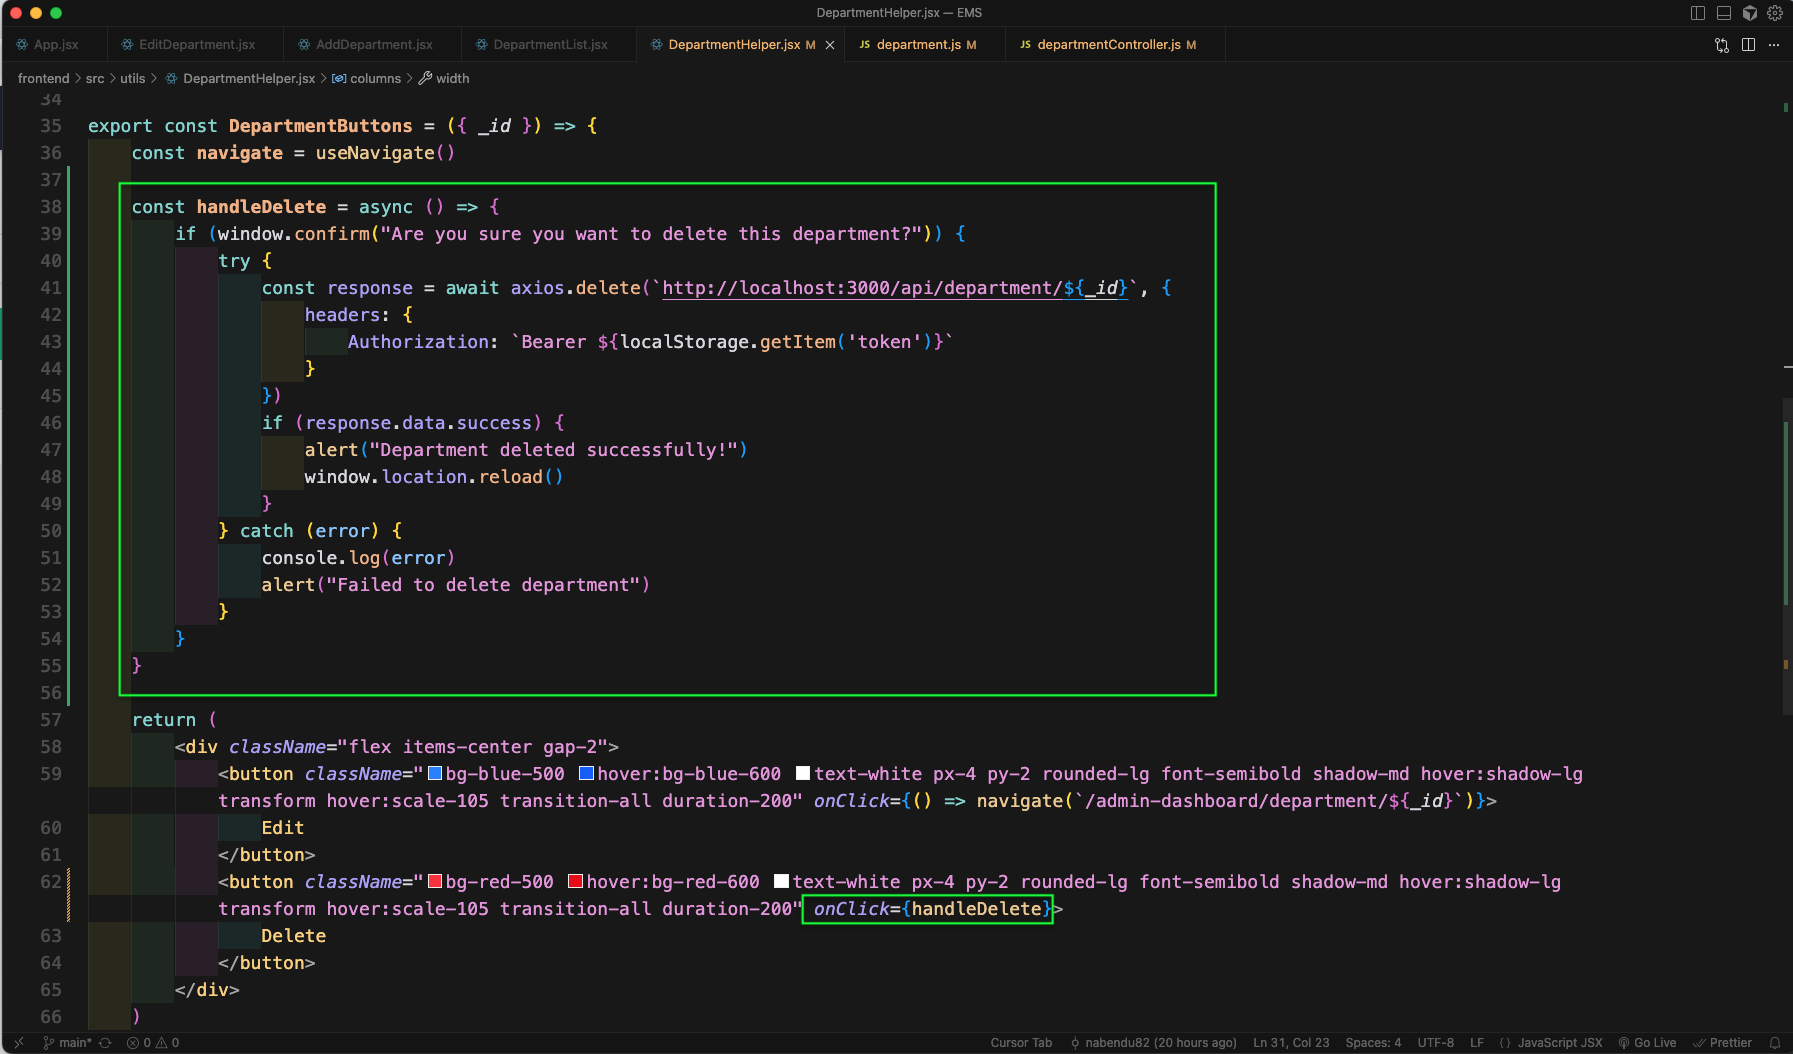
Now, in the DepartmentHelper.jsx file we will update the Delete button. Here, our handleDelete function will do a delete API call to a new endpoint.
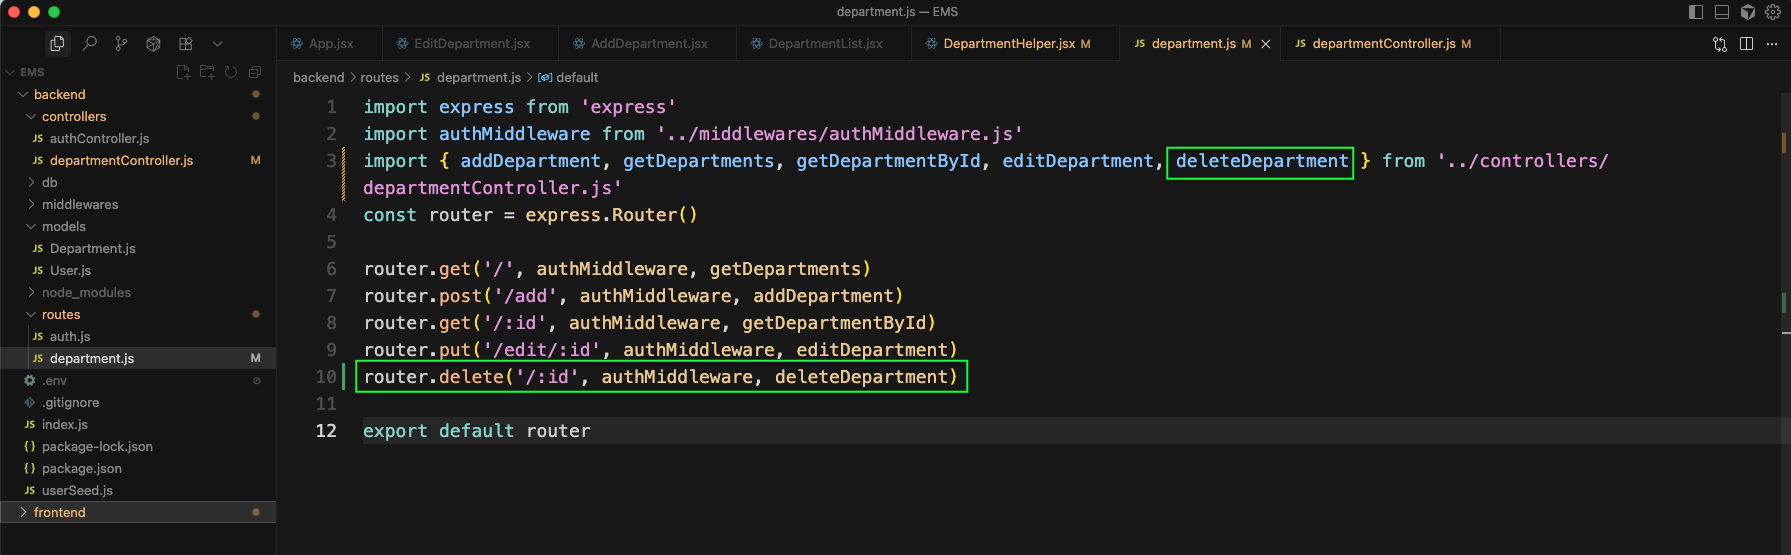
Now, in the department.js file, we will add a DELETE route, which will call deleteDepartment controller.
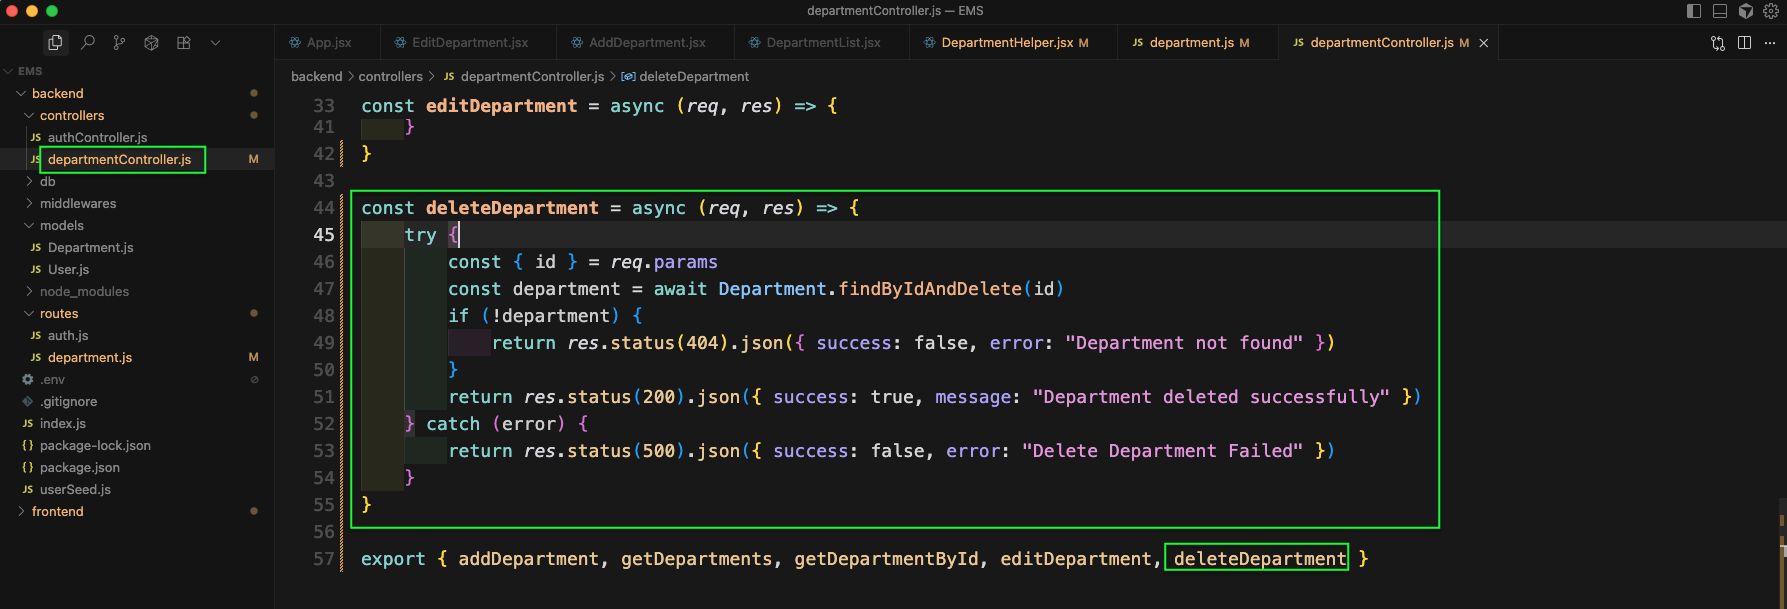
Now, we will add the deleteDepartment function in departmentController.js file.
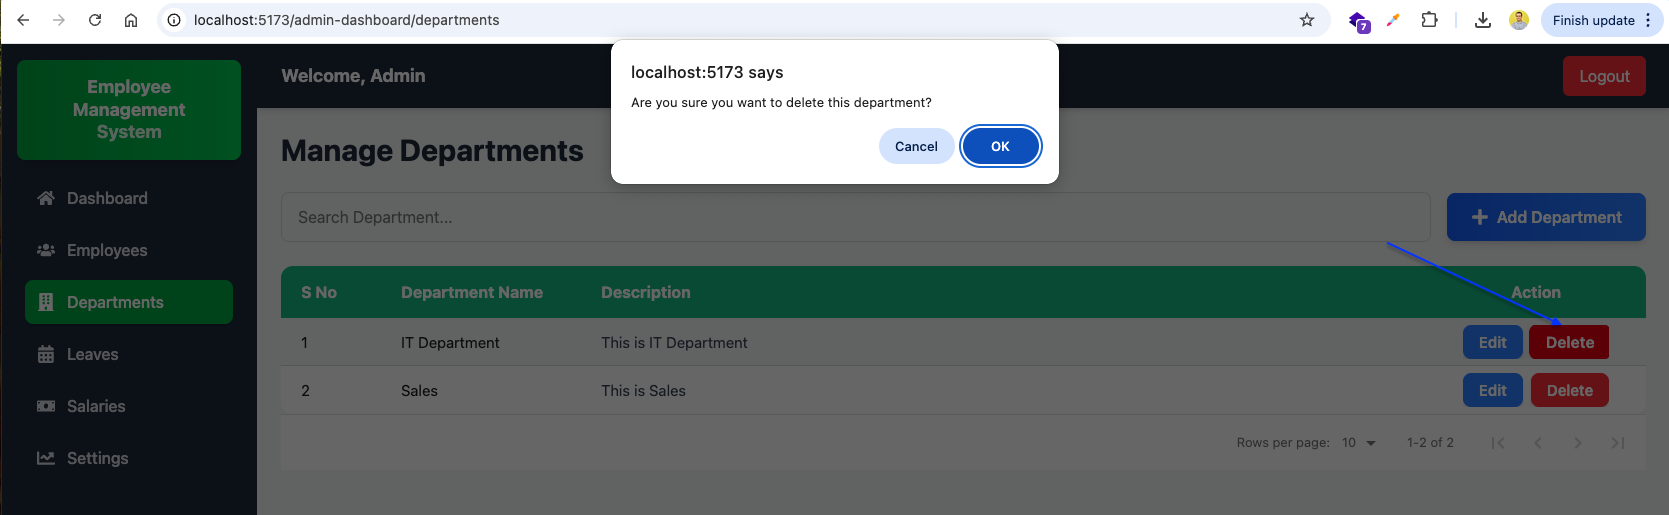
Now, back in http://localhost:5173/admin-dashboard/departments page, we will click on the Delete button. And will get the confirmation pop-up.
Back in http://localhost:5173/admin-dashboard/departments page, the department is deleted.
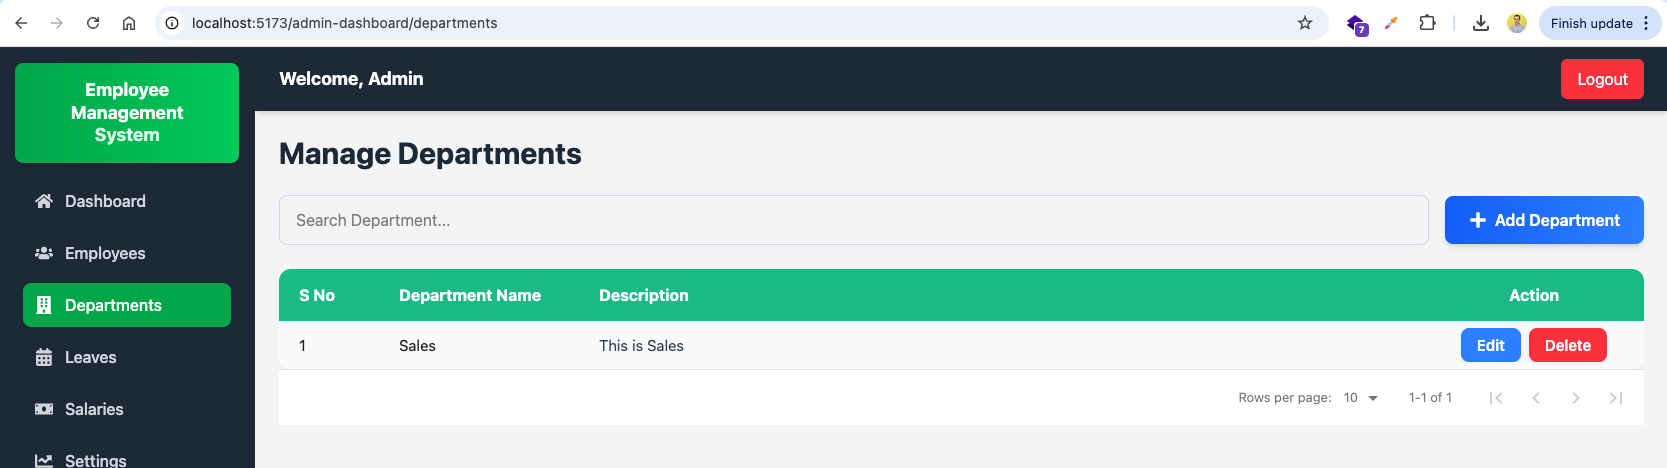
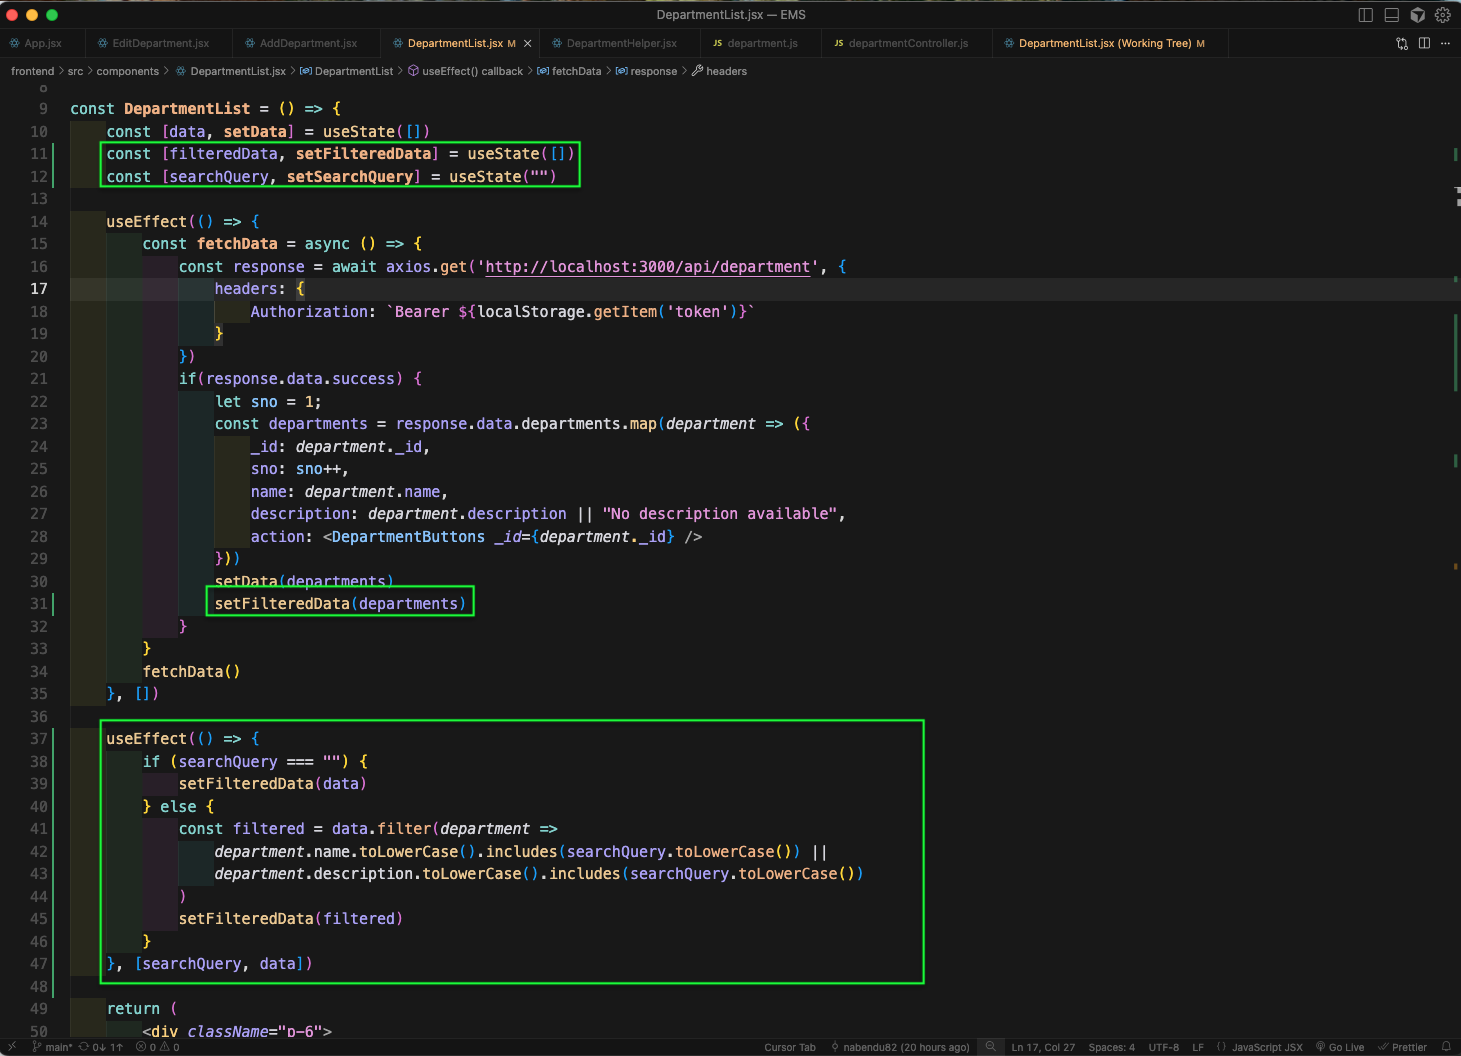
Next, we will add search functionality in Department. For this in DepartmentList.jsx file, we will add state and also an useEffect.
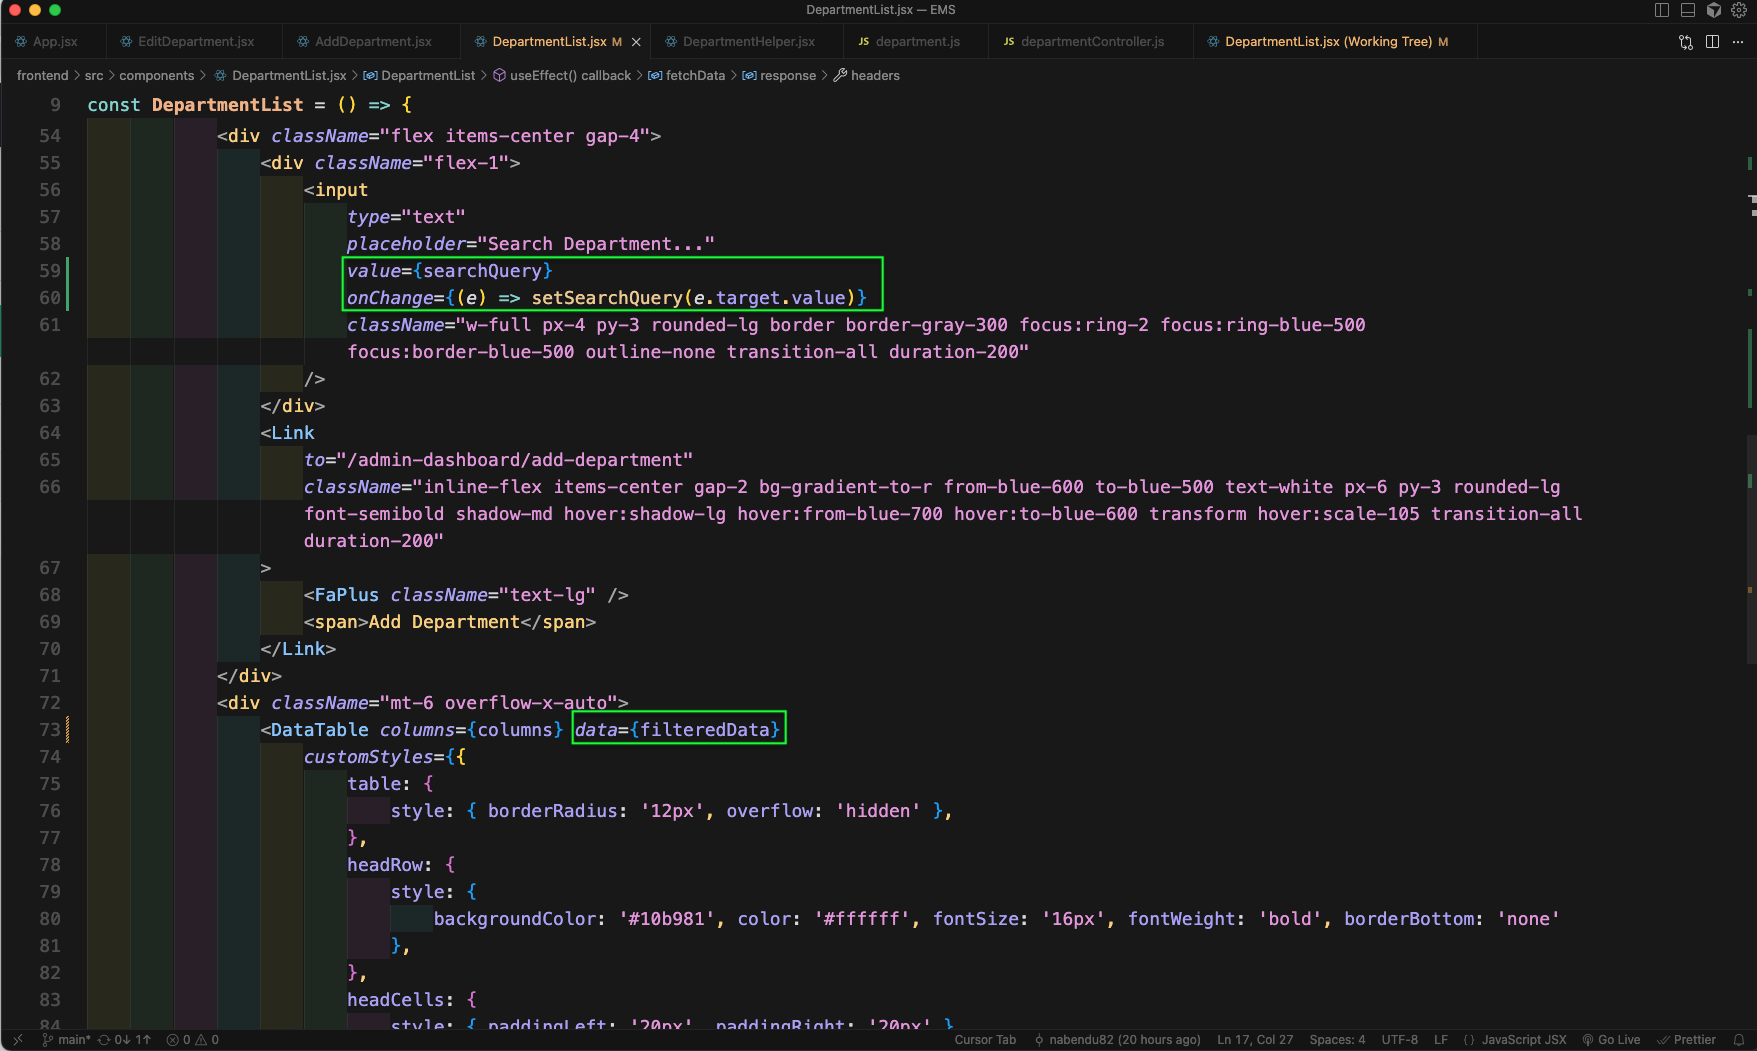
Now, we will update the value and onChnage for the input field. And also change the data props in DataTable.
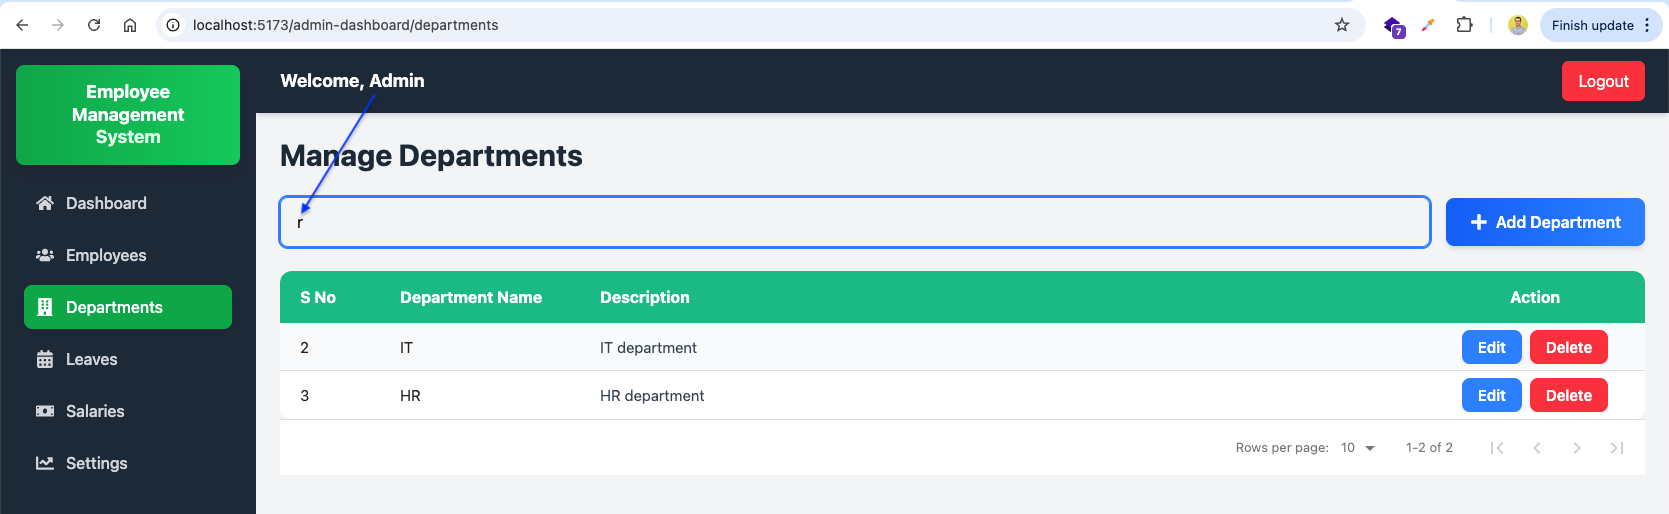
Now, search anything in http://localhost:5173/admin-dashboard/departments it will give us updated list.
Now, we will add a new route for employees which will render the EmployeeList component in App.jsx file.
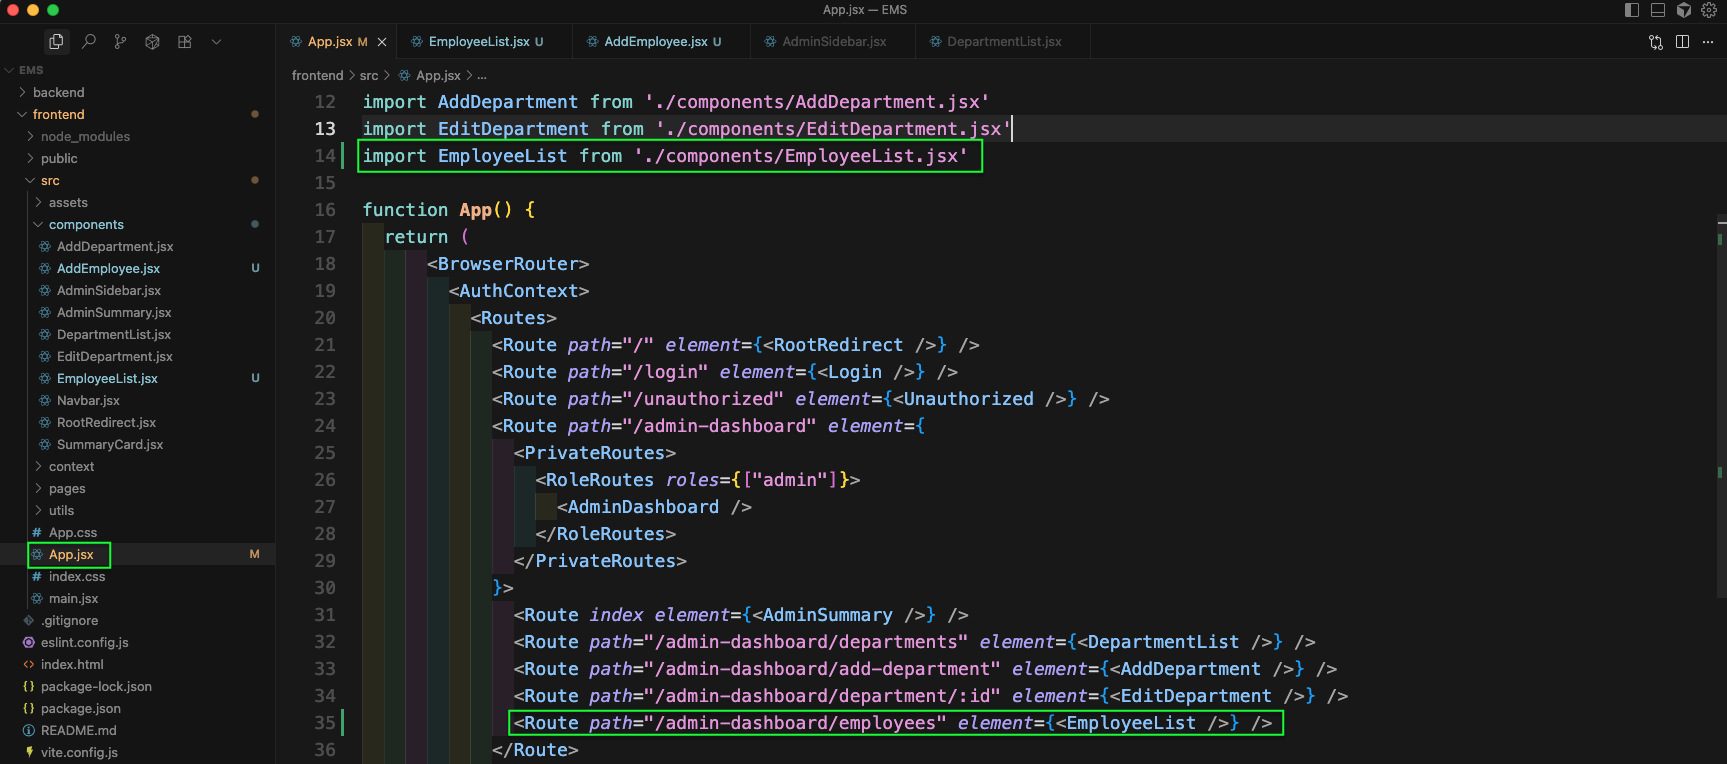
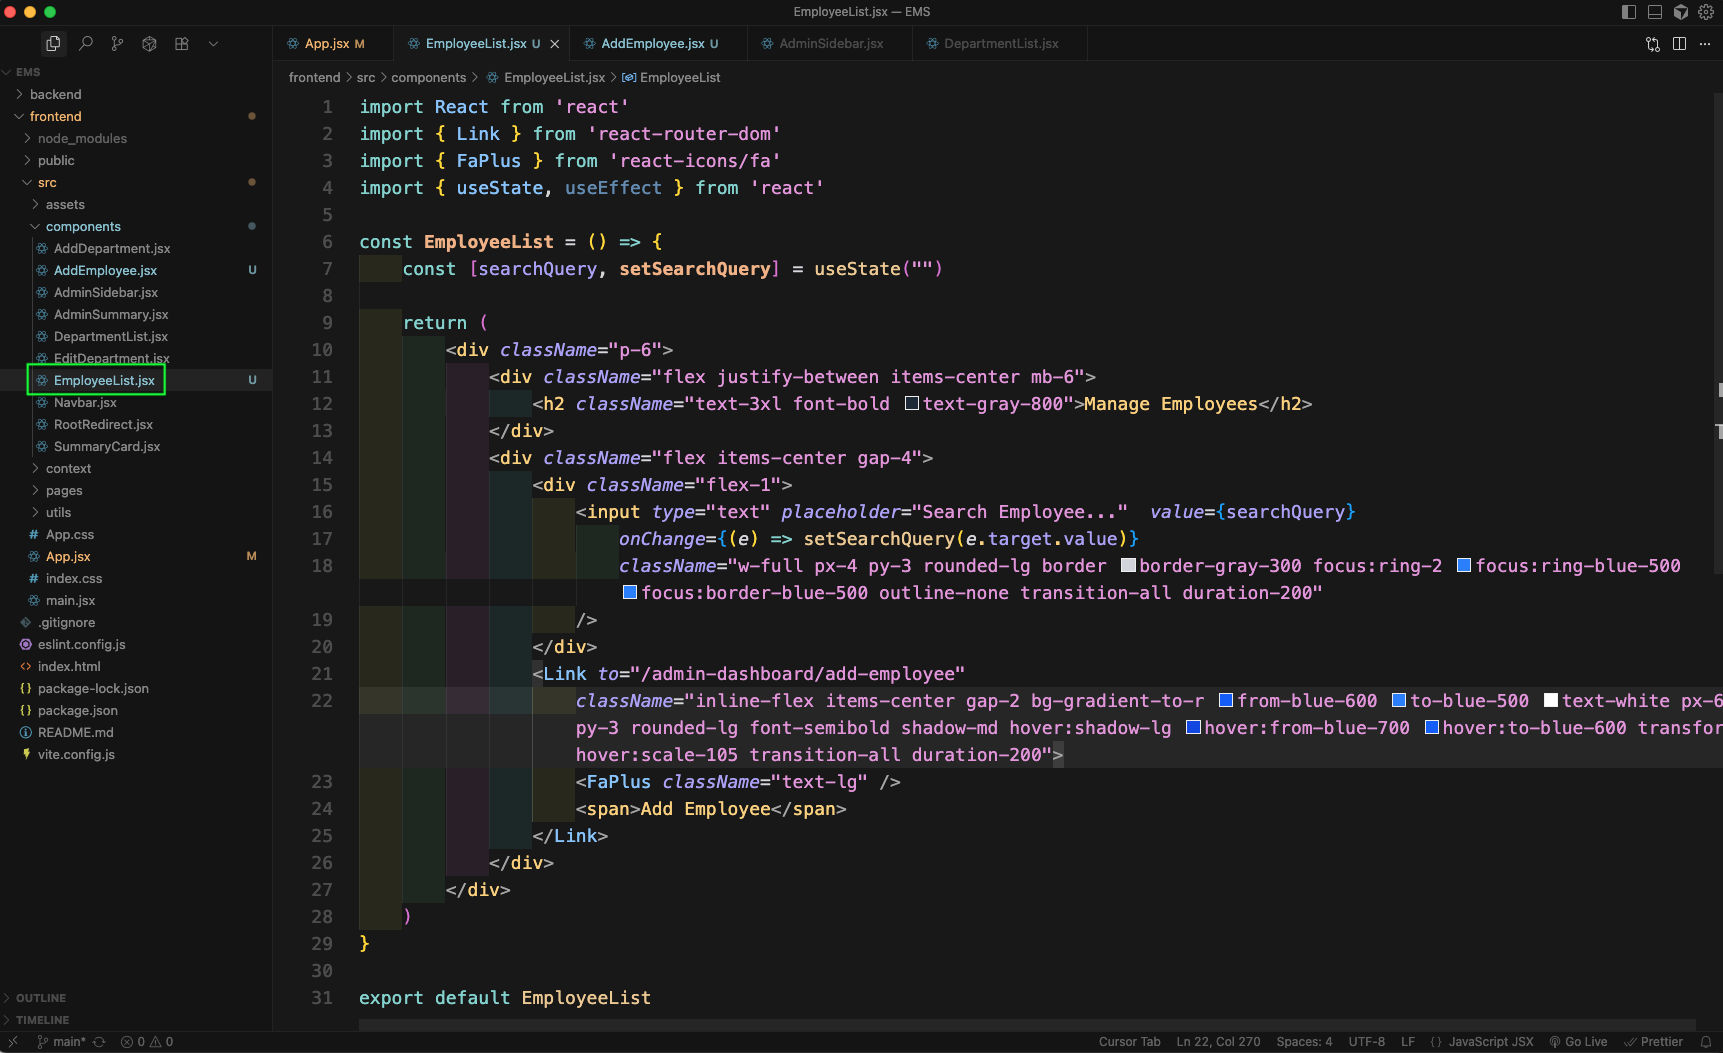
Now, create a new EmployeeList.jsx file inside components folder. Here, we have basic code with Tailwind CSS.
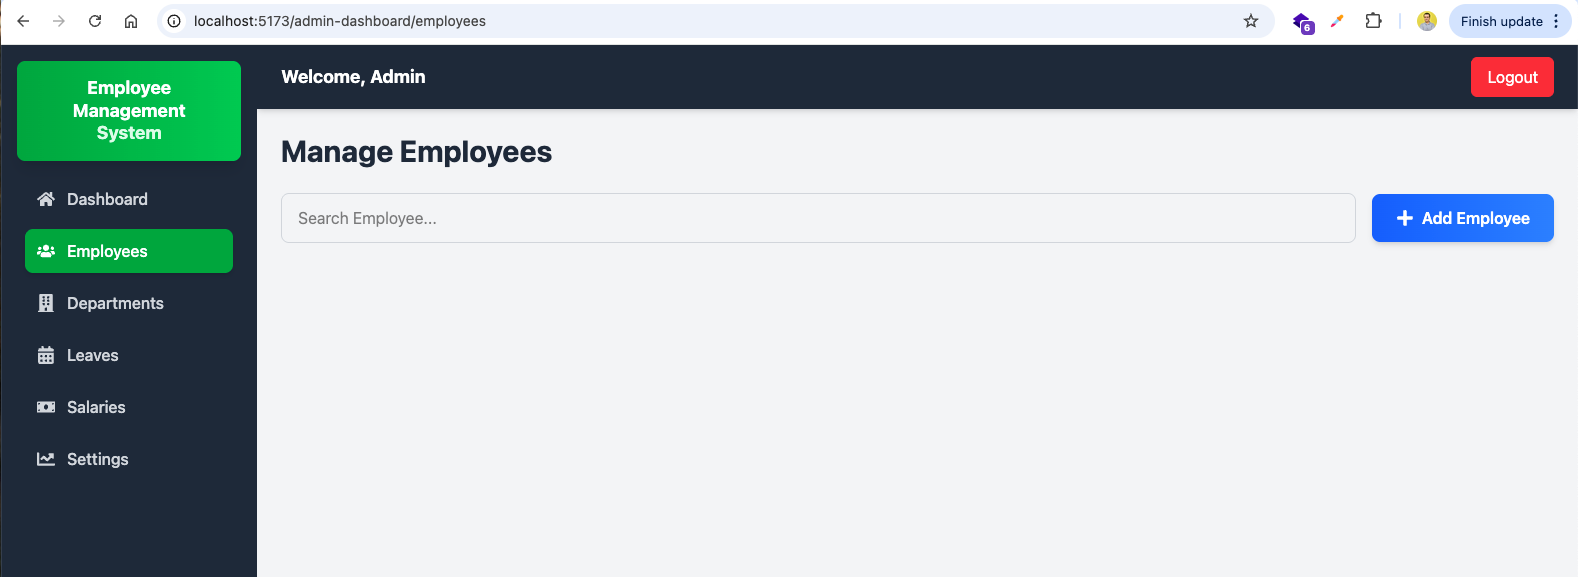
Now, in http://localhost:5173/admin-dashboard/employees we will see the below beautiful UI.
Now, we will add a new route to add employee which will render the AddEmployee component in App.jsx file.
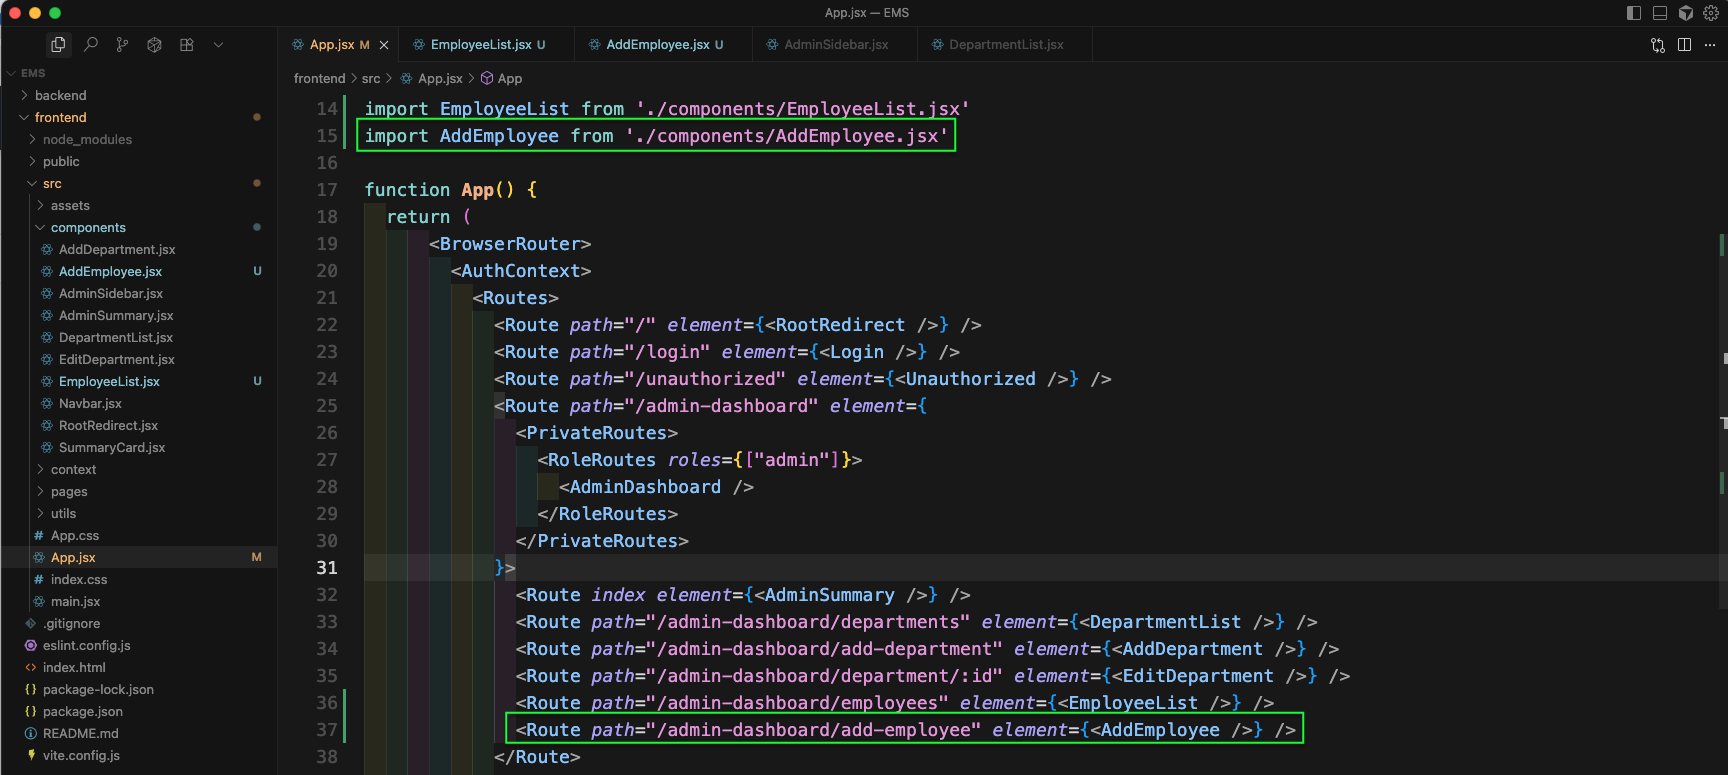
Now, create a new AddEmployee.jsx file inside components folder. Here, we have basic code with Tailwind CSS.
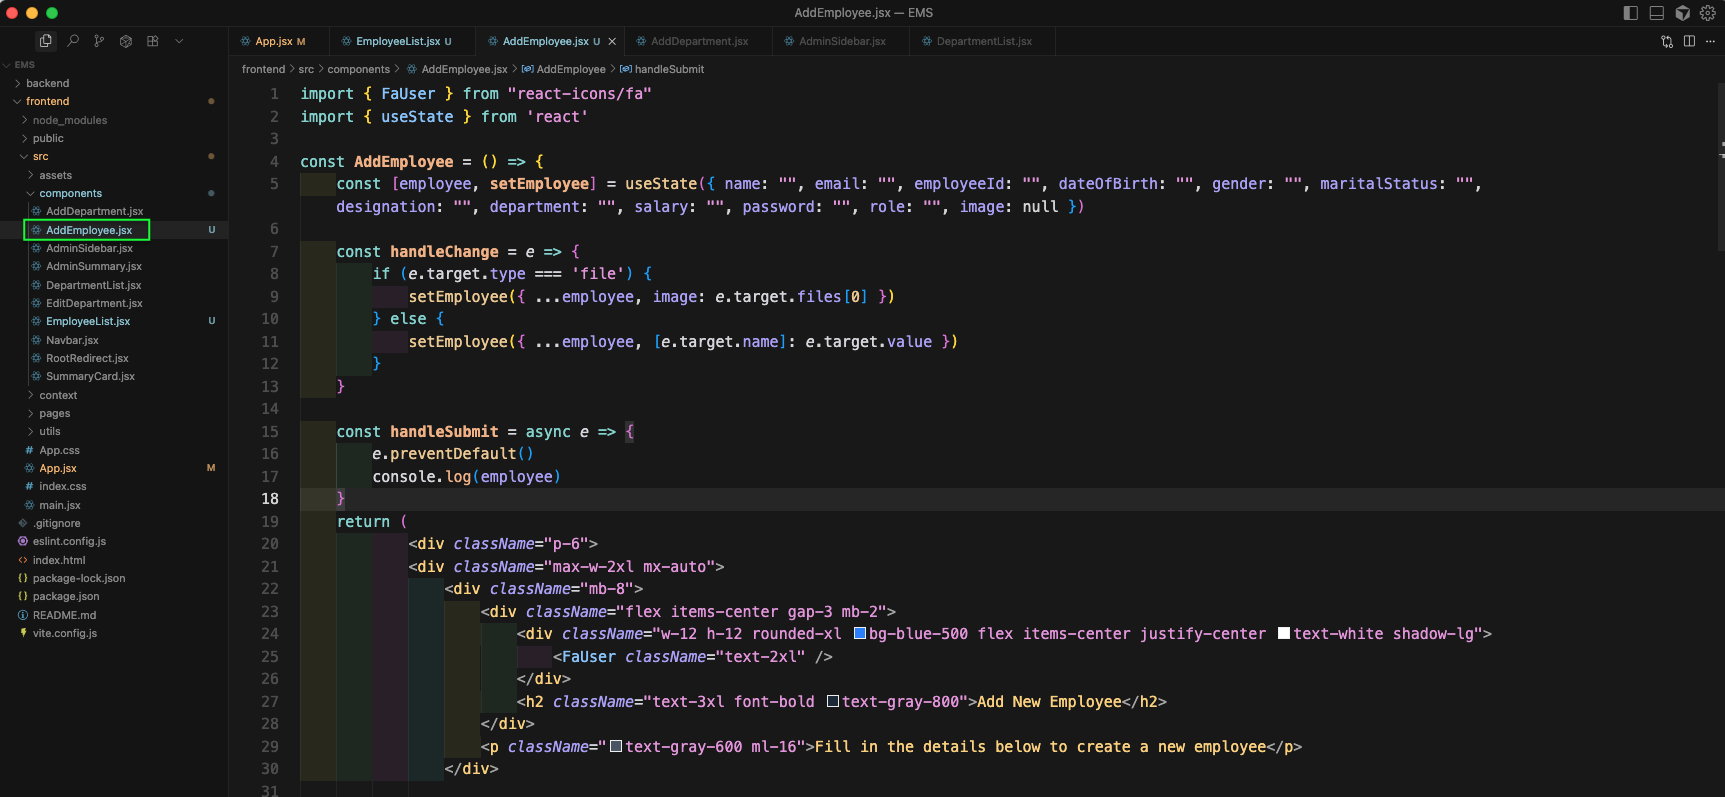
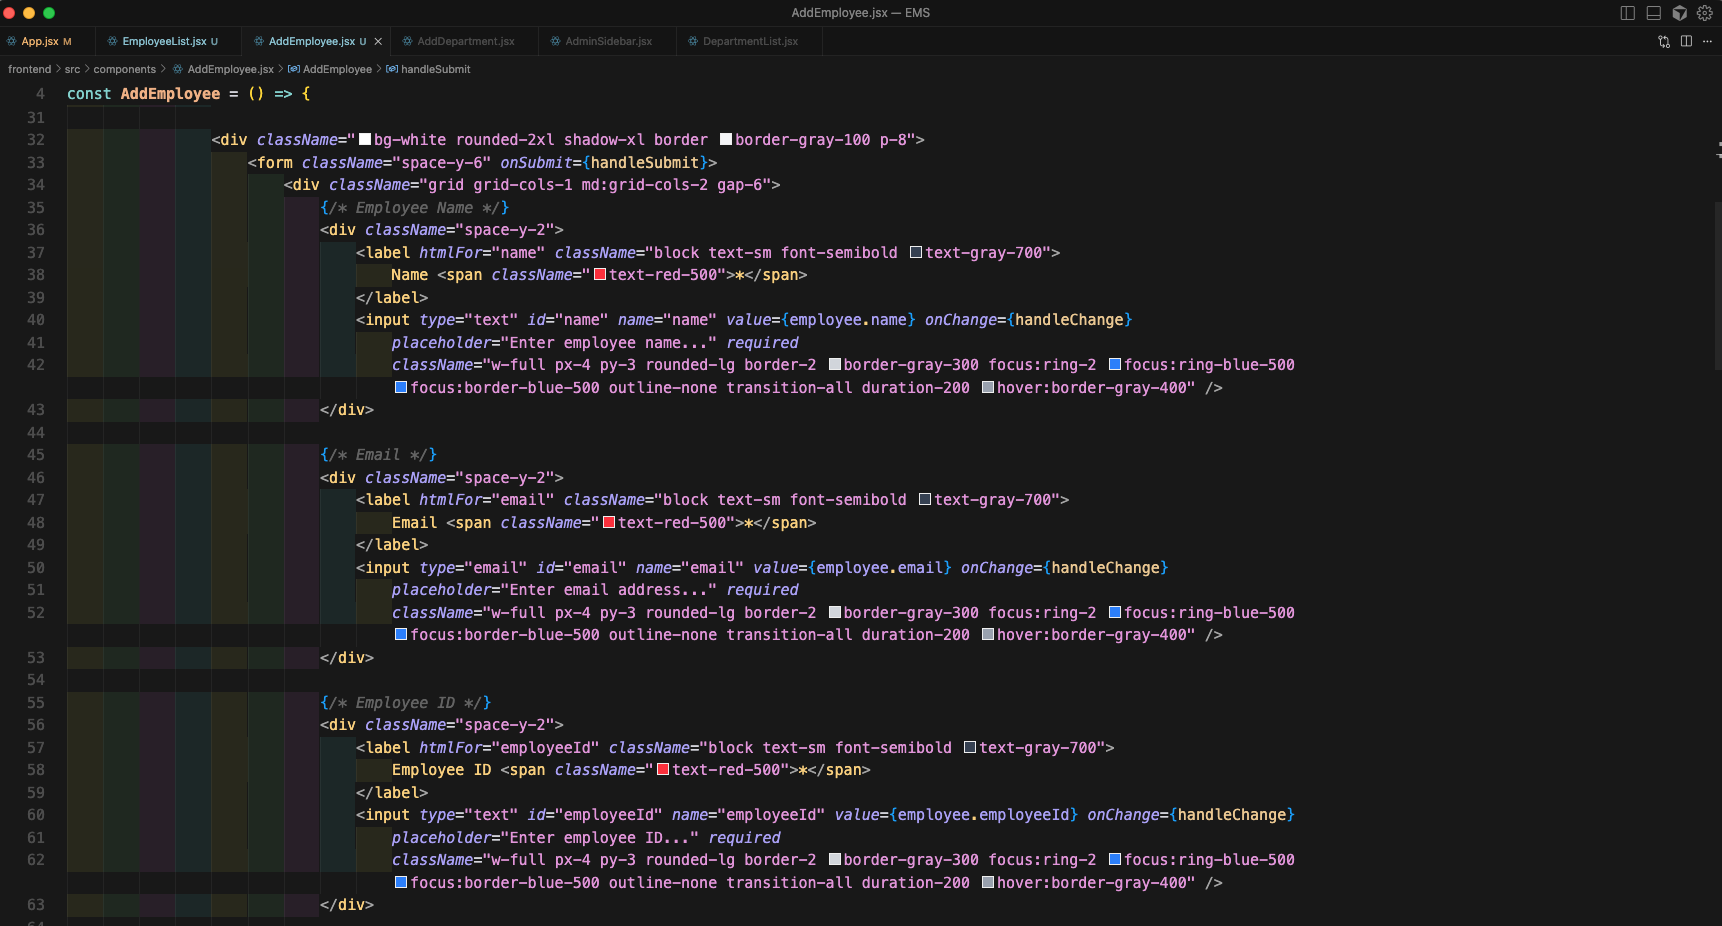
Now, we will add more code with Tailwind CSS inside the return statement for AddEmployee.jsx file. These are for Employee Name, Email and Employee ID.
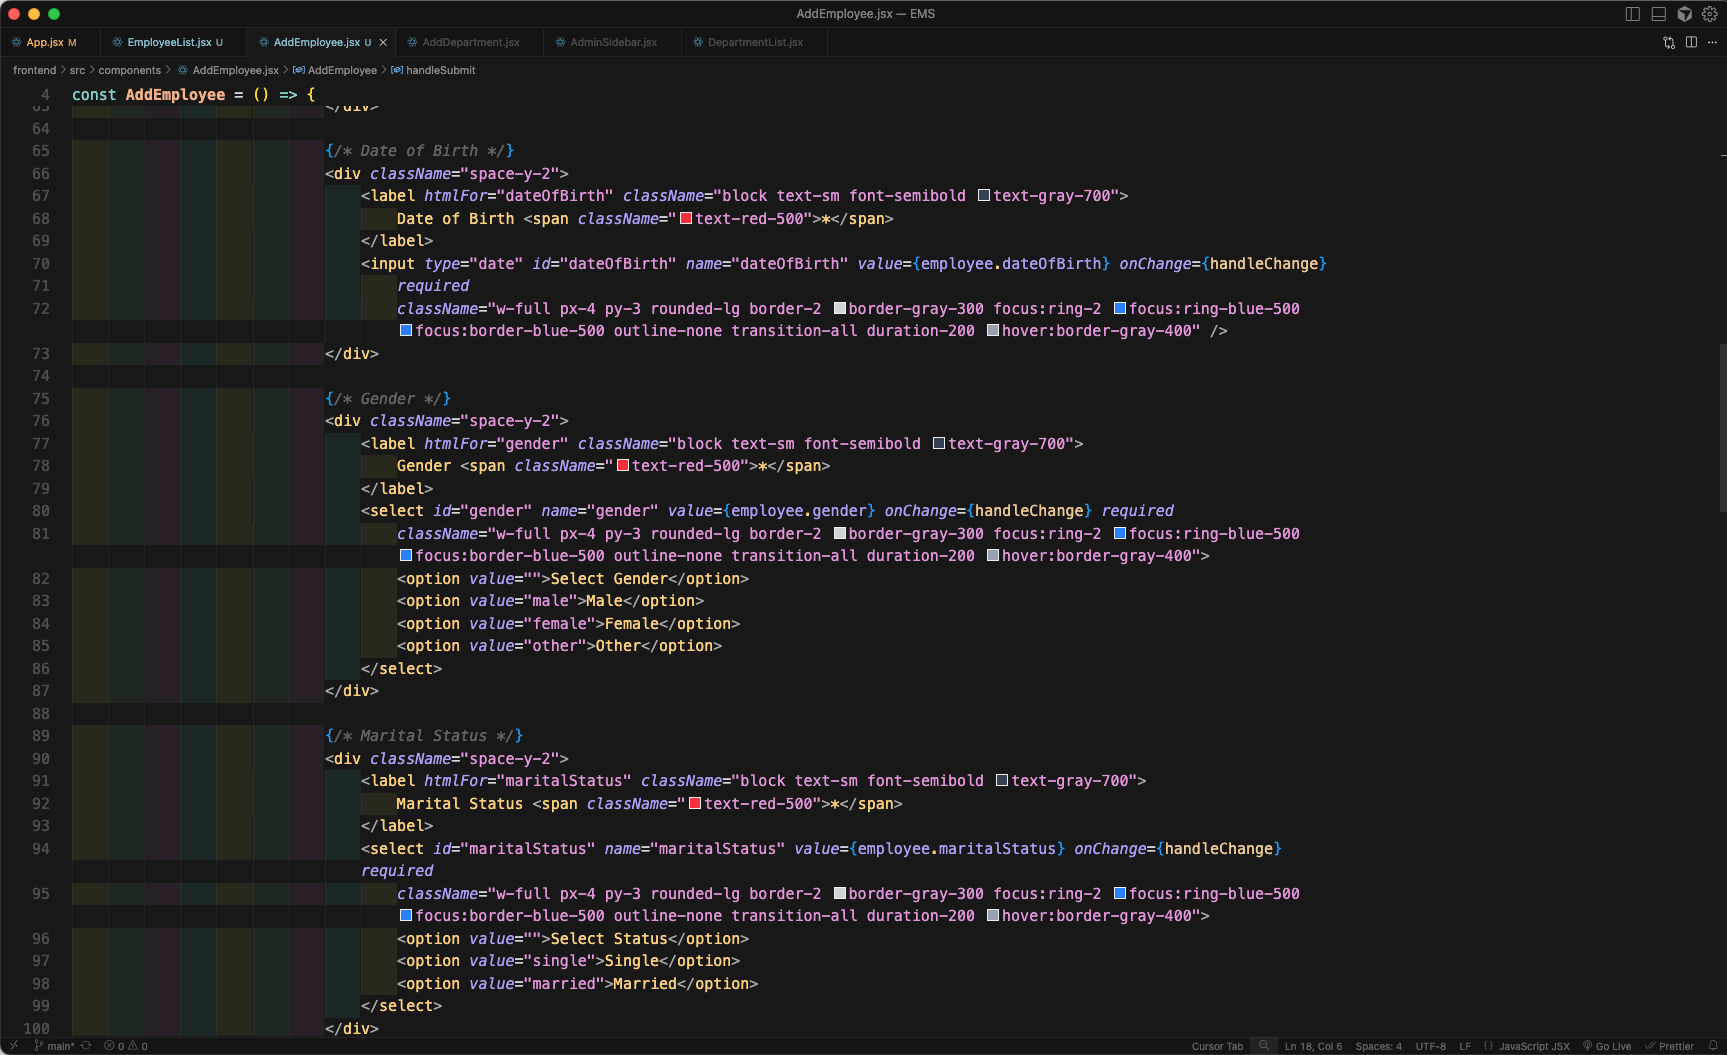
We will add even more code for Date of Birth, Gender, Marital Status in AddEmployee.jsx file.
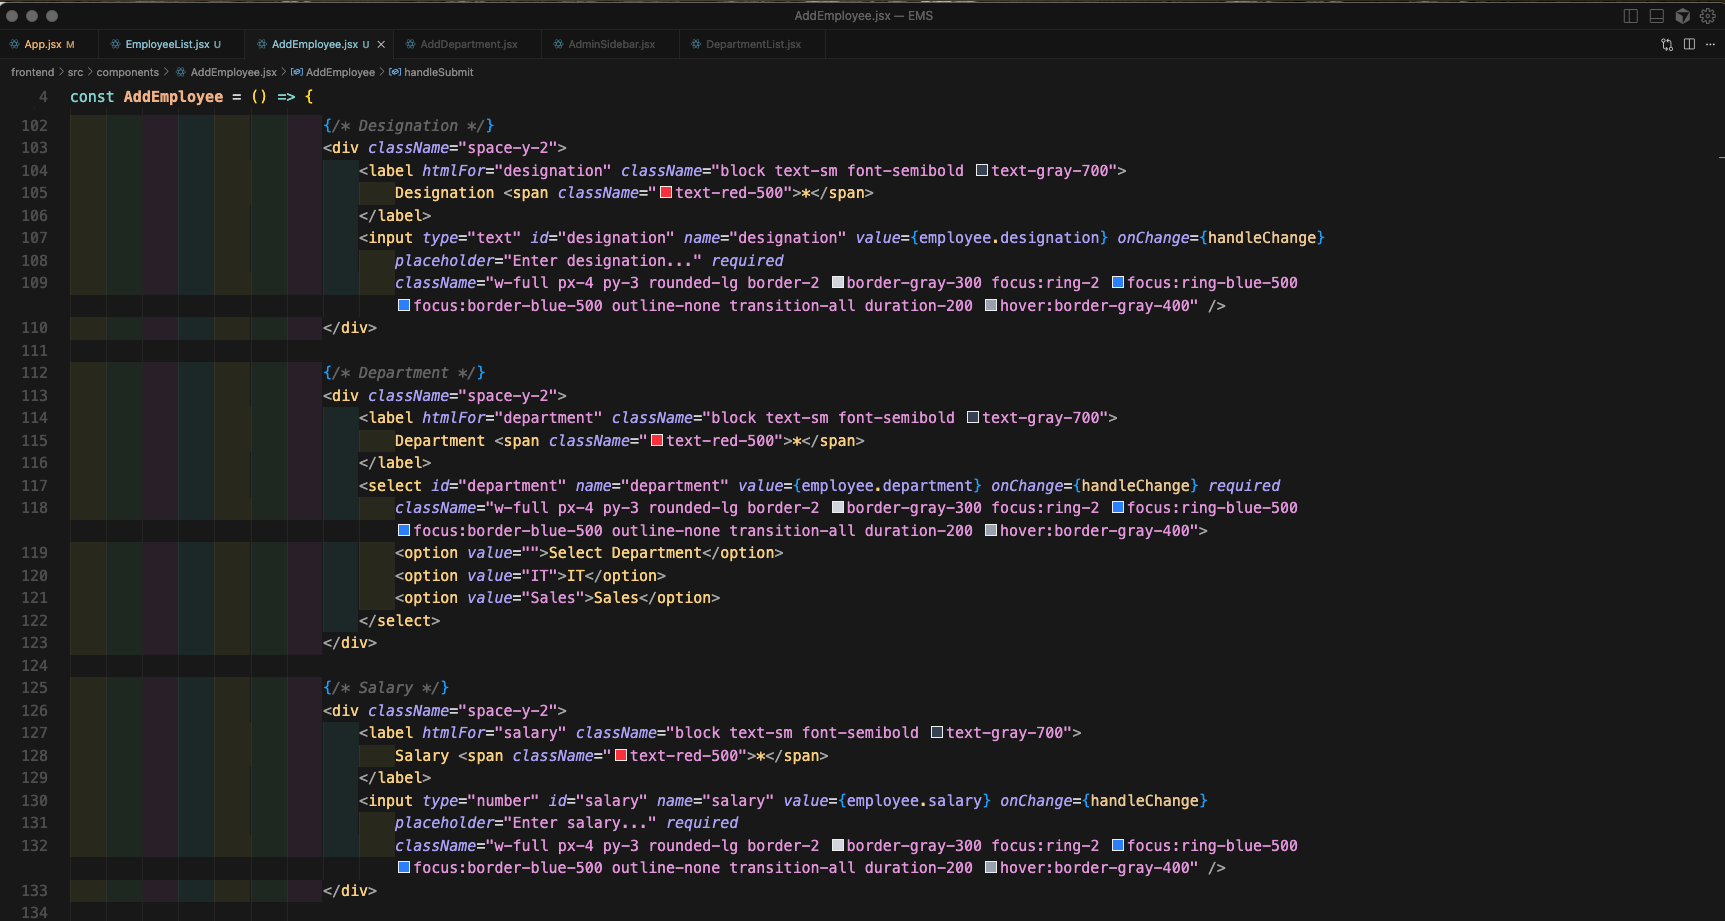
We will add more code for Designation, Department, Salary in AddEmployee.jsx file.
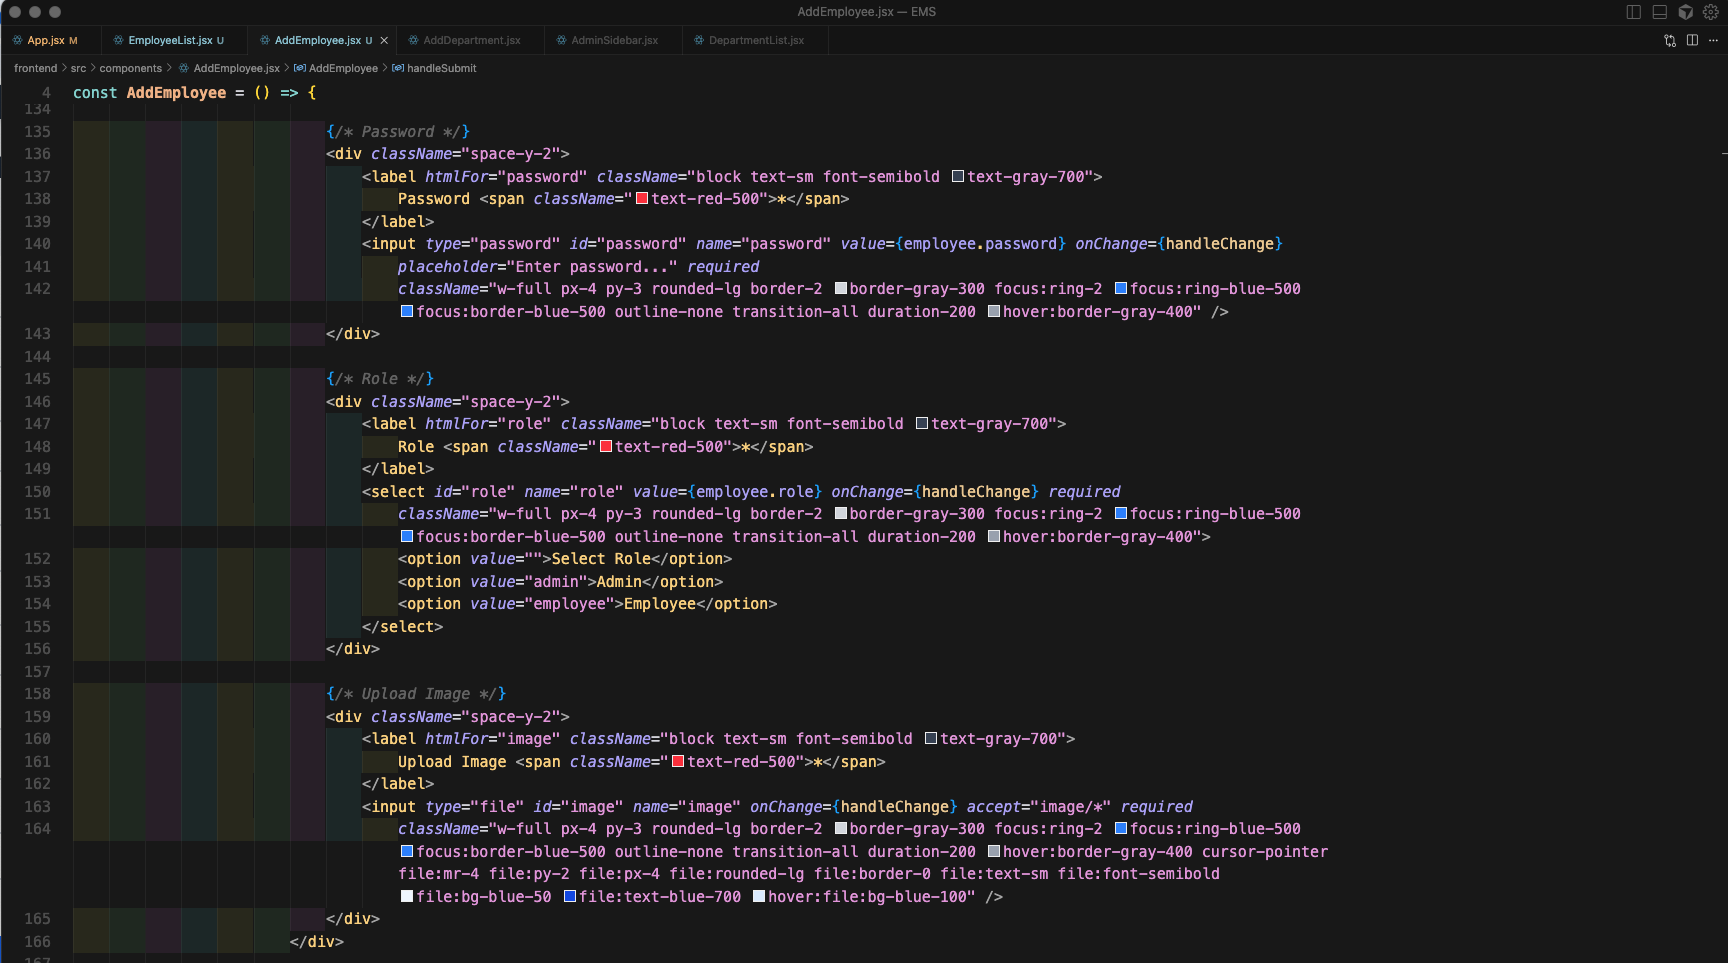
We will add even more code for Password, Role, Upload Image in AddEmployee.jsx file.
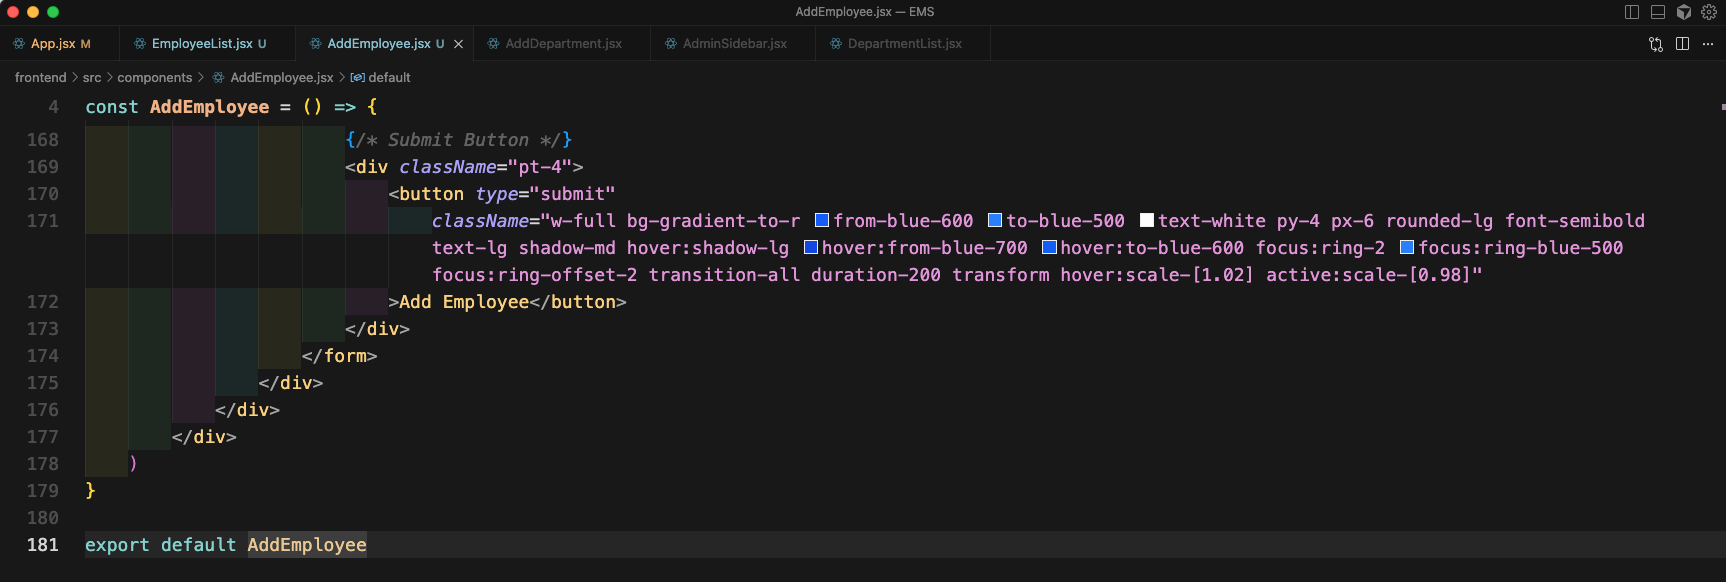
Finally, we will add the Submit button in AddEmployee.jsx file.
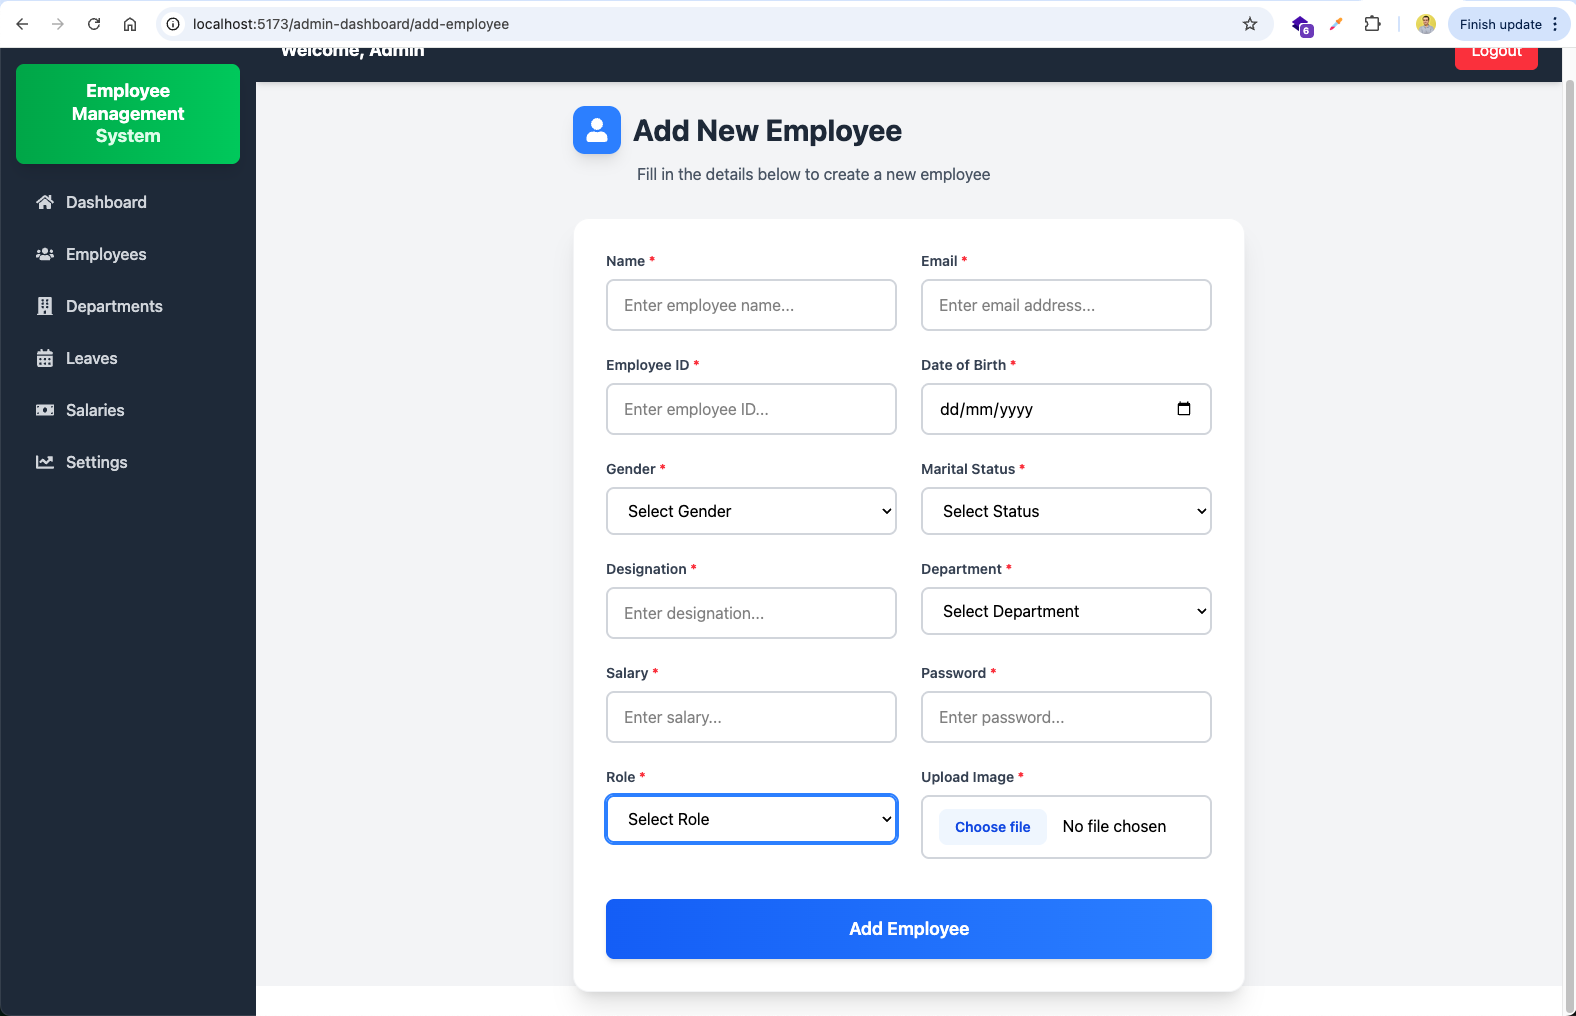
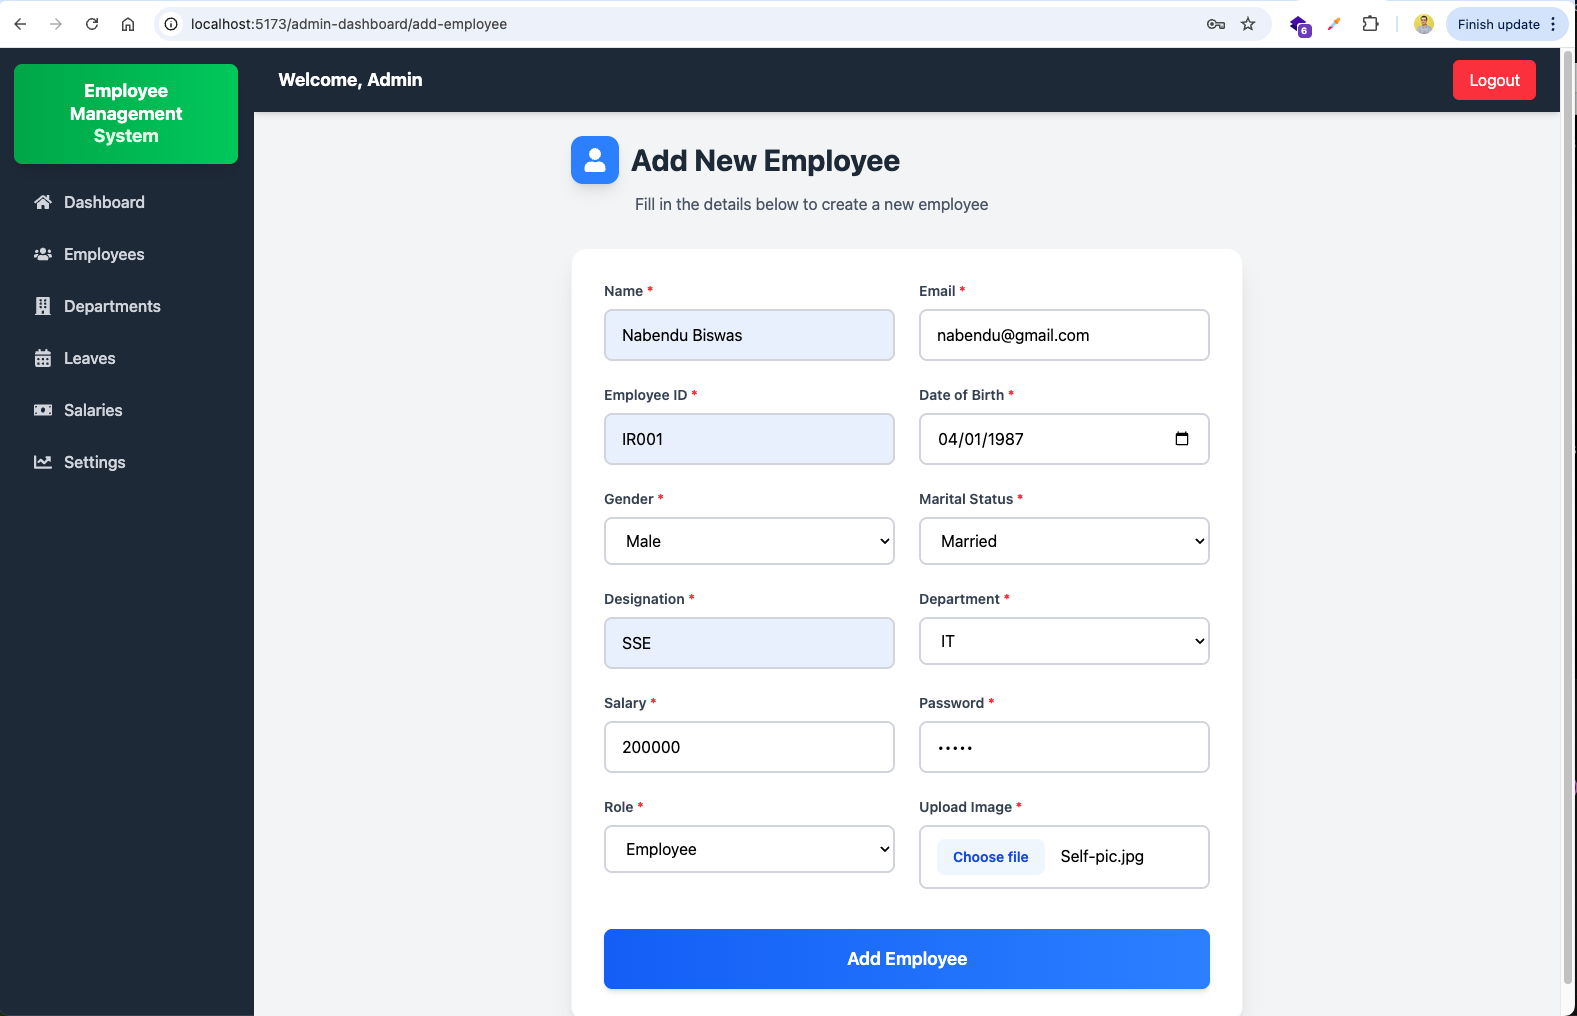
Now, in http://localhost:5173/admin-dashboard/add-employee we will get our complete form in a nice UI.
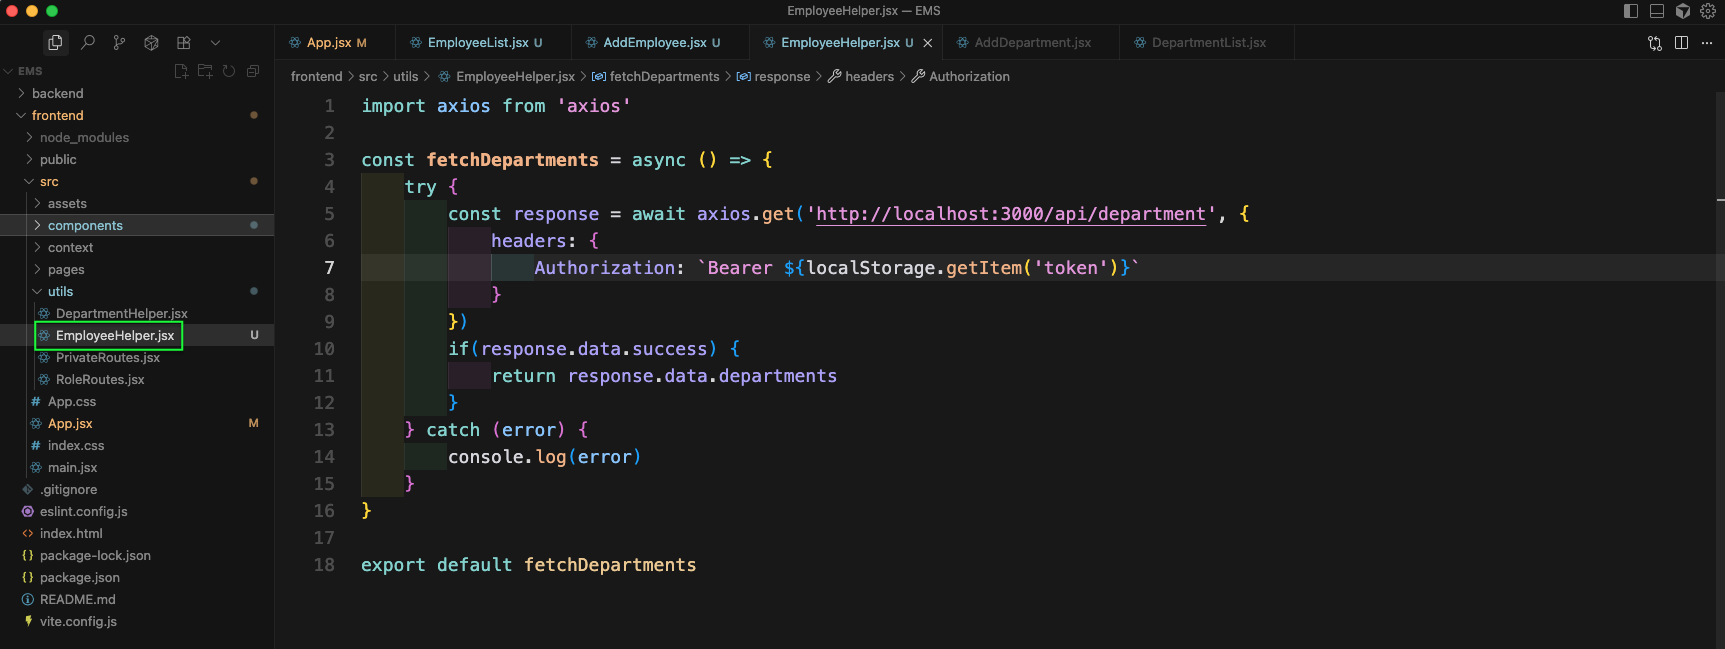
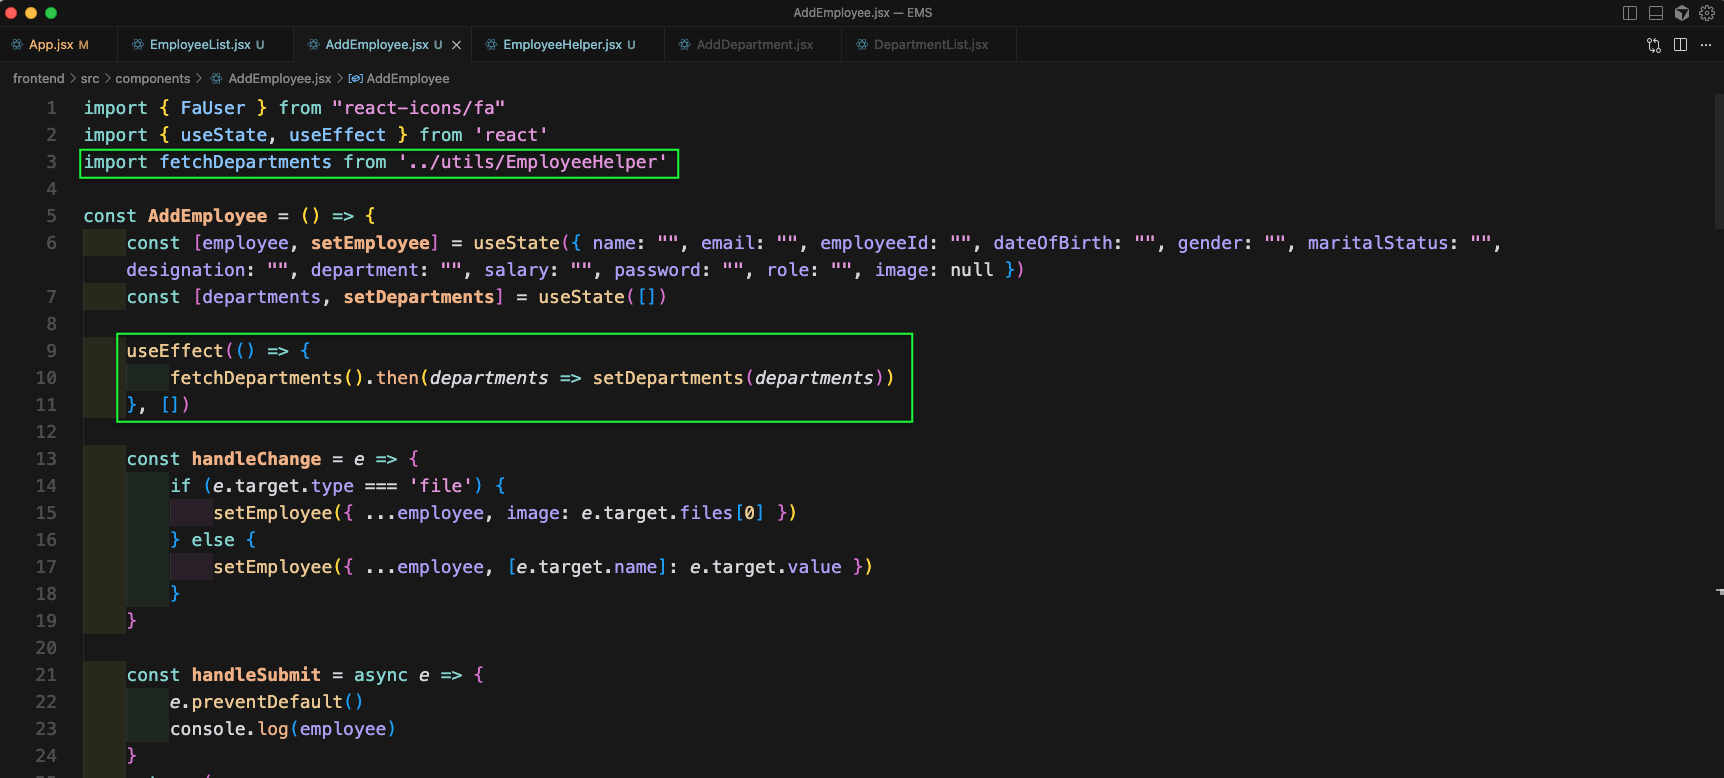
Now, we will create an EmployeeHelper.jsx file and add the code for fetchDepartments in it, which will hit an GET api to get the departments.
Now, in AddEmployee.jsx file we will call the fetchDepartments from an useEffect.
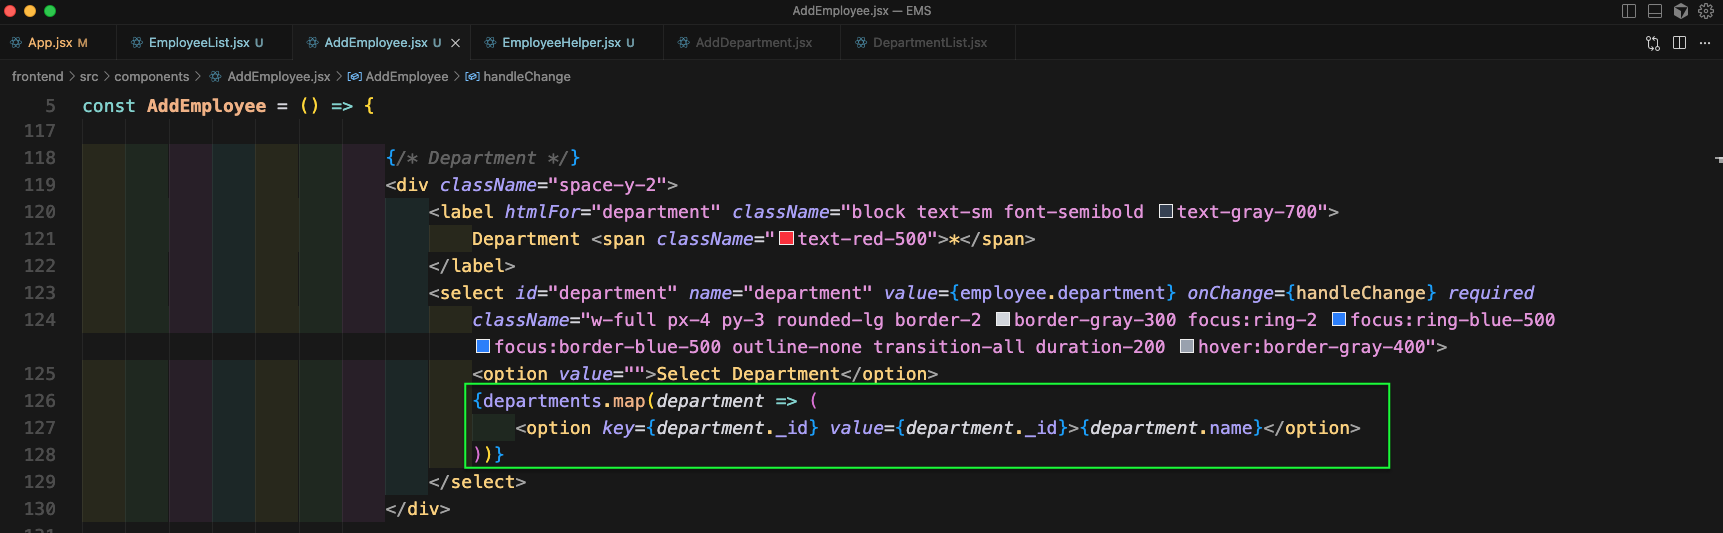
Now, we will change the select for department to get get value from our api.
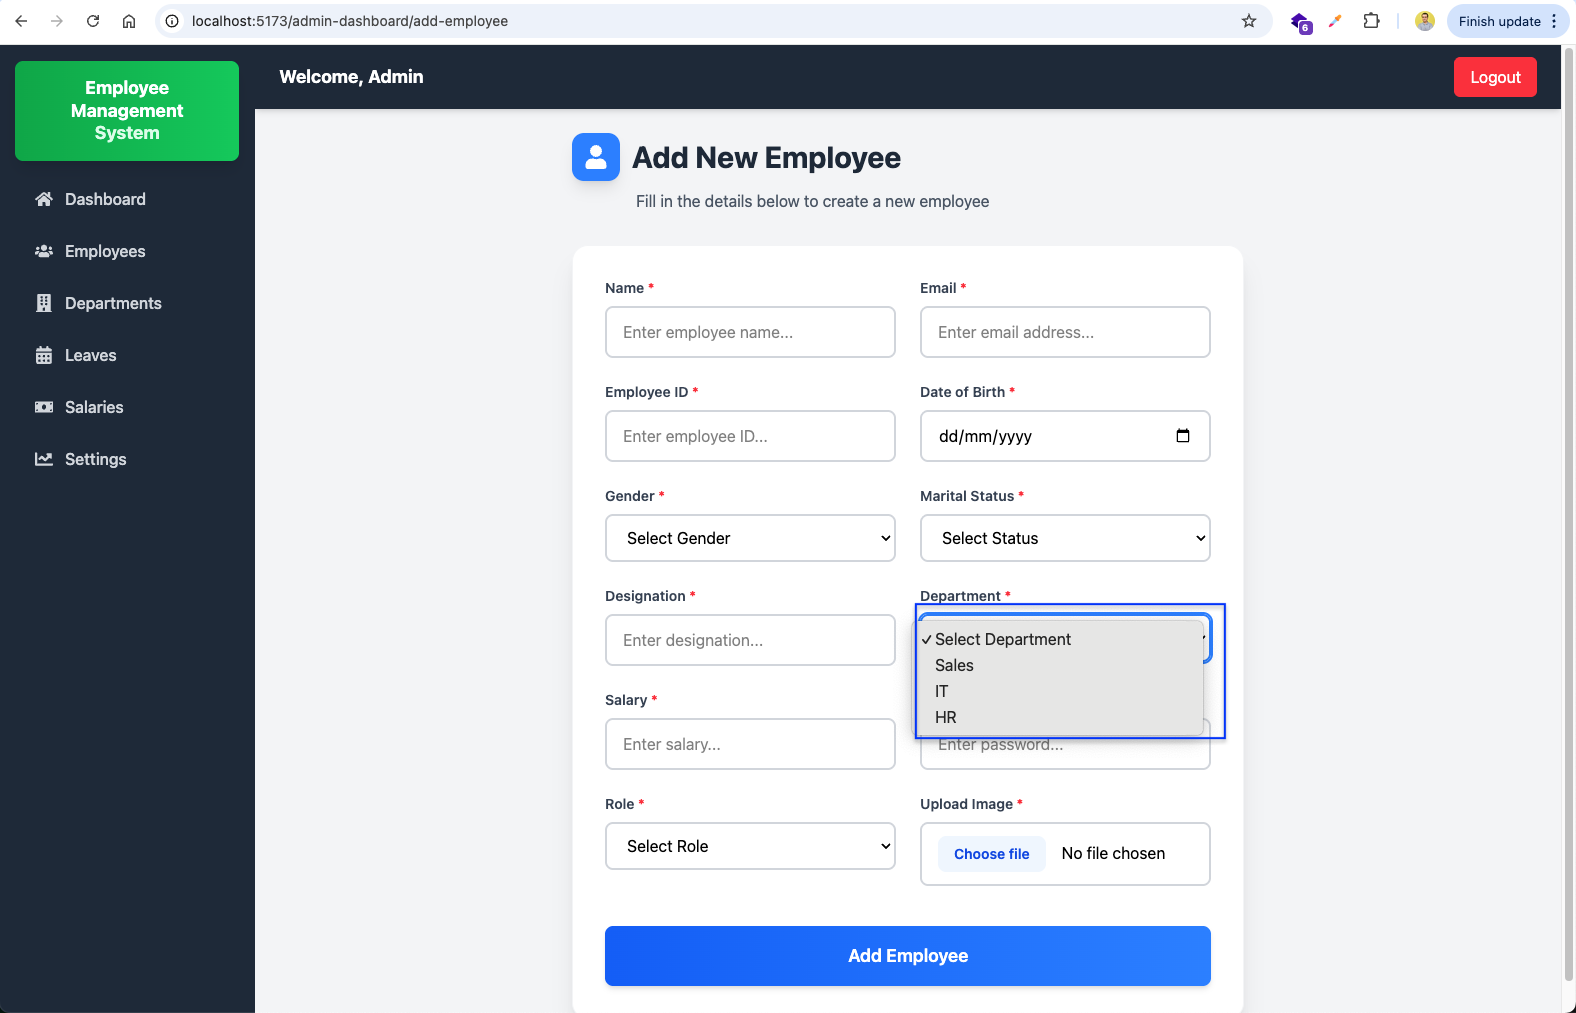
Now, our Department in UI is updated from the database.
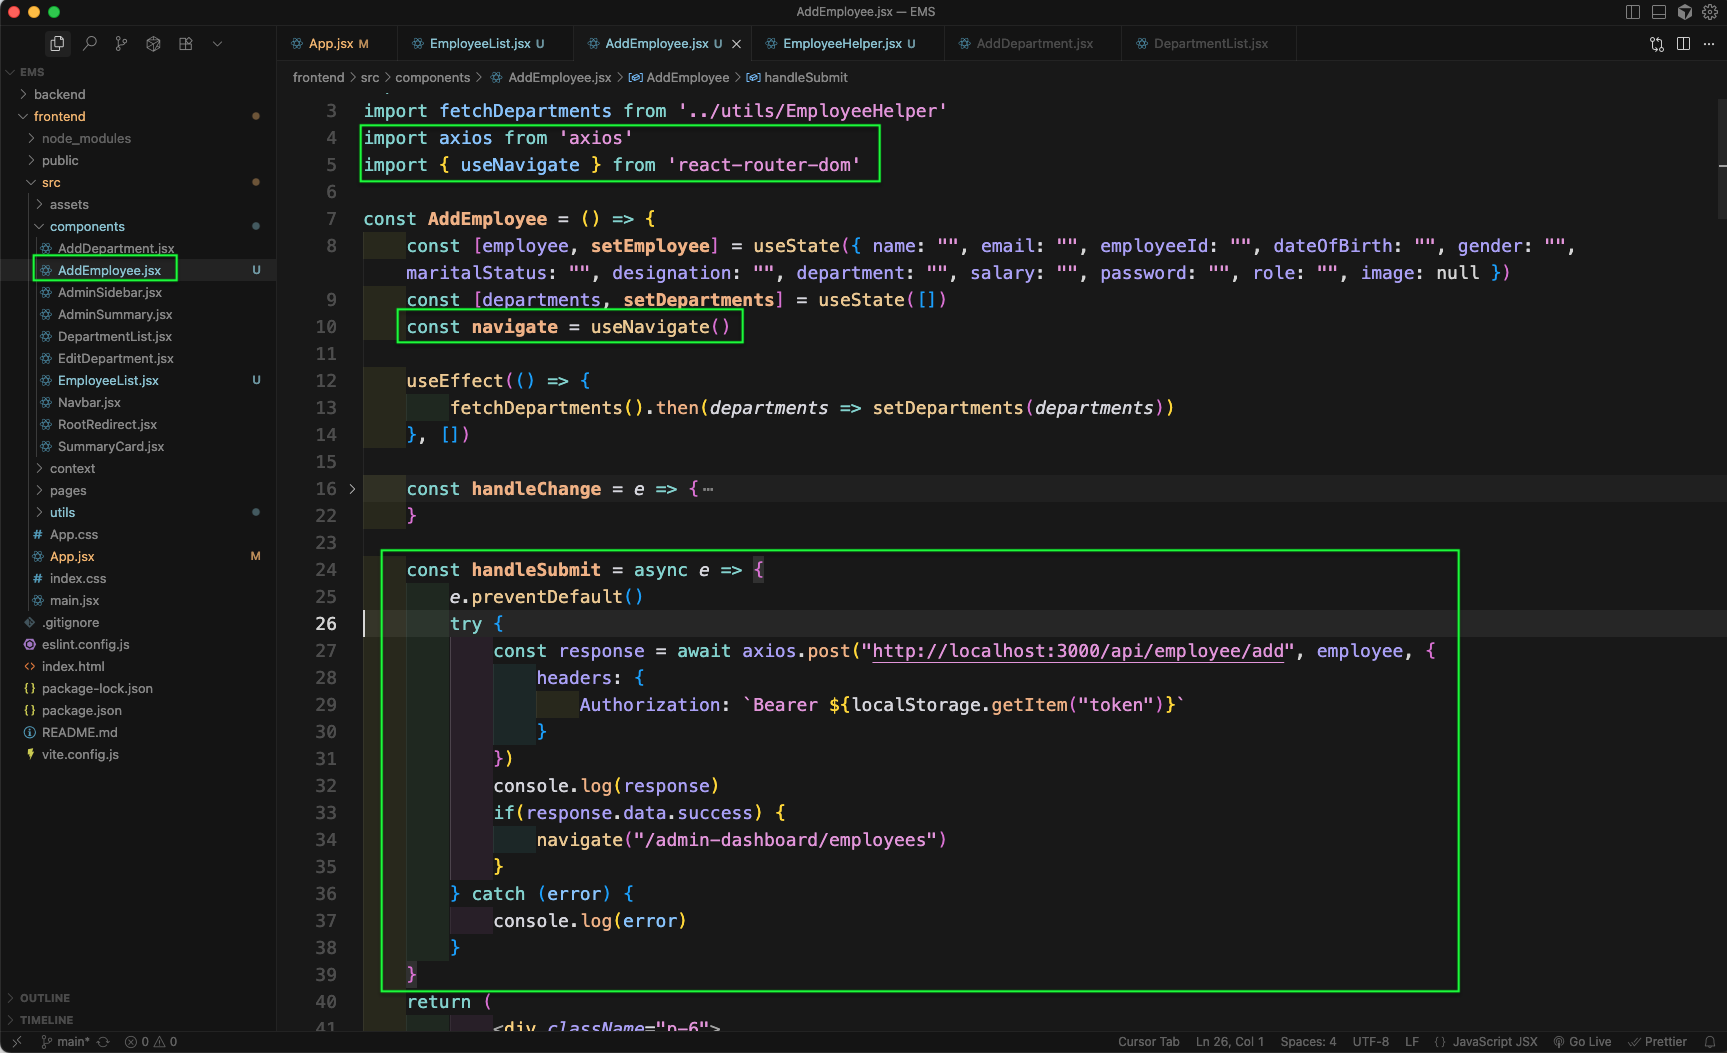
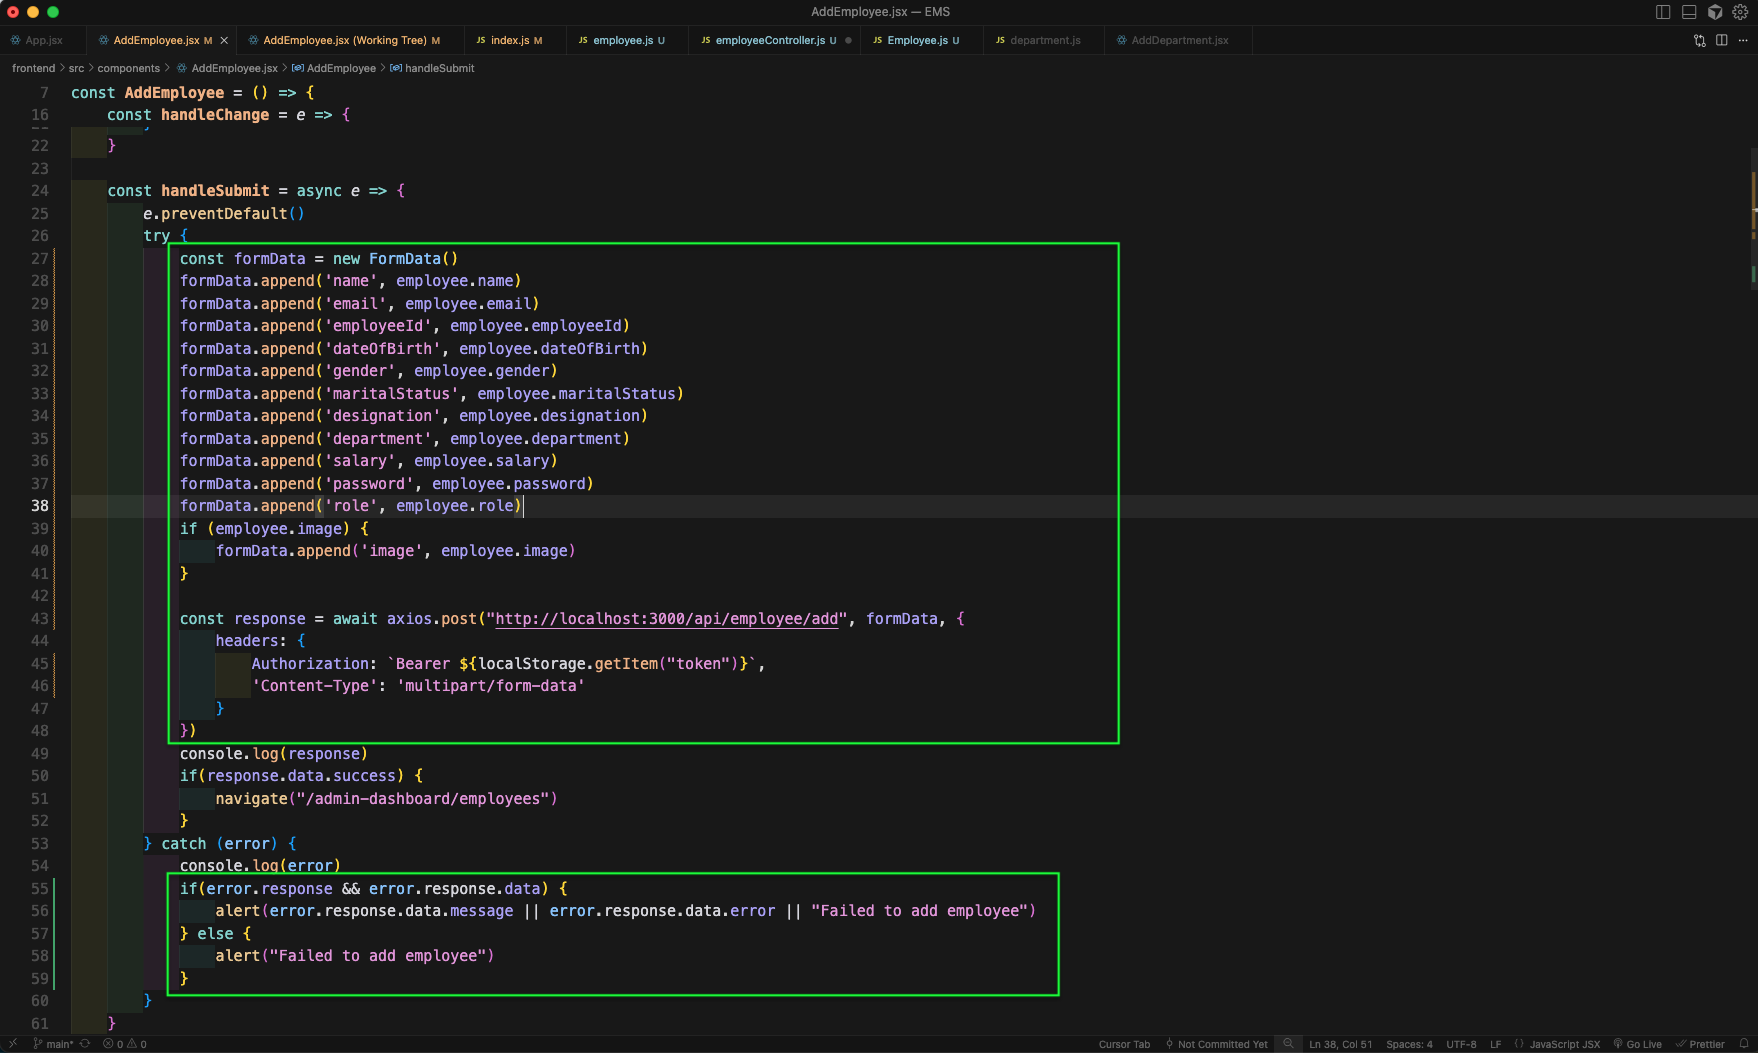
Now, we will update the handleSubmit in AddEmployee.jsx file. Here, we will be passing data to a POST api endpoint.
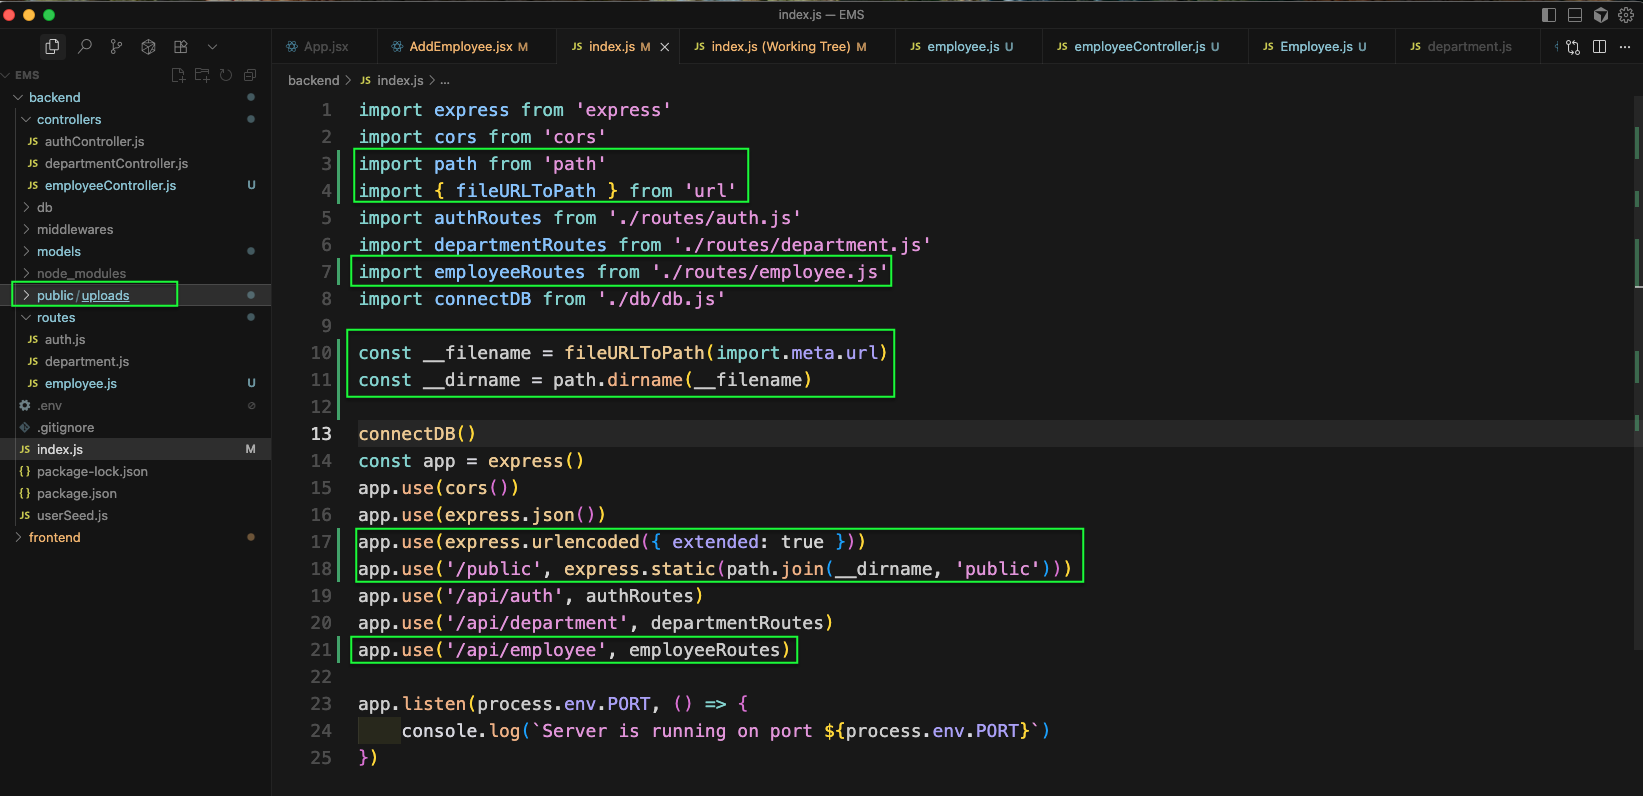
Now, in the backend we will create a public folder and inside it uploads folder. In the index.js file we will add code to handle files and also the employeeRoutes.
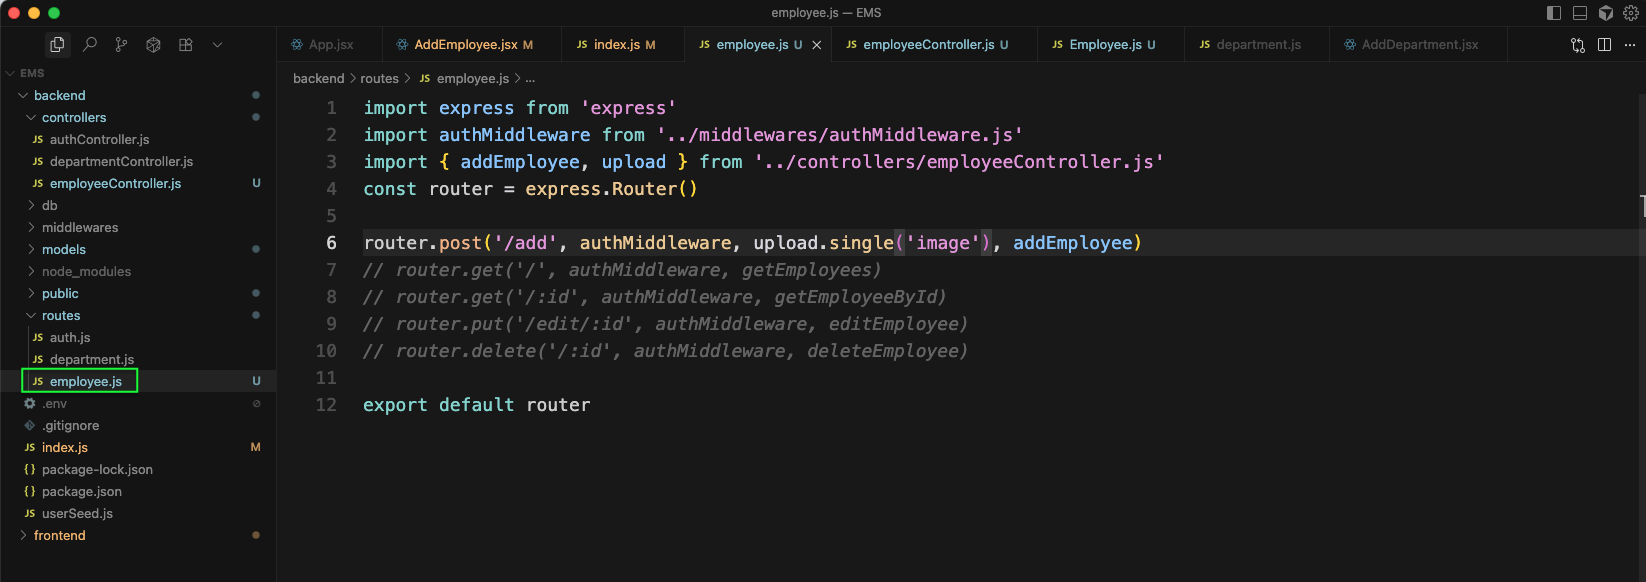
Now, create an employee.js file inside the routes folder. Here, we will add the add route.
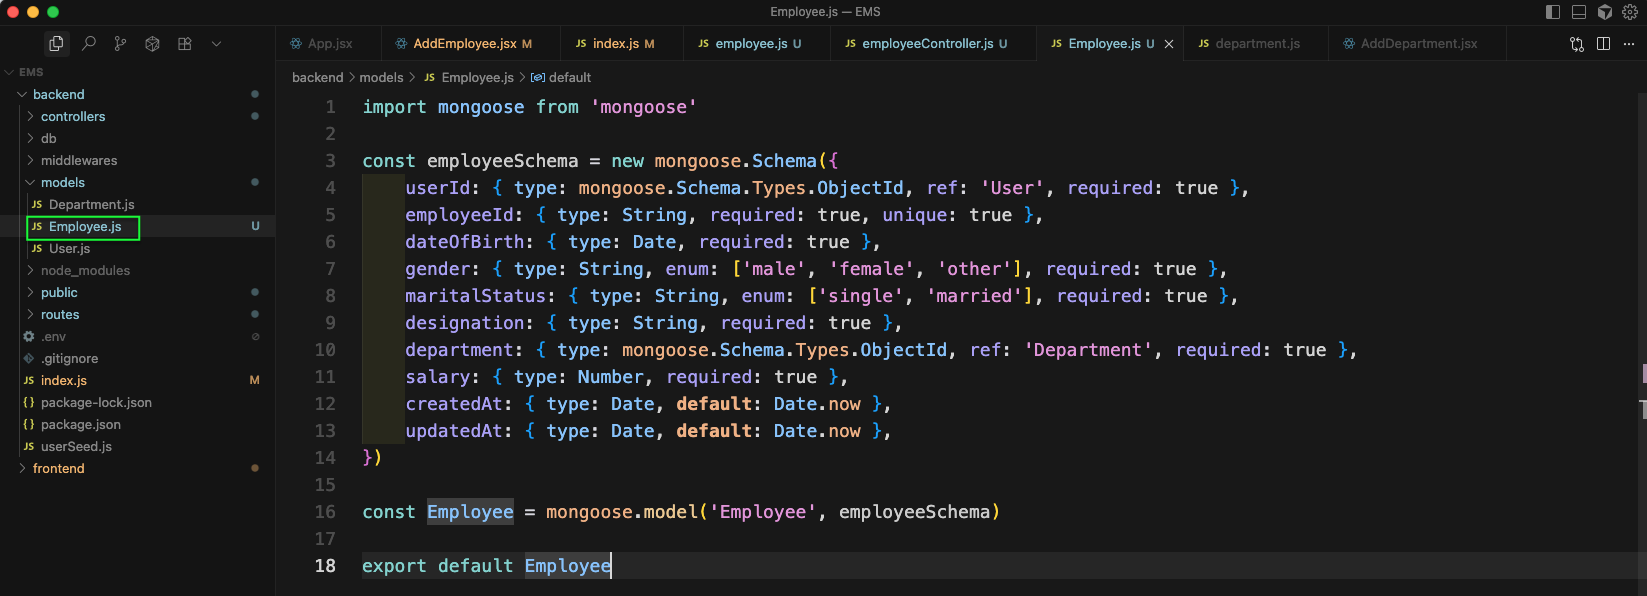
Next, create the Employee.js file inside the models folder. Here, we will add all properties expected in Employee.
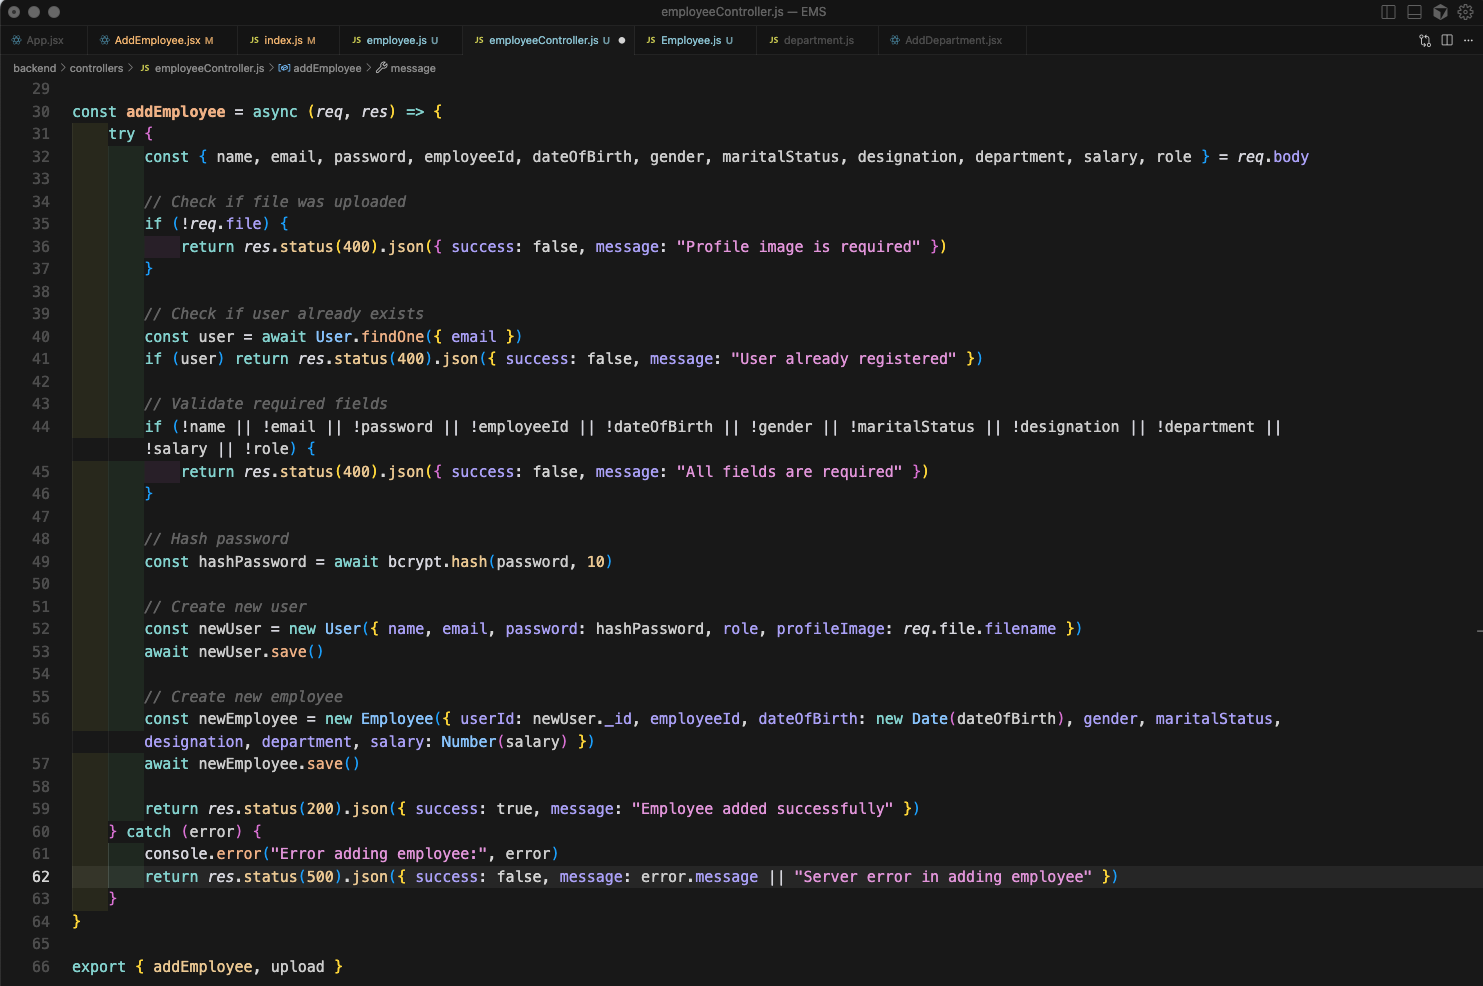
Now, create an employeeController.js file. Here, we have first added the code to get the path and uploaded file.
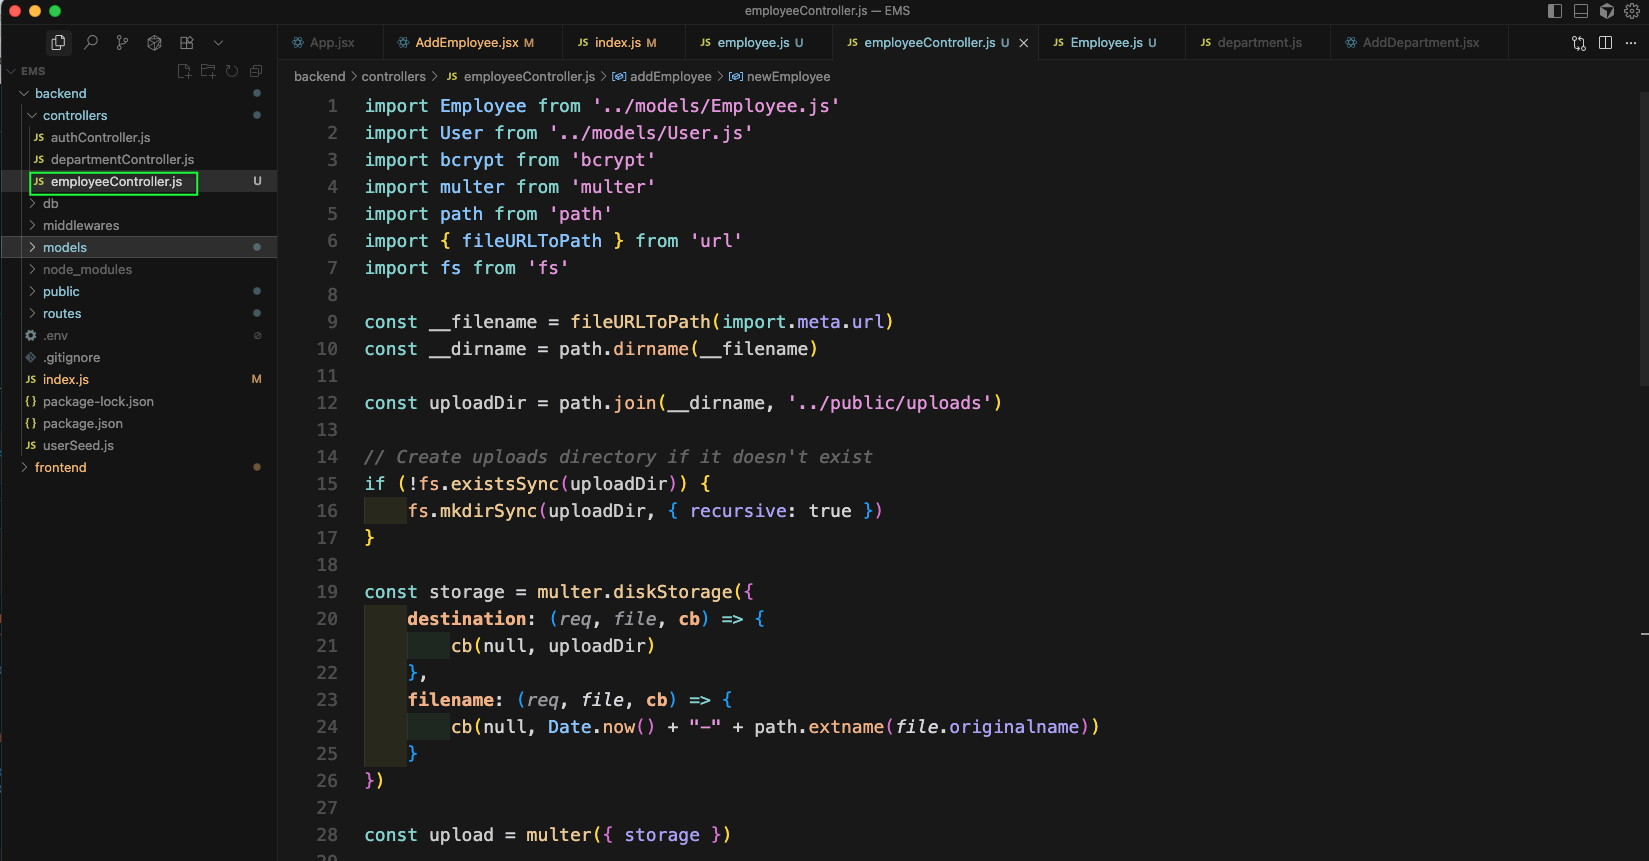
Next in employeeController.js file we will add the code for addEmployee
Back in AddEmployee.jsx file we will update our handleSubmit function.
Now, add some data in http://localhost:5173/admin-dashboard/add-employee and click on *Add Employee button.
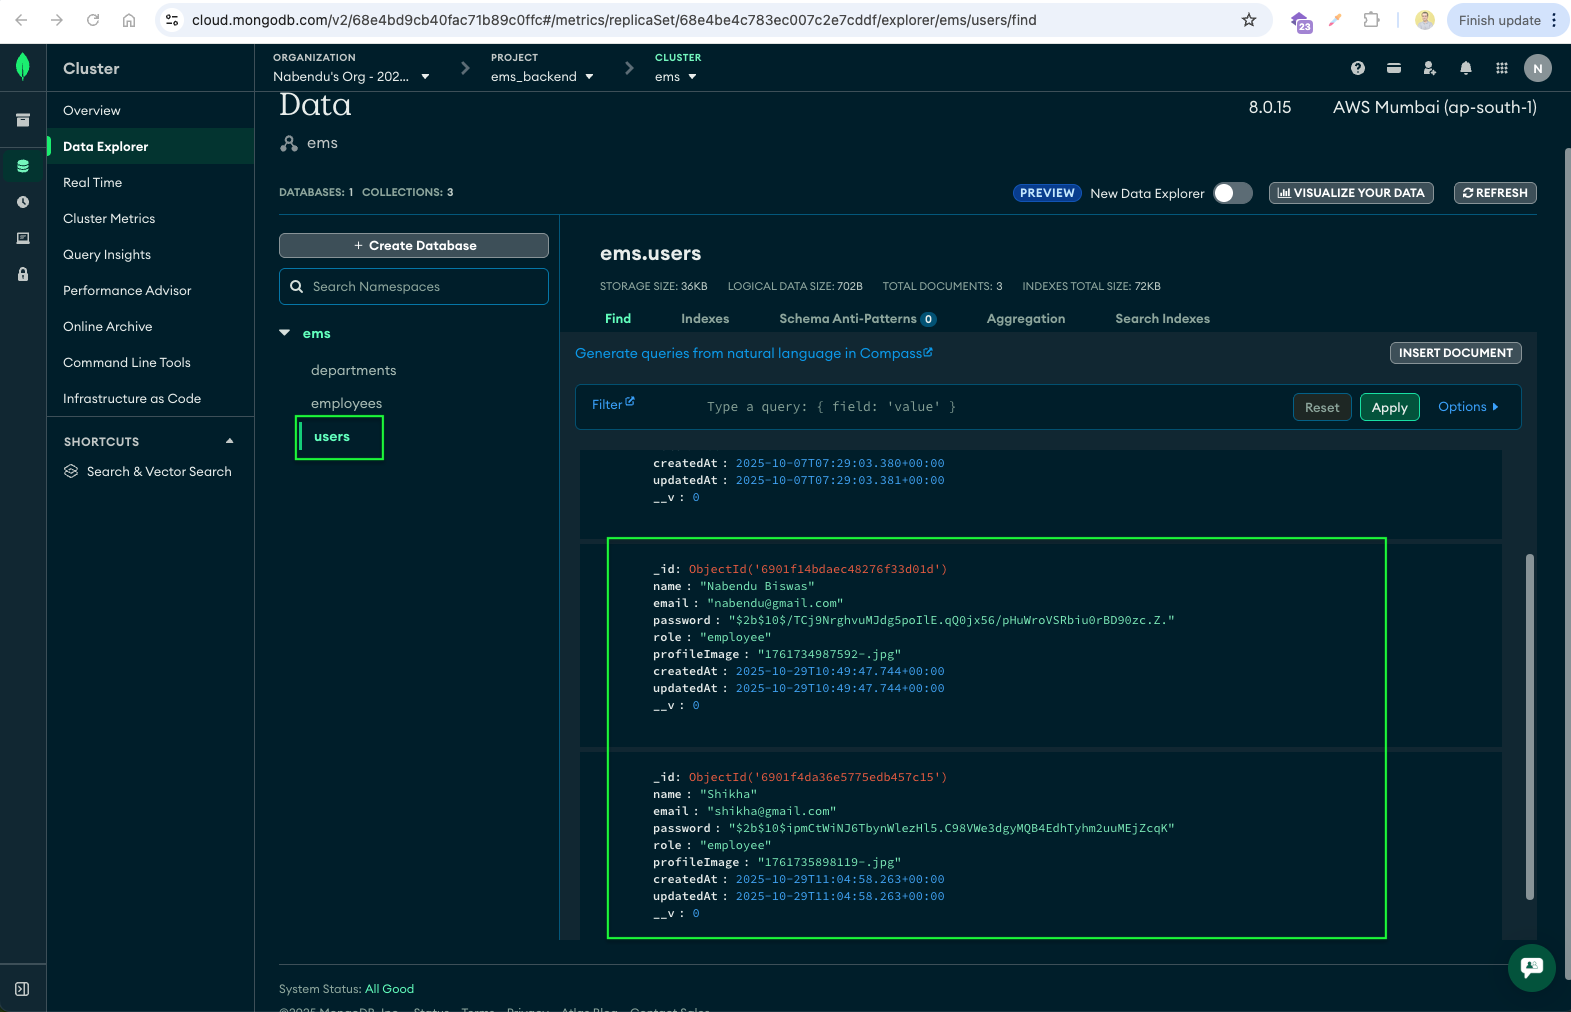
The data got correctly added in the MongoDB database.
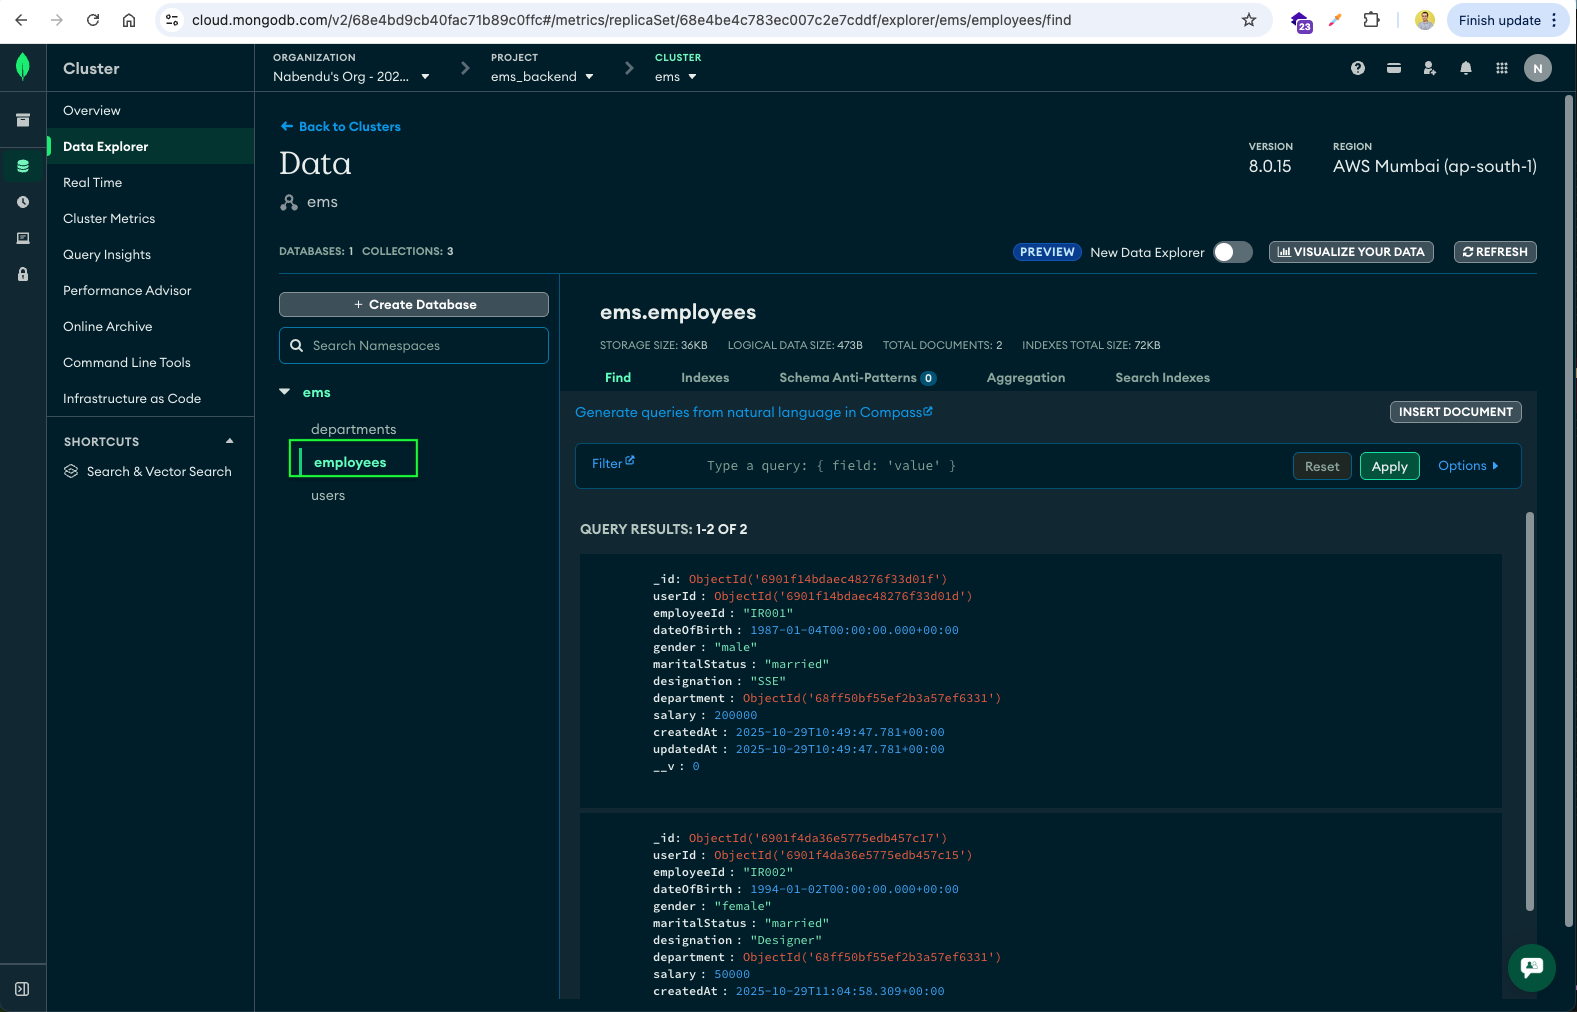
Also the users data is added in the database.
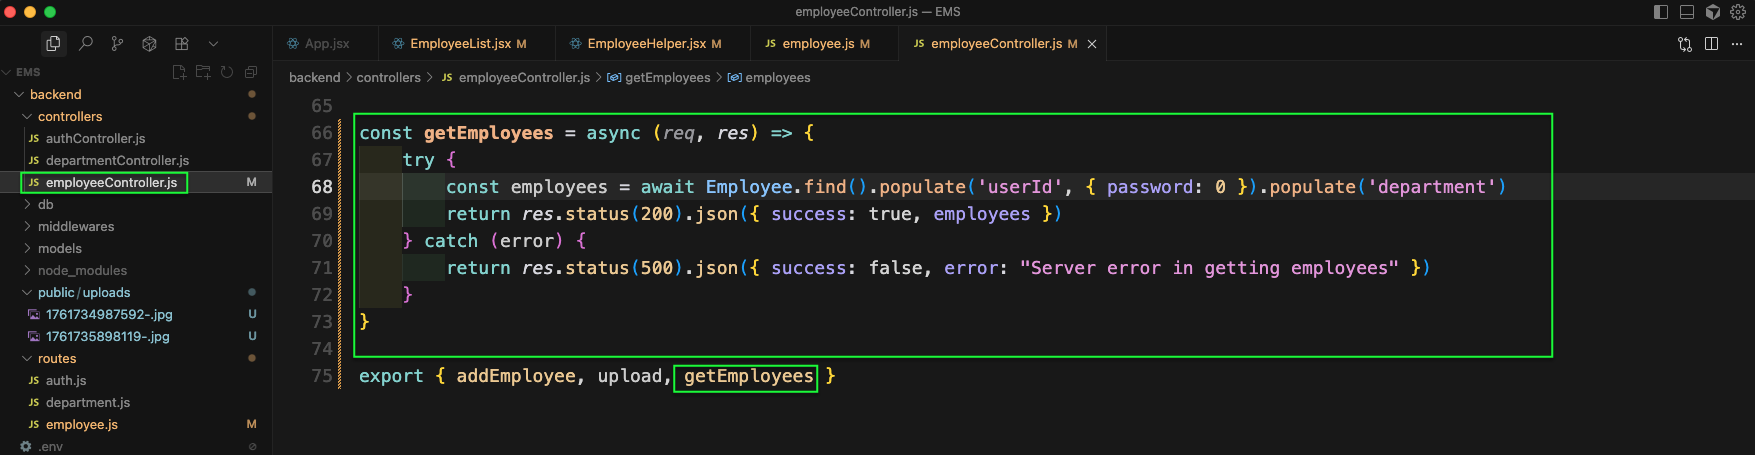
Now, we will add the GET route in employee.js which will render the getEmployees from employeeController.js file.

Next in the employeeController.js file we will add the function of getEmployees
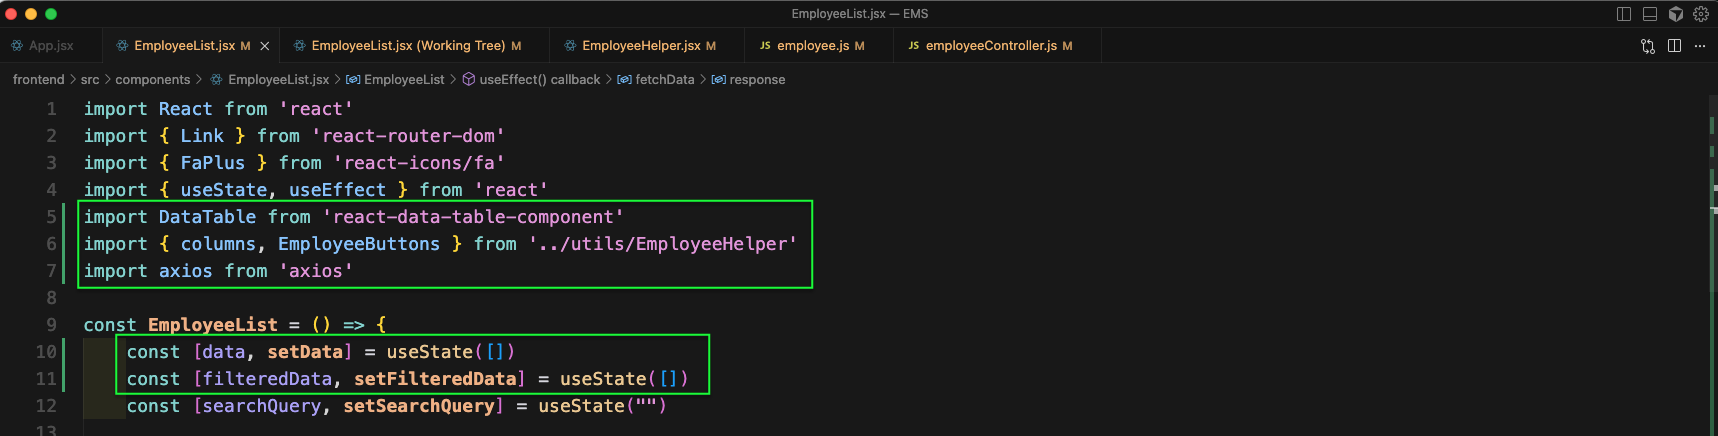
Now, in the EmployeeList.jsx file we will import DataTable and other things. Also, will create state for data and filteredData.
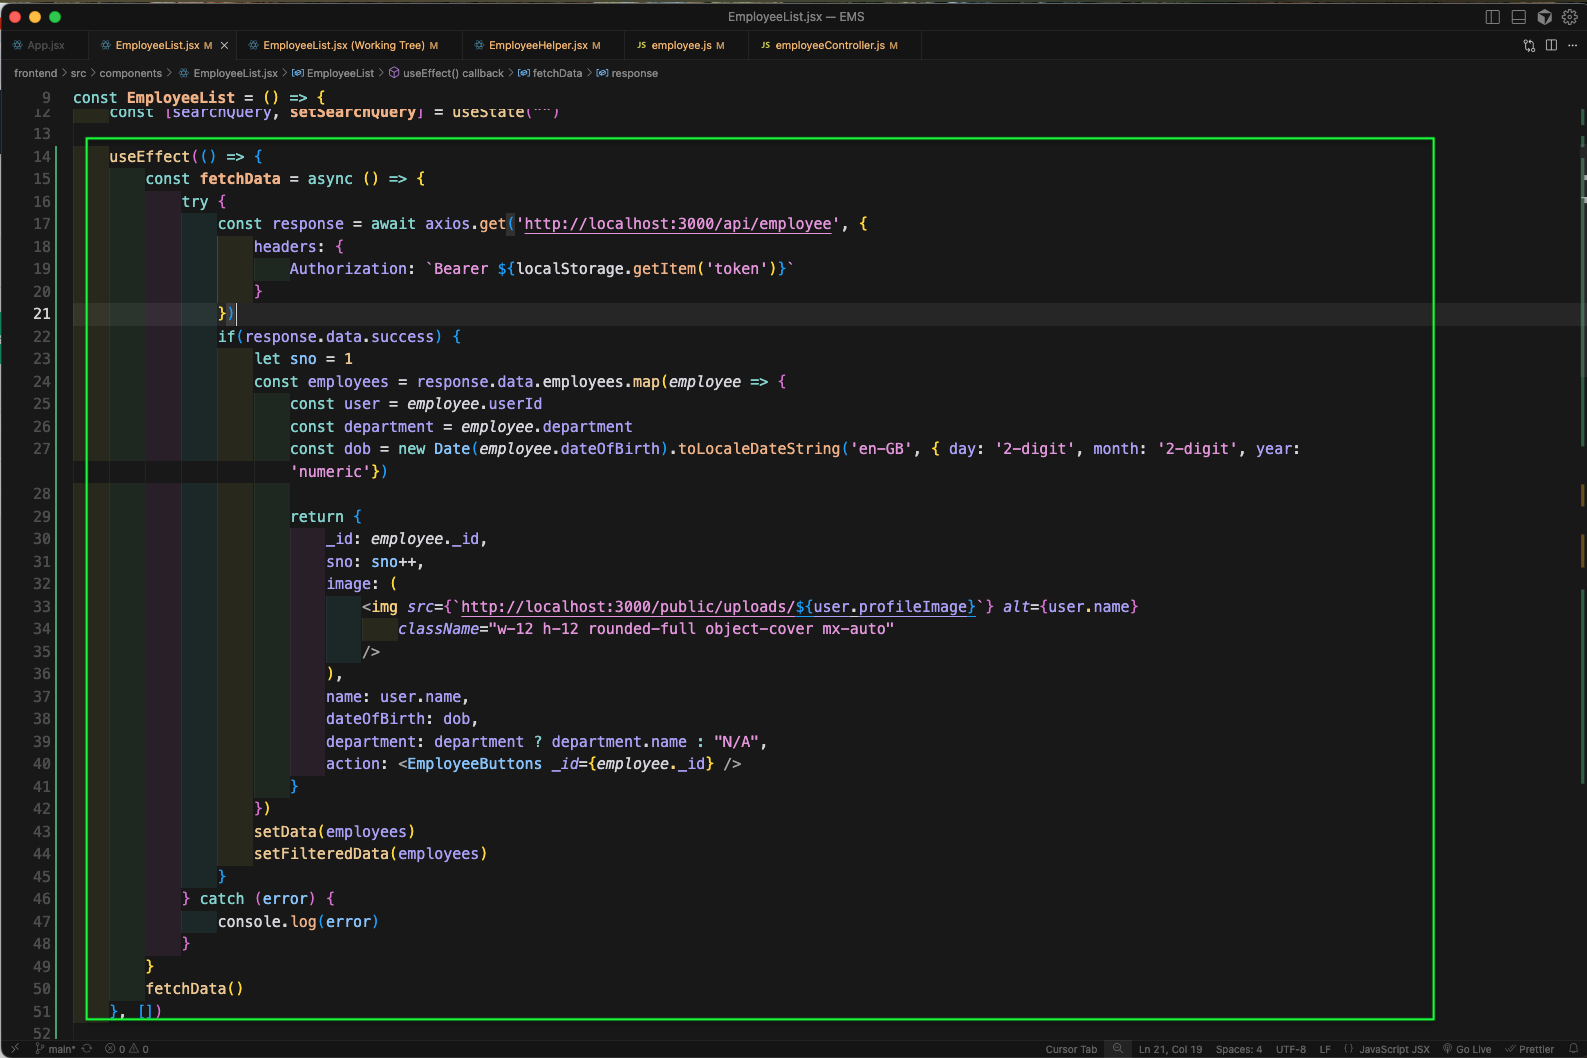
Now, in the useEffect for EmployeeList.jsx file we will fetch data from employee GET endpoint. After that we will create the employees data, in which we will also add the image from public folder.
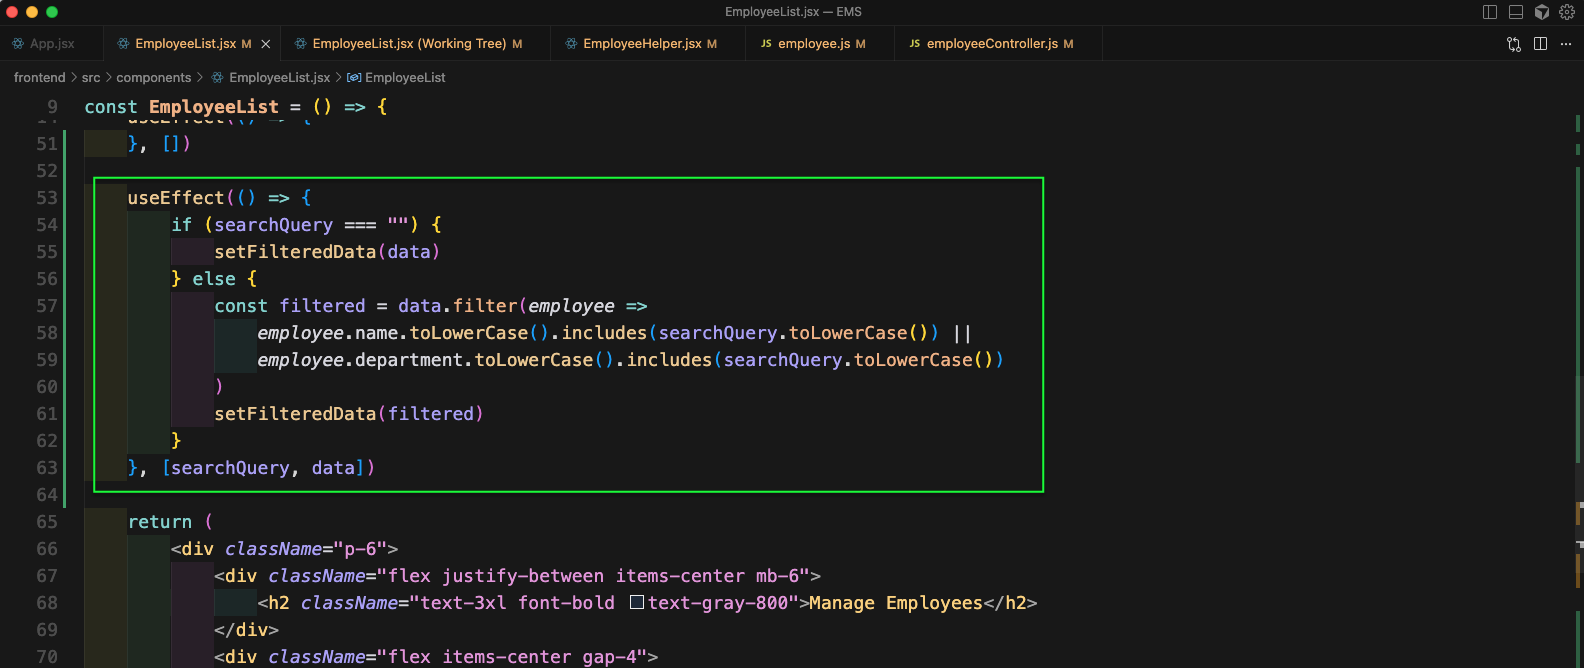
We will add another useEffect in EmployeeList.jsx file. This is for our search and filter functionality.
We will update the div inside the return statement in EmployeeList.jsx file. It will use the DataTable and pass various data in it.

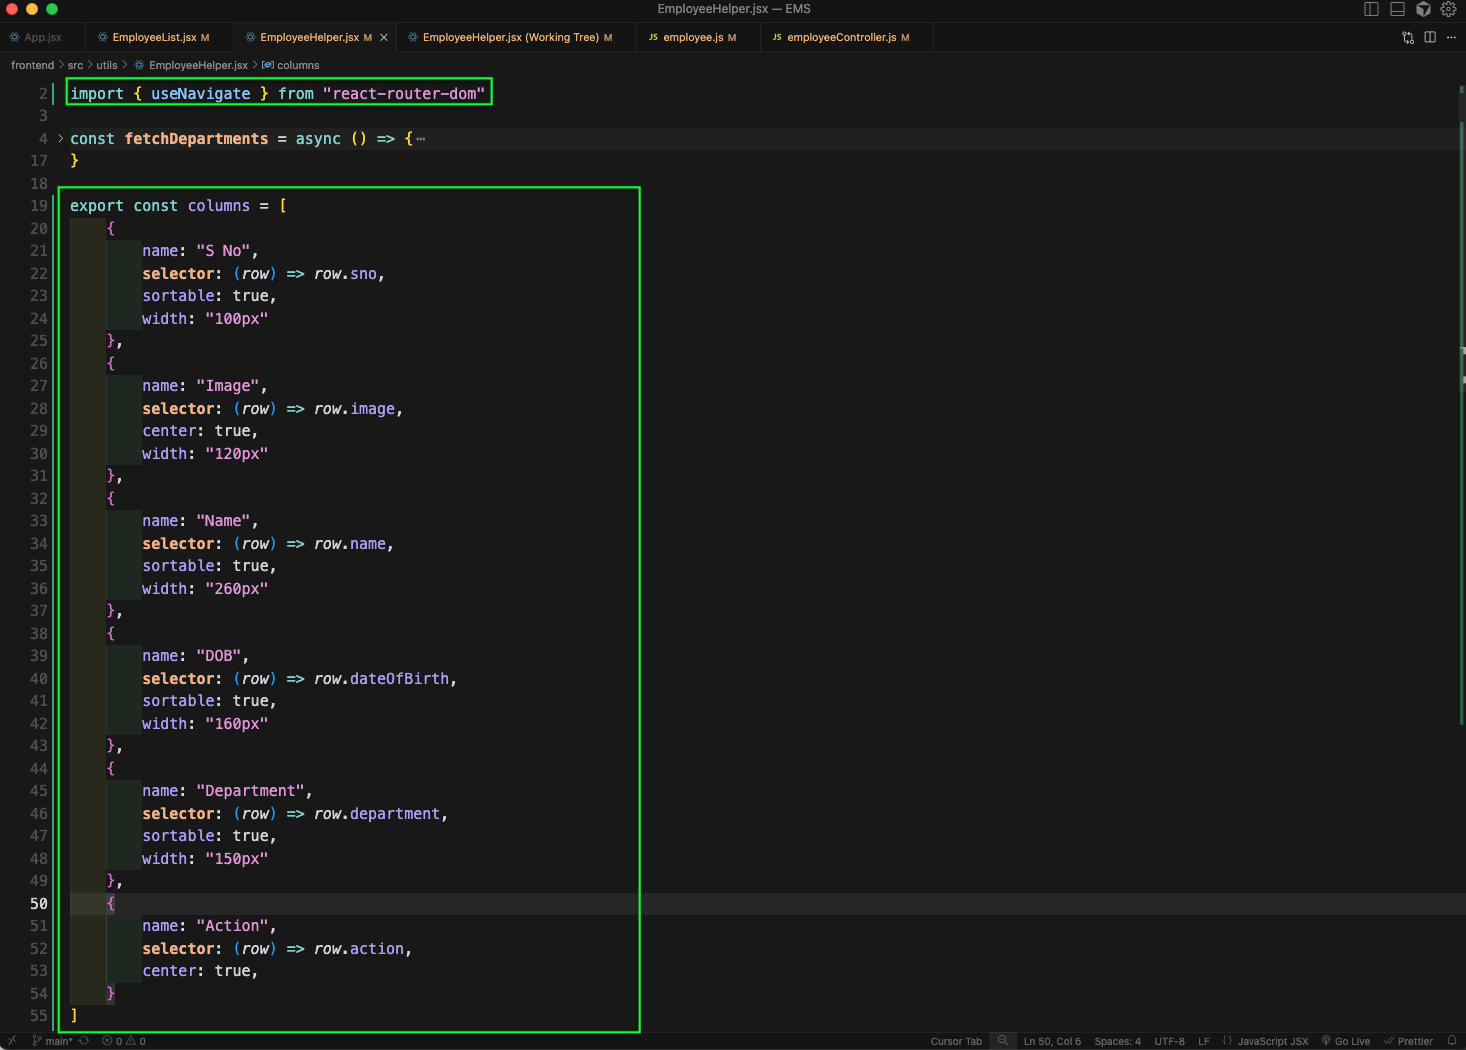
Next, in EmployeeHelper.jsx file, we will add the columns which will show different columns.
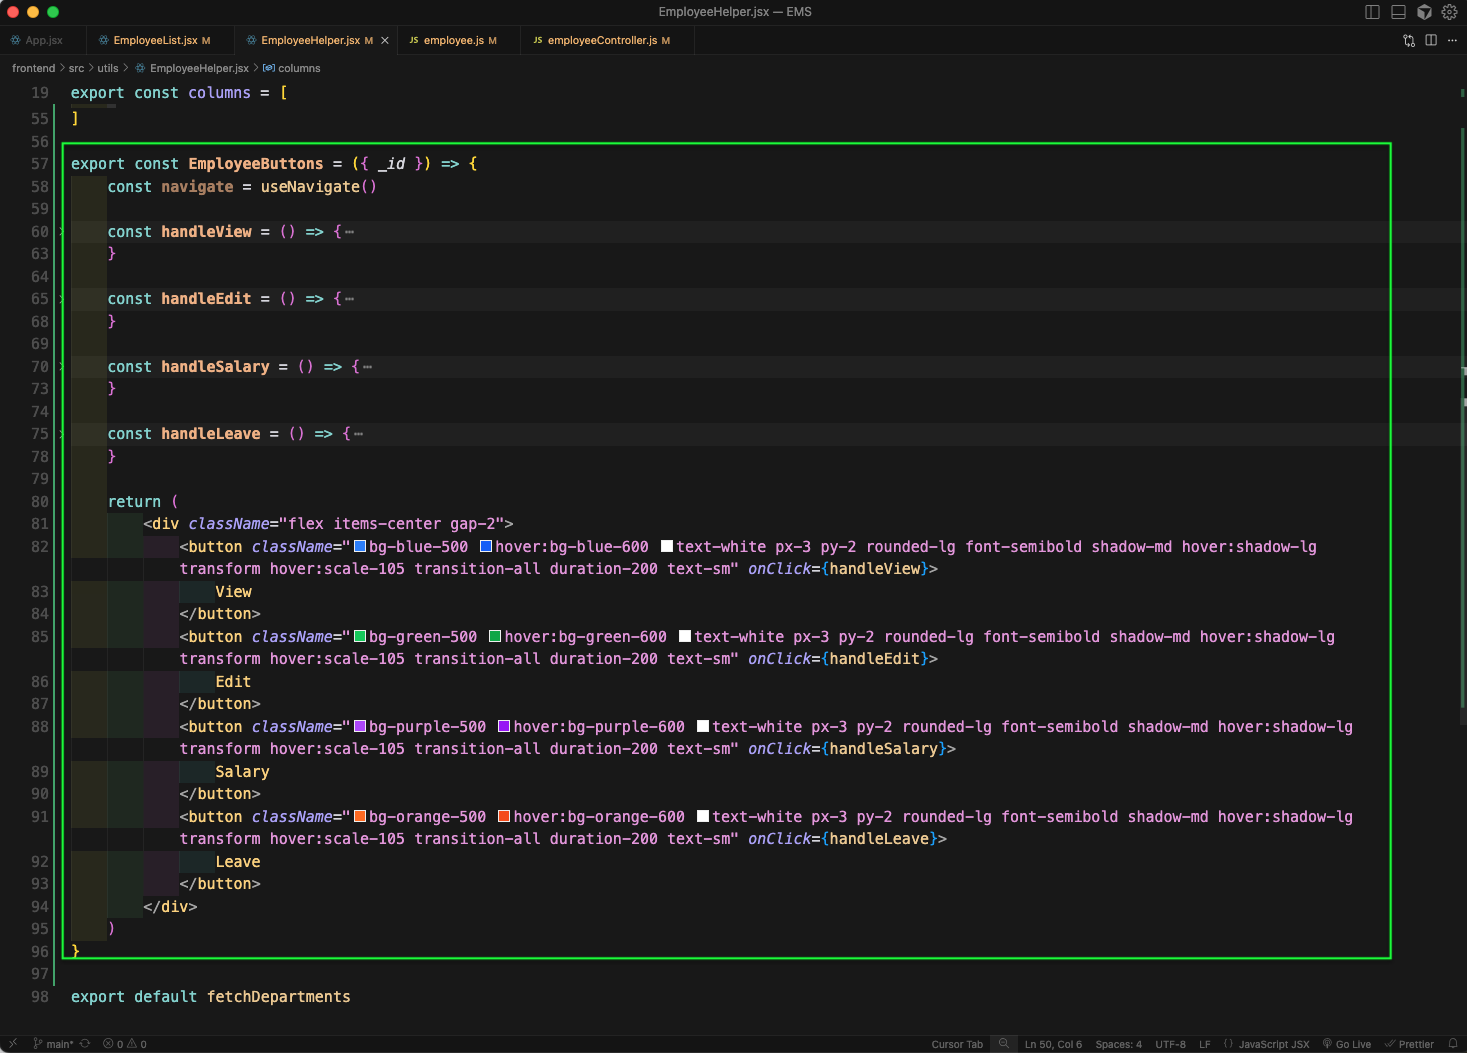
Next, we will add the code for EmployeeButtons in EmployeeHelper.jsx file.
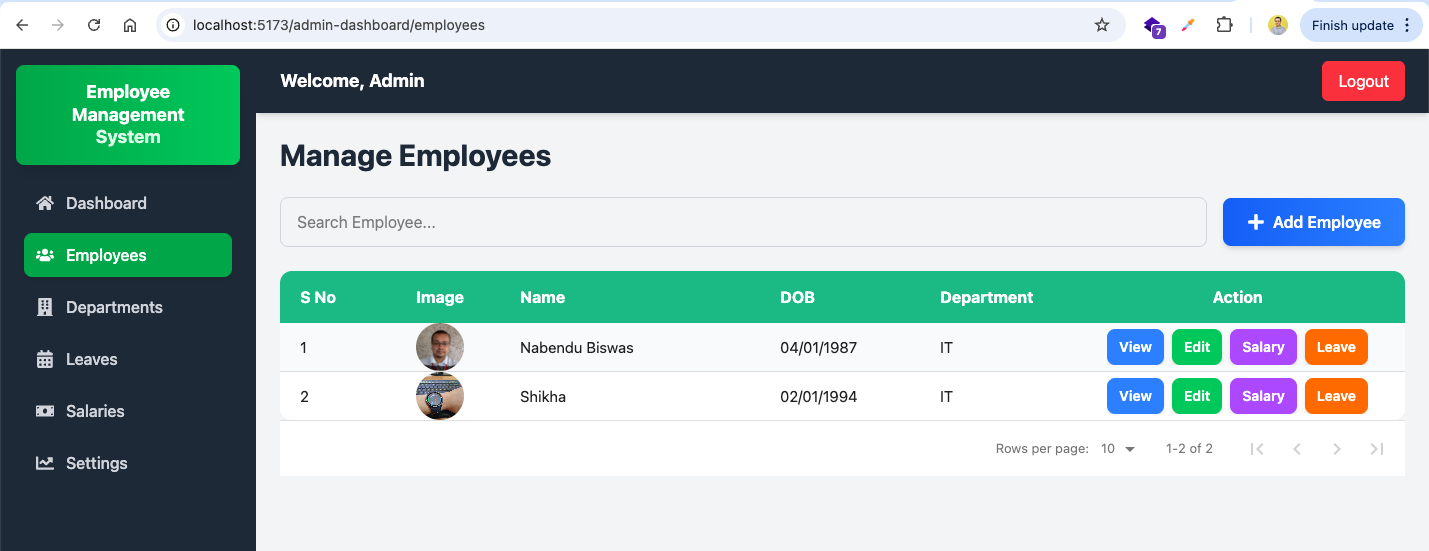
Now in http://localhost:5173/admin-dashboard/employees we will see a nice table for employees with all data from database.
Next, we will add a new route in employee.js to get employee by id.
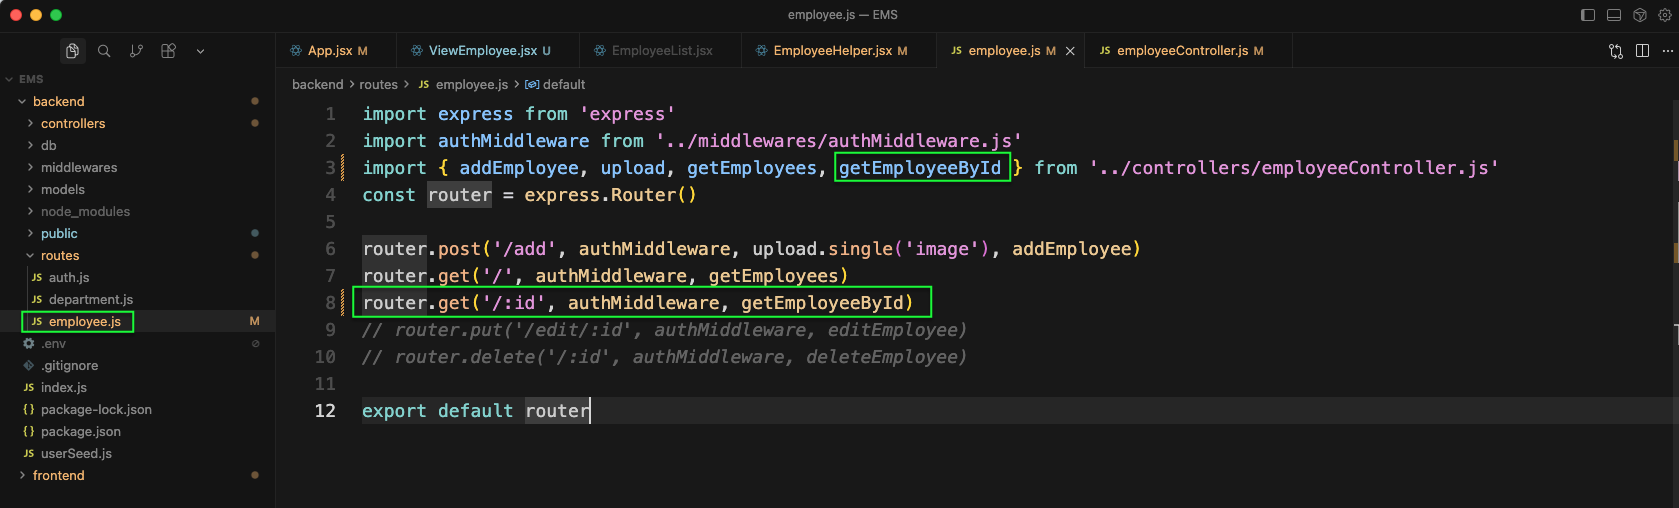
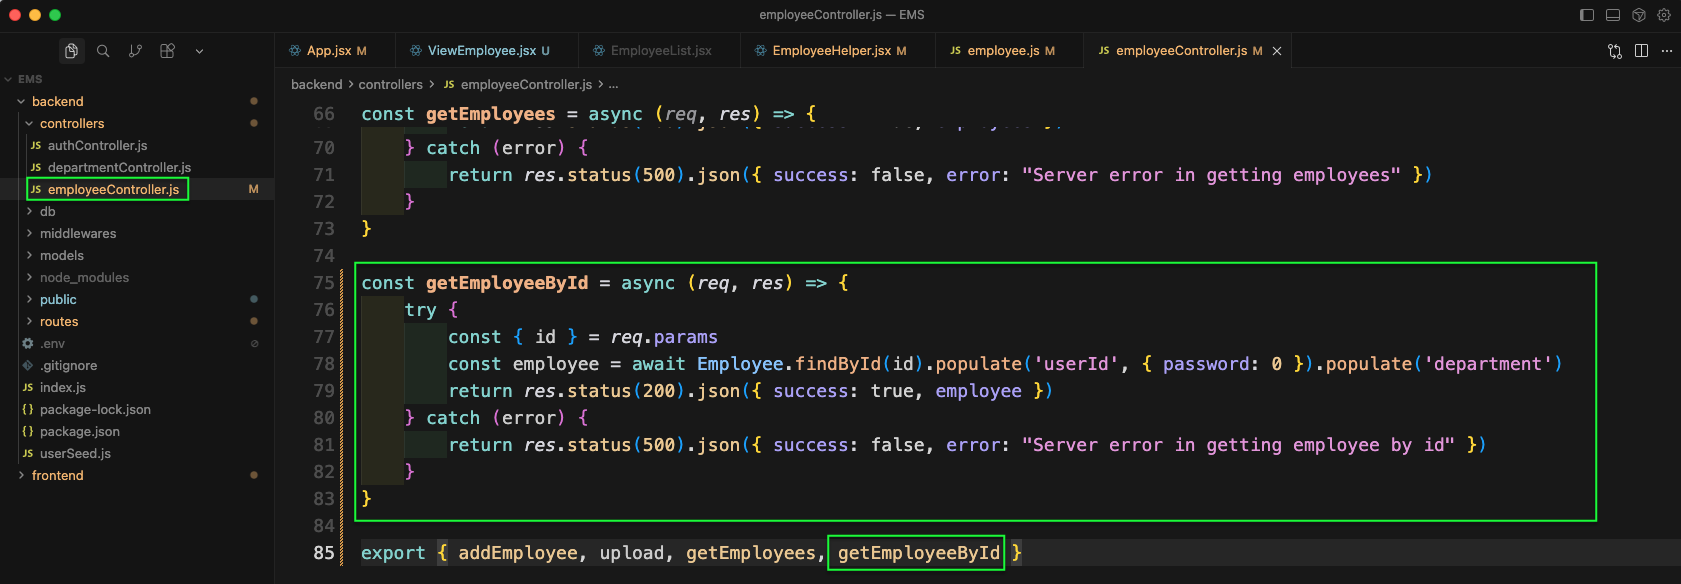
Now, in the employeeController.js file, we will add the function getEmployeeById
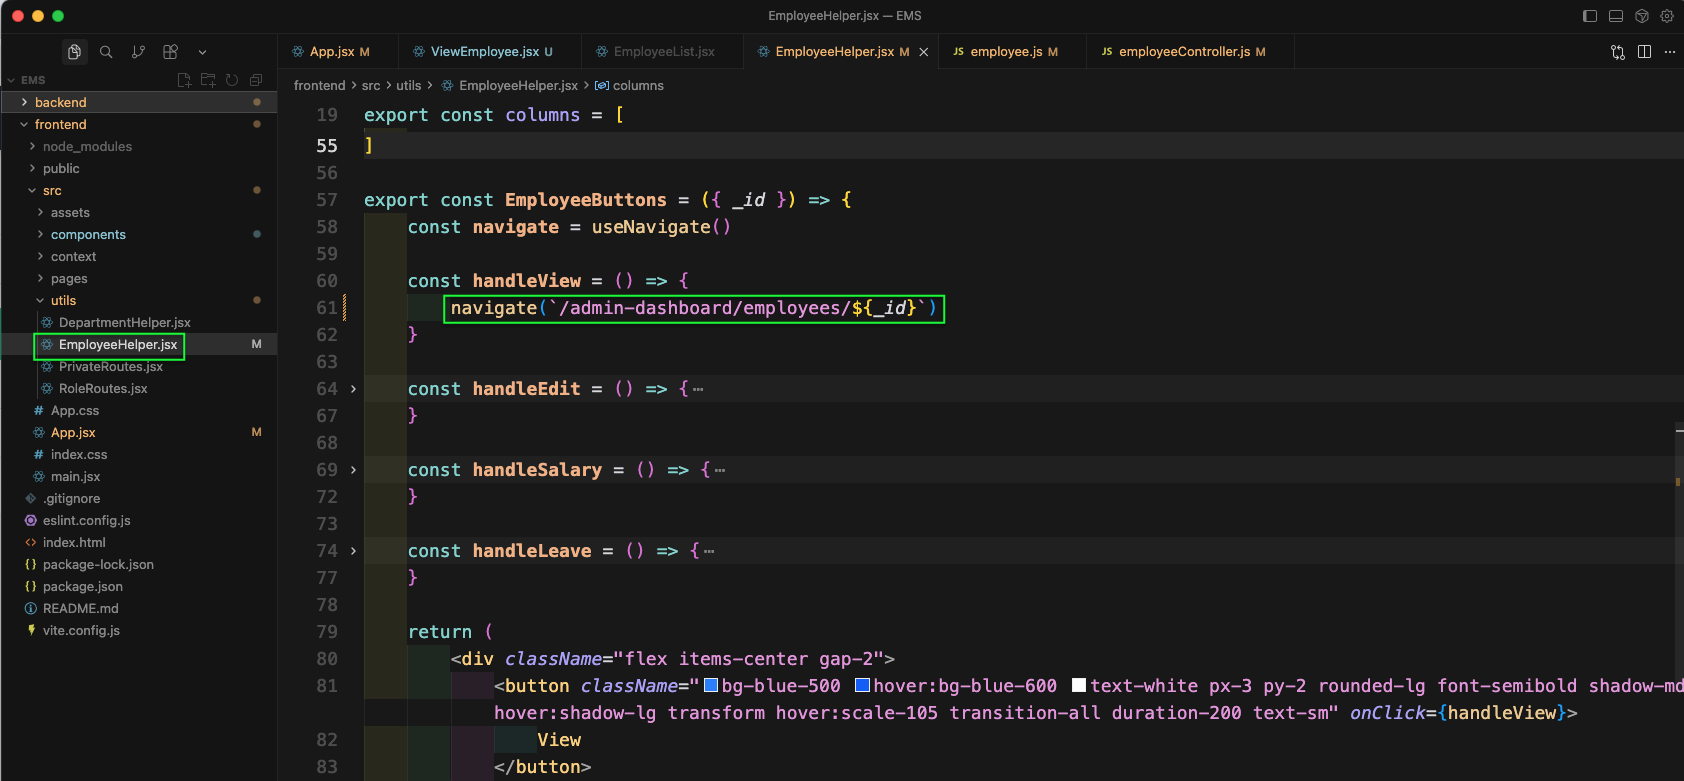
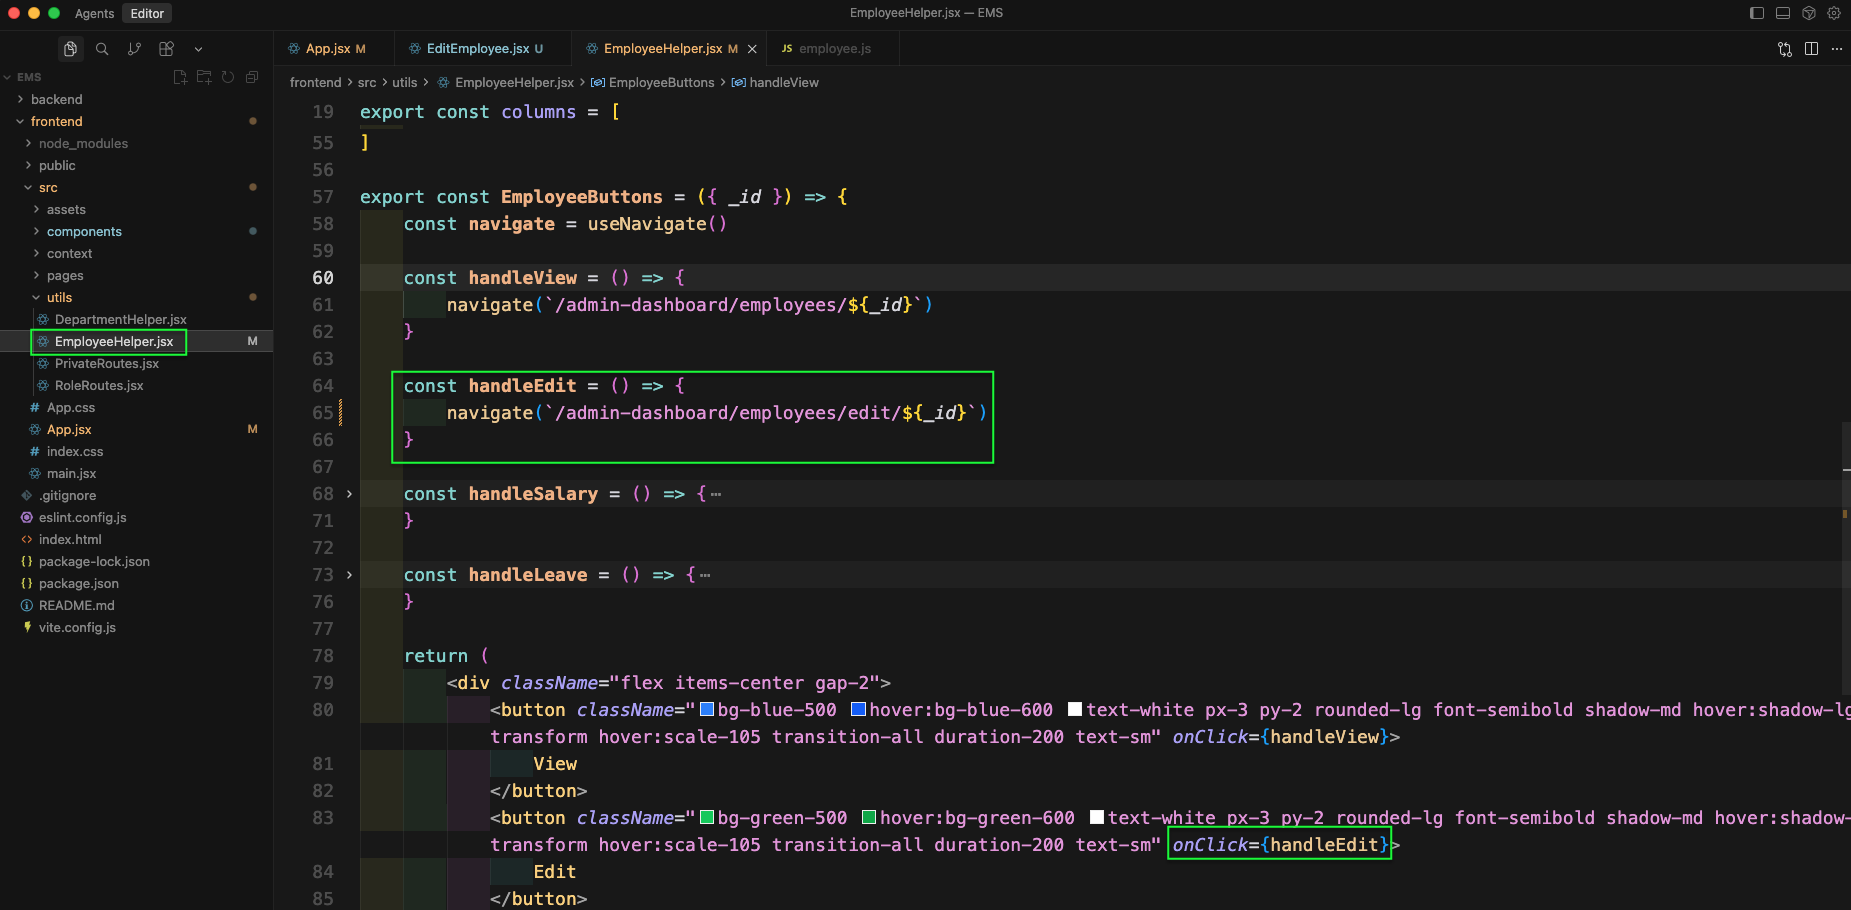
In the EmployeeHelper.jsx file, we will update the function handleView to naviage to the specific employee.
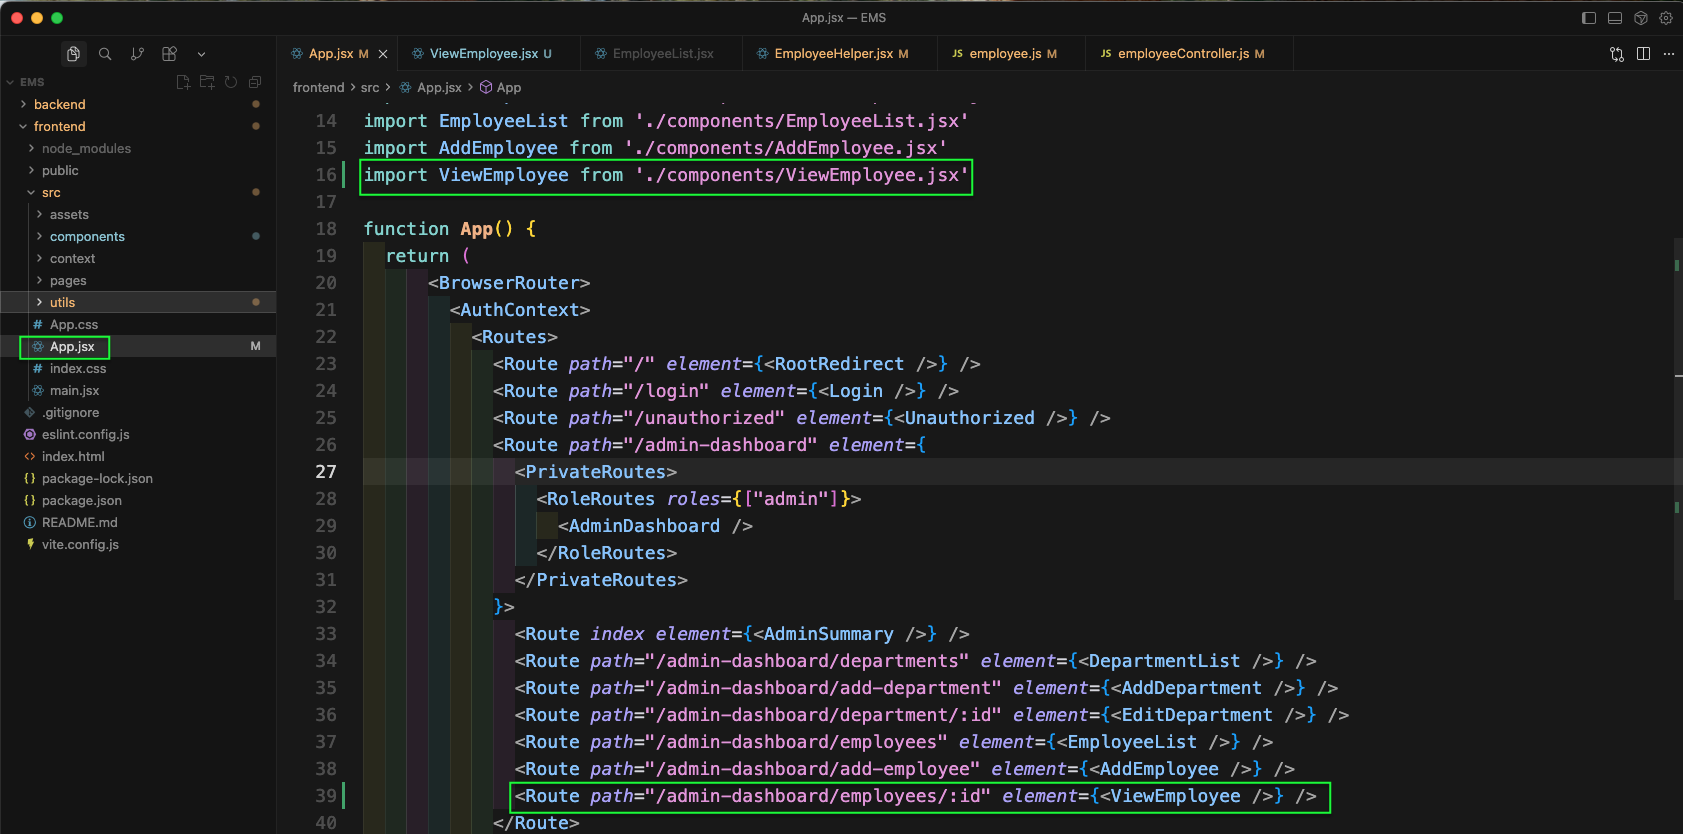
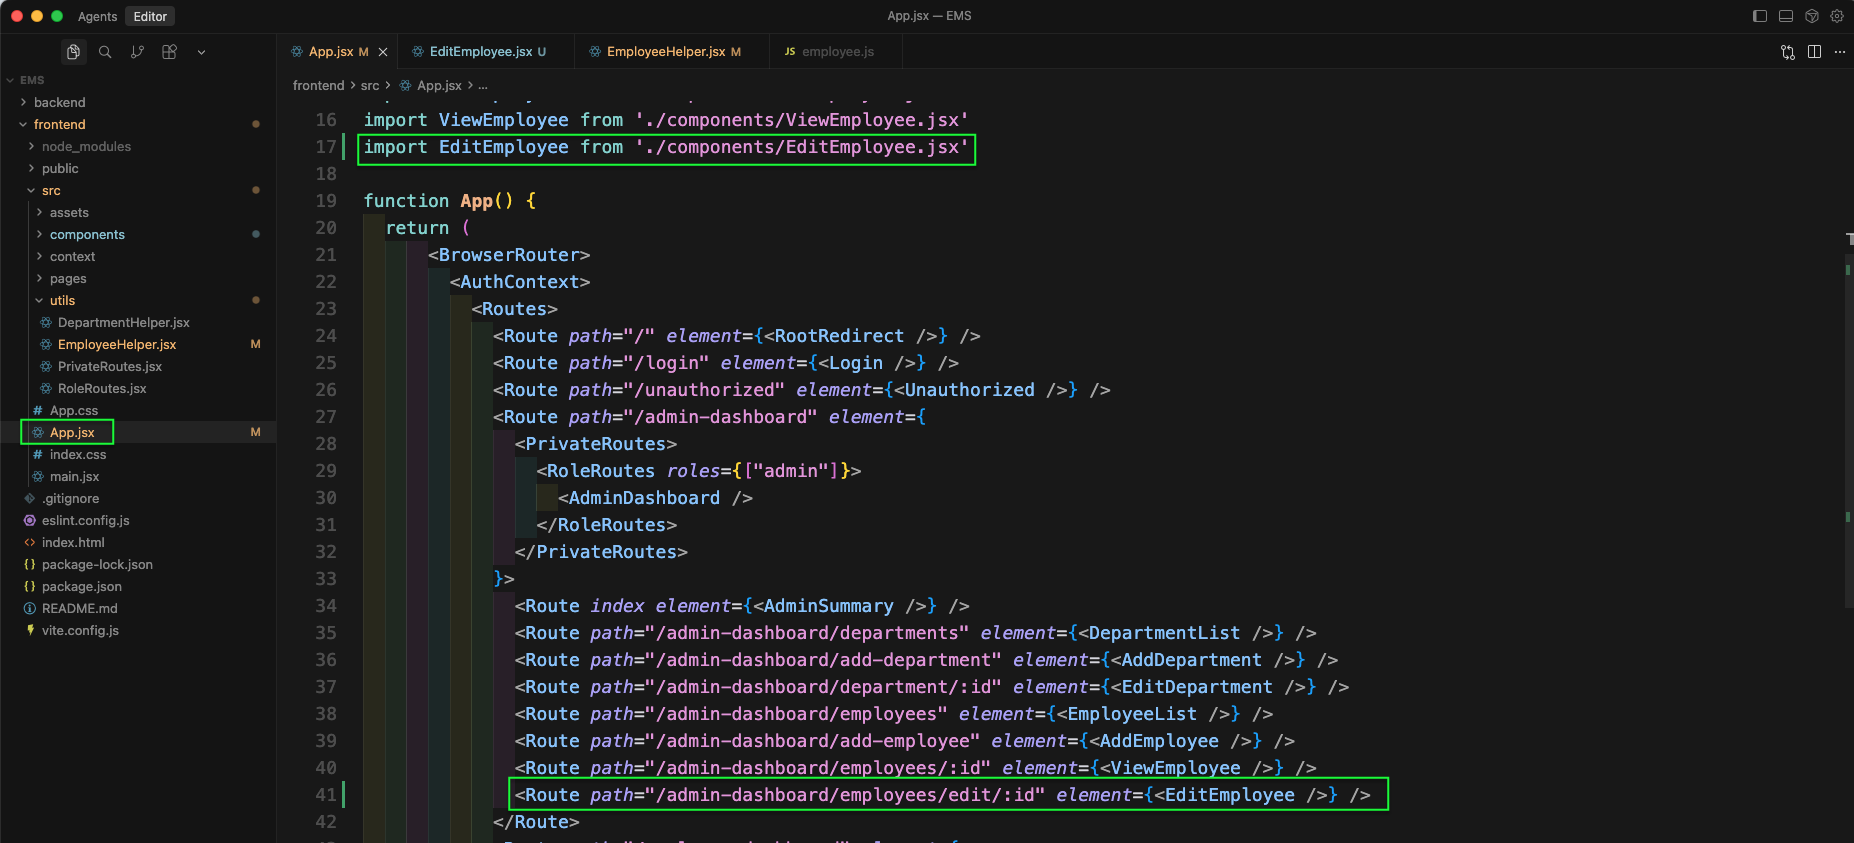
Now, in App.jsx file we will add the route for specific employee which will call the *ViewEmployee component.
Now, create a file ViewEmployee.jsx inside components folder. Here, after the required imports and state variables, we are using an useEffect to get data of a specific employee.
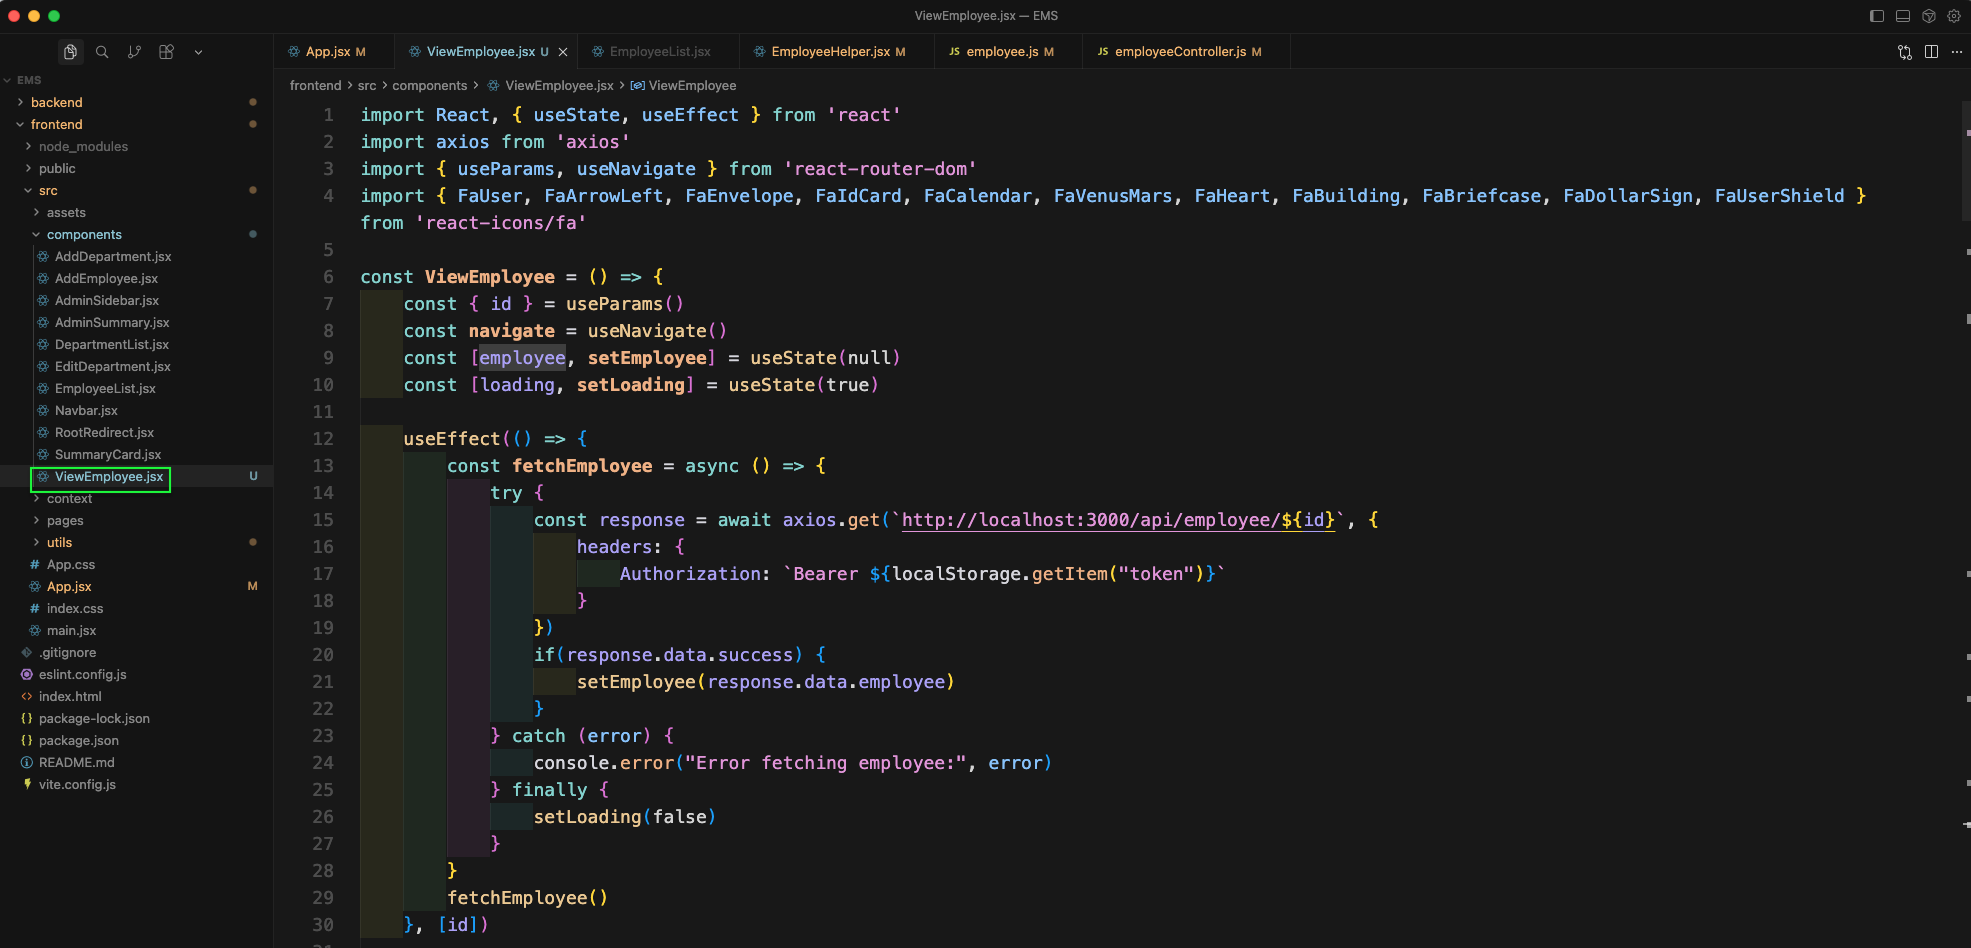
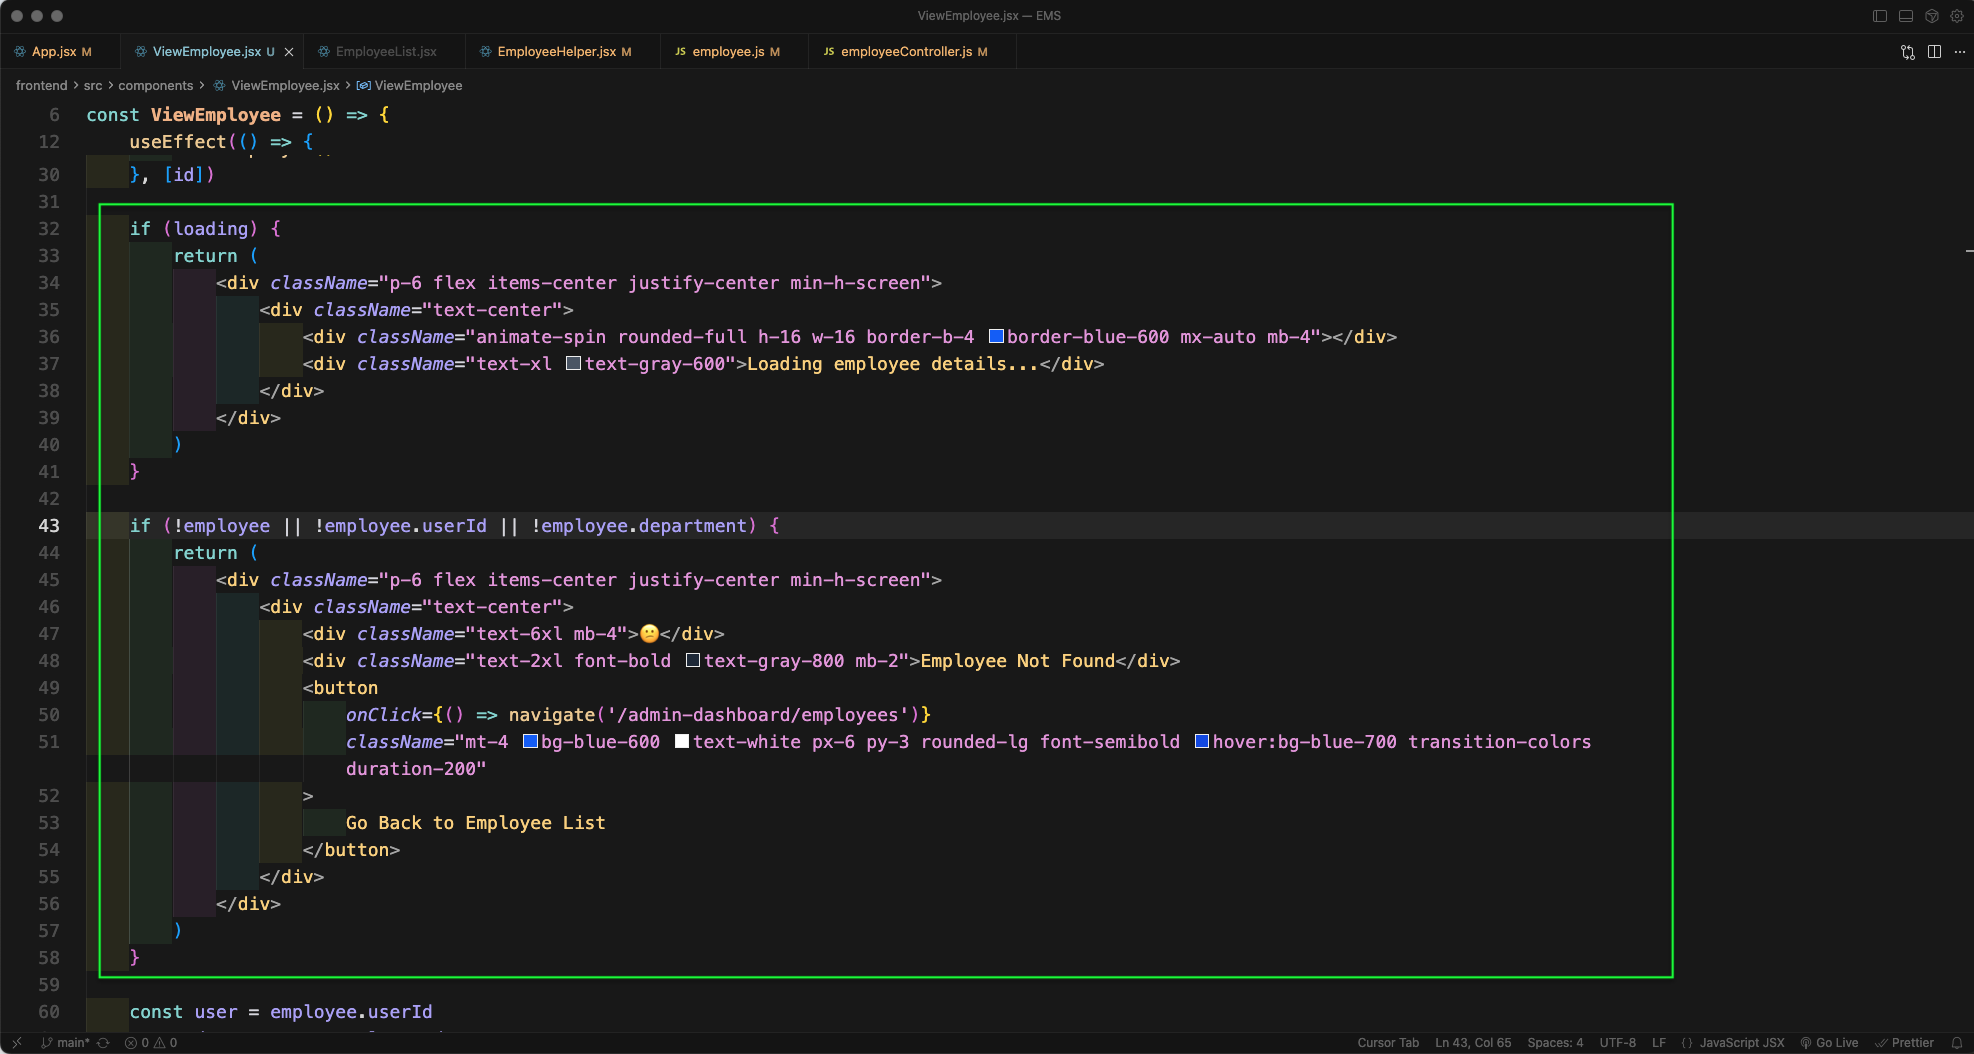
Now, we will add if statements for loading and no employee find in ViewEmployee.jsx file.
Now, in the return statement we will add tailwind css classes to show Employee Details in ViewEmployee.jsx file.
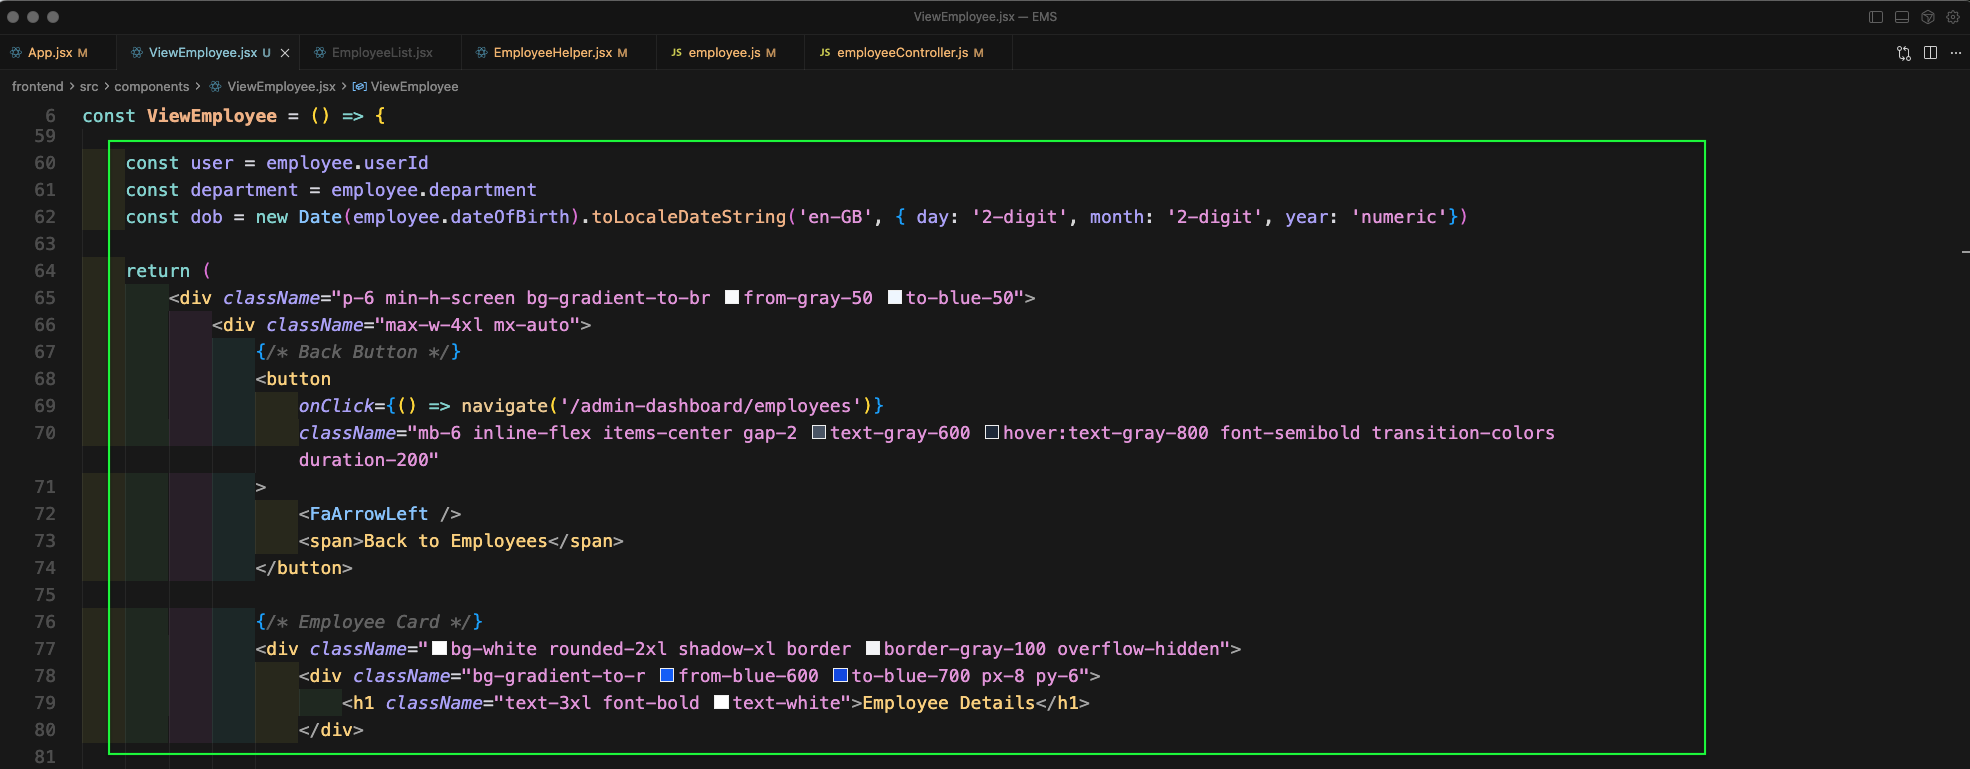
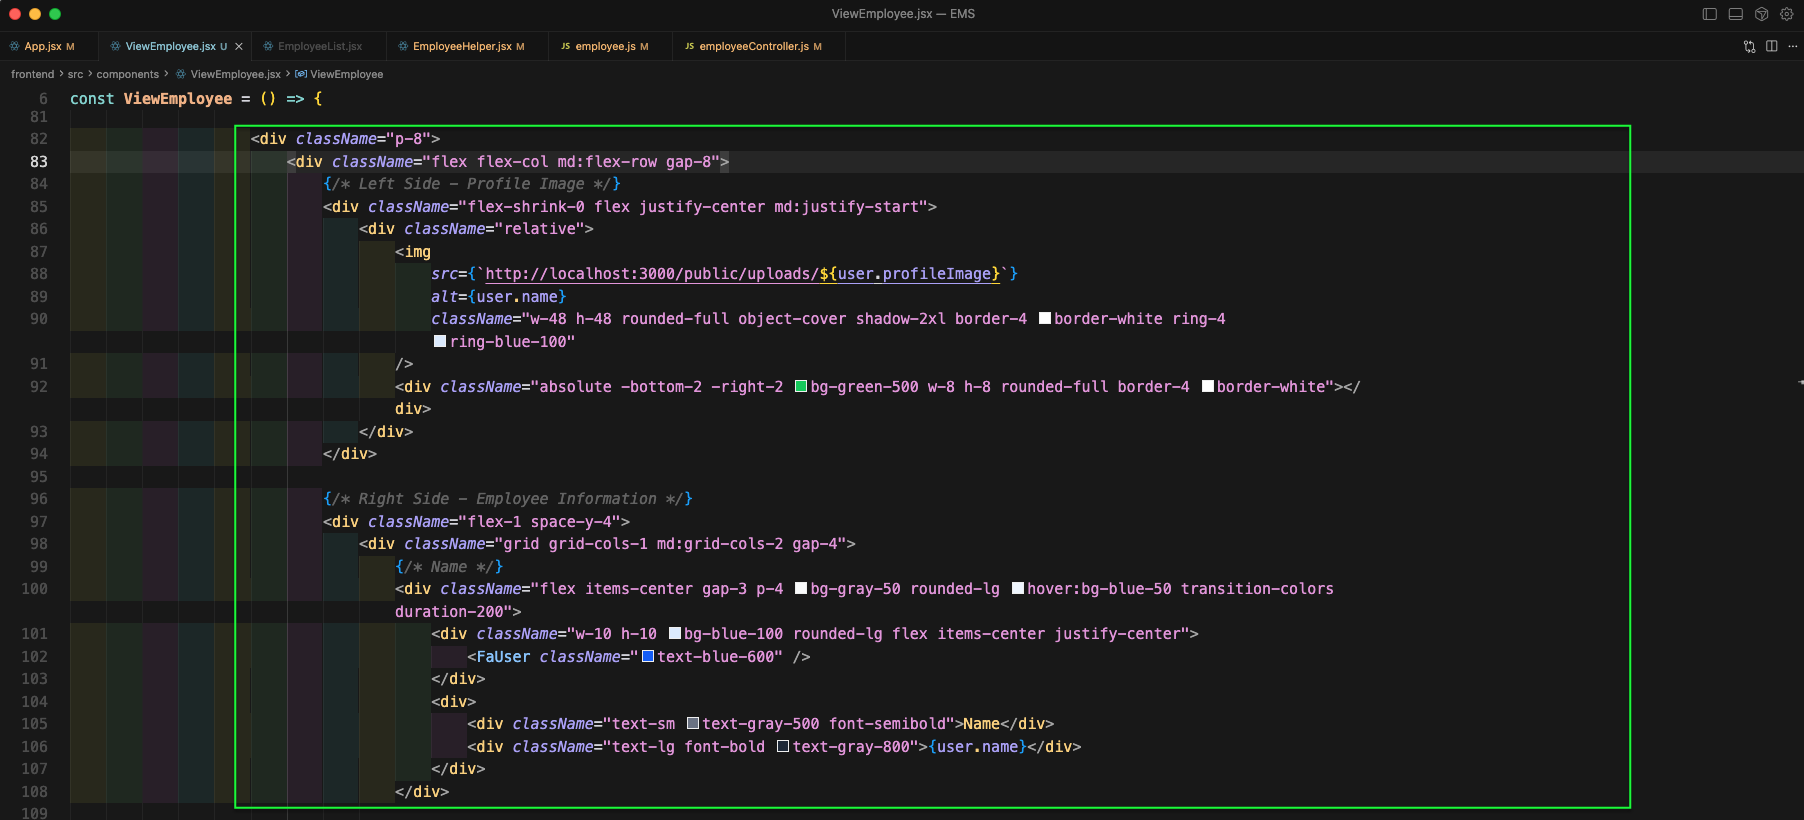
Next, in ViewEmployee.jsx file we will add more tailwind css classes to show image on left side and Right side starting with Name.
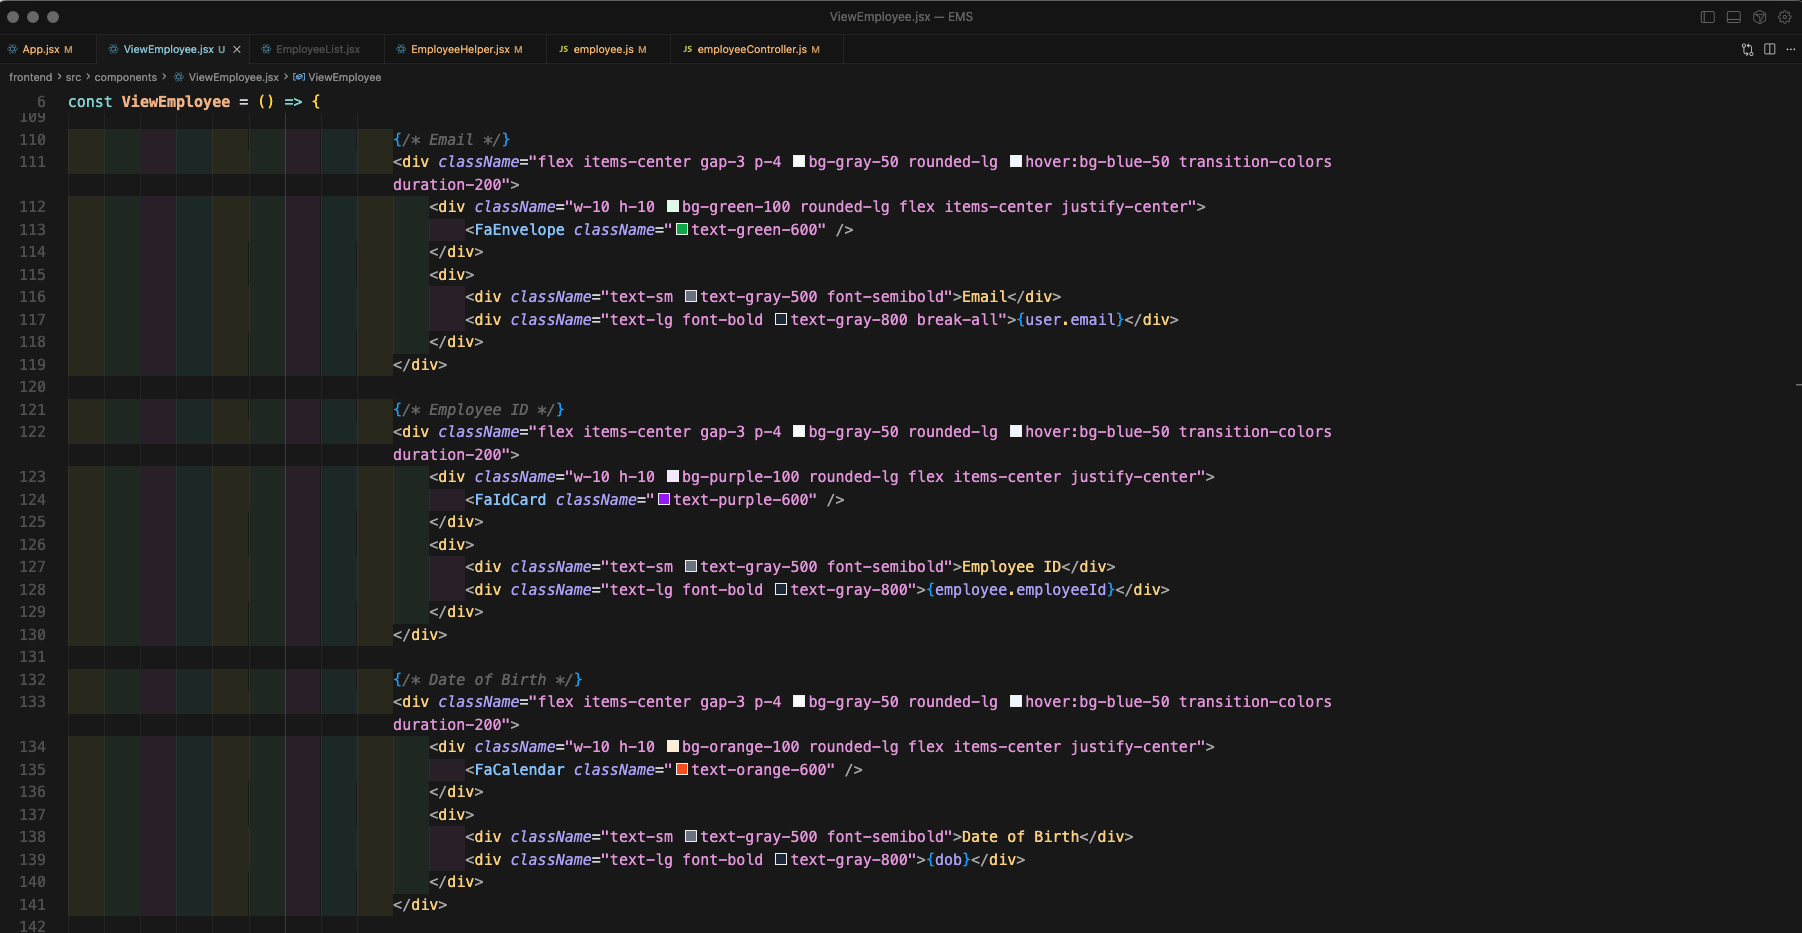
Then in ViewEmployee.jsx file we will show Email, Employee ID, Date of Birth.
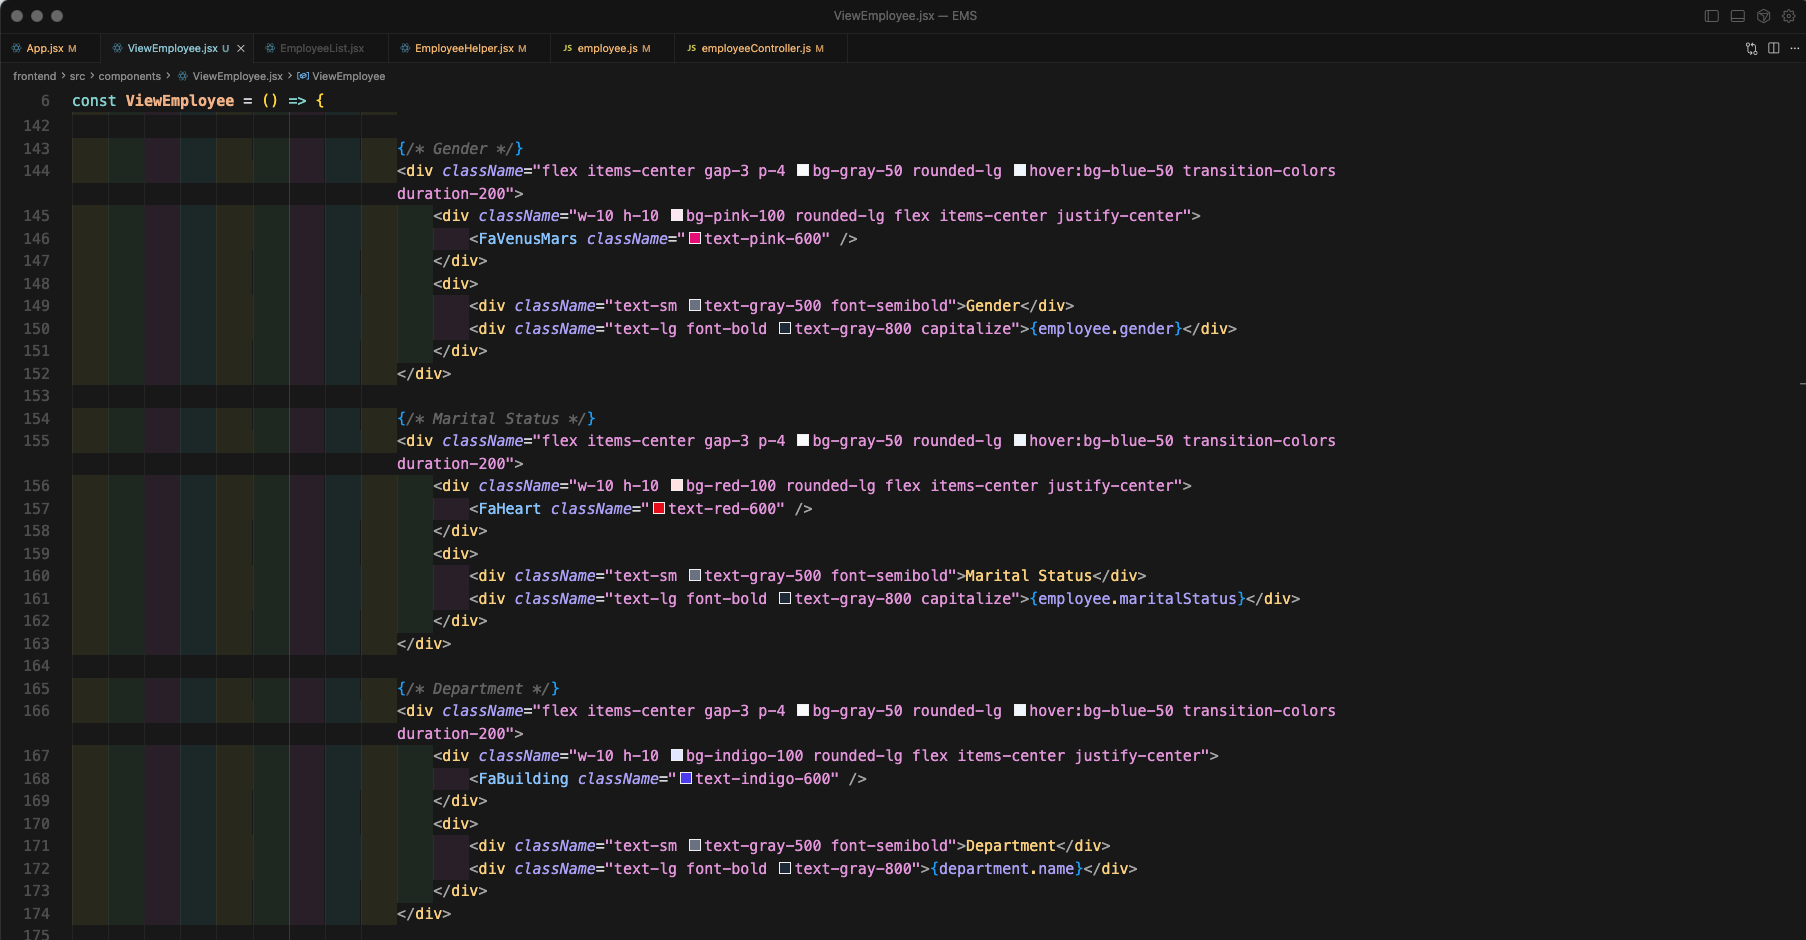
Next in ViewEmployee.jsx file we will show Gender, Marital Status, Department.
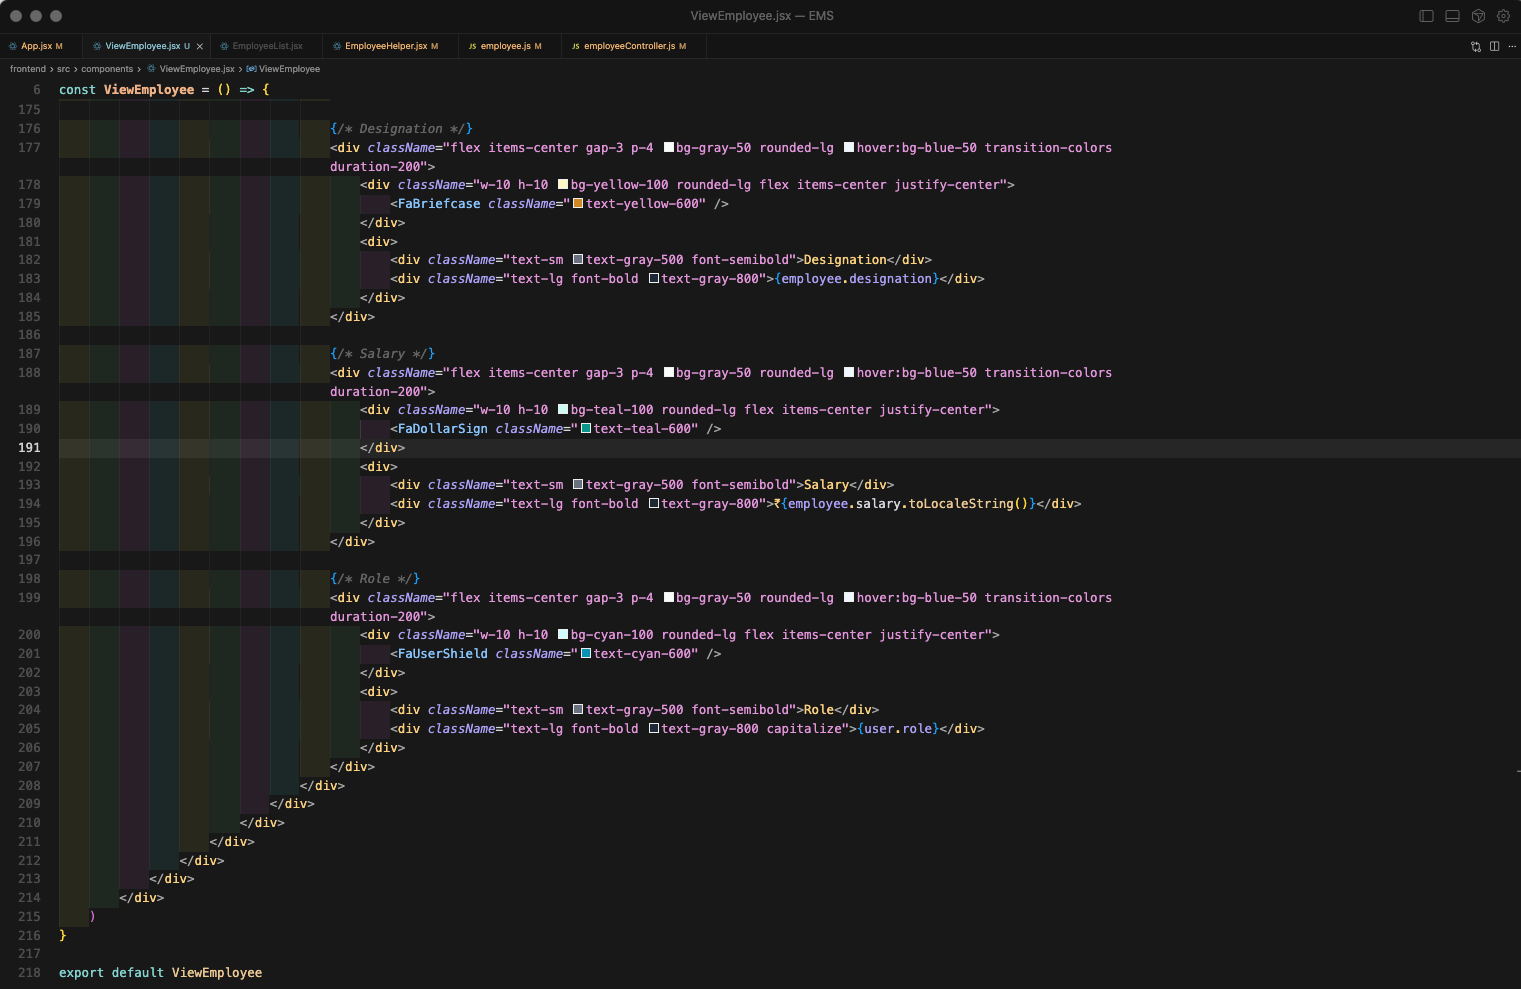
Lastly in ViewEmployee.jsx file we will show Designation, Salary, Role.
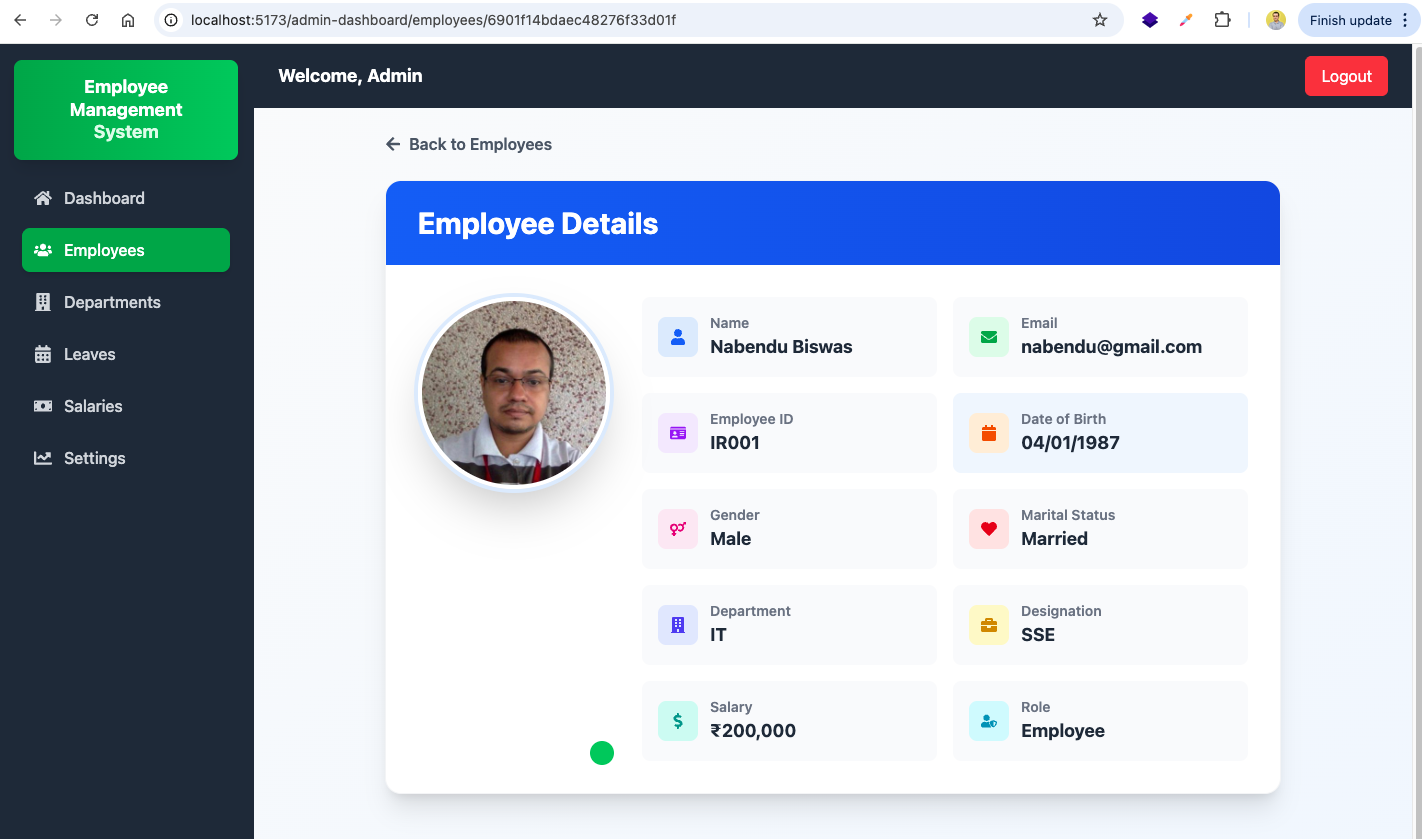
Now, go back to http://localhost:5173/admin-dashboard/employees and click on View button.

It will show all Employee details in nice UI.
Now, in App.jsx file, we will add a new route to edit employee. It will render *EditEmployee component.
Now, in EmployeeHelper.jsx file we will update the handleEdit function to navigate to edit employee route.
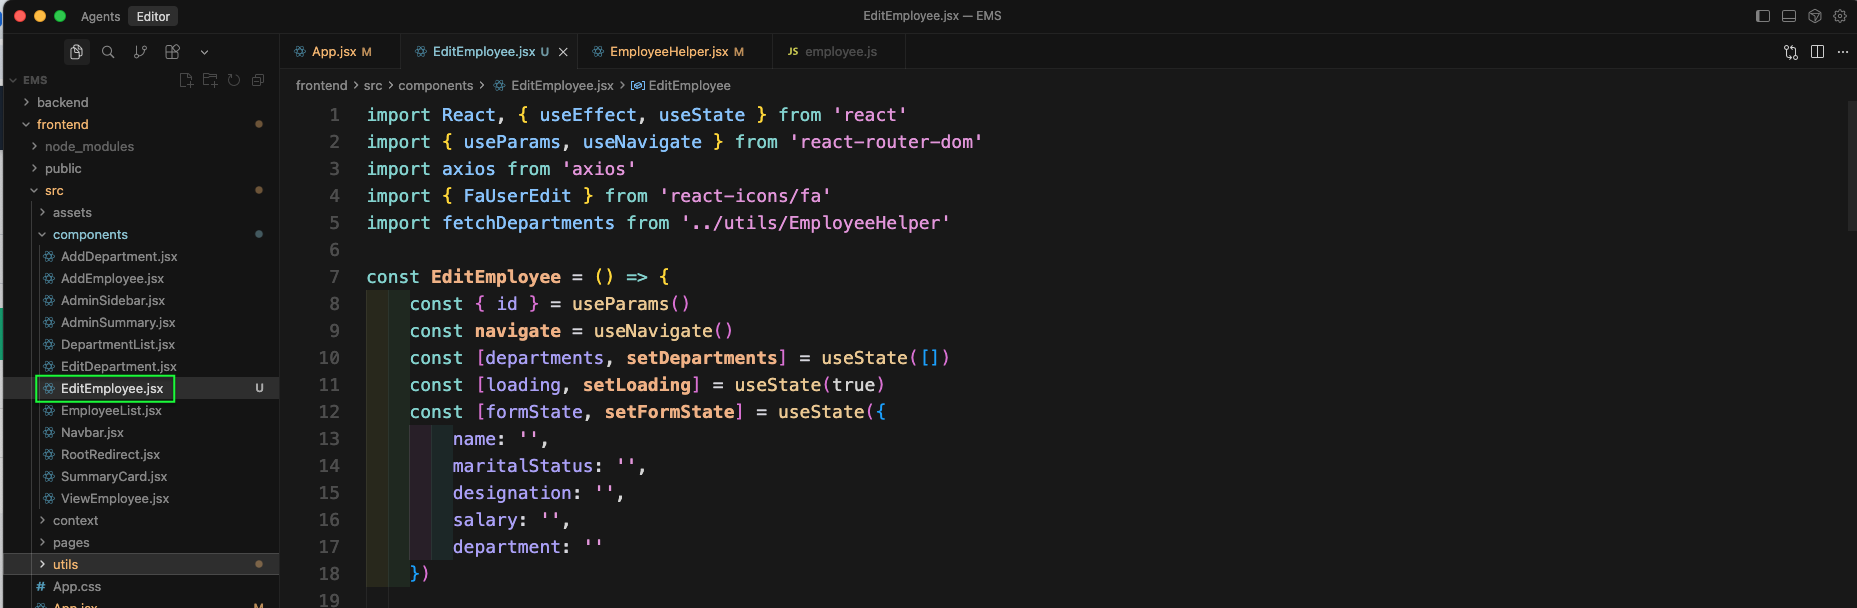
Next, we will create an EditEmployee.jsx component. Here, we first have the basic imports and states.
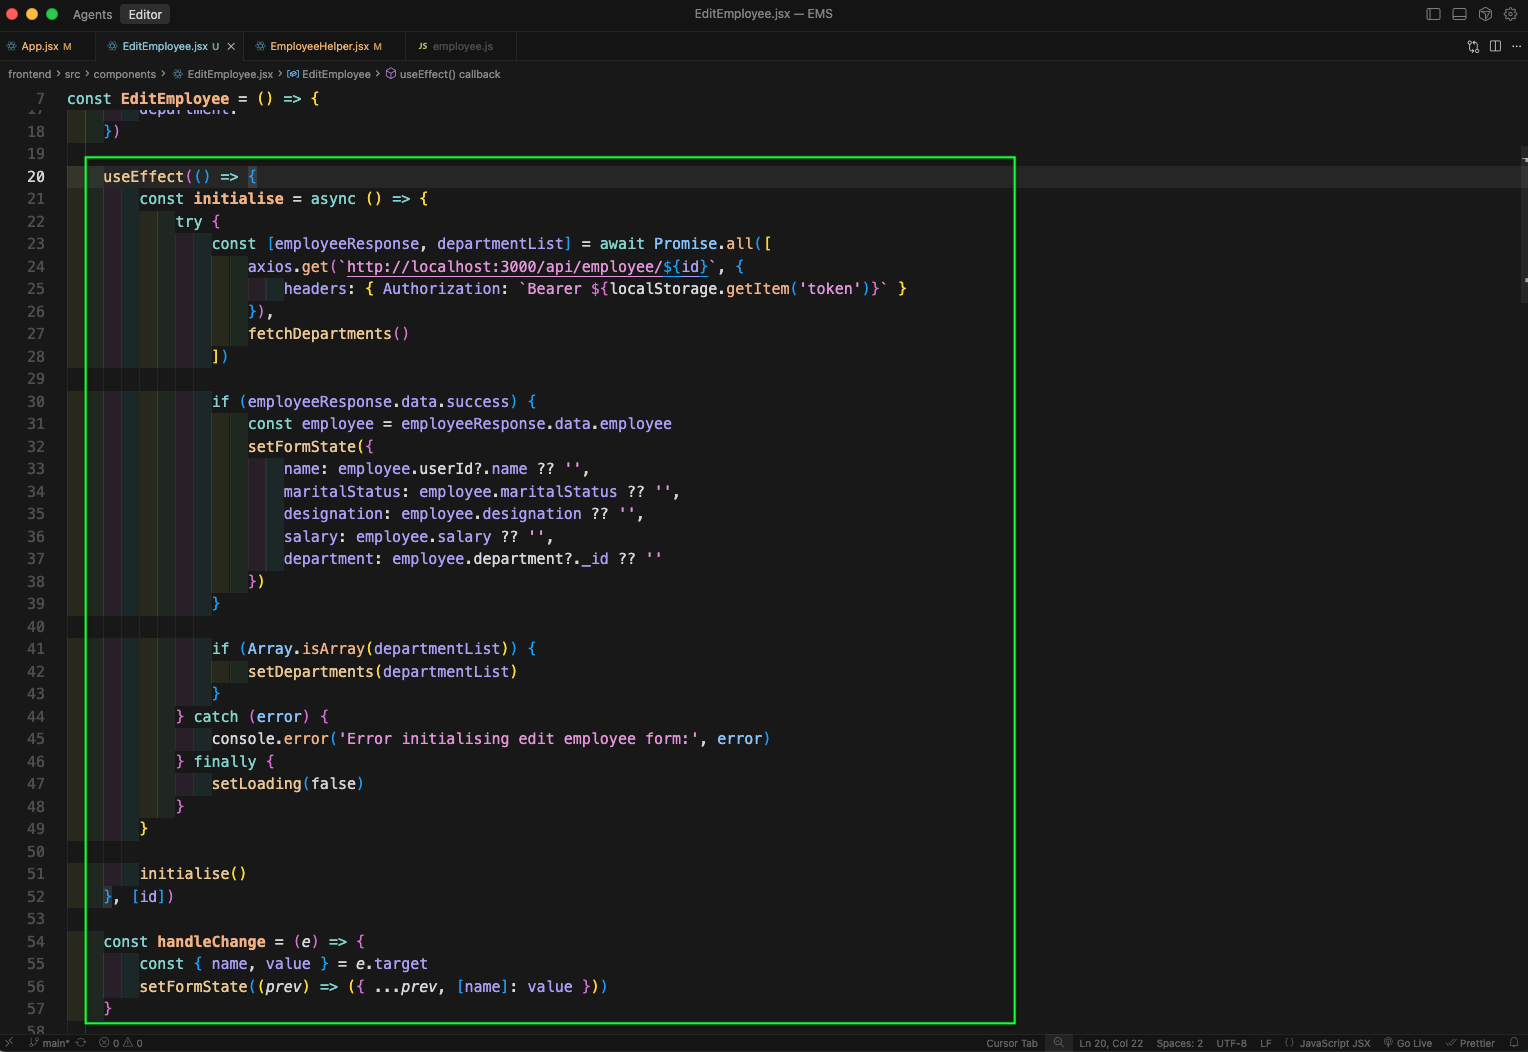
Next, we will add an useEffect which will call the GET API endpoint to get details of an employee. We will also have the handleChange function.
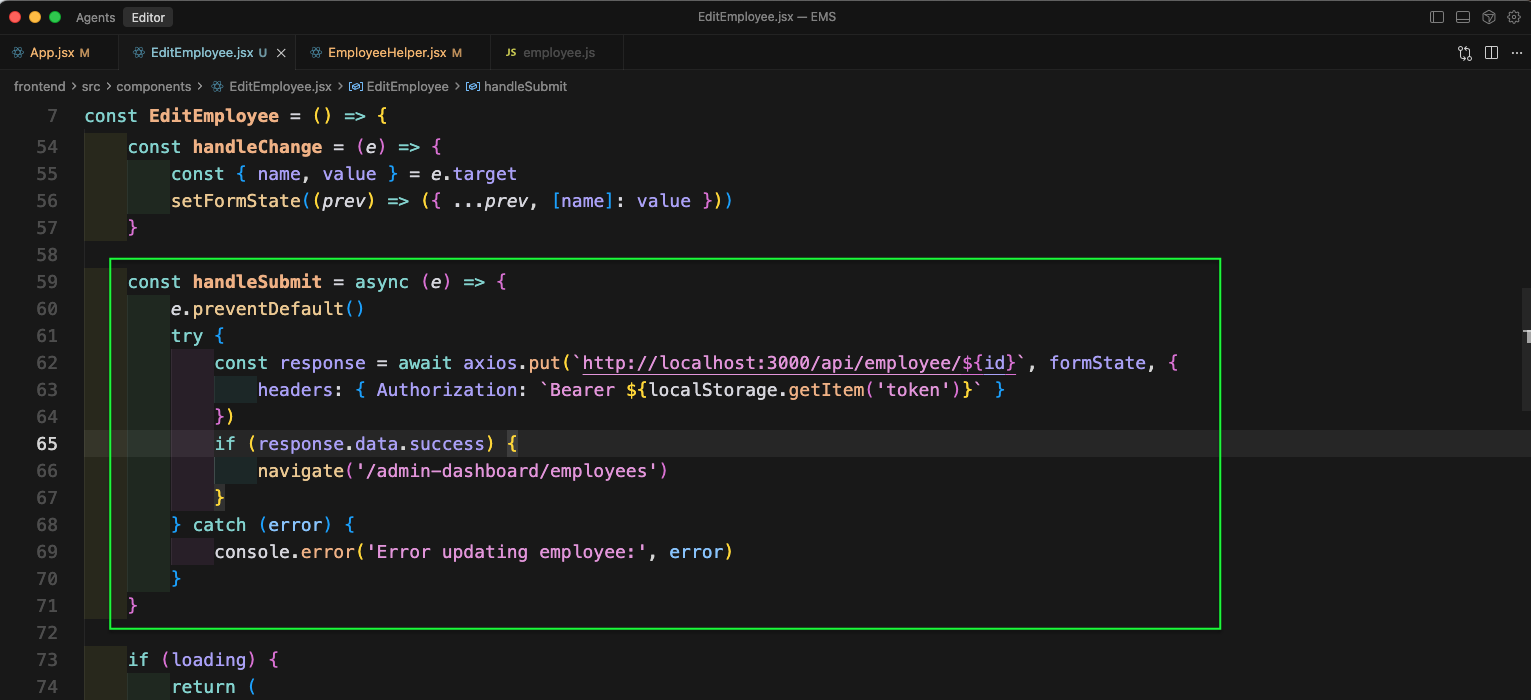
Next, we will have the handleSubmit function and also the loading code. In the return statement we will have an Edit Employee text.

Next, we will have form input for name, marital status.

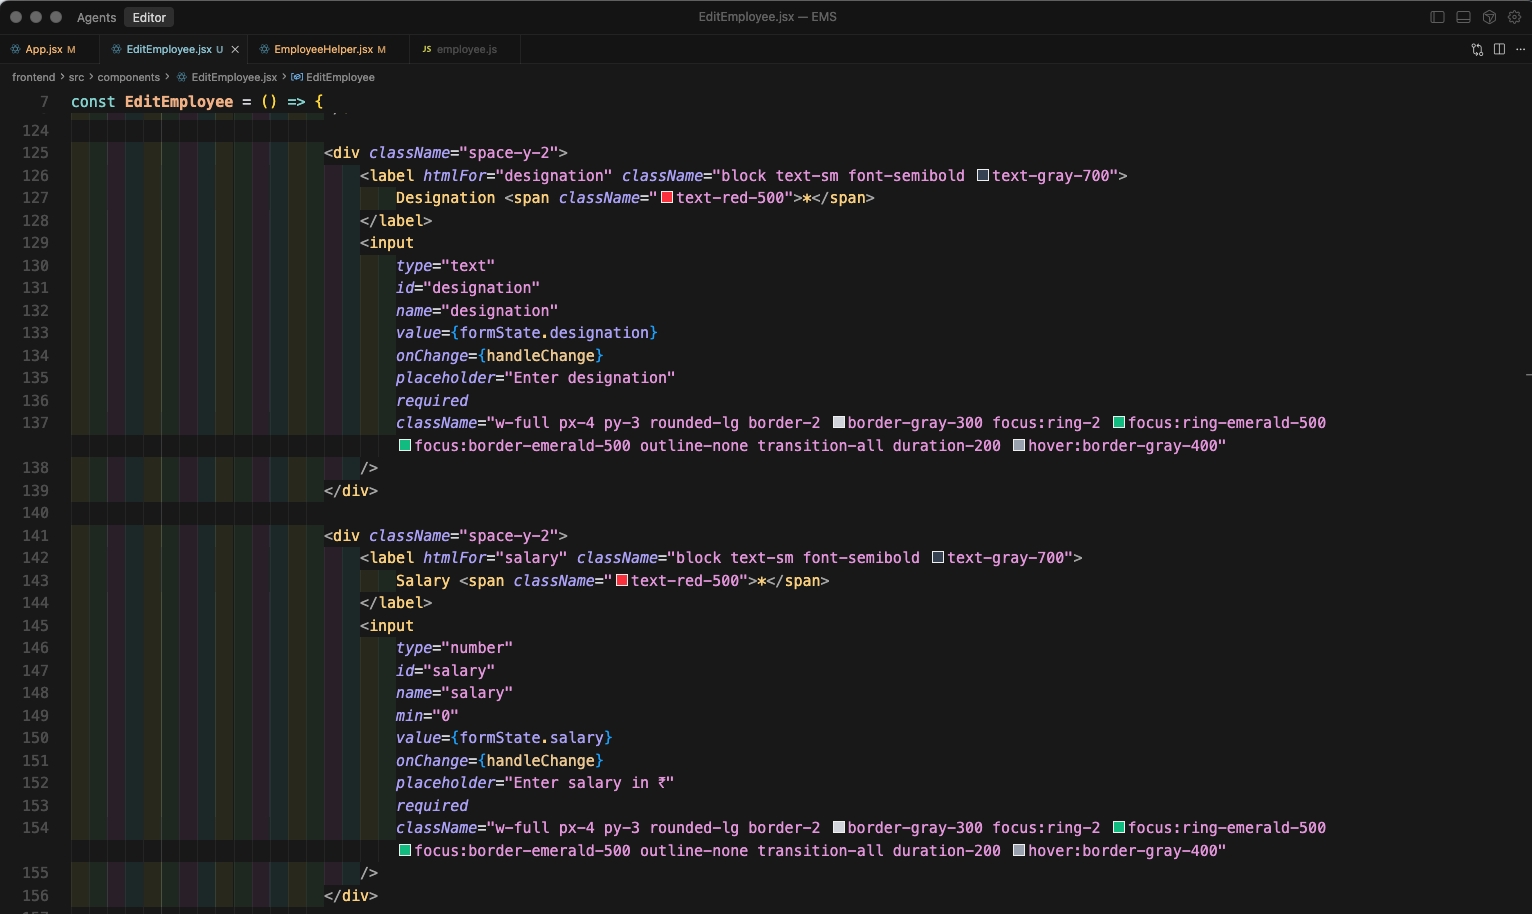
Next, we will have input for designation and salary.
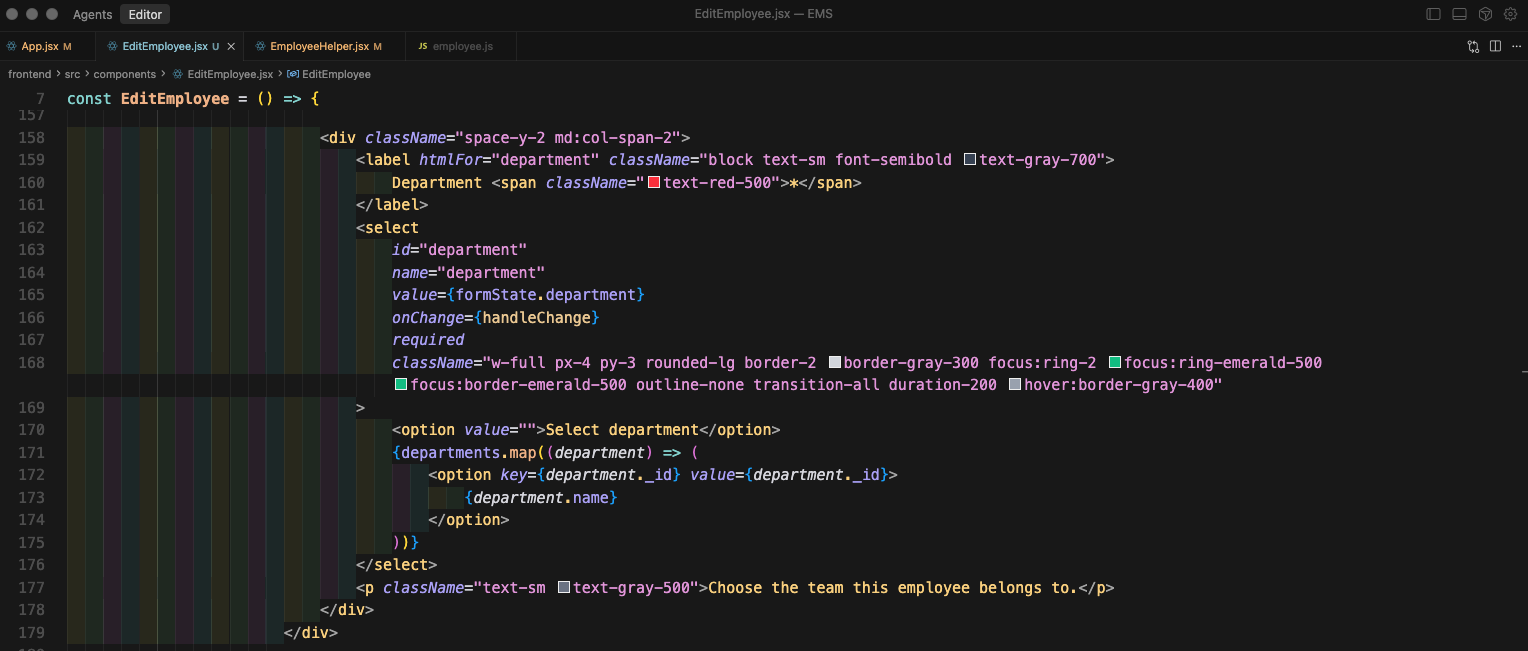
Next, we will have select for department.
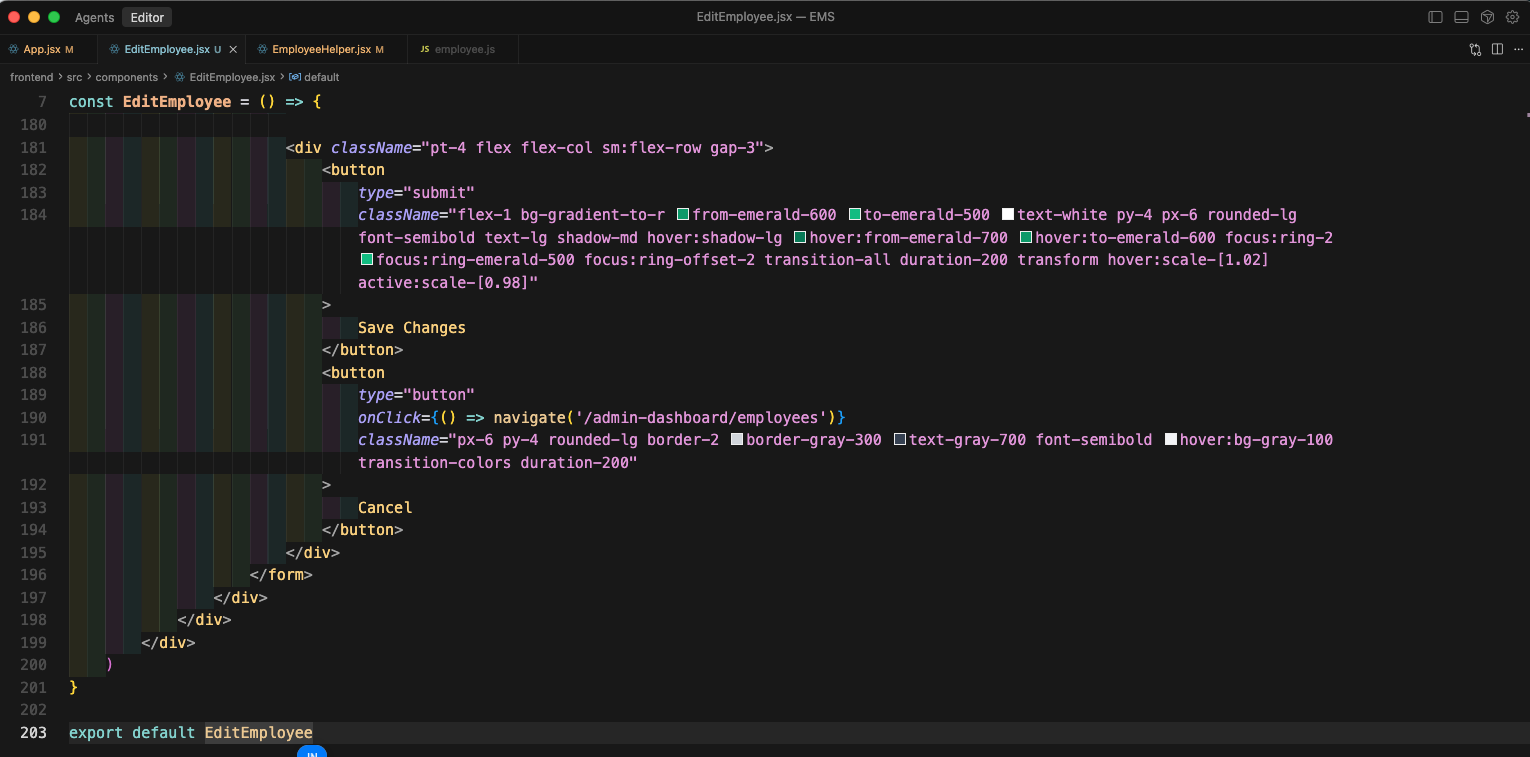
Lastly, we will have the button to Save Changes and Cancel
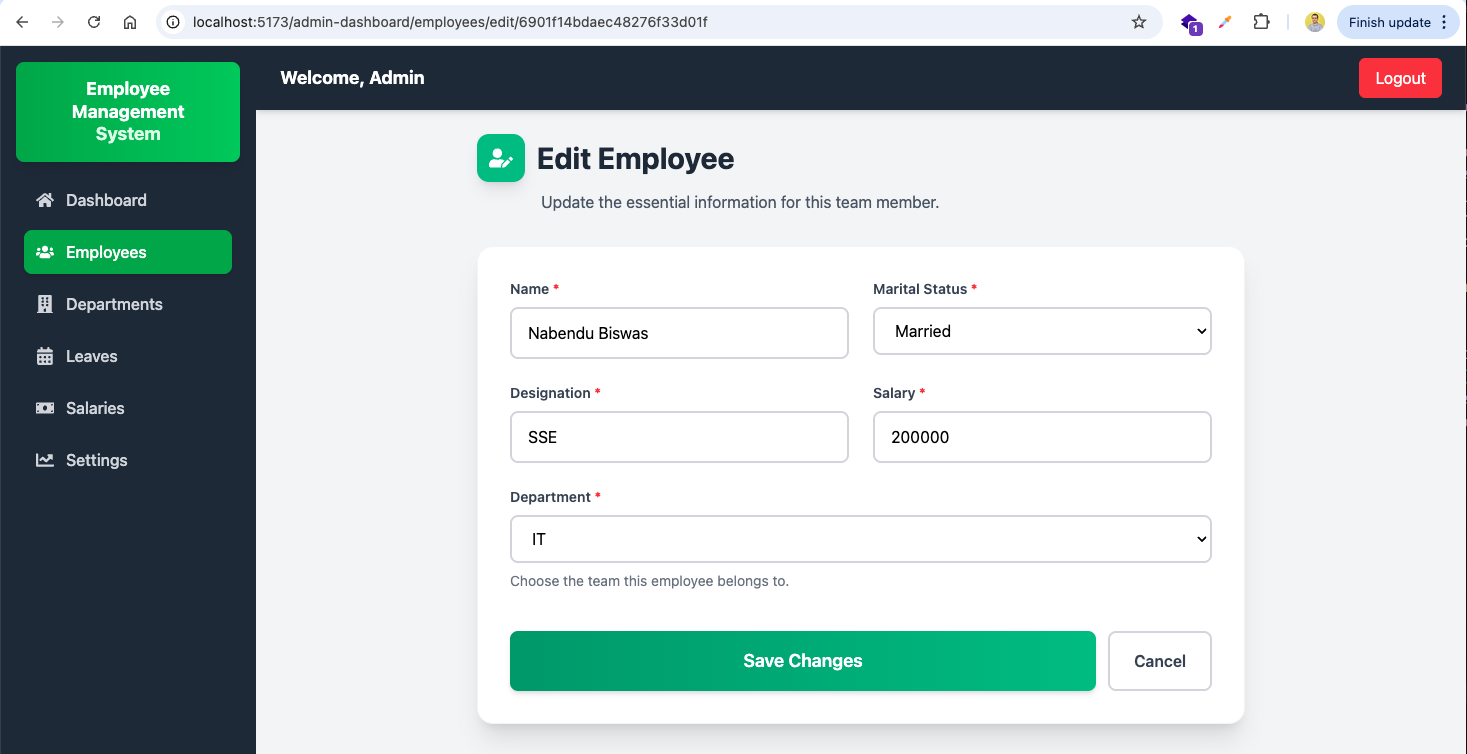
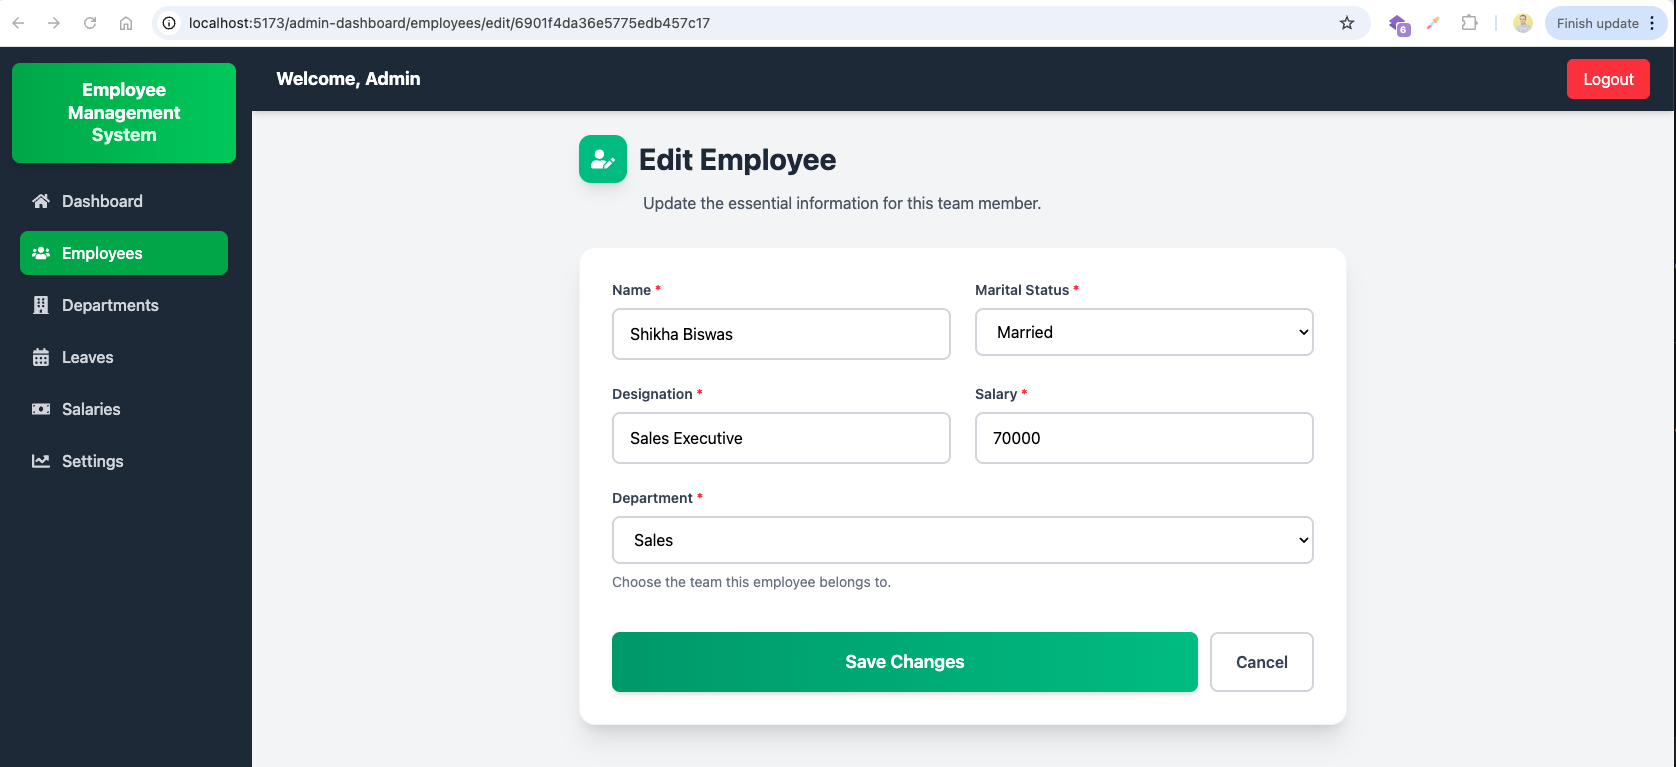
Now, when we click on the Edit button in Employee List, we will get our form. All the data is already updated from the database.
Clicking on the Save Changes button, will show all data in browser console.
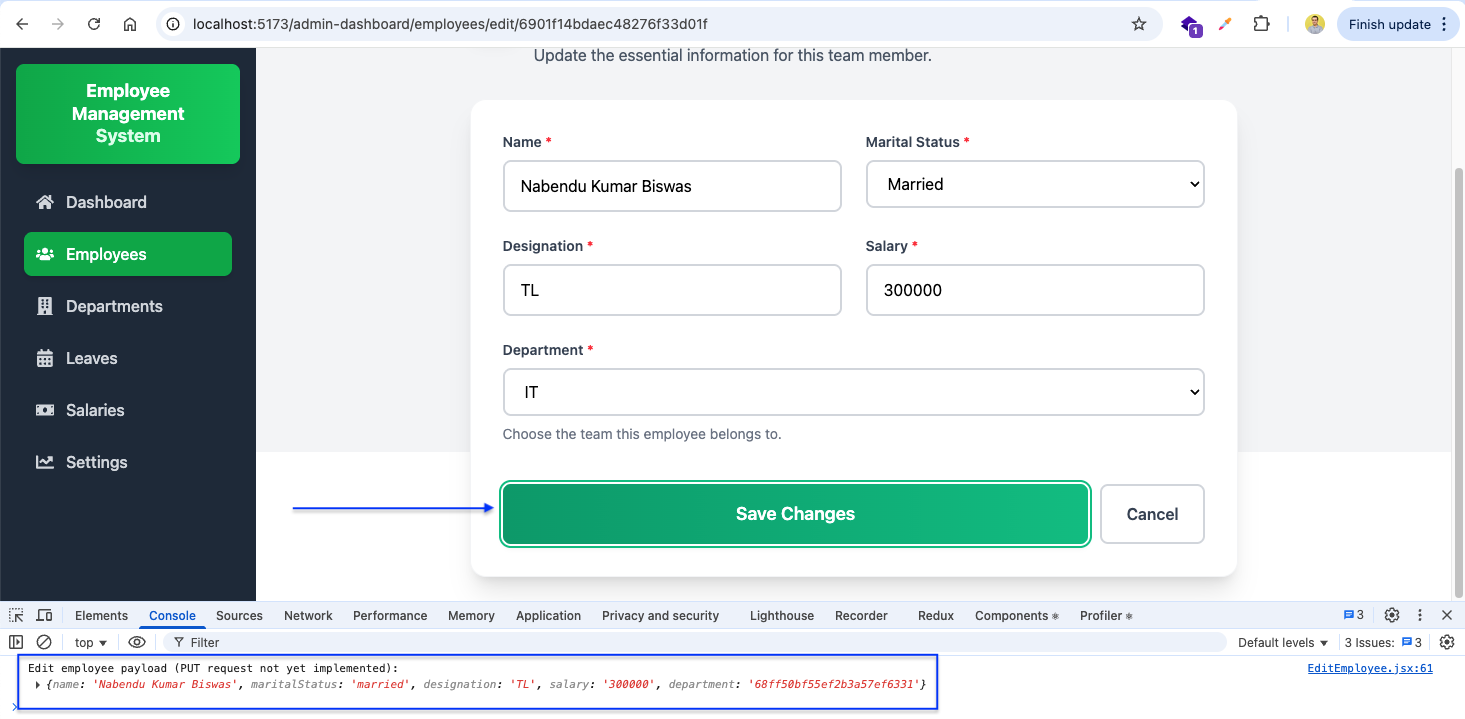
Now, we will update the handleSubmit in EditEmployee.jsx file. Here, we will send the data through a PUT request for the specific employee.
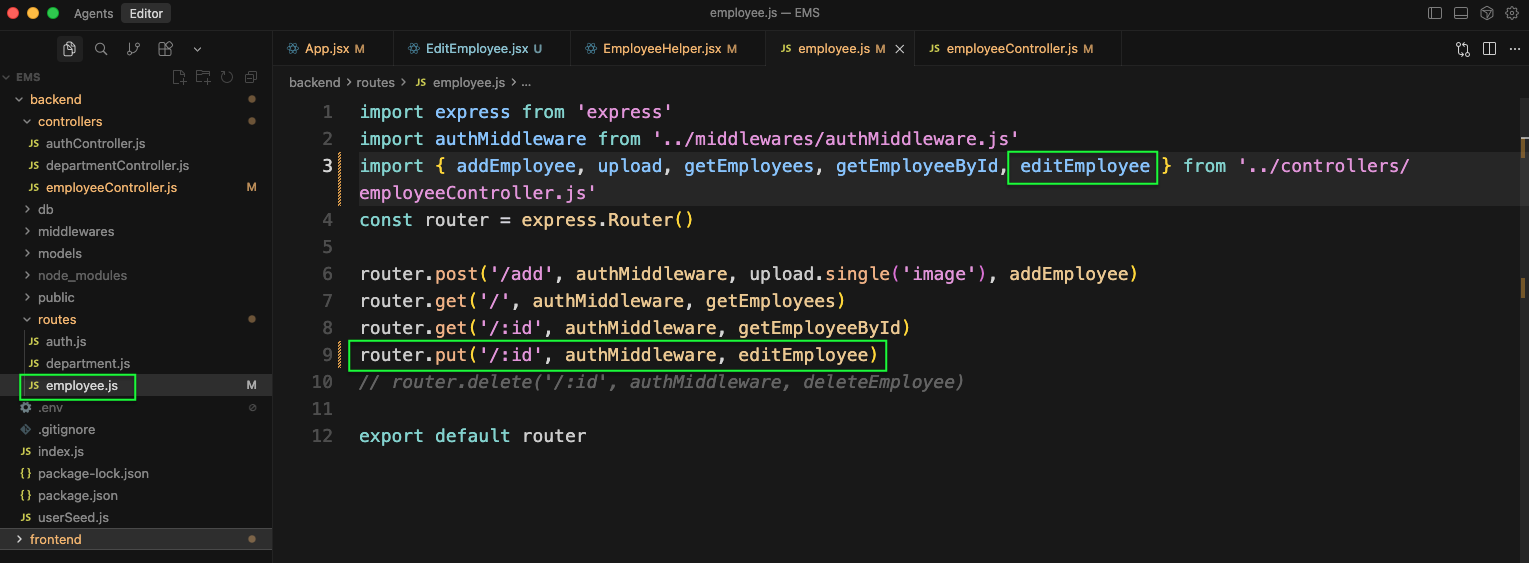
Now, in employee.js file, we will add the route for PUT which will call the editEmployee.
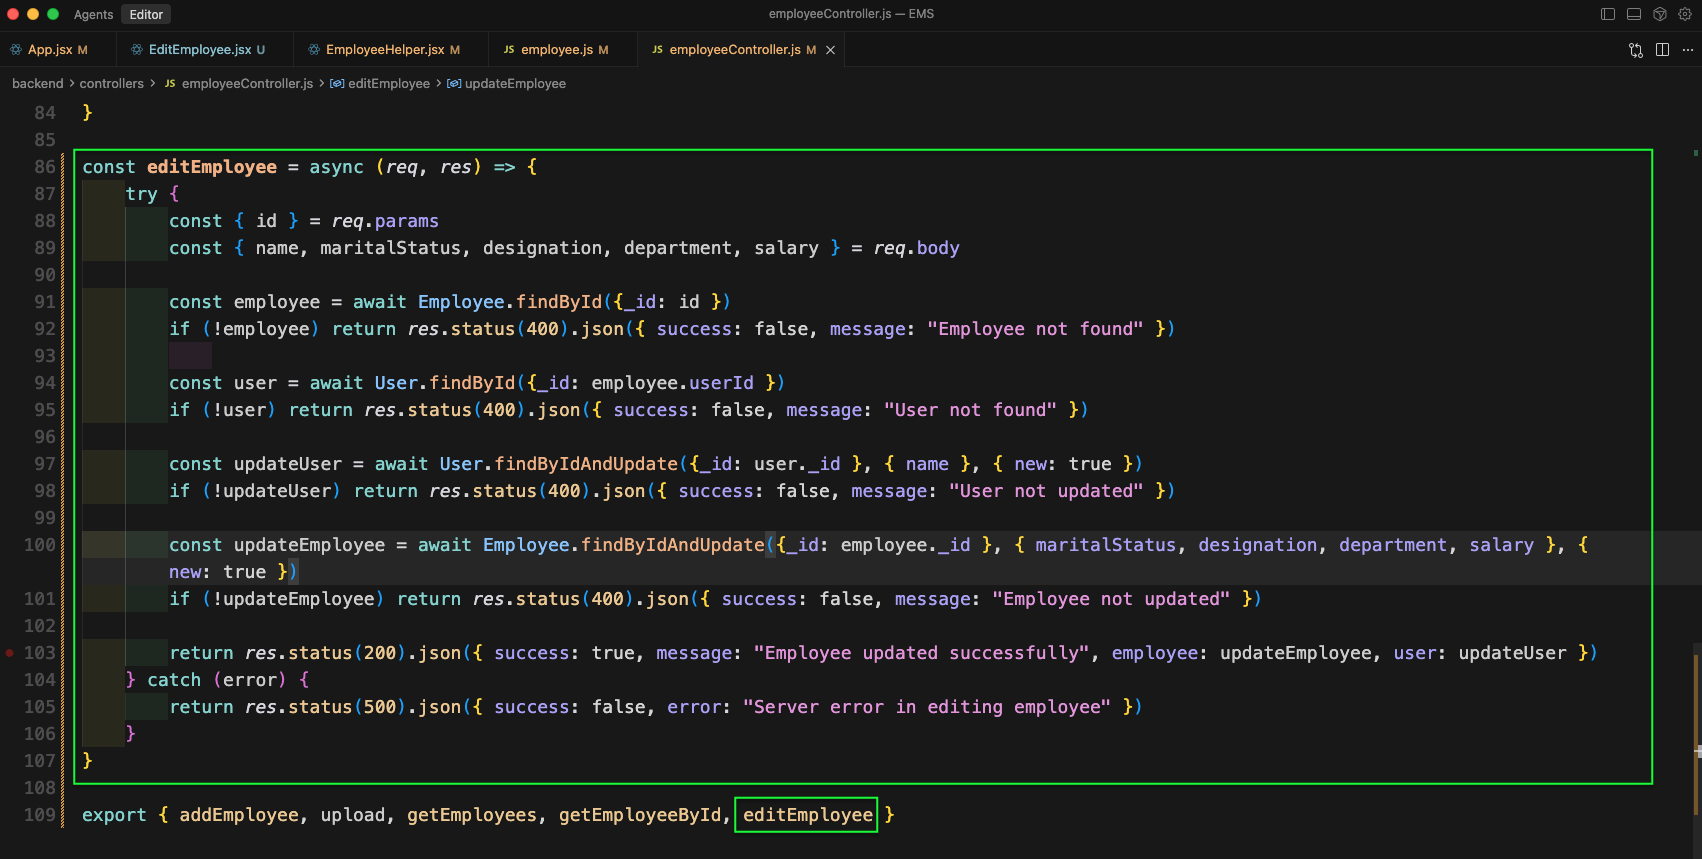
Next, in the employeeController.ks file we will add the function editEmployee.
Now, go back to the Employee and update anything and click on Save Changes
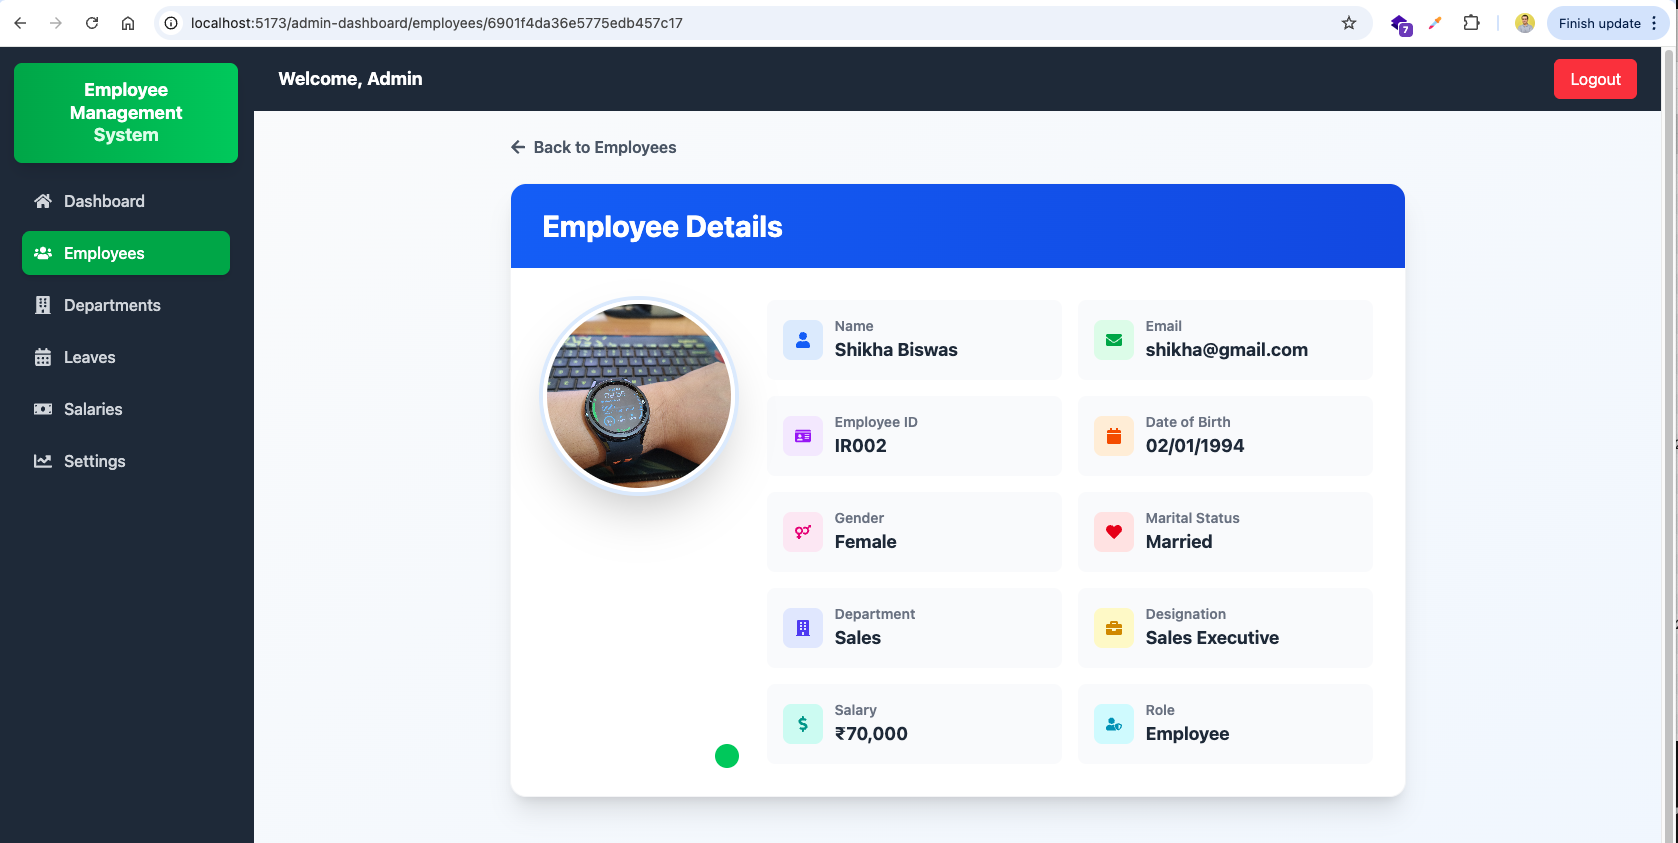
The data will be updated and we can see that in View of the employee.
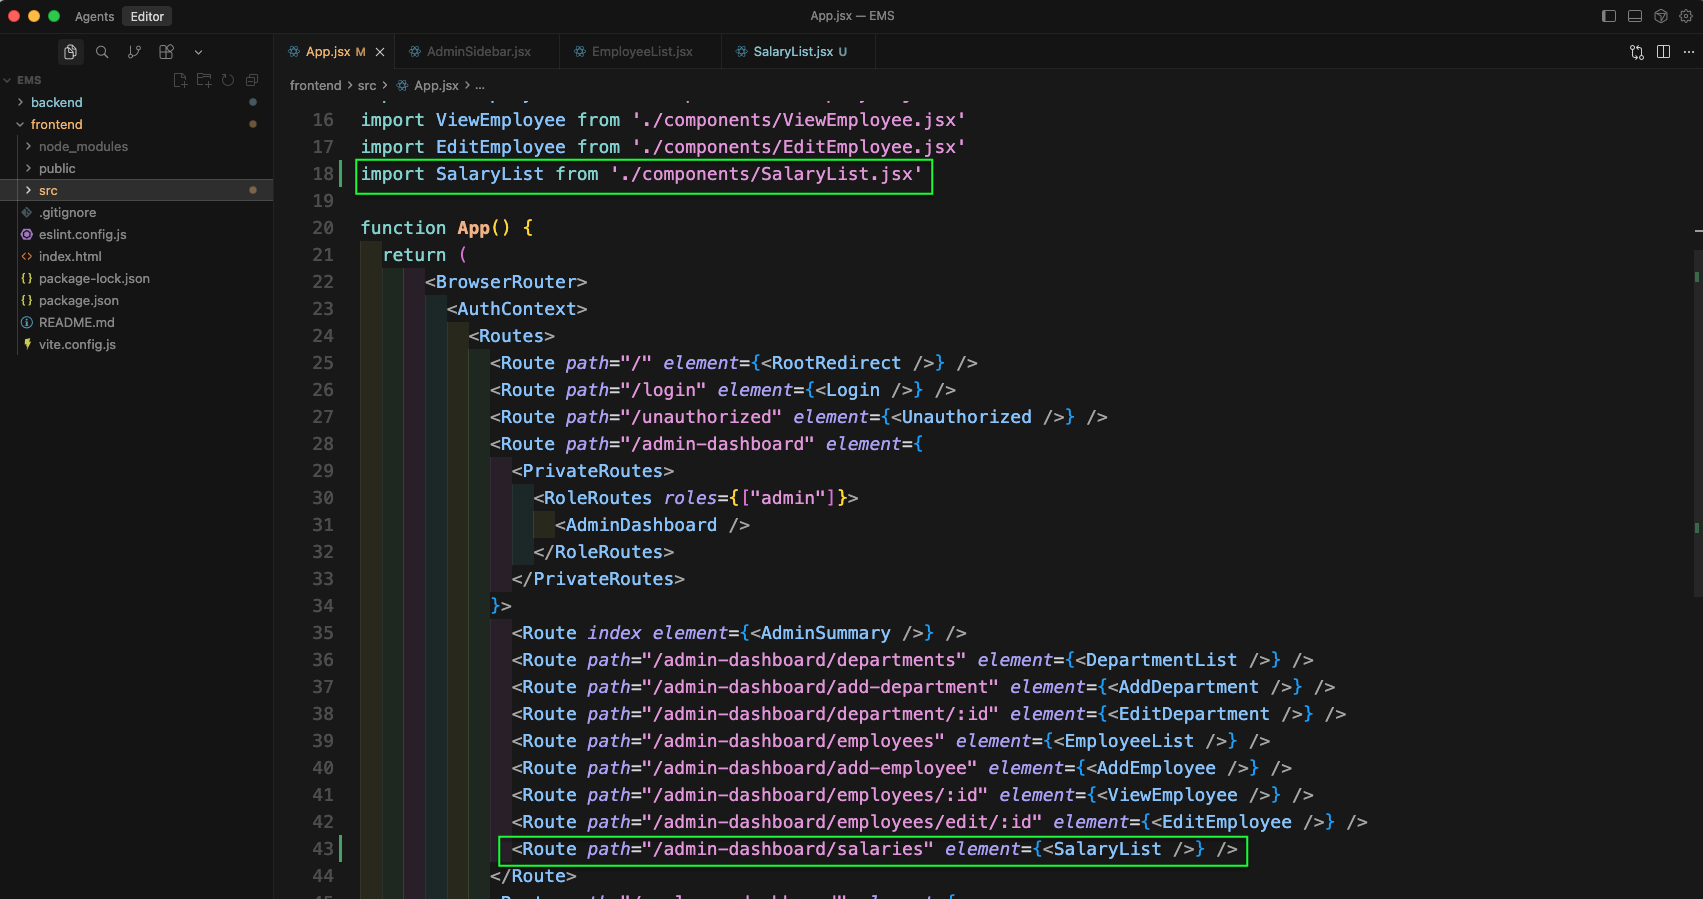
Now, we will create a route for salaries in App.jsx which will call SalaryList component.
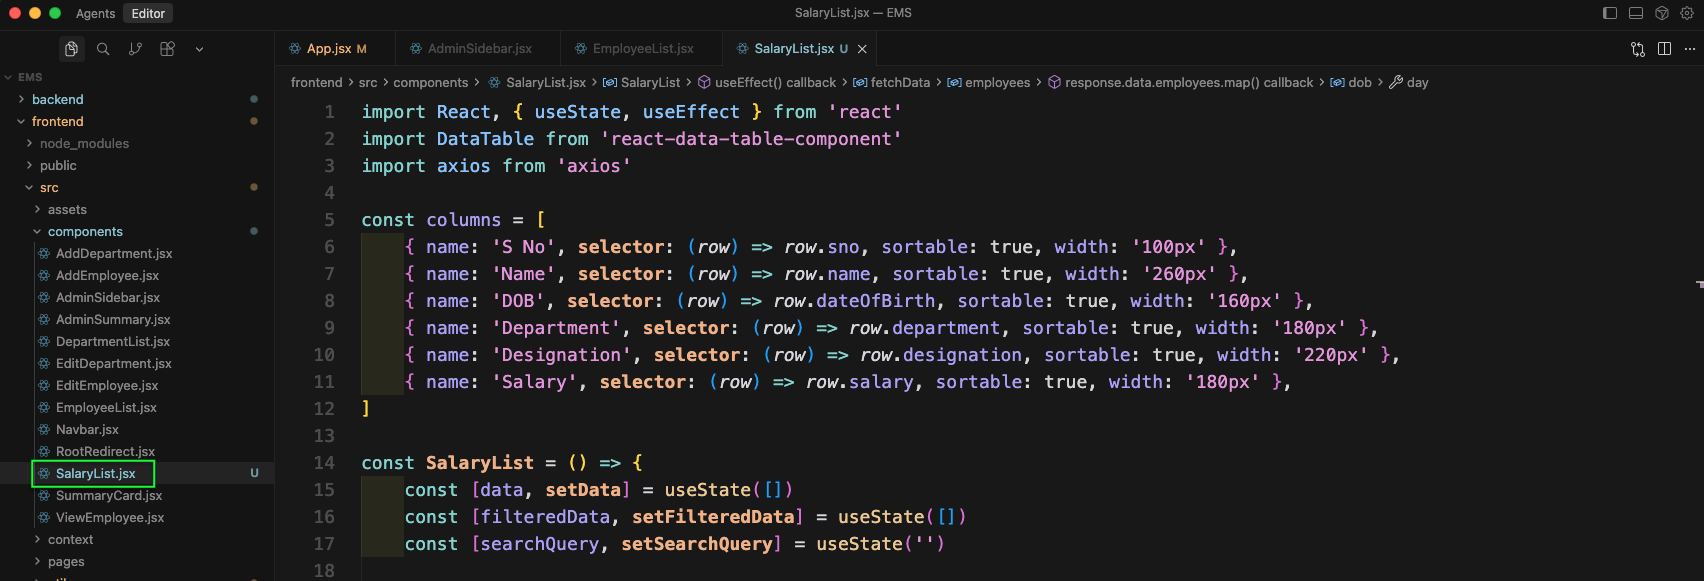
Now, create a SalaryList.jsx file and add the basic imports and columns in it.
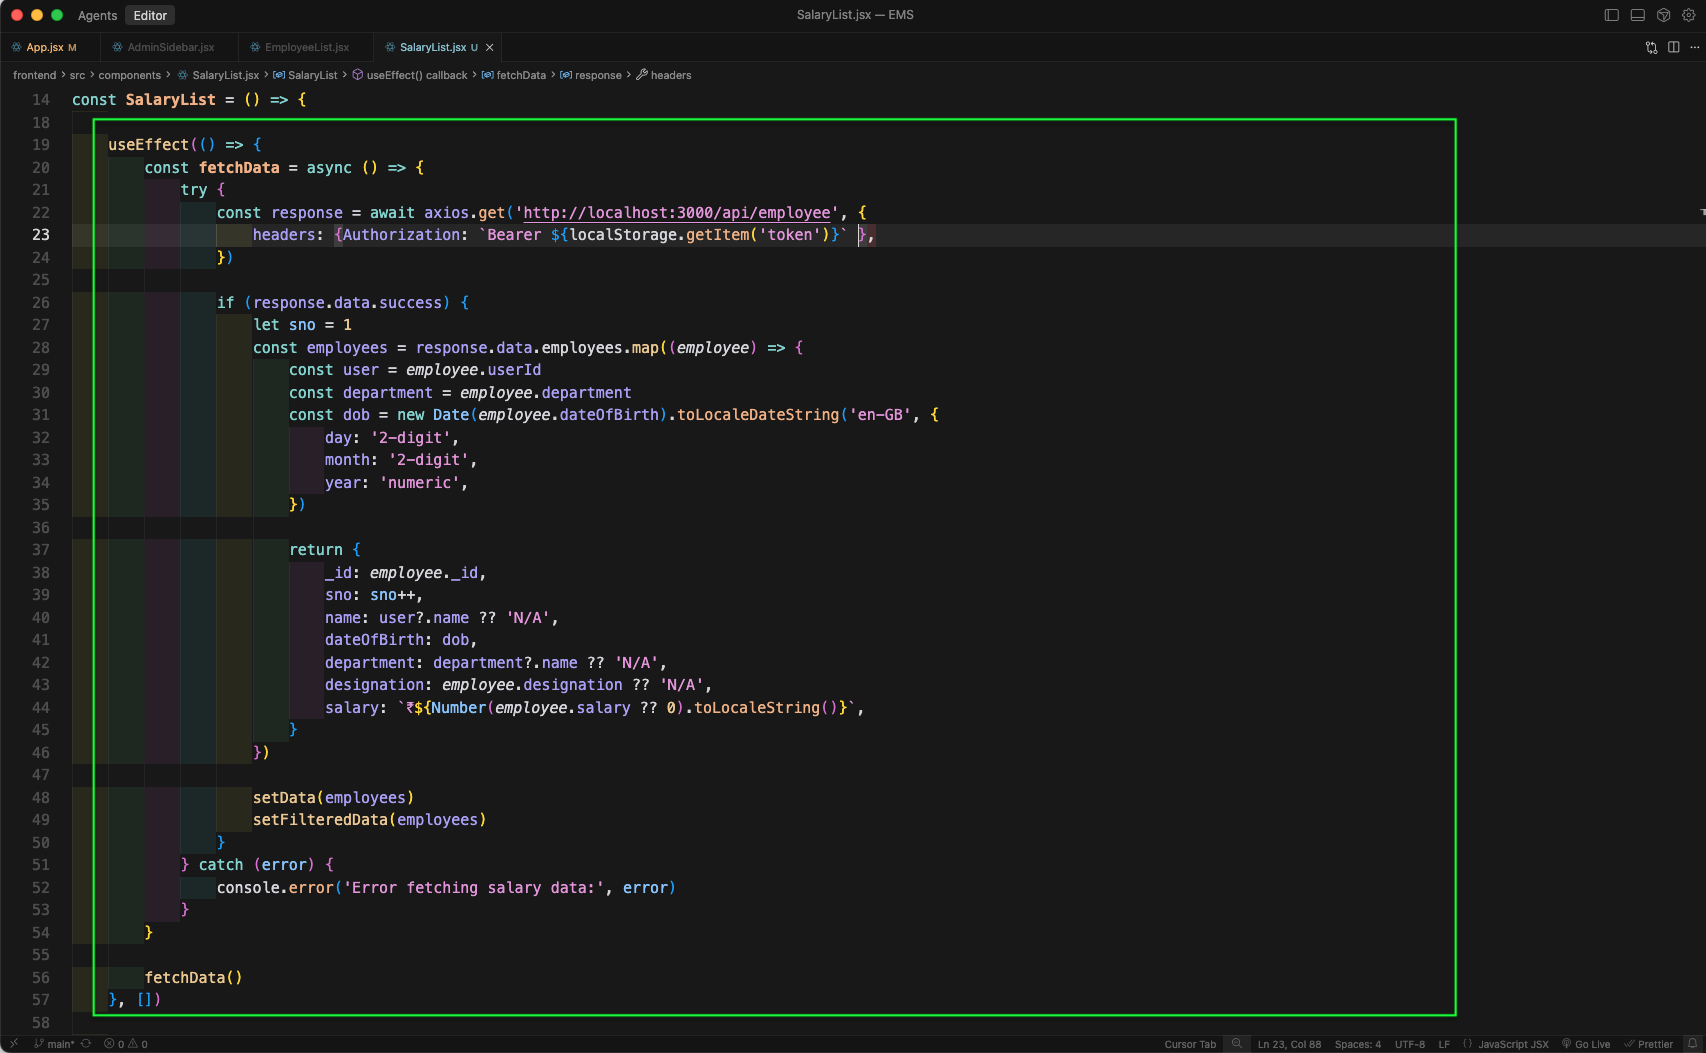
Next, we will add the useEffect next in SalaryList.jsx file, which we ill do a GET call to employee. And then get the data and add it in employees state.
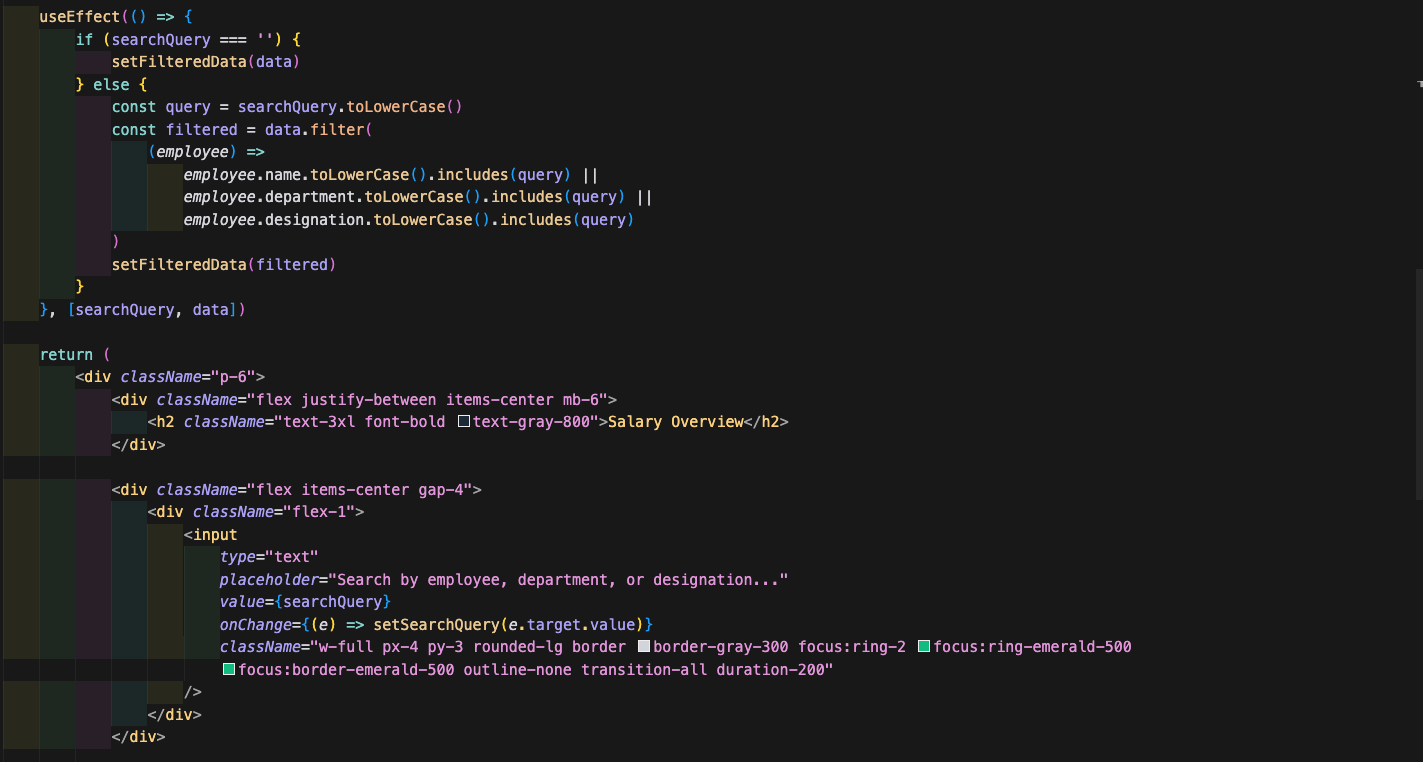
Next, we will have an useEffect for search and filter. Also, will start the return statement.
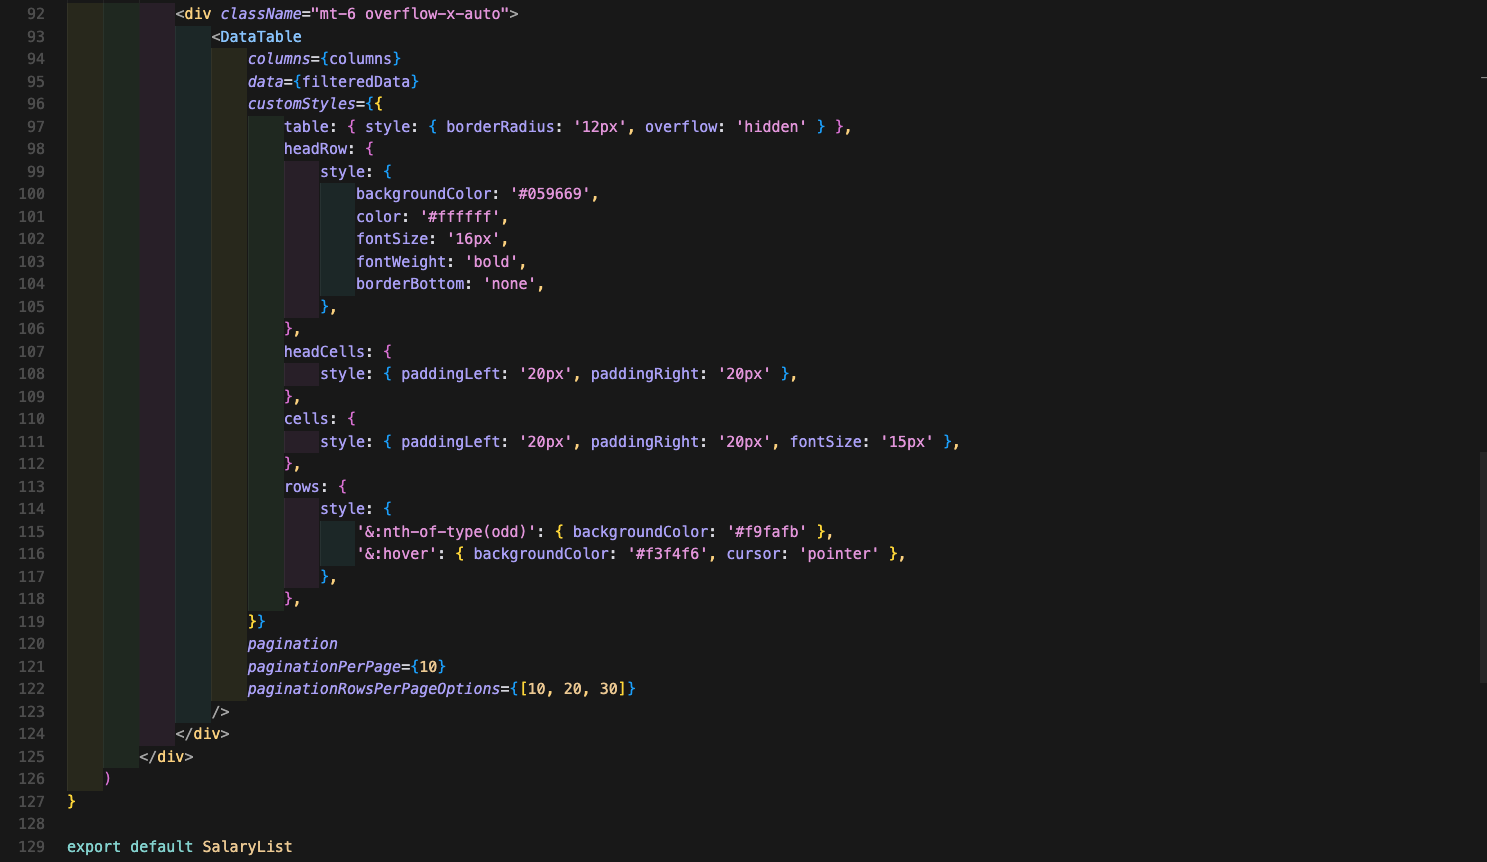
Next, we will complete the DataTable details.
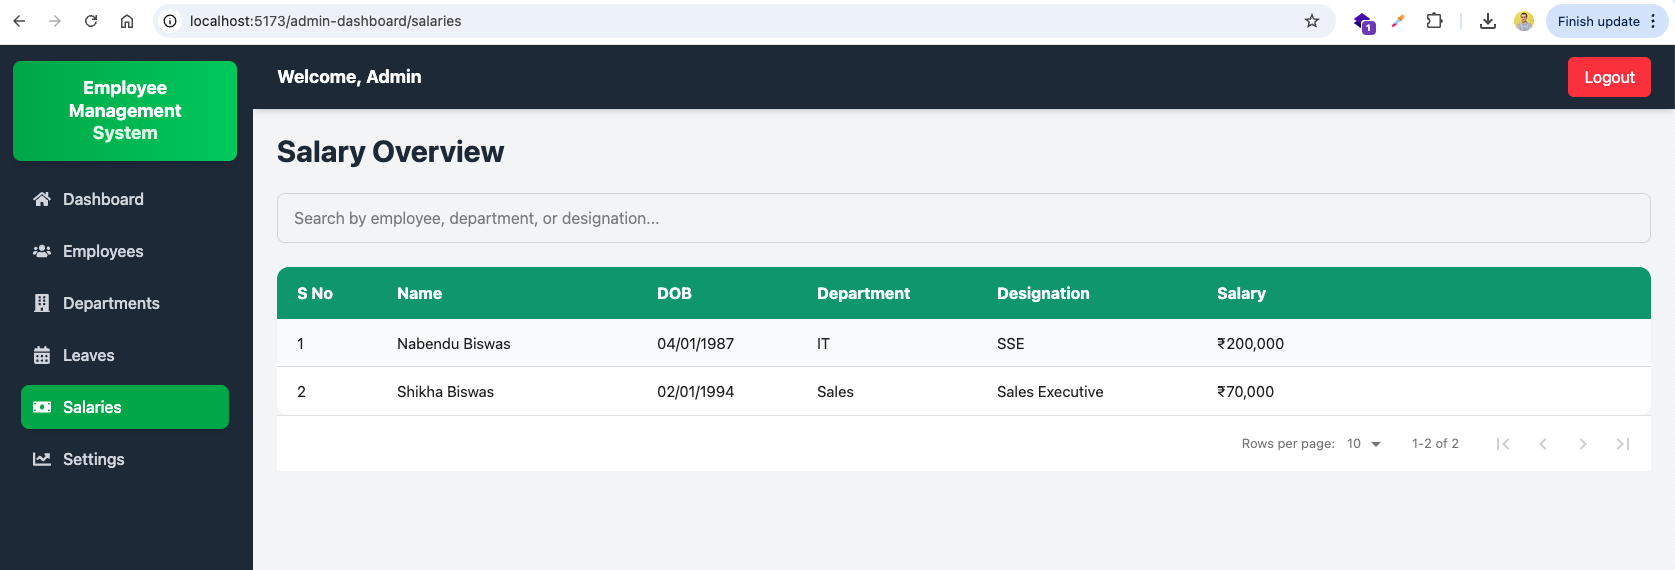
Now, click on Salaries in Side bar and it will show all the salaries of employees.
This completes part-1 of the series. You can find the code for the same here